One of the best ways to improve your experience is by customizing your device with screensavers when using your Mac. That will make your computer look more appealing and allow you to show your personality. Apart from the stock screensavers, you can also add custom ones to make your Mac or MacBook stand out.

Macs and MacBooks have plenty of screensaver customization options, and the process is pretty straightforward. However, adding a new one is a bit tricky. This article will show you how to set, customize, and delete a Mac screensaver.
How to Set a Screensaver on Mac
Adding a screensaver to your Mac will only take you a few minutes at most unless you spend a bit more time picking the right one for you. To add a new screensaver, follow the steps listed below.
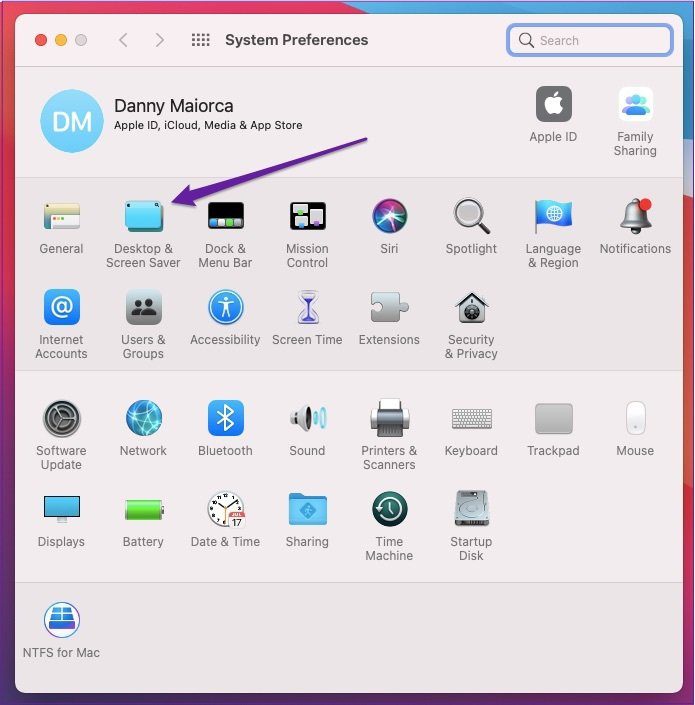
Step 1: Click on the Apple logo in the top left-hand corner of your Mac’s toolbar.
Step 2: Select the option named System Preferences, which is the second one from the top.

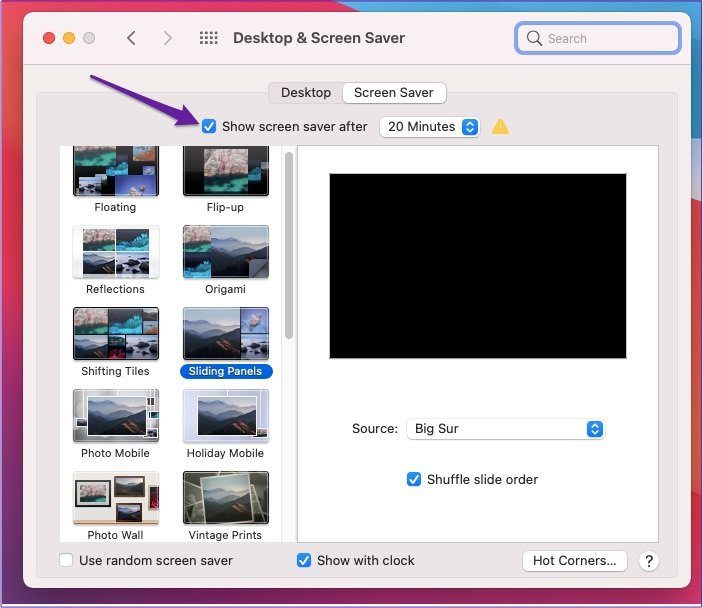
Step 3: Go to Desktop & Screen Saver. The icon for this is visible underneath your name and icon.
Step 4: Select the Screen Saver tab. On the left-hand side, you’ll see a list of possible screensaver options.
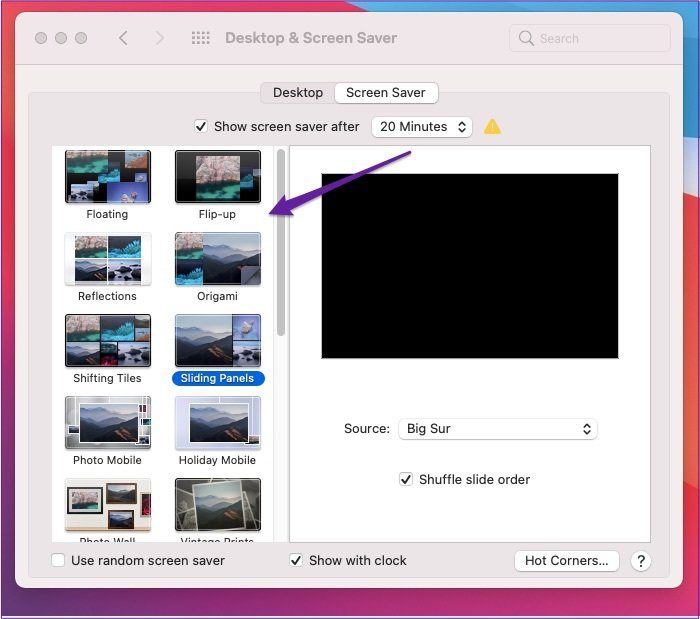
Step 5: Pick the screensaver you want to use.
If you’re not sure which one you’d like to choose, you can tick the box titled Use random screen saver. You’ll find this underneath the list of options on the left menu.
How to Customize Your Mac Screensaver
Once you’ve chosen a screensaver, there’s every chance that you’ll want to change it again in the future. And when the time comes to do that, it’s a good idea to keep this article bookmarked so you can access the steps easier.
To customize your Mac screensaver, you’ll need to follow the steps listed underneath this paragraph.
Step 1: Go back to System Preferences and navigate your way to Desktop & Screen Saver again.
Step 2: Choose from the list of options to change your screensaver.
You can also pick whether or not you want to display when your computer shows your screensaver. To do this, tick the Show with the clock box.
Another way you can customize your Mac screensaver is by setting how long you want it to come on after. You’ll be able to do this by picking a specific period from the dropdown menu at the top of the window.
Apart from the selection of Apple’s screensaver options you’ll see on your Mac, you can also add custom ones. To do this, follow the steps below.
Step 1: Create a folder on your computer and add all of the pictures you want to include in your screensaver.
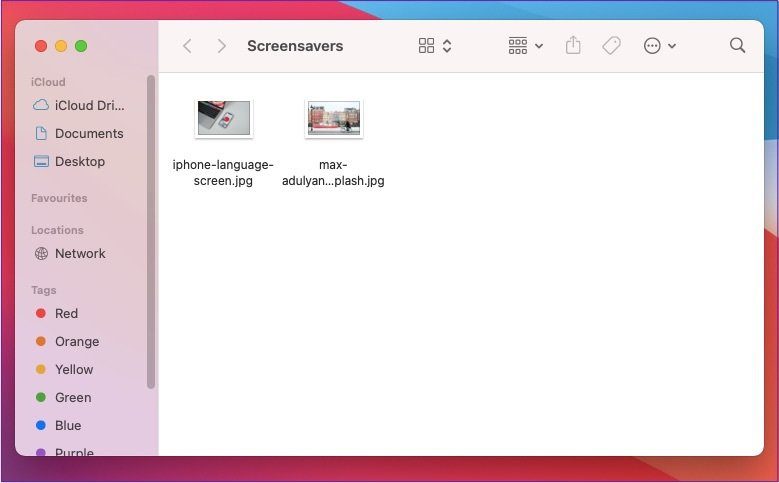
Step 2: Once you’ve added all of your pictures, go back into Desktop & Screen Saver.
Step 3: In the Screen Saver window, look for the drop-down titled “Source:” menu. It appears on the right-hand side underneath the preview picture.

Step 4: Click on this choice. When you’re there, go to Choose Folder.

Step 5: Select the folder containing your pictures.
Once you’ve added this, the changes should take effect immediately. If they don’t, try restarting your Mac.
How to Delete a Screensaver on Mac
Of course, having a Mac screensaver isn’t something that everybody wants. If you’ve decided that you’d rather not use one, getting rid of yours is as easy as adding one.
The steps below will walk you through how to delete a screensaver on your Mac.
Step 1: Go back into Desktop & Screen Savers and click on the Screen Savers window.
Step 2: Go to the option near the top of your screen where you can choose how long it needs to pass before your computer shows the screensaver.
Step 3: Untick the “Show screen saver after” box.
Like with adding a new screensaver, these changes should come into effect without delay after you’ve unticked the box.
Customize Your Mac Screensaver With These Tips
Macs are some of the most aesthetically pleasing computers out there, and having your screensaver will only add to that. Setting one of these takes little time, and the steps are straightforward, meaning you set one and customize it as many times as you’d like.
If you later decide that you no longer want to have a screensaver, the process for achieving this is even easier than if you were to set one. And thanks to this article, you now have the steps required for all of them.
Was this helpful?
Last updated on 07 February, 2022
Read Next
 3 Ways to Fix Screensaver Not Working on Mac
Basic Troubleshooting Change the screensaver - Sometimes, your currently selected Screensaver might need fixing.
3 Ways to Fix Screensaver Not Working on Mac
Basic Troubleshooting Change the screensaver - Sometimes, your currently selected Screensaver might need fixing.
 4 Fixes for Screensaver Not Working on Windows 11
Basic Fixes Check Screensaver settings: You should check the wait time selected for your screensaver.
4 Fixes for Screensaver Not Working on Windows 11
Basic Fixes Check Screensaver settings: You should check the wait time selected for your screensaver.
 Top 6 Ways to Customize Safari on Mac
With macOS Big Sur and Monterey, Apple positions Safari as the true alternative to Google Chrome or Microsoft Edge.
Top 6 Ways to Customize Safari on Mac
With macOS Big Sur and Monterey, Apple positions Safari as the true alternative to Google Chrome or Microsoft Edge.
 How to Customize Gestures for Apple’s Trackpad or Magic Mouse on a Mac
One of the iPhone’s greatest innovations was the ability to zoom with a pinch.
How to Customize Gestures for Apple’s Trackpad or Magic Mouse on a Mac
One of the iPhone’s greatest innovations was the ability to zoom with a pinch.
 How to Customize Share Menu on Samsung Galaxy Phones
There are multiple different ways to share files from your Android phone.
How to Customize Share Menu on Samsung Galaxy Phones
There are multiple different ways to share files from your Android phone.
 How to Customize Microsoft Edge Sidebar
How to Enable or Disable Edge Sidebar While Edge's sidebar is useful for accessing several browser functions, it might end up taking up additional space on your page or even
How to Customize Microsoft Edge Sidebar
How to Enable or Disable Edge Sidebar While Edge's sidebar is useful for accessing several browser functions, it might end up taking up additional space on your page or even
 How to Add, Customize and Delete a Text Box in Microsoft Word
Like in Microsoft PowerPoint, you can add a text box to a Microsoft Word document.
How to Add, Customize and Delete a Text Box in Microsoft Word
Like in Microsoft PowerPoint, you can add a text box to a Microsoft Word document.
 How to Bring Back the Missing “Customize Chrome” Button
Fix 1: Check the Requirements First things first.
How to Bring Back the Missing “Customize Chrome” Button
Fix 1: Check the Requirements First things first.
The article above may contain affiliate links which help support Guiding Tech. The content remains unbiased and authentic and will never affect our editorial integrity.