Method 1: Open the DirectX Diagnostic Tool With the Task Manager
The Task Manager app on Windows 11 allows you to monitor and manage all running applications and processes. You can use it to create a new task for running the DirectX Diagnostic Tool.
Step 1: Press the Windows + X shortcut to open the Power User Menu > select Task Manager to open it.

Step 2: Click Run new task at the top right of the Processes tab, type dxdiag, and press Enter to launch it.

Method 2: Create a Shortcut for the DirectX Diagnostic Tool
If you regularly use the DirectX Diagnostic Tool, I recommend creating its desktop shortcut for quick access.
Step 1: Right-click the blank space on your Desktop > select New > Shortcut.
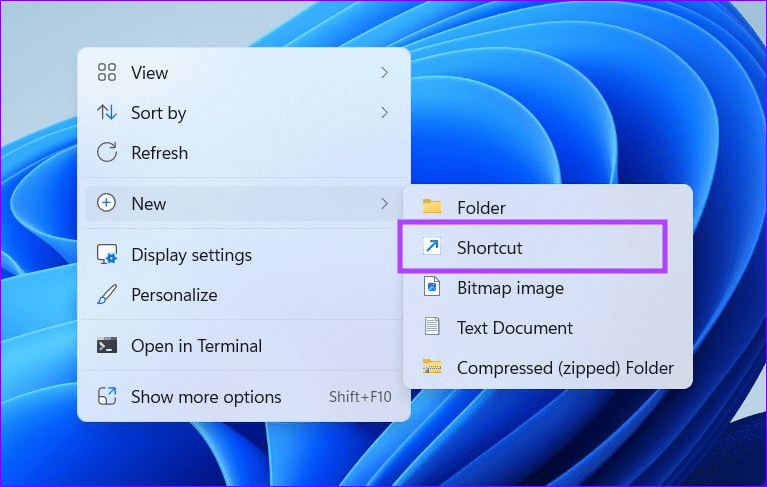
Step 2: Type dxdiag under Type the location of the item > click Next.

Step 3: Name the shortcut as you like and click Finish. Double-click the created shortcut to open the DirectX Diagnostic Tool.

Method 3: Create a Hotkey to Run the DirectX Diagnostic Tool
If you don’t wish to deal with the hassle of locating and opening the DirectX Diagnostic Tool from its shortcut, assign a hotkey to it.
Step 1: Right-click the DirectX Diagnostic Tool and select Properties.

Step 2: Open the Shortcut tab, click the Shortcut key box, and press your desired key combination to assign it. Click Apply, followed by OK to save changes.
Tip: I recommend assigning the Ctrl + Shift + D keyboard shortcut for opening the DirectX Diagnostic Tool.

Method 4: Utilize the Command-Line Tools
Besides creating a shortcut, you can utilize command-line tools such as Windows PowerShell and Command Prompt to open the DirectX Diagnostic Tool.
Step 1: Press the Windows key, search Windows PowerShell, and click to open it. Alternatively, search CMD to open the Command Prompt app.

Step 2: Type dxdiag in the window and press Enter to launch the app.

Method 5: Edit the Desktop Context Menu
Lastly, you can edit the desktop context menu via Registry Editor on Windows 11 to open the DirectX Diagnostic Tool with a few clicks.
Note: Back up the Windows Registry files before editing them using File > Export.
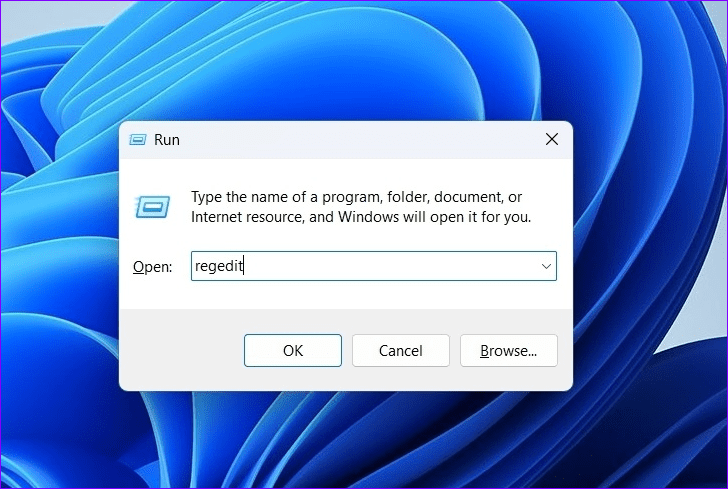
Step 1: Press the Windows + R shortcut to open the Run dialog, type regedit, and click OK.
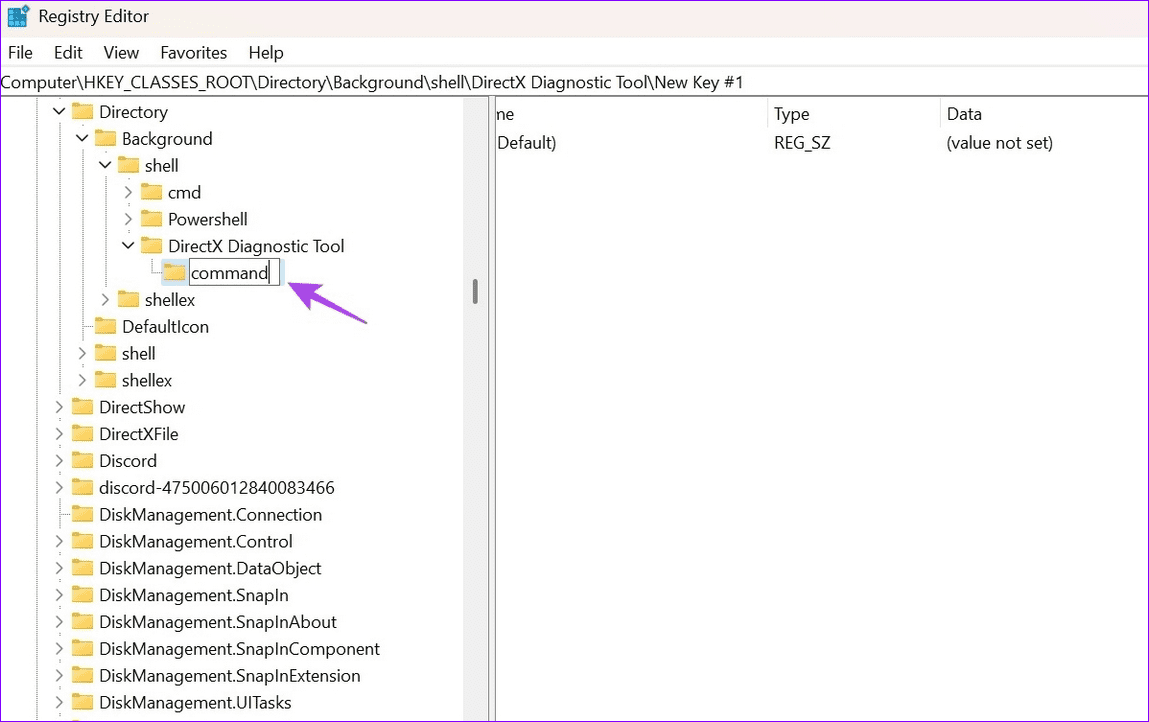
Step 2: Copy-paste the below address in the navigation bar, press Enter, and right-click Shell > New > Key.
Computer\HKEY_CLASSES_ROOT\Directory\Background\shell

Step 3: Type DirectX Diagnostic Tool in the name box and press Enter.

Step 4: Right-click the DirectX Diagnostic Tool key > choose New > select Key > Name this key as command.
Step 5: Finally, double-click the (Default) string on the right, paste the below location in the Value data, and click OK. Restart your PC to view the applied changes.
C:\Windows\System32\dxdiag.exe

Was this helpful?
Last updated on 22 May, 2024
Read Next
 How to Use the Windows Memory Diagnostic Tool on Windows 11
How to Use the Windows Memory Diagnostic Tool You can open the diagnostic tool from the search, Command Prompt, Control Panel, and Recovery.
How to Use the Windows Memory Diagnostic Tool on Windows 11
How to Use the Windows Memory Diagnostic Tool You can open the diagnostic tool from the search, Command Prompt, Control Panel, and Recovery.
 3 Ways to Fix DirectX Not Installing Error on Windows 11
Basic Fixes Check the internet connection: The DirectX web installer requires internet connectivity to download files from the server.
3 Ways to Fix DirectX Not Installing Error on Windows 11
Basic Fixes Check the internet connection: The DirectX web installer requires internet connectivity to download files from the server.
 4 Ways to Fix DirectX ‘Could Not Allocate Sufficient Memory’ Error on Windows 11
Common Fixes Launch the Windows Memory Diagnostic tool: Press the Windows key, search Windows Memory Diagnostic tool, and click to open it.
4 Ways to Fix DirectX ‘Could Not Allocate Sufficient Memory’ Error on Windows 11
Common Fixes Launch the Windows Memory Diagnostic tool: Press the Windows key, search Windows Memory Diagnostic tool, and click to open it.
 How to Update DirectX on Windows 11
DirectX is a component of the Windows OS that enables software, primarily games, to work seamlessly with your computer's hardware, and keeping it up-to-date ensures your system can handle the
How to Update DirectX on Windows 11
DirectX is a component of the Windows OS that enables software, primarily games, to work seamlessly with your computer's hardware, and keeping it up-to-date ensures your system can handle the
 7 Quick Ways to Open Remote Desktop Connection Tool in Windows 11
Method 1.
7 Quick Ways to Open Remote Desktop Connection Tool in Windows 11
Method 1.
 6 Ways to Fix Snipping Tool Not Working on Windows 11
Fix 1: Ensure Snipping Tool Notifications Are Enabled Snipping Tool may fail to show screenshots after capturing them if you have turned off its notification permission.
6 Ways to Fix Snipping Tool Not Working on Windows 11
Fix 1: Ensure Snipping Tool Notifications Are Enabled Snipping Tool may fail to show screenshots after capturing them if you have turned off its notification permission.
 3 Ways to Fix the “Recording Stopped” Error in Snipping Tool for Windows 11
Try Basic Fixes Disable screen projection: The Snipping Tool may sometimes have trouble recording the screen if you are using multiple displays.
3 Ways to Fix the “Recording Stopped” Error in Snipping Tool for Windows 11
Try Basic Fixes Disable screen projection: The Snipping Tool may sometimes have trouble recording the screen if you are using multiple displays.
 4 Ways to Fix Snipping Tool Keyboard Shortcut Not Working
Basic Fixes: Check your keyboard for damages: Any physical damage to keyboard keys might prevent them from working as expected.
4 Ways to Fix Snipping Tool Keyboard Shortcut Not Working
Basic Fixes: Check your keyboard for damages: Any physical damage to keyboard keys might prevent them from working as expected.
The article above may contain affiliate links which help support Guiding Tech. The content remains unbiased and authentic and will never affect our editorial integrity.