So, you’ve tried to shrink a volume in Disk Management, and you get an error message that you “cannot shrink a volume beyond the point.” What’s just happened, and how do you fix it? Not to worry. In this article, we’ll be explaining why and also show you how to work around the error.
What Causes This Error?
Let’s start with why you cannot shrink a volume beyond a point. It’s often down to unmovable system files. If you’re shrinking the volume your OS is installed on, for example, you’ll likely run into this.
System files like these are important to the running of your machine. When you shrink a volume, Windows attempts to move files toward the beginning of the volume to create free space at the end, except for files designated as unmovable. The biggest offenders are:
- Hiberfil.sys
- Pagefile.sys
- Shadow copy storage (VSS)
- File system and storage-driver metadata
The best way to resolve this is to disable, delete, and try again.
Fix “Cannot Shrink a Volume Beyond the Point” With These Troubleshooters
Let’s get into fixing this error. We’ve got some solutions lined up below:
Defragment Your Disk
Perhaps the least intrusive place to start is by optimizing your drive, which can consolidate fragmented files and make more free space available toward the end of the volume. Here’s what to do:
Step 1. Type “defrag” or “defragment” into the search bar and wait for the “Defragment and Optimize Drives” system to pop up. Click it.
Step 2. A window will open showing the available drives. Choose the volume you want to optimize.
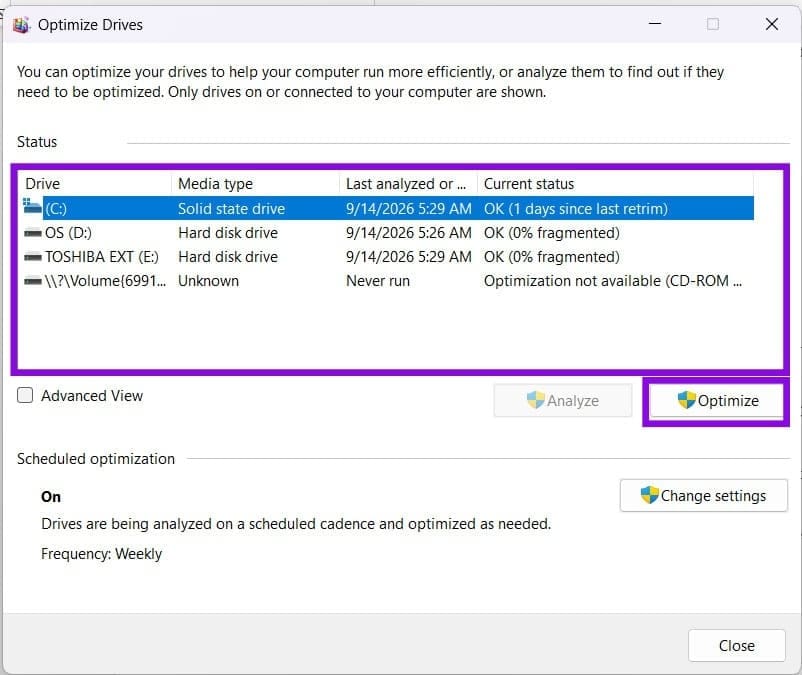
Step 3. Select the desired drive, then click “Optimize” to manually begin the optimization process.
Step 4. The defragmentation process will begin, first with an analysis of the drive, then a number of “passes” to fully reorganize the data.
Step 5. Once the disk has been defragmented, the “Stop” button will disappear, and the “Analyze” and “Optimize” buttons will reappear.
Disable Certain System Files
The next fix is to temporarily disable certain system features that may prevent you from shrinking the volume further. After disabling each, try shrinking your volume, only progressing to the next if unsuccessful. If it works, don’t forget to reactivate them.
For “Hibernate,” you can use Command Prompt:
Step 1. Open the Run dialog (Win + R) and type “cmd” before hitting (Ctrl + Shift + Enter) to run as Admin.
Step 2. In Command Prompt, type “powercfg /hibernate off” and hit “Enter.
Step 3. To re-enable, type “powercfg /hibernate on” and hit “Enter.”
Another potential offender is the paging file, which can be disabled through System Properties:
Step 1. Right-click “This PC” and choose “Properties.”
Step 2. Click “Advanced system settings.”

Step 3. Click the “Settings” button under “Performance.”

Step 4. Under the “Advanced” tab, click the “Change” button.
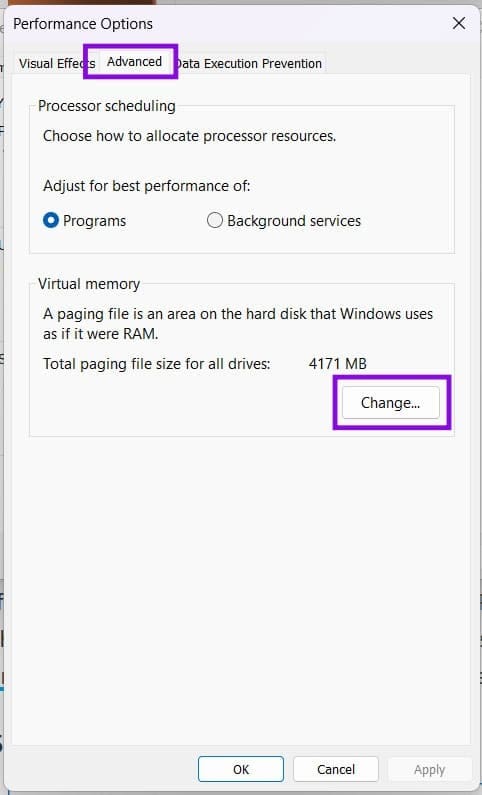
Step 5. In the next window, uncheck “Automatically manage paging file size for all drives,” select the drive you want to shrink, choose “No paging file,” and click “Set.”
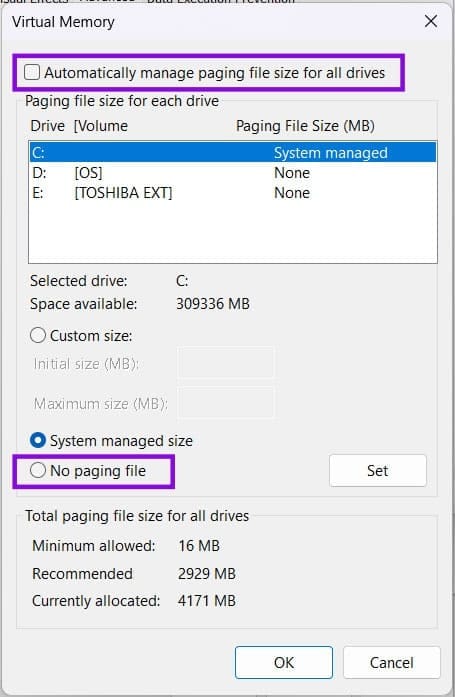
Step 6. Click the “Set” button and “OK” to finalize.
If there are no system problems that occur, you can also disable System Restore:
Step 1. Open Control Panel and click “Recovery.”

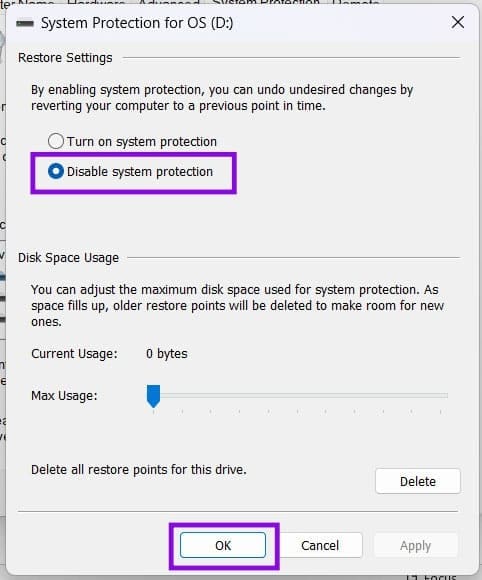
Step 2. Under the “System Protection” tab, select the drive you want to shrink and click “Configure.”

Step 3. Select the drive you’re looking to shrink and click “Configure.”
Step 4. Choose “Disable system protection” and click “Apply” and “OK” to finalize.
Was this helpful?
Last updated on 17 September, 2026
Read Next
 How to Fix Registry Editor Cannot Import File Error in Windows 10
Windows Registry is a critical database that stores information about the apps, services, and hardware used to run Windows.
How to Fix Registry Editor Cannot Import File Error in Windows 10
Windows Registry is a critical database that stores information about the apps, services, and hardware used to run Windows.
 How to Fix Windows 10’s User Profile Cannot Be Loaded Error
Logging in to a computer is as easy as typing a password (if any) and tapping the sign-in button.
How to Fix Windows 10’s User Profile Cannot Be Loaded Error
Logging in to a computer is as easy as typing a password (if any) and tapping the sign-in button.
 5 Ways to Fix “A Driver Cannot Load on This Device” Error on Windows 11
Fix 1: Update the Problematic Driver If a driver is incompatible, Windows may fail to load it.
5 Ways to Fix “A Driver Cannot Load on This Device” Error on Windows 11
Fix 1: Update the Problematic Driver If a driver is incompatible, Windows may fail to load it.
 6 Ways to Fix “The Set of Folders Cannot Be Opened” Error in Outlook for Windows
Fix 1: Reset the Navigation Pane Sometimes, Outlook may fail to load the navigation pane entirely and throw an error message that reads, "Cannot start Microsoft Outlook.
6 Ways to Fix “The Set of Folders Cannot Be Opened” Error in Outlook for Windows
Fix 1: Reset the Navigation Pane Sometimes, Outlook may fail to load the navigation pane entirely and throw an error message that reads, "Cannot start Microsoft Outlook.
 5 Ways to Fix “Outlook Data File Cannot Be Accessed” Error on Windows
Fix 1: Change the Default Mail Delivery Location One of the most straightforward ways to fix the "Outlook data file cannot be accessed" error is to configure Microsoft Outlook to
5 Ways to Fix “Outlook Data File Cannot Be Accessed” Error on Windows
Fix 1: Change the Default Mail Delivery Location One of the most straightforward ways to fix the "Outlook data file cannot be accessed" error is to configure Microsoft Outlook to
 Top 6 Ways to Fix Cannot Expand Folder Error in Outlook
Microsoft Outlook users have been facing a particular error for the past decade.
Top 6 Ways to Fix Cannot Expand Folder Error in Outlook
Microsoft Outlook users have been facing a particular error for the past decade.
 6 Fixes for “This Image Cannot Currently Be Displayed” Error in Microsoft Word
Fix 1: Use the "In Line With Text" Option for Wrap Text A common reason images might not appear in your Word document is if you use a wrapping style
6 Fixes for “This Image Cannot Currently Be Displayed” Error in Microsoft Word
Fix 1: Use the "In Line With Text" Option for Wrap Text A common reason images might not appear in your Word document is if you use a wrapping style
 How to Fix PlayStation “Cannot Communicate Using SSL” Error
Try Basic Fixes Restart your router: Temporary issues with your Wi-Fi or LAN connection can cause your PS4 or PS5 to repeatedly show the "Cannot communicate using SSL" error.
How to Fix PlayStation “Cannot Communicate Using SSL” Error
Try Basic Fixes Restart your router: Temporary issues with your Wi-Fi or LAN connection can cause your PS4 or PS5 to repeatedly show the "Cannot communicate using SSL" error.
The article above may contain affiliate links which help support Guiding Tech. The content remains unbiased and authentic and will never affect our editorial integrity.