The iPhone and Mac are both powerful devices individually. However, it’s when they’re combined that you experience the real power of ecosystem cohesion. From instant file sharing to seamless handoff, you can connect iPhone to Mac in numerous ways. And this article is designed to help you learn, use, and make the most of Apple’s ecosystem.

Many features contribute to building a seamless connection between iPhone and Mac. And we can divide all of these into two key categories, sync and continuity. Accordingly, we have divided the article into these two sections for easier understanding. Let’s begin!
How to Seamlessly Sync Content Between Mac and iPhone
Whether for backup or using files across devices, content syncing is an important tool. And Apple gives you plenty of tools to keep your iPhone and Mac in sync always. Let’s look at each of them.
1. Connect iPhone to Mac With USB
Step 1: Connect the iPhone to Mac via a USB cable.
Step 2: If prompted, tap Trust Computer on the iPhone.
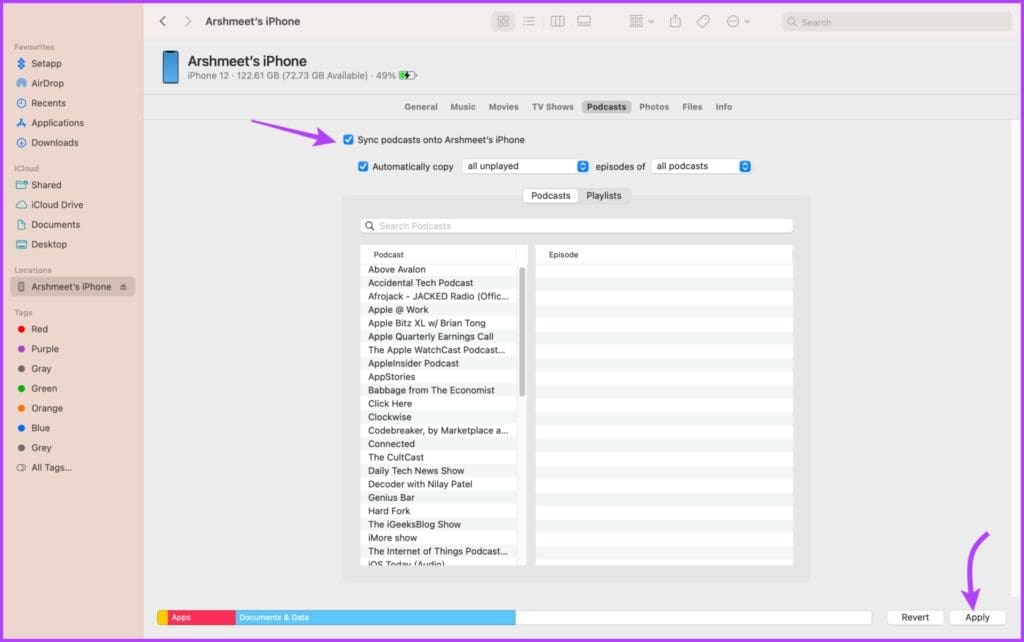
Step 3: Launch Finder on your Mac and select iPhone from the sidebar.

Step 4: Here, select the data type you want to sync from the top bar. You have the following options:
- Music
- Movies
- TV Shows
- Podcasts
- Audiobooks
- Books
- Photos
- Files
- Info
Step 5: In the selected section, check the box next to ‘Sync [content type] onto the iPhone’.

Step 6: To sync other types of data, repeat steps 4 and 5.
Note: If you use iCloud Photos or Apple Music, the photos and music will sync automatically via iCloud respectively. Thus, when you click the Music or Photos tab, the sync option might not appear.
Step 7: Once you’re ready, Click Apply to sync content between iPhone and Mac.

Step 8: After the content sync is completed, click the Eject button in the Finder sidebar to ensure iPhone’s safe removal.
Tip: Keep an eye out for the bar at the bottom of the window. It shows available space on the iPhone after sync. If you’re running out of space, check out this guide to easily manage iPhone storage.
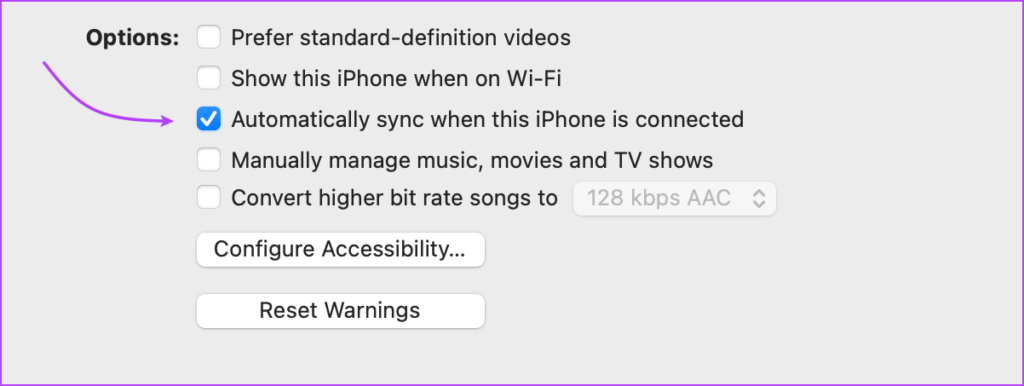
Concurrently, you can also automize the syncing process. So, whenever the iPhone is connected to your Mac, it automatically syncs the data. To enable or disable this setting, go to the General Tab → check or uncheck ‘Automatically sync when this [device] is connected’ → click Apply.
Note: If you delete an automatically synced file from your Mac, it will be deleted from the iPhone, the next time you sync. So, bear that in mind.
2. Connect iPhone With Mac Over Wi-Fi
If you want to forgo cables for good, Apple allows you to sync content between iPhone and Mac via Wi-Fi. The iPhone will show up in the Finder whenever it’s nearby the Mac and on the same network. You can sync the data manually or turn on automatic syncing.
Although, ironically you’ll have to connect the iPhone to Mac via cable, to set up the cable-free connection. So, let’s get going.
Step 1: Connect iPhone to Mac via USB → select the iPhone from the Finder sidebar.
Step 2: Go to the General tab.

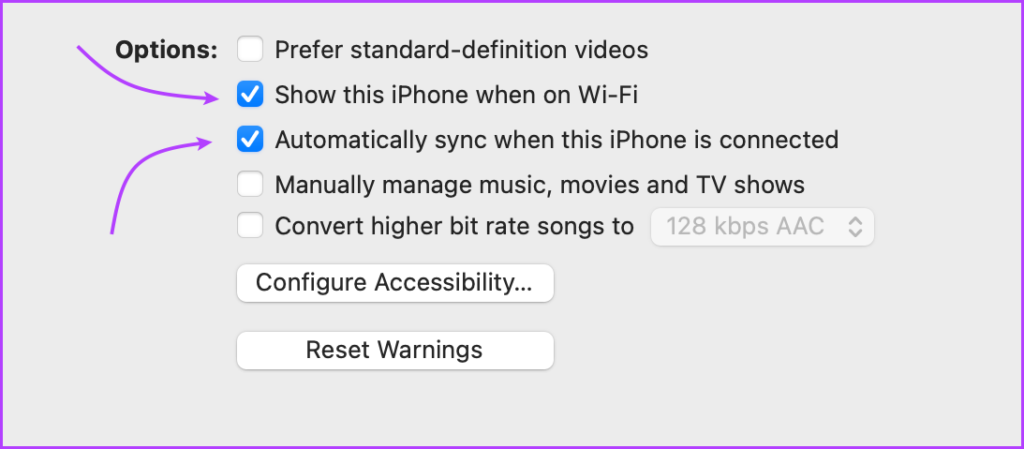
Step 3: Check the box next to ‘Show this [device] when on Wi-Fi’.
Step 4: If you want to enable/disable automatic sync, check or uncheck ‘Automatically sync when this [device] is connected’ accordingly.
Step 5: Next, select the type of data you sync. Go to the tabs on the top bar → select ‘Sync [content type] onto iPhone’.
Step 6: Click Apply to finalize the changes.
Step 7: Click the Eject button next to the phone name in the sidebar and then disconnect the USB.

While the iPhone icon will disappear from the sidebar (for now), it will reappear automatically the next time Mac and iPhone are connected to the same Wi-Fi network.
To manually sync data over Wi-Fi, click the iPhone name from the sidebar and select Sync from the bottom of the window. It should be noted that syncing over Wi-Fi is considerably slower than over cable.
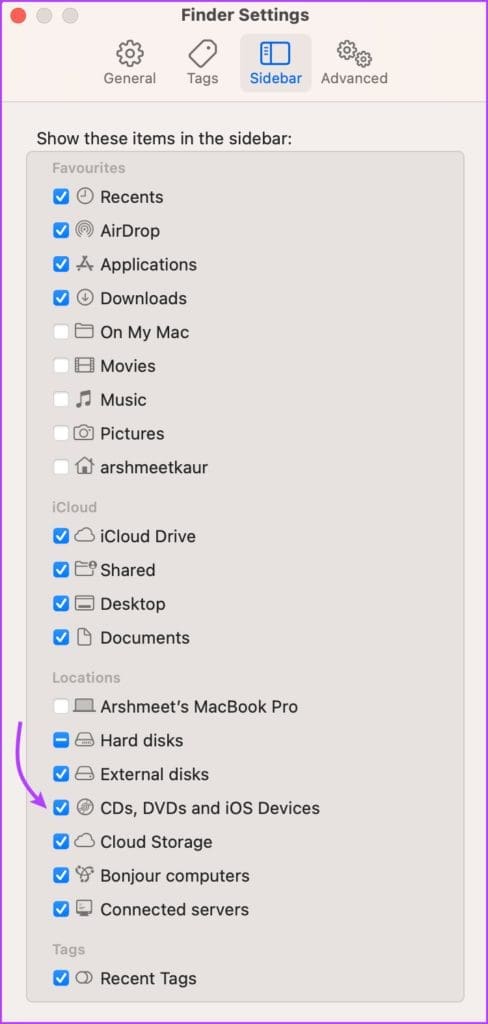
Note: If you don’t see the phone in the Finder sidebar, click Finder from the top menu → Settings/Preferences → ensure the box next to ‘CDs, DVDs, and iOS Devices’ is checked.
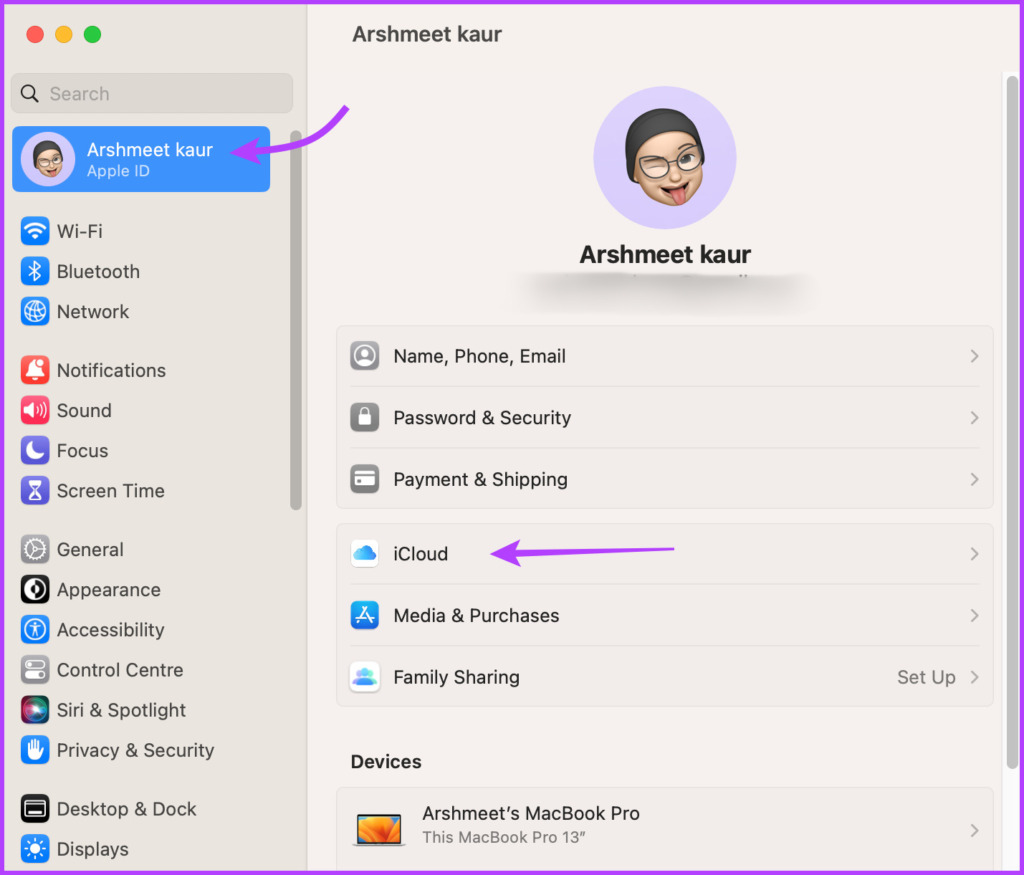
3. Link iPhone to Mac Via iCloud
iCloud Storage is one of the most common ways to keep your iPhone and Mac synced. It can handle a multitude of data types from photos, files, and music to contacts.
The best part is that all you need is the same Apple ID on both devices and a stable network. Of course, you’ll also need to turn on iCloud sync on both devices.
- On your iPhone: Go to Settings → your name → iCloud → Show All → turn on sync for each app or service you want to use across devices.


- On your Mac running macOS Ventura or later: Click Apple Menu → System Settings → your name from the sidebar → iCloud → enable the toggle for apps and services you want to sync.

- For macOS Monterey or earlier: Click Apple Menu → System Preferences → Apple ID → iCloud → turn on sync for apps and services.
Once the iCloud sync is turned on for both devices, changes made in one will auto-sync with the other device. The only snag here is to smartly manage iCloud storage, you can either purchase iCloud+ or follow this guide to free up iCloud storage.
How to Use Continuity Between iPhone and Mac
While it might sound cliche, it has to be said, iPhone and Mac are a match made in heaven. And if that was not clear from the above section, the following continuity will prove it.
Continuity allows us to work smarter and move seamlessly between the iPhone and Mac. Let’s see how.
4. AirDrop Files Between iPhone and Mac
One of the most coveted features of the Apple ecosystem. After all, it connects iPhone to Mac wirelessly and makes file sharing between them a breeze. To use AirDrop, simply tap the share icon on your iPhone or Mac and select AirDrop. Here, select the device you want to share.


You can share anything from photos, videos, and documents to calendar invites wirelessly without compromising on the quality. Markedly, the feature is not limited to your devices (with the same Apple ID), it is functional for any iPhone, iPad, or Mac near your device.
5. Handoff Apps and Tasks Between iPhone and Mac
This one takes the concept of connecting an iPhone to a Mac to another level. You’ll especially love it if you ever dreamt of starting working on one device and finishing it off on another device.
Handoff works with all major native Apple apps like Mail, Safari, Messages, FaceTime, Reminders, and many third-party apps. Markedly, before using the feature, you’ll have to enable it on each device individually.
How to Turn On Handoff on Mac
Step 1: Click Apple Menu → System Settings → General.
Step 2: Here, select AirDrop & Handoff.
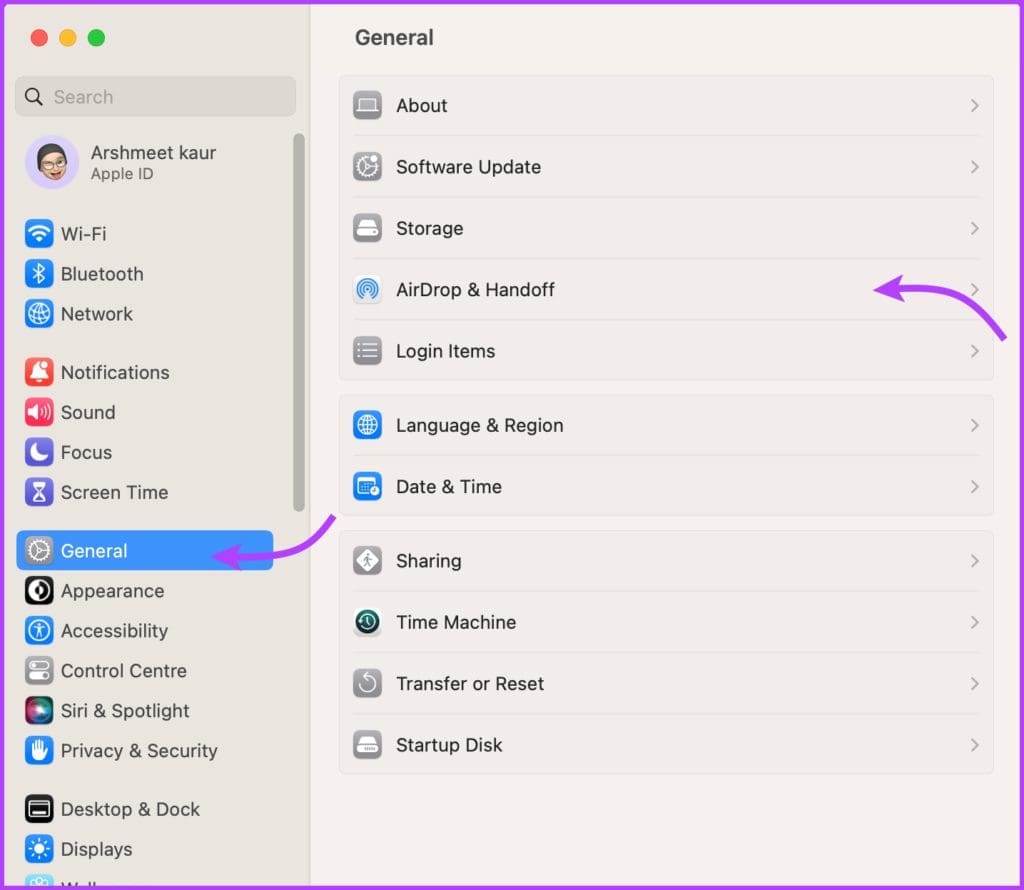
Step 3: Toggle on the switch next to ‘Allow Handoff between this Mac and your iCloud devices.’

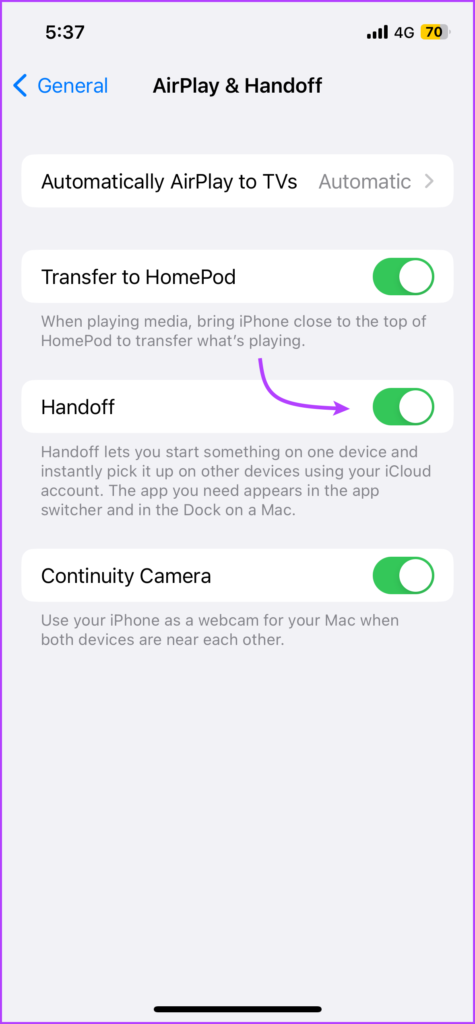
How to Turn On Handoff on iPhone
Step 1: Launch Settings and go to General.
Step 2: Select AirPlay & Handoff.
Step 3: Toggle on Handoff.

Now when you open any supported app, let’s say Safari or Google Chrome on iPhone, a matching icon will pop up on the Dock. Click the app icon to pick up where you left off on your iPhone.

6. Use Universal Clipboard Between Mac and iPhone
This one’s a worthy extension of the Handoff concept. As the name suggests, you’ll be sharing the clipboard with other Apple devices. That means you can copy text, image, photos, and videos from one Apple device and paste it into another.
To enjoy this feature, you must meet the Continuity system requirements and both devices should have their Bluetooth, Wi-Fi, and Handoff turned on. Next, all you have to do is copy and paste.
7. Make the Most of the Continuity Camera on Mac
While MacBooks have decent cameras, the iPhone certainly takes the cake here. So, why not connect the iPhone to MacBook and make the most of its camera?
The feature allows you to use your iPhone as a webcam for Mac and use its camera to take pictures or scan documents.
8. Use Continuity Markup Between iPhone and Mac
When using Continuity Markup, you can edit images, screenshots, PDF documents, etc. Open the image or document in Quick Look on your Mac.
Here, make the edits you want to make on Mac. When ready, click the Markup Tool and then select the Continuity icon or smartphone’s logo.

Give it a few seconds, the image will open on your iPhone carrying the changes you made and ready for changes you want to make now.

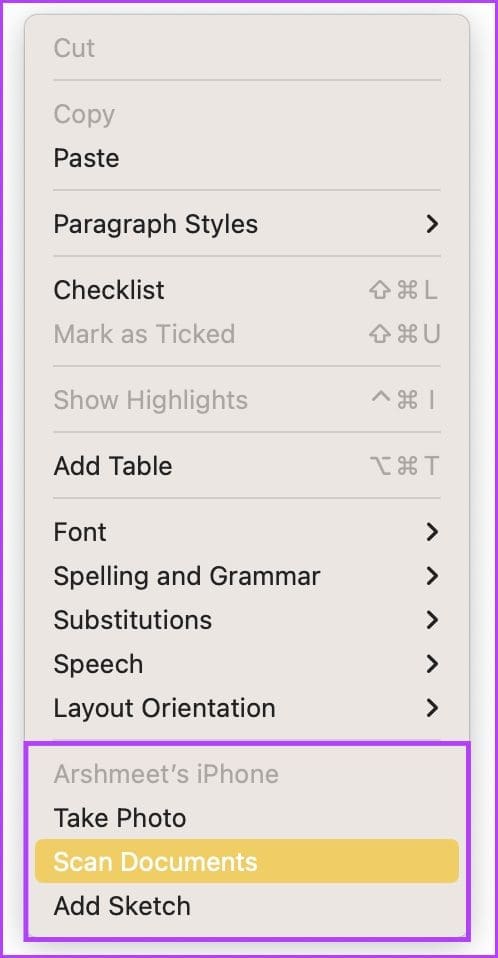
9. Use Continuity Sketch Between iPhone and Mac
Yes, the iPad’s screen works better as a sketch board. However, the iPhone does a decent job as well, at least in comparison to Mac. The great thing is that you can draw sketches on iPad or iPhone and import it onto Mac in email, messages, documents, notes, folders, and more.
To do so, simply open the app/page where you want to insert the sketch. Control-click or choose File → Insert from iPhone. Here, choose Add Sketch.
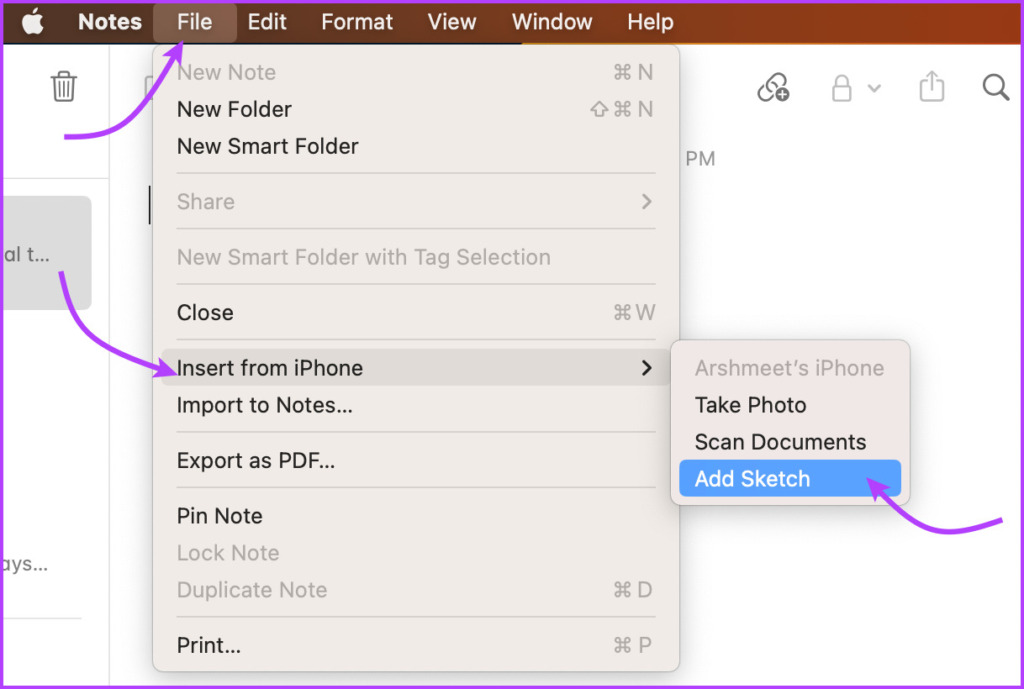
A window will open on your iPhone or iPad, use your finger or Apple Pencil to sketch. Tap Done when you’re ready. The said sketch will now appear on your Mac’s screen.
10. Get Instant Hotspot From iPhone for Your Mac
When your iPhone and Mac are nearby, the iPhone can offer a stable connection to the Mac via its personal hotspot. And while any other Android device can also provide similar services, the Apple ecosystem advantage is that you don’t require any setup.
The iPhone hotspot option auto-appears in Mac’s Wi-Fi menu. And when you click it, the iPhone hotspot is automatically enabled, allowing you to use the internet in one click.

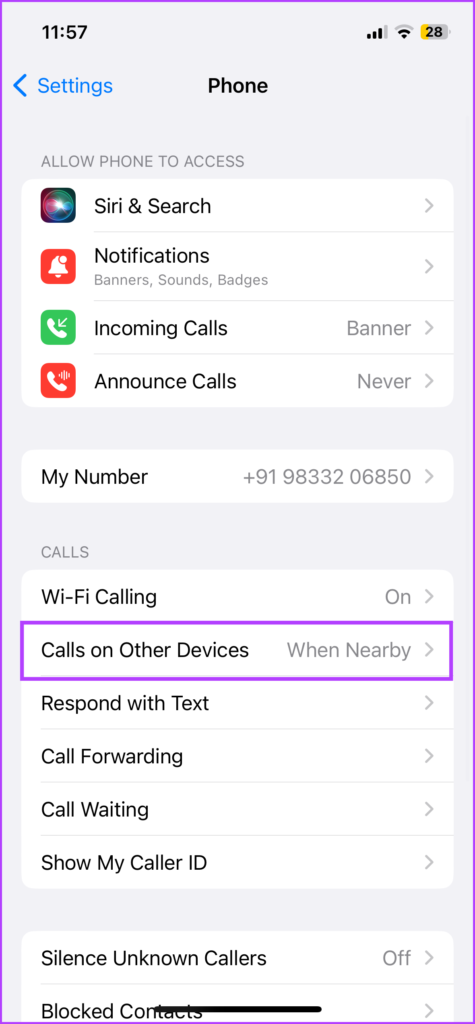
11. Handoff Phone Calls From iPhone to Mac
When your iPhone and Mac are connected, you can also handoff calls between the two devices. That means you can make or receive calls from the Mac with ease. Furthermore, you can also transfer calls from iPhone to Mac.
The feature works for both FaceTime and regular calls (via Wi-Fi Calling). Follow the instructions below to enable calls on other devices.
- On your iPhone: Go to Settings → Phone → select ‘Calls on Other Devices’ → toggle on ‘Allow Calls on Other Devices’ → under Allow Calls On, toggle on your Mac. (Also ensure Wi-Fi Calling is enabled)

- On your Mac: Launch the FaceTime app → choose FaceTime from the top menu → select Settings/Preferences → General tab → check the box next to Calls From iPhone.

Now, whenever you receive a call, both your iPhone and Mac will ring. Pick up the call on whichever device you wish.
12. Sync iPhone SMS or iMessage to Mac
Just like phone handoff, you can also handoff, i.e., sync Messages with your Mac. Send and receive SMS, MMS, and iMessages from Mac, whether your iPhone is nearby or not.
To do so, you’ll need to ensure that iCloud sync for Messages is enabled on both iPhone and Mac. Plus, also turn on message forwarding on iPhone and receiving on Mac. Here’s how:
- On your iPhone: Go to Settings → Messages → Text Message Forwarding → turn on the toggle for your Mac.


- On your Mac: Open Messages → select Messages from the top menu bar → Settings/Preferences → select iMessage tab → Check ‘Enable Messages in iCloud’.

Henceforth, you’ll receive SMS and iMessages on both devices. And you reply, Tap back, forward, send voice notes, etc., from any device of your choice.
13. AirPlay to Mac From iPhone
From file sharing to file playing, the Apple ecosystem has ways to handle it all. Thanks to AirPlay, you can stream content or mirror screen from your iPhone to your Mac and other AirPlay-compatible devices.
However, before we can AirPlay content to Mac, let’s first set up Mac as an AirPlay receiver.
Step 1: Click on the Apple icon at the top left → System Settings → General → AirDrop and Handoff.
Step 2: Enable the toggle for AirPlay Receiver.
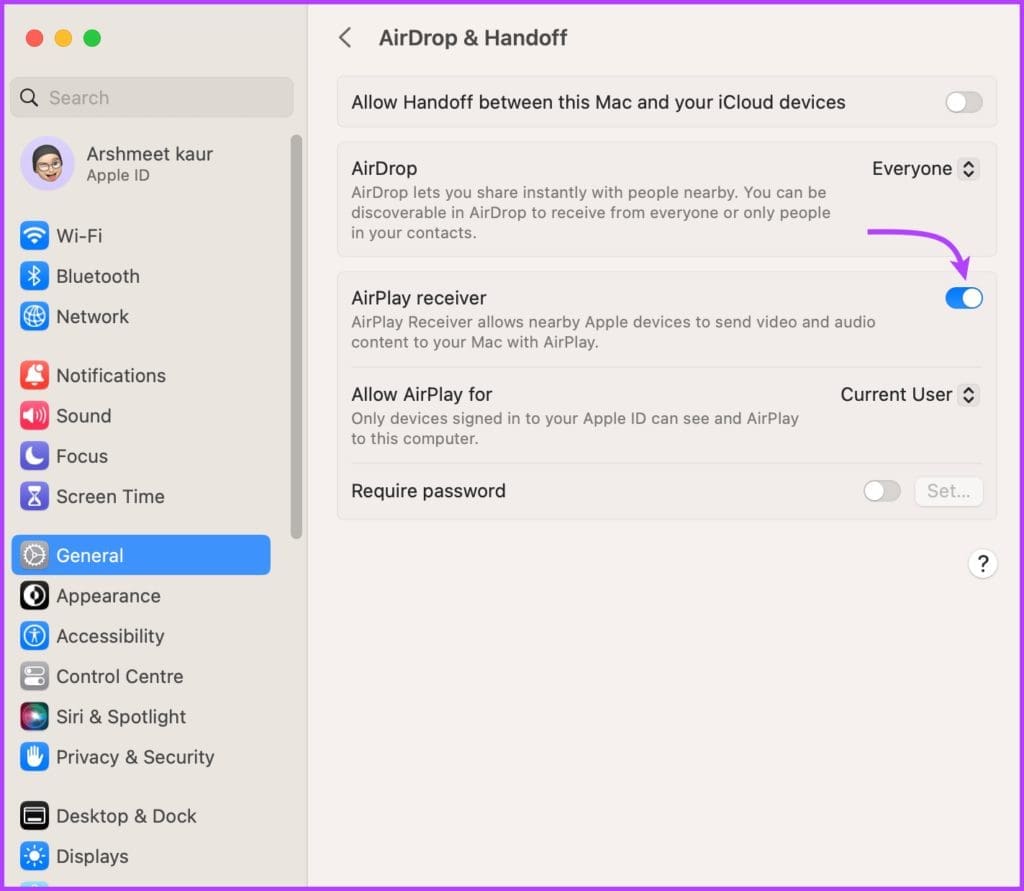
Step 3: Next, click the drop-down menu next to Allow AirPlay for and choose an appropriate option:
- Current User: Only devices using the same Apple ID as this Mac.
- Anyone on the Same Network: Any nearby Apple devices using the same network.
- Everyone: Any nearby Apple device.

Tip: You can also set a password. Turn on the toggle for Require Password, set the password, and then click Ok.
Step 4: After this, simply tap the AirPlay icon (from the app or Control Center) or the Screen Mirroring icon (Control Center) on your iPhone and select your Mac.


Enjoy Seamless Integration by Connecting Your iPhone to Mac
While iPhone and Mac aren’t co-dependent, they make a great team. Everything from syncing content to switching devices is a breeze when you connect your iPhone to Mac.
But do you know what is a hard task? Disconnecting your iPhone from Mac. However, the good thing is that you have the option to disconnect only specific features. So, which feature would you turn on or off? Share your take in the comments below.
Was this helpful?
Last updated on 19 January, 2023
Read Next
 How to Connect Samsung Galaxy Buds Live to Laptop, iPhone and Mac
Thanks to their unusual shape, the Samsung Galaxy Buds Live had created quite the hype even before its release.
How to Connect Samsung Galaxy Buds Live to Laptop, iPhone and Mac
Thanks to their unusual shape, the Samsung Galaxy Buds Live had created quite the hype even before its release.
 3 Ways to Fix Apple iPad Can’t Connect to App Store
Basic Fixes: Restart iPad: A simple reboot may fix glitches like the iPad can’t connect to the App Store.
3 Ways to Fix Apple iPad Can’t Connect to App Store
Basic Fixes: Restart iPad: A simple reboot may fix glitches like the iPad can’t connect to the App Store.
 Nintendo’s Joy-Cons Can Connect to Windows, Mac and Android
Nintendo Switch recently went on sale globally with an array of games lined up for the console, including FIFA, NBA, Zelda and more, but there were people concerned about its
Nintendo’s Joy-Cons Can Connect to Windows, Mac and Android
Nintendo Switch recently went on sale globally with an array of games lined up for the console, including FIFA, NBA, Zelda and more, but there were people concerned about its
 How to Connect MacBook to TV – Wired and Wirelessly
Method 1: Connect MacBook to TV Using HDMI Cable Let us start by showing you how to use an HDMI cable to connect your MacBook to your TV.
How to Connect MacBook to TV – Wired and Wirelessly
Method 1: Connect MacBook to TV Using HDMI Cable Let us start by showing you how to use an HDMI cable to connect your MacBook to your TV.
 8 Ways to Fix Wi-Fi Doesn’t Connect After Sleep in Windows 10
Typically, when you restart your computer or wake it up from sleep or hibernate, the Wi-Fi connects automatically.
8 Ways to Fix Wi-Fi Doesn’t Connect After Sleep in Windows 10
Typically, when you restart your computer or wake it up from sleep or hibernate, the Wi-Fi connects automatically.
 6 Best Ways to Fix Windows 11 Apps Won’t Connect to the Internet
Computers have a myriad of apps that enhance the performance of certain features.
6 Best Ways to Fix Windows 11 Apps Won’t Connect to the Internet
Computers have a myriad of apps that enhance the performance of certain features.
 How to Connect Outlook Calendar With Google Calendar: 4 Best Ways
Note: The methods recommended in the article allow two-way syncs in the calendar.
How to Connect Outlook Calendar With Google Calendar: 4 Best Ways
Note: The methods recommended in the article allow two-way syncs in the calendar.
 5 Ways to Fix Windows Stuck on “Let’s Connect You to a Network”
Fix 1: Restart the Router and Check the Internet Connectivity Restart your Wi-Fi router, as it essentially refreshes the network connection.
5 Ways to Fix Windows Stuck on “Let’s Connect You to a Network”
Fix 1: Restart the Router and Check the Internet Connectivity Restart your Wi-Fi router, as it essentially refreshes the network connection.
The article above may contain affiliate links which help support Guiding Tech. The content remains unbiased and authentic and will never affect our editorial integrity.