Whenever you receive a message on your iPhone, the Messages app sends you a notification specifying who has sent the message and, in some instances, even the content of the message. However, if you work for an organization that handles sensitive cases or you want some privacy, the ability to hide the sender’s name on the iPhone’s Messages app can be a game-changer.
As of now, you can’t find any option to hide the sender’s name in Messages settings. However, you can use certain workarounds, like hiding message notifications, using Focus filters, and even changing the contact name to get the work done. For more details, keep reading.
1. Disable Message Previews and Lock Screen Notification
When you receive a message, your iPhone typically shows you a preview of its contents. This can help you gauge if the message is important. And, if you have enabled lock screen notifications, you can see who has sent you a message without unlocking your device.
However, you can turn off these message previews and stop the Messages app from showing message notifications on the Lock Screen. This way, you can hide the message as a whole, indirectly hiding the sender’s name on the iPhone lock screen and notification window. Here’s how to do it.
Step 1: Open the Settings app and tap on Notifications.
Step 2: Scroll down and tap on Messages.
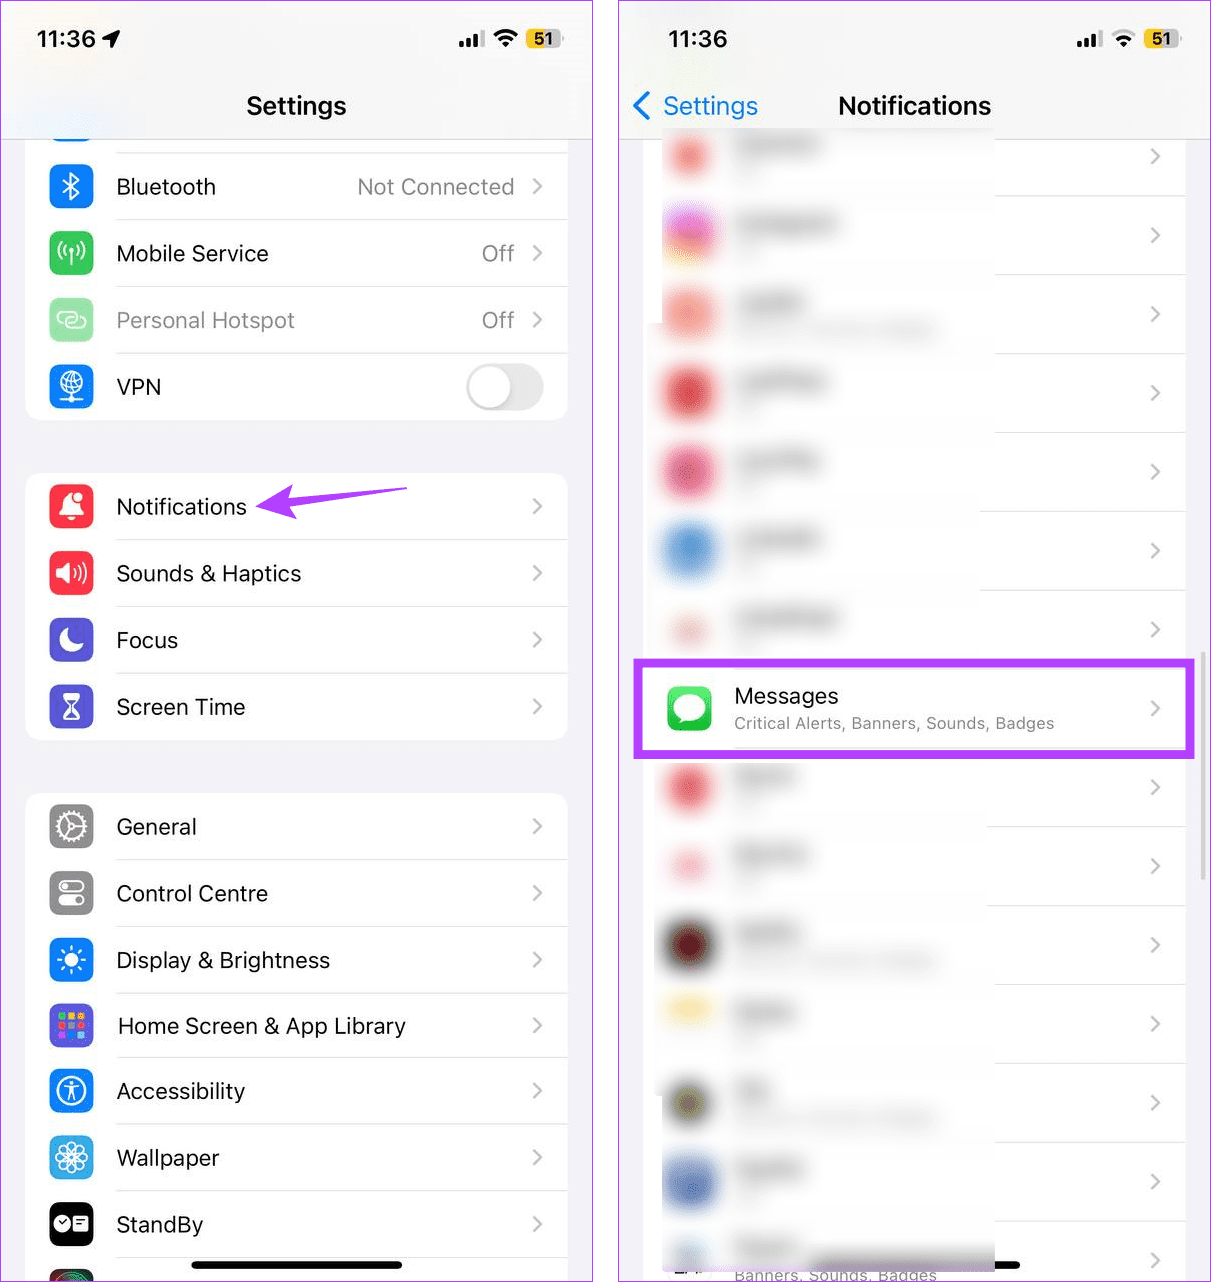
Step 3: Here, go to the Alerts section and uncheck the Lock Screen option.
Step 4: Then, tap on Show Previews and select Never.
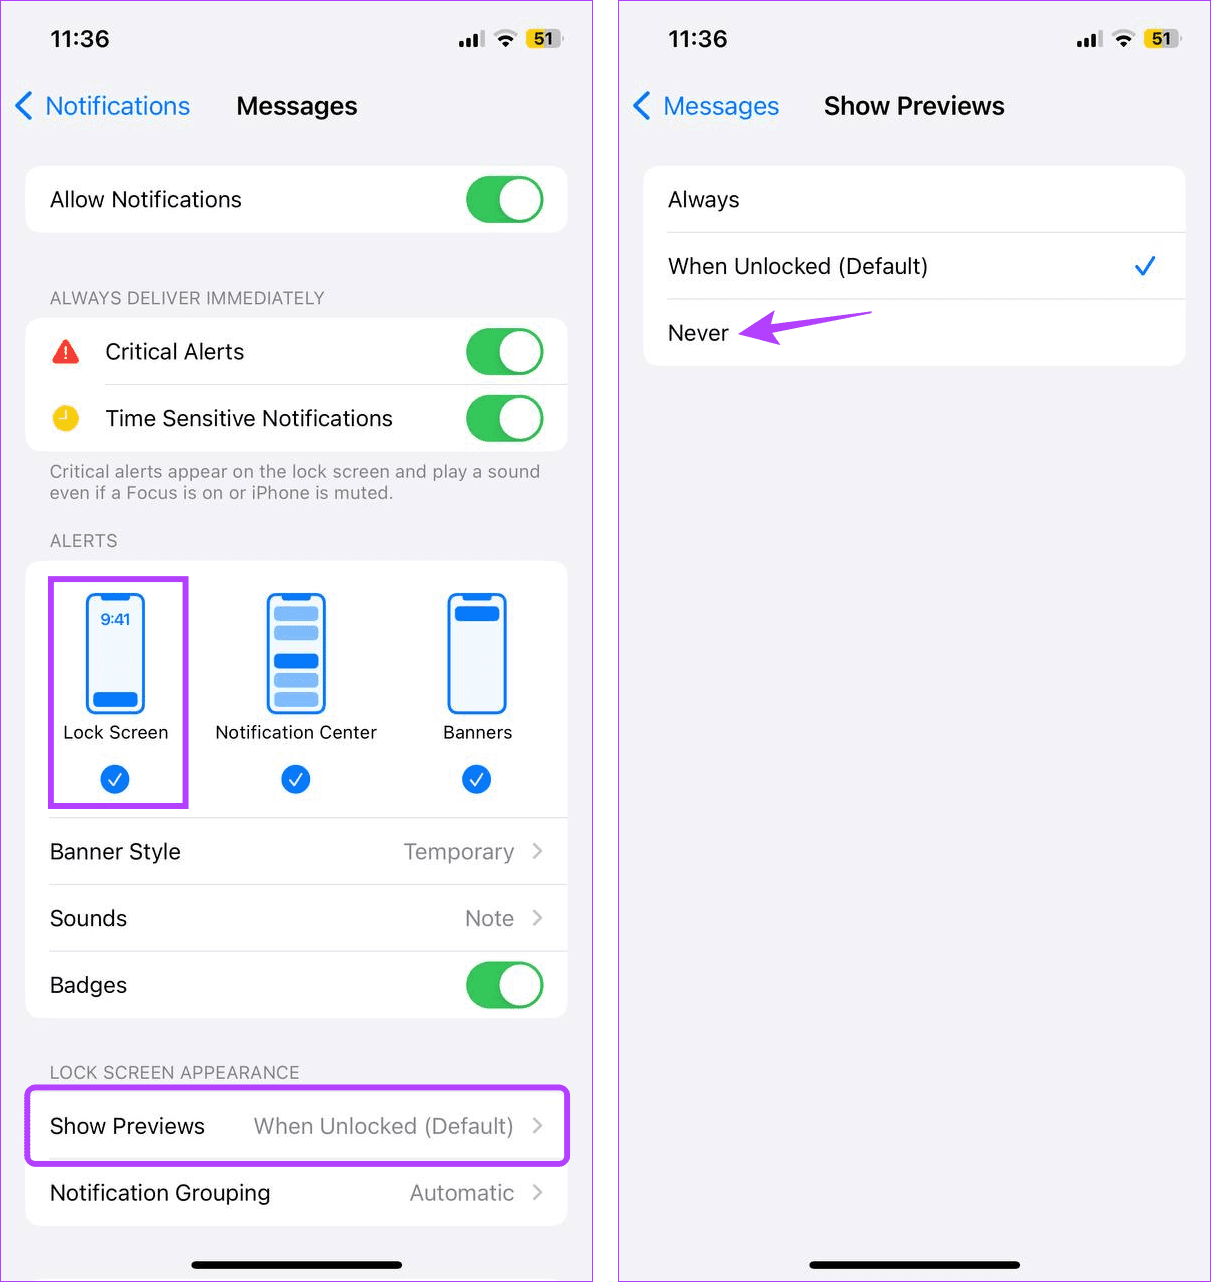
This will ensure the Messages app doesn’t show message previews and turn off lock screen notifications as well. You will now have to open the Messages app to see who has sent you the message.
2. Delete the Contact
Another way to hide the sender’s name on iMessage notifications is by deleting the contact. Then, head over to the Messages app settings and enable unknown message filtering. This will hide the sender and separately categorize the message within the Messages app. However, it will still display the sender’s number. If you’re okay with it, follow the steps below.
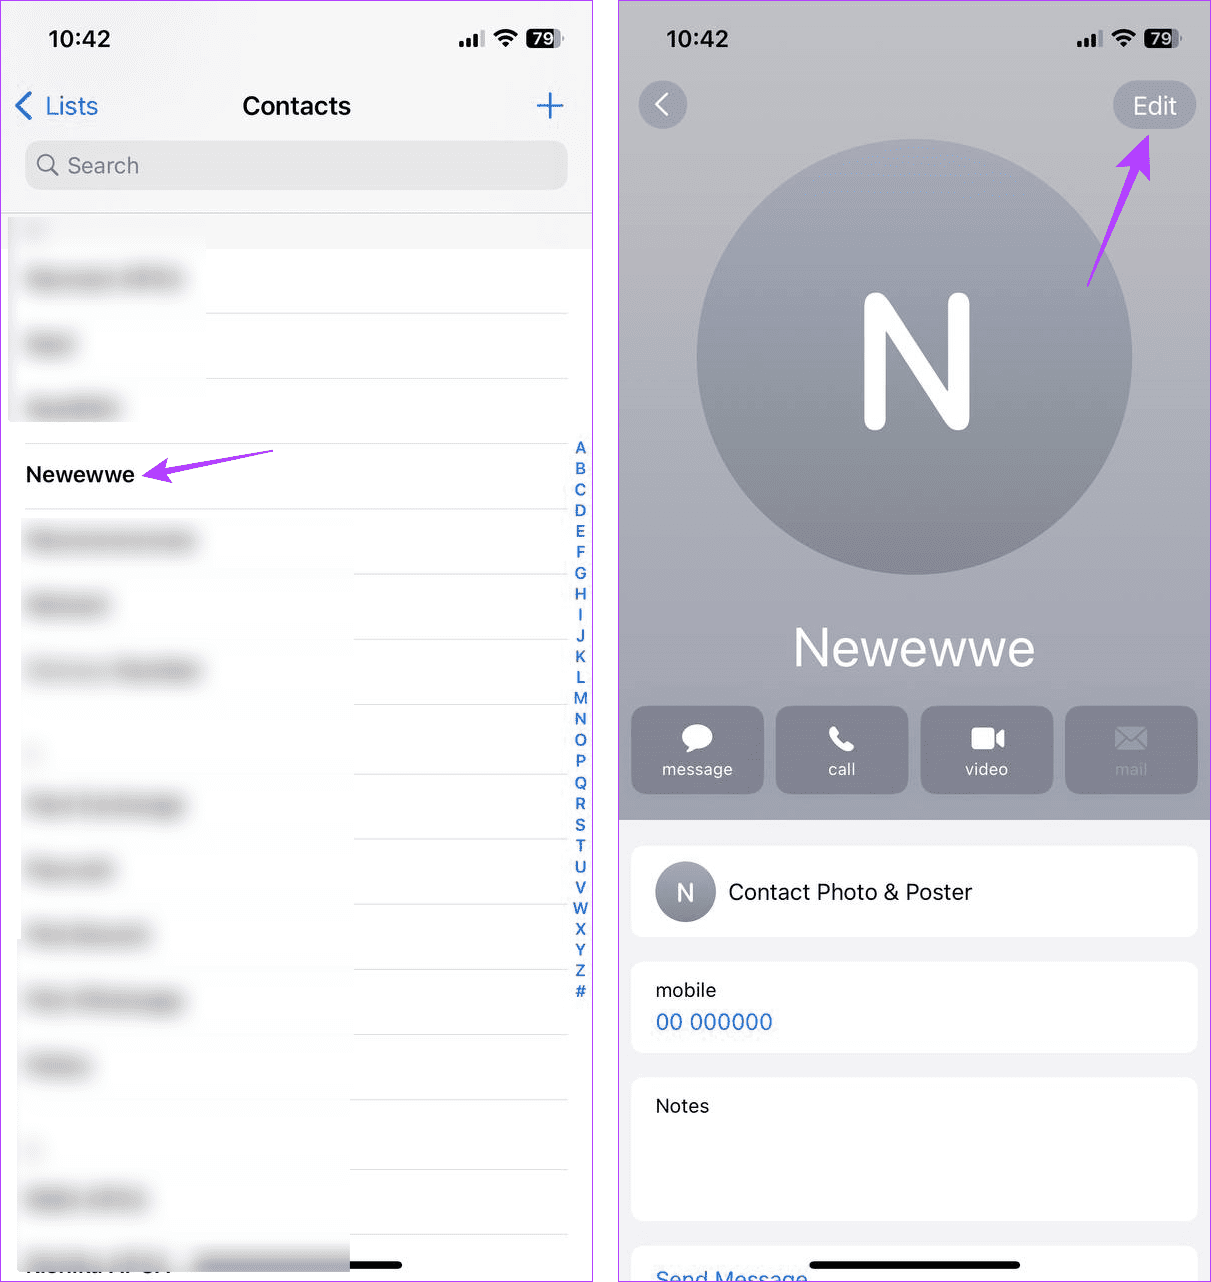
Step 1: Open the Contacts app on your iPhone. Then, tap on the relevant contact.
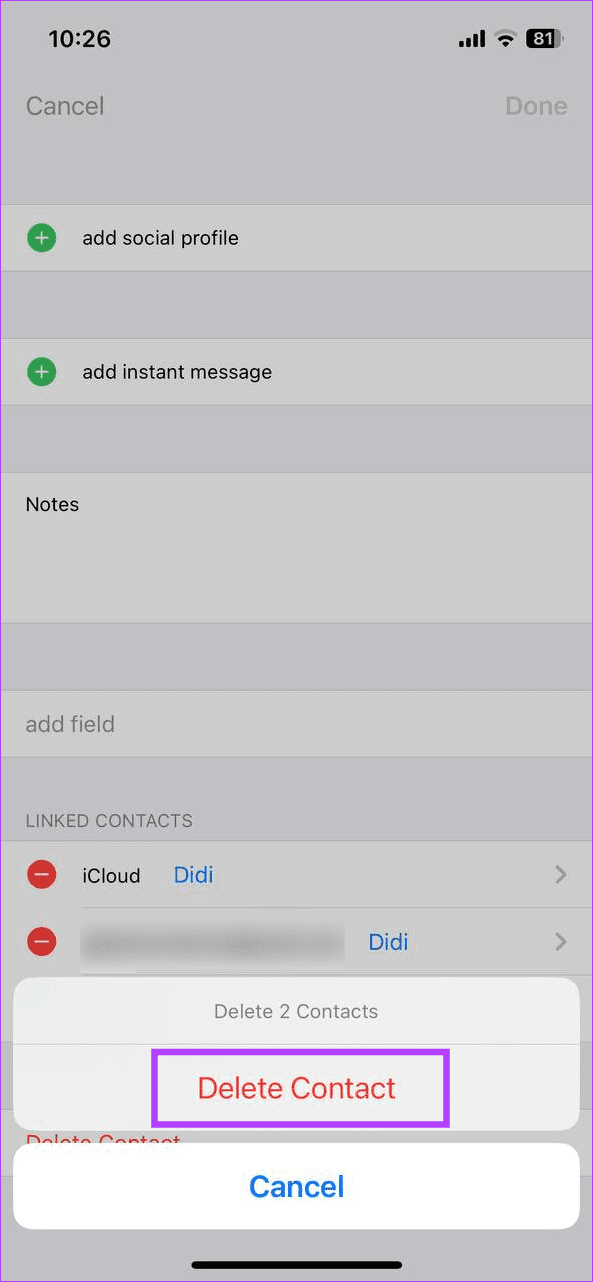
Step 2: Scroll down and tap on Delete Contact.
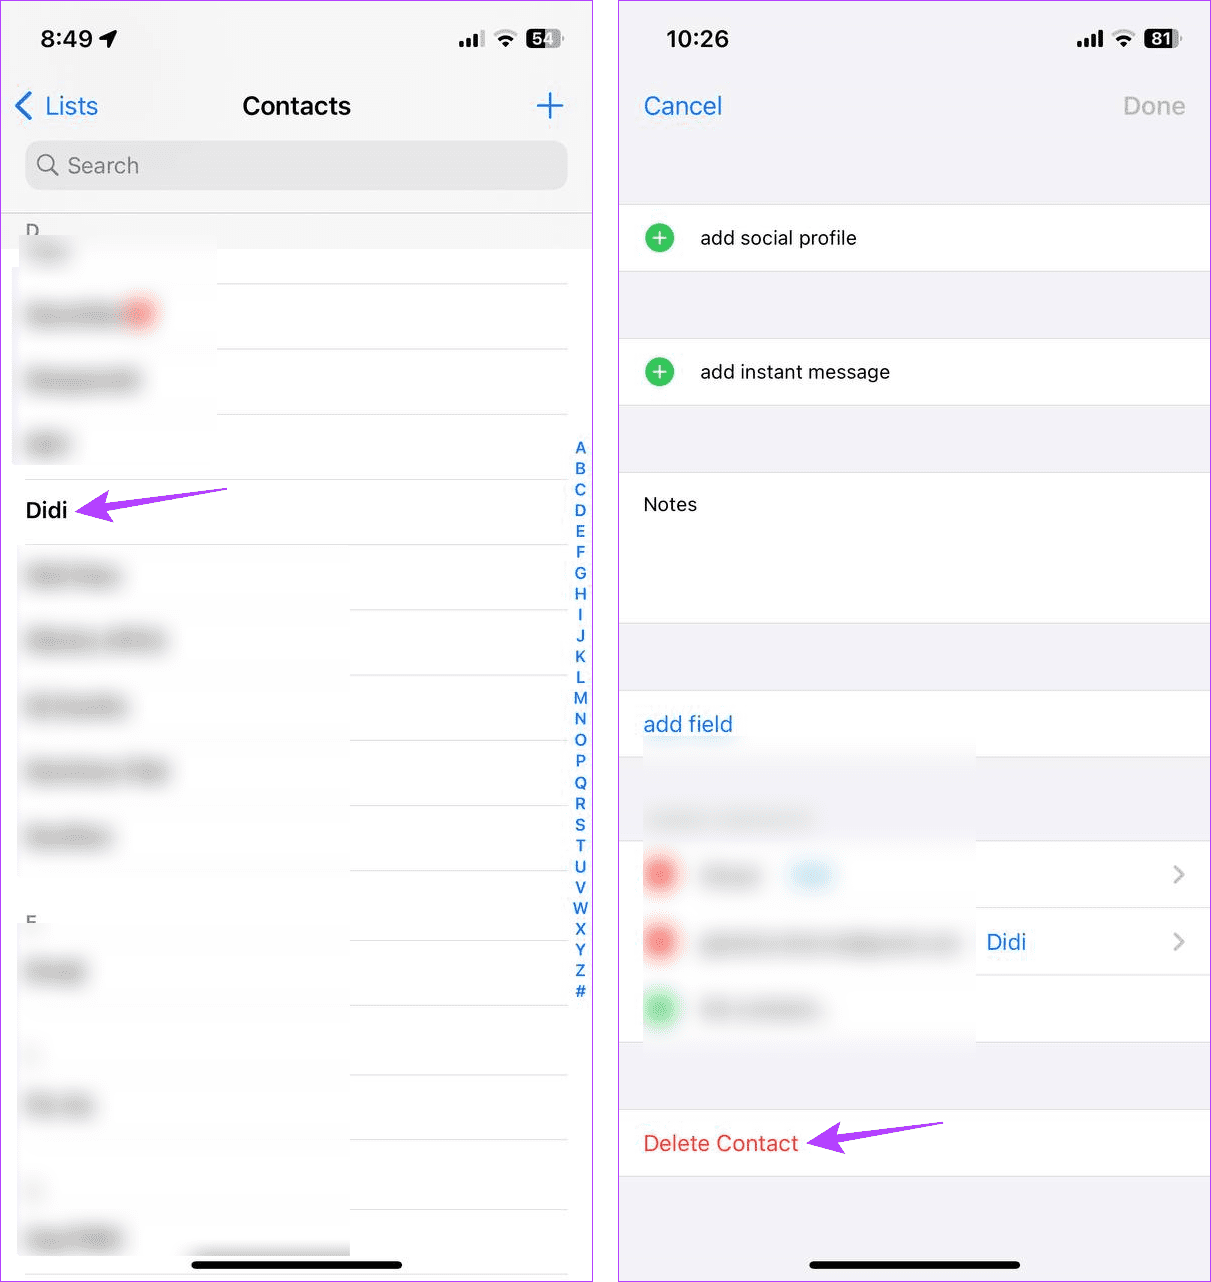
Step 3: Tap on Delete Contact to confirm.
Once done, it will delete the contact from your iPhone’s contact list. You can now enable the unknown message filter to ensure messages from such contacts don’t end up in the main messages window within the Message app. Here’s how.
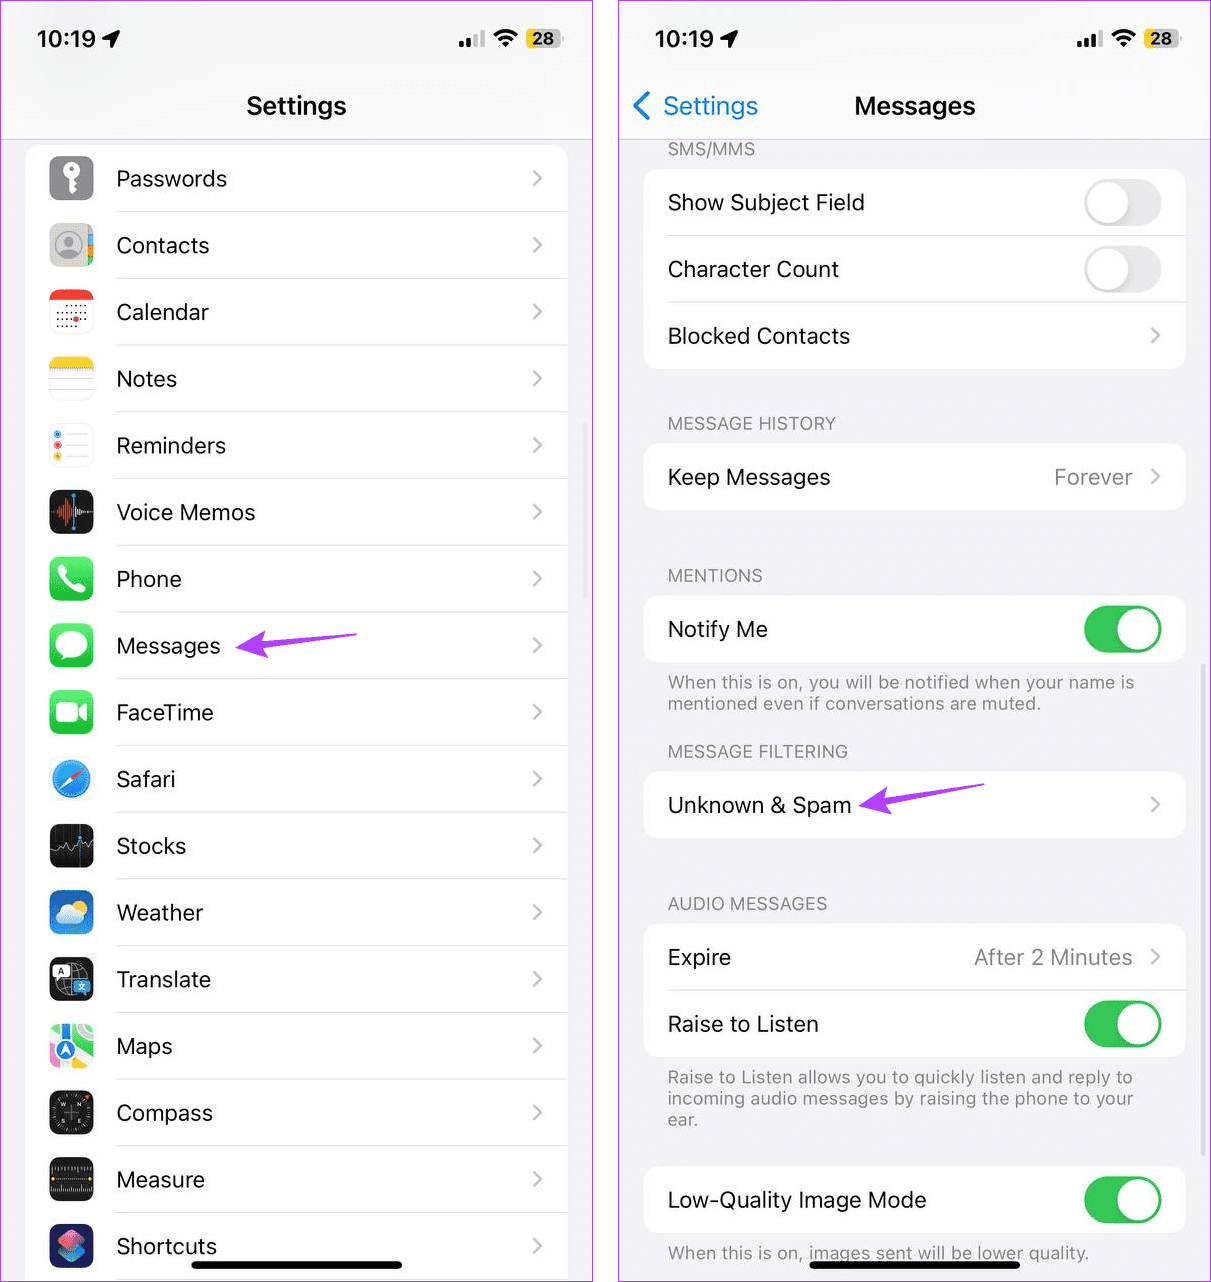
Step 4: Open Settings and tap on Messages.
Step 5: Scroll down and tap Unknown & Spam.
Step 6: Here, turn on the toggle for Filter Unknown Senders.
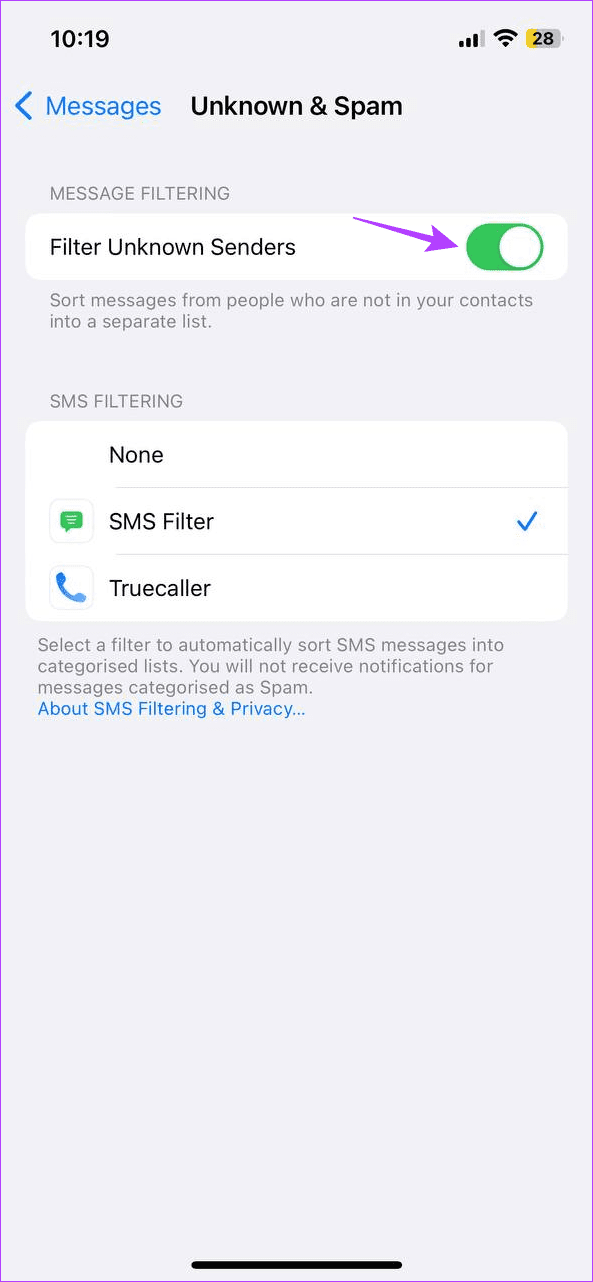
Now, all the messages from unknown senders will be available in the Unknown Senders filter within the Messages app on your iPhone.
3. Add a Nickname
If you want the contact to be available but not to show the name on text messages, you can change the contact details to a nickname instead. This will allow you to hide the sender when receiving the message while still retaining them in your iPhone’s contact list. Here’s how.
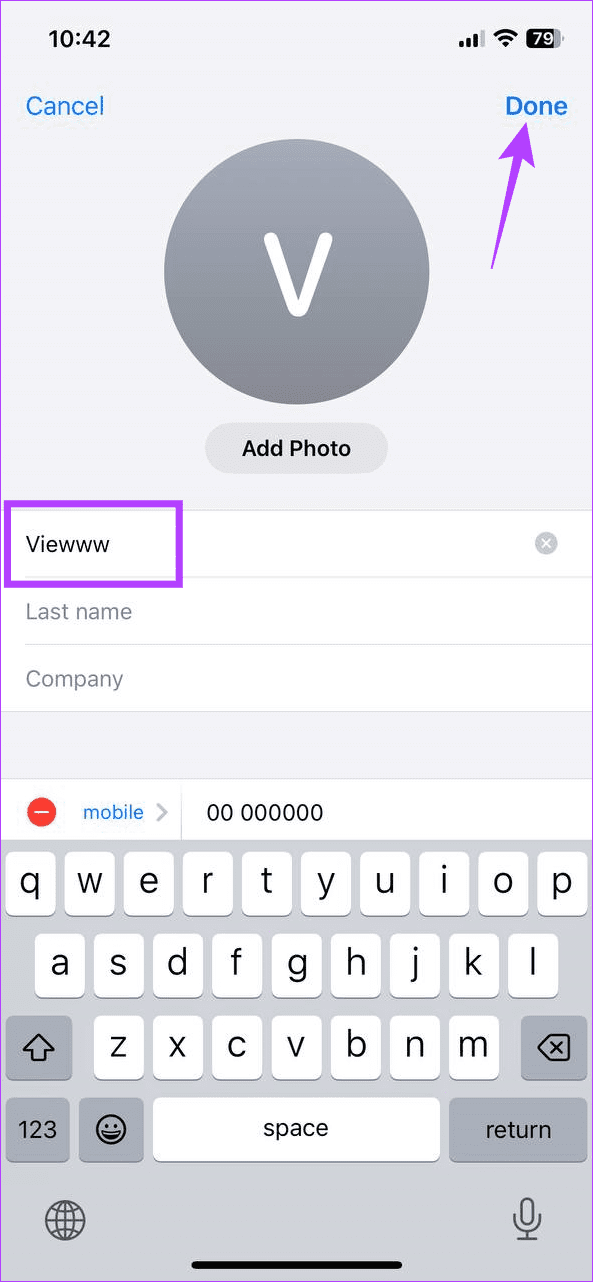
Step 1: Open the Contacts app and tap on the relevant contact.
Step 2: Here, tap on Edit.
Step 3: Now, change the name to their nickname.
Step 4: Tap on Done to close the editing window.
4. Collaborate via the Notes App or Google Docs
You can create a note in the Notes app and share that note with others. This will allow them to add text to the note, helping you keep in touch. Then, lock the note on your iPhone to stop others from accessing it, thus hiding the sender.
Similarly, you can share a Google Docs file and allow others to comment or edit the doc. This will eliminate the need to send messages and hide the sender.
5. Use Focus Filters
Users can create specific Focus Filters and block the required contacts. This way, whenever the Focus Filter is enabled, you can see all senders except for the ones that have been blocked. Here’s how to do it.
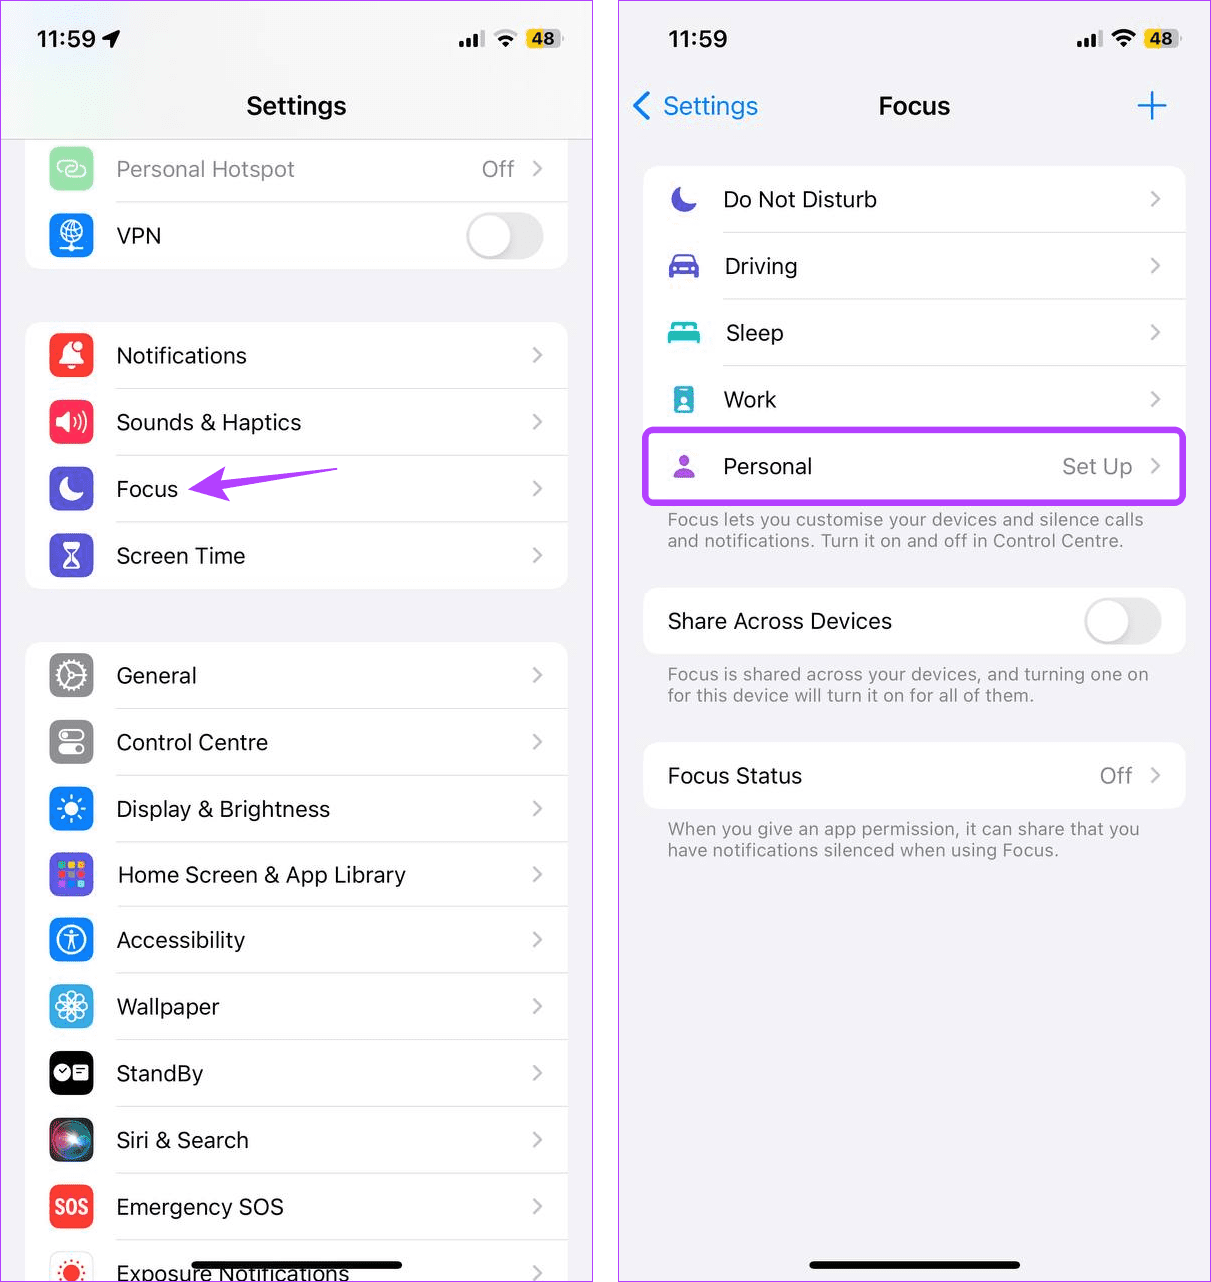
Step 1: Open the Settings menu and tap on Focus.
Step 2: Here, tap on Personal.
Step 3: If prompted, tap on Customize Focus and tap on People.
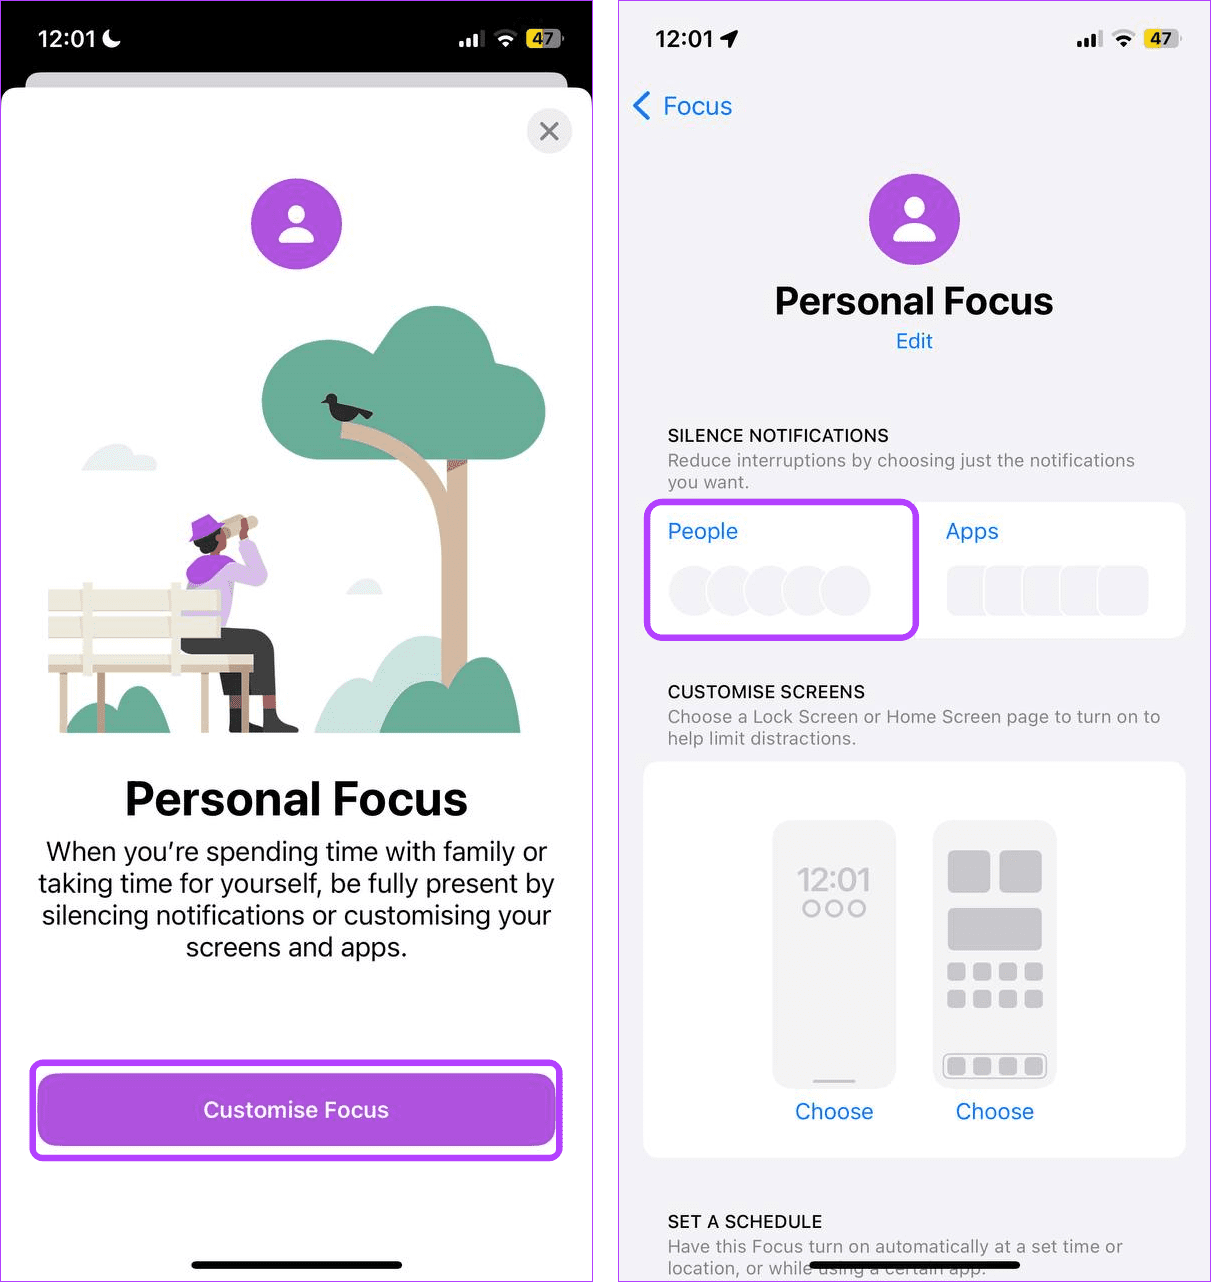
Step 4: From the menu options, select Silence Notifications From. Then, tap on Add.
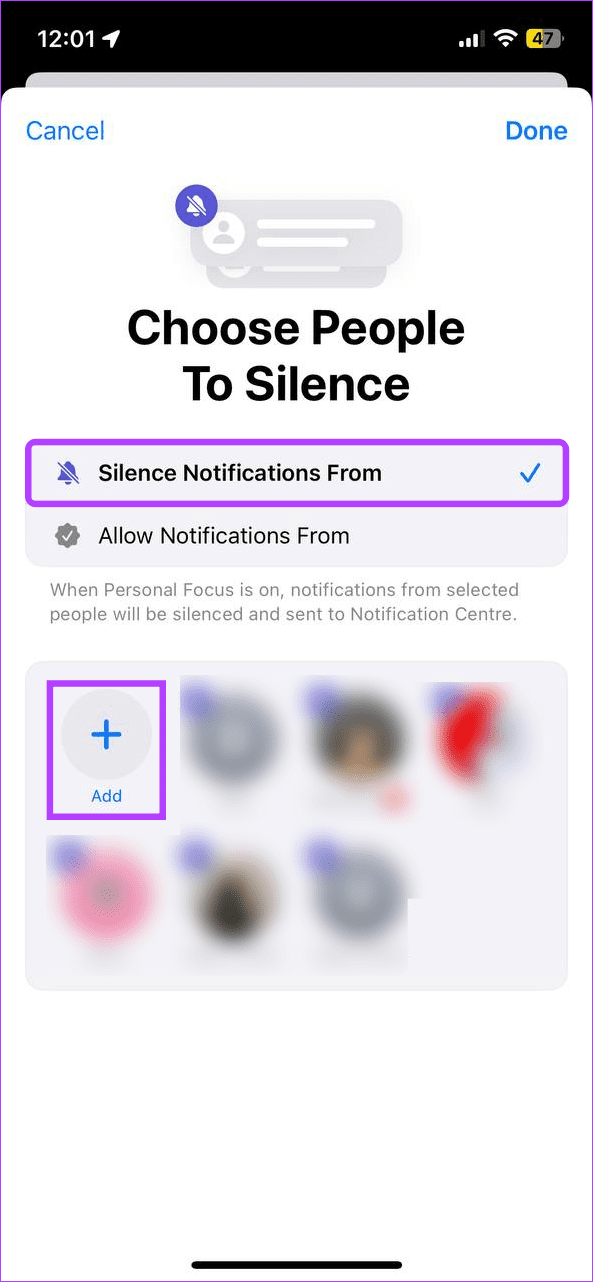
Step 5: Scroll through this page and select the relevant contacts. Then, tap on Done to close the selection window.
Step 6: Review the contacts once. Then, tap on Done.

Now, turn on this Focus Mode on your iPhone. Once the modified Focus Mode is turned on, you will not receive any message notification from the selected contacts. However, once you disable this Focus Mode, updates from the selected contacts will be visible again on your iPhone.
6. Go for Other Apps
Instead of using the Messages app, you can converse using other apps, such as WhatsApp. Then, lock the individual chat using the settings menu. This will not only make the chat disappear from the main page but also hide the sender’s name in the notification window.
Tip: You can lock your Messages app with a Screen Time passcode to stop all message notifications from appearing, thus hiding the sender’s name. However, upon testing, this method proved successful intermittently. So, if you want to go ahead, proceed with caution.
Hide Sender’s Name on iPhone
While chat notifications can help you find who has texted you, they might expose the sender’s identity to others. So, we hope you could hide the sender’s name on iPhone messages using the abovementioned methods.
Was this helpful?
Last updated on 18 January, 2024
Read Next
 What Is Hide Alerts in Messages on iPhone, iPad, and Mac
What Is ‘Hide Alerts’ Feature in Messages?
What Is Hide Alerts in Messages on iPhone, iPad, and Mac
What Is ‘Hide Alerts’ Feature in Messages?
 How to Add, Delete, or Hide iMessage Apps on iPhone
How to Access iMessage App Drawer To access the iMessage app drawer on your iPhone, follow these steps: Step 1: Open the Messages app on your iPhone.
How to Add, Delete, or Hide iMessage Apps on iPhone
How to Access iMessage App Drawer To access the iMessage app drawer on your iPhone, follow these steps: Step 1: Open the Messages app on your iPhone.
 6 Ways to Hide or Delete a Calendar on iPhone
Method 1: Delete an iCloud Calendar The fewer number of calendars means the least distraction.
6 Ways to Hide or Delete a Calendar on iPhone
Method 1: Delete an iCloud Calendar The fewer number of calendars means the least distraction.
 How to Transfer Samsung Messages to Google Messages
How to Switch From Samsung Messages to Google Messages on the Same Phone If you want to switch to the Messages by Google app on your Samsung phone, you only
How to Transfer Samsung Messages to Google Messages
How to Switch From Samsung Messages to Google Messages on the Same Phone If you want to switch to the Messages by Google app on your Samsung phone, you only
 Google Messages vs. Samsung Messages: Which Is Better
1.
Google Messages vs. Samsung Messages: Which Is Better
1.
 How to Hide Your Profile Picture From Specific Contacts on WhatsApp
What Happens When You Hide Your Profile Picture From Specific Contacts on WhatsApp The selected WhatsApp contacts can no longer view your account photo.
How to Hide Your Profile Picture From Specific Contacts on WhatsApp
What Happens When You Hide Your Profile Picture From Specific Contacts on WhatsApp The selected WhatsApp contacts can no longer view your account photo.
 5 Ways to Retrieve Deleted Text Messages on iPhone
Method 1: Check the Recently Deleted Folder iOS lets you retrieve deleted text messages within 30 days.
5 Ways to Retrieve Deleted Text Messages on iPhone
Method 1: Check the Recently Deleted Folder iOS lets you retrieve deleted text messages within 30 days.
 How to Set up Auto Replies to Calls and Messages on iPhone
Method 1: Set up Automatic Replies to Calls on iPhone The Phone app settings give you three predefined text options for sending them as automatic replies.
How to Set up Auto Replies to Calls and Messages on iPhone
Method 1: Set up Automatic Replies to Calls on iPhone The Phone app settings give you three predefined text options for sending them as automatic replies.
The article above may contain affiliate links which help support Guiding Tech. The content remains unbiased and authentic and will never affect our editorial integrity.