Apple continues to take “inspiration” from Android to add new features in iOS. The App Library in iOS is one such recent addition. You also get the ability to add widgets on the home screen. While these are welcome changes, users continue to wonder how to hide photos and videos on an iPhone.

If you have sensitive pictures and videos on your iPhone, you will have to figure out ways to hide them. The Photos app on iOS does offer the native option to hide photos and videos. But they’re visible in a folder called Hidden that anyone can open. Don’t worry though, as we’ll tell you how to hide pictures on your iPhone.
Method 1: How to Hide Photos/Videos on iPhone
The default gallery on an iPhone is the Photos app. The Photos app shows all pictures and videos, including downloaded images, media files, screenshots, screen recordings, etc.
If you’re wondering where to hide videos and photos on your iPhone, the Photos app itself is the most convenient way. Here’s how you can do it.
Step 1: Open the ‘Photos’ app on your iPhone.
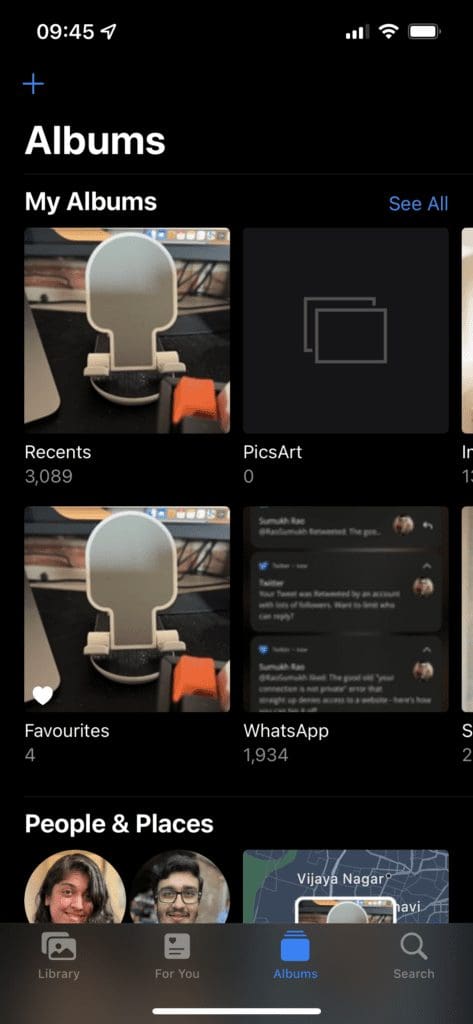
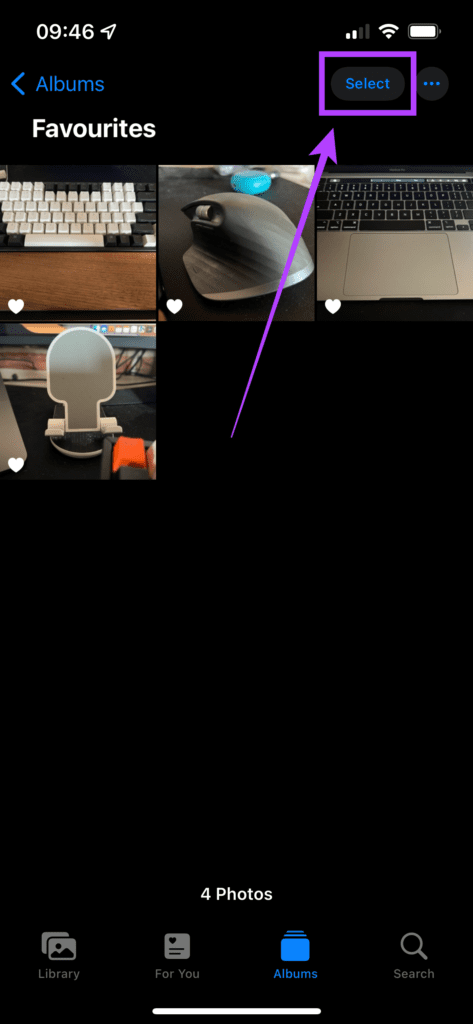
Step 2: Tap on the album consisting of the photos and videos you want to hide. Select it from the list of albums within the Photos app.
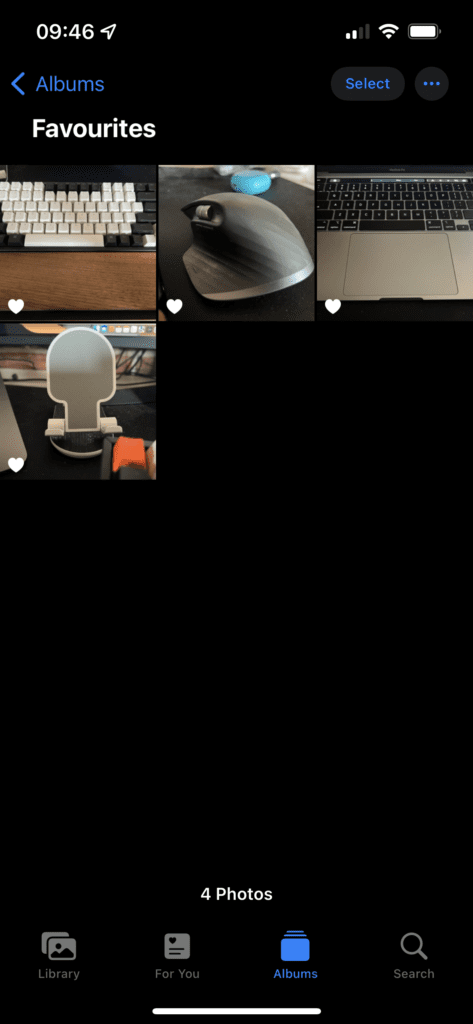
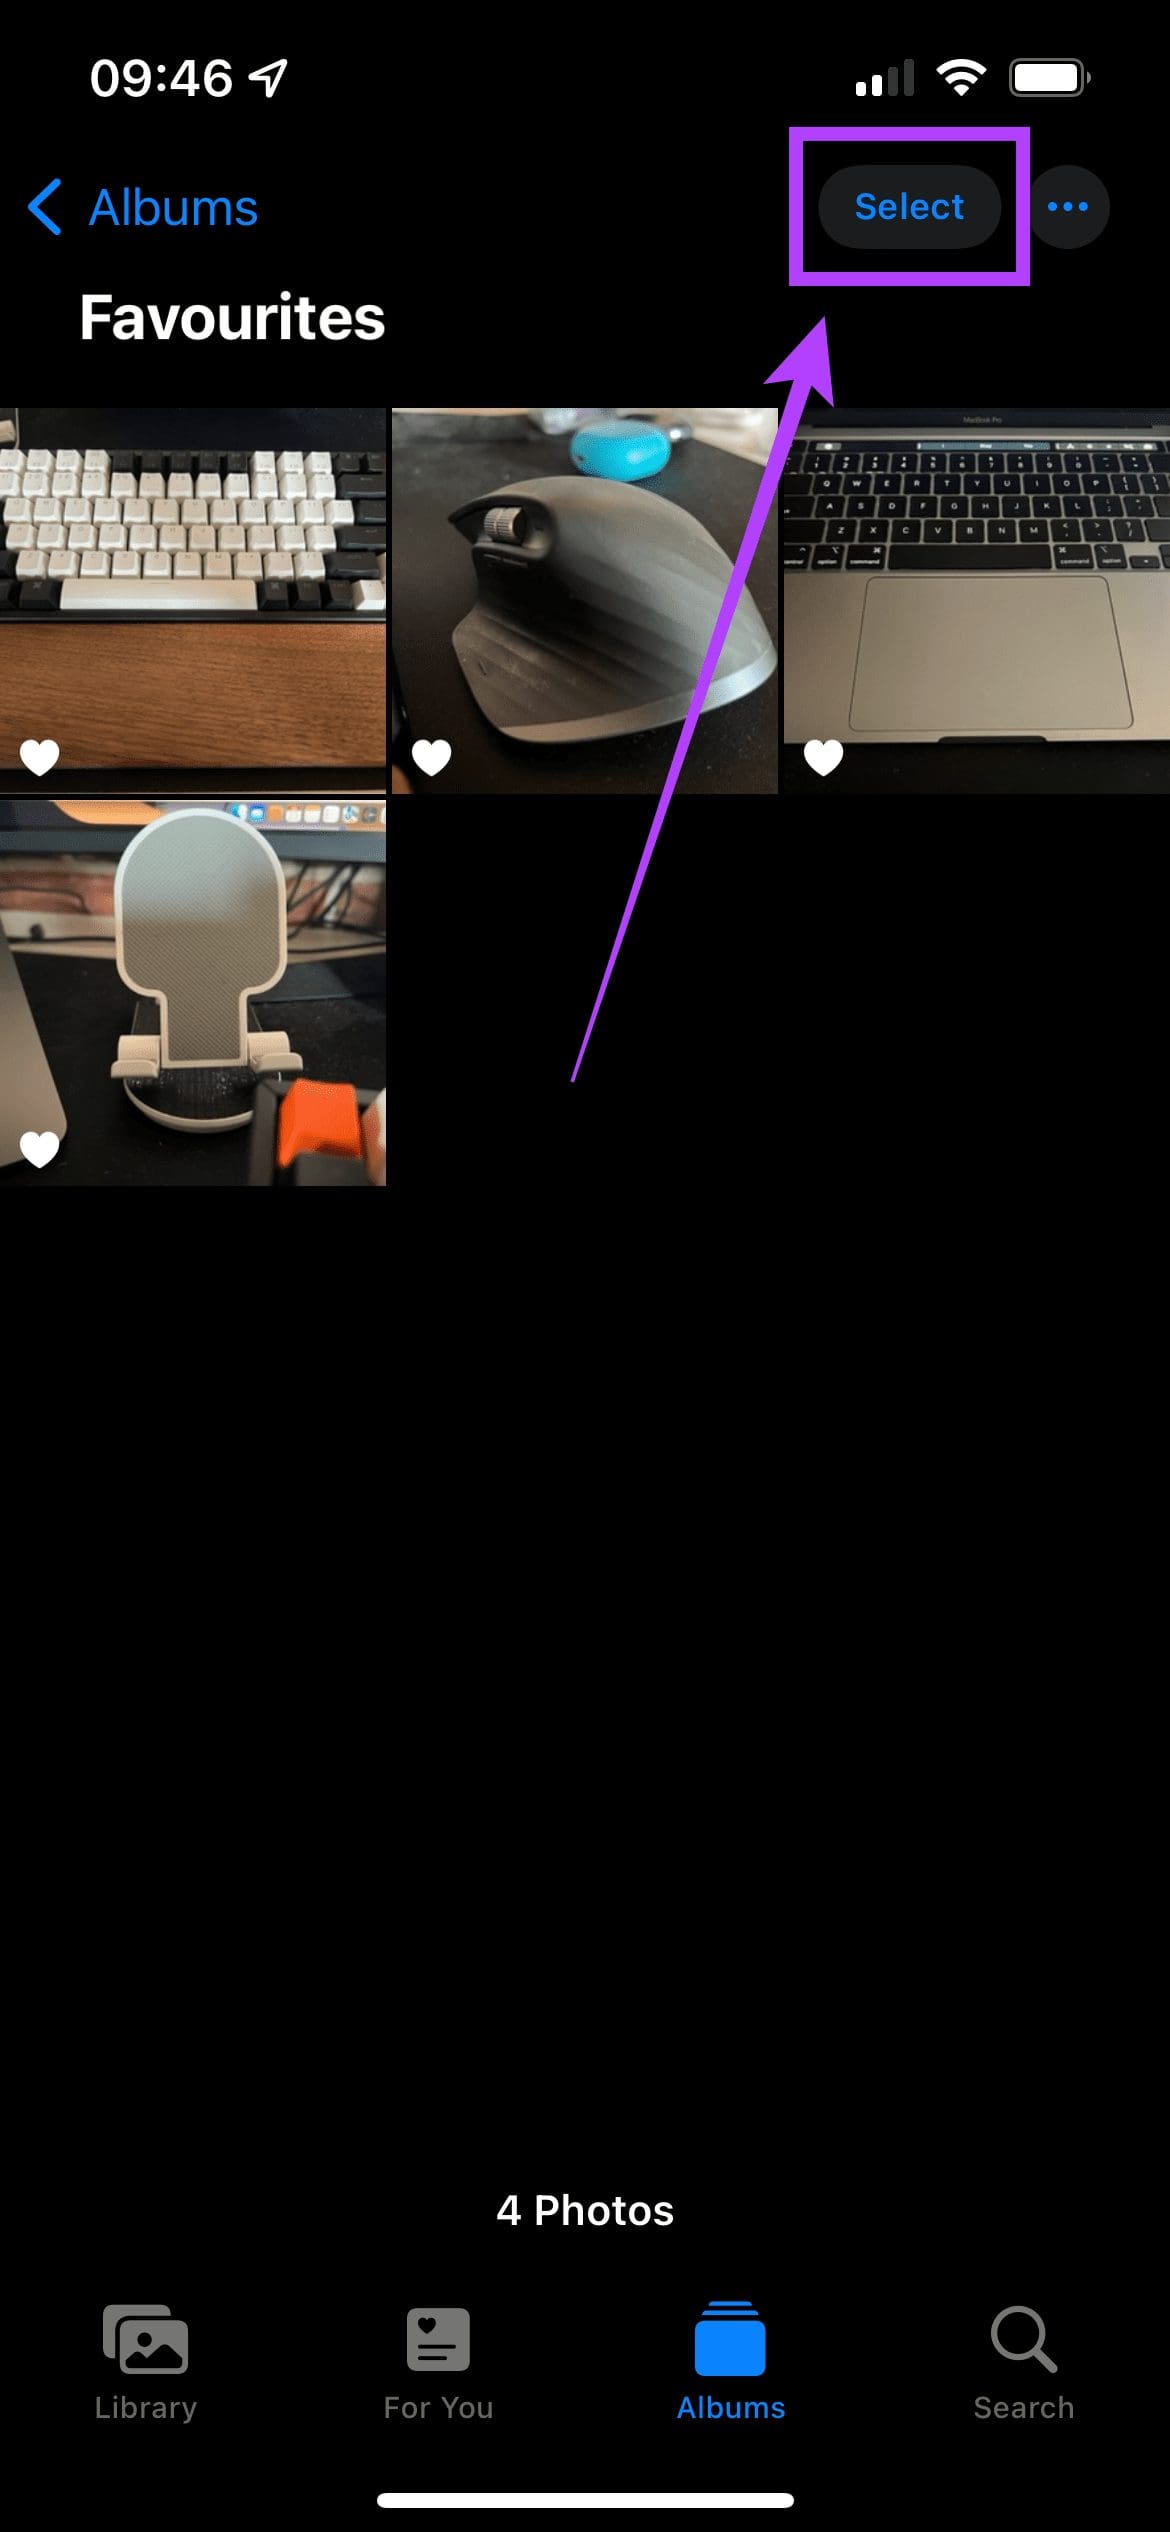
Step 3: Now, tap on the ‘Select’ button in the top-right corner of the screen. Select all the photos and videos you want to hide.
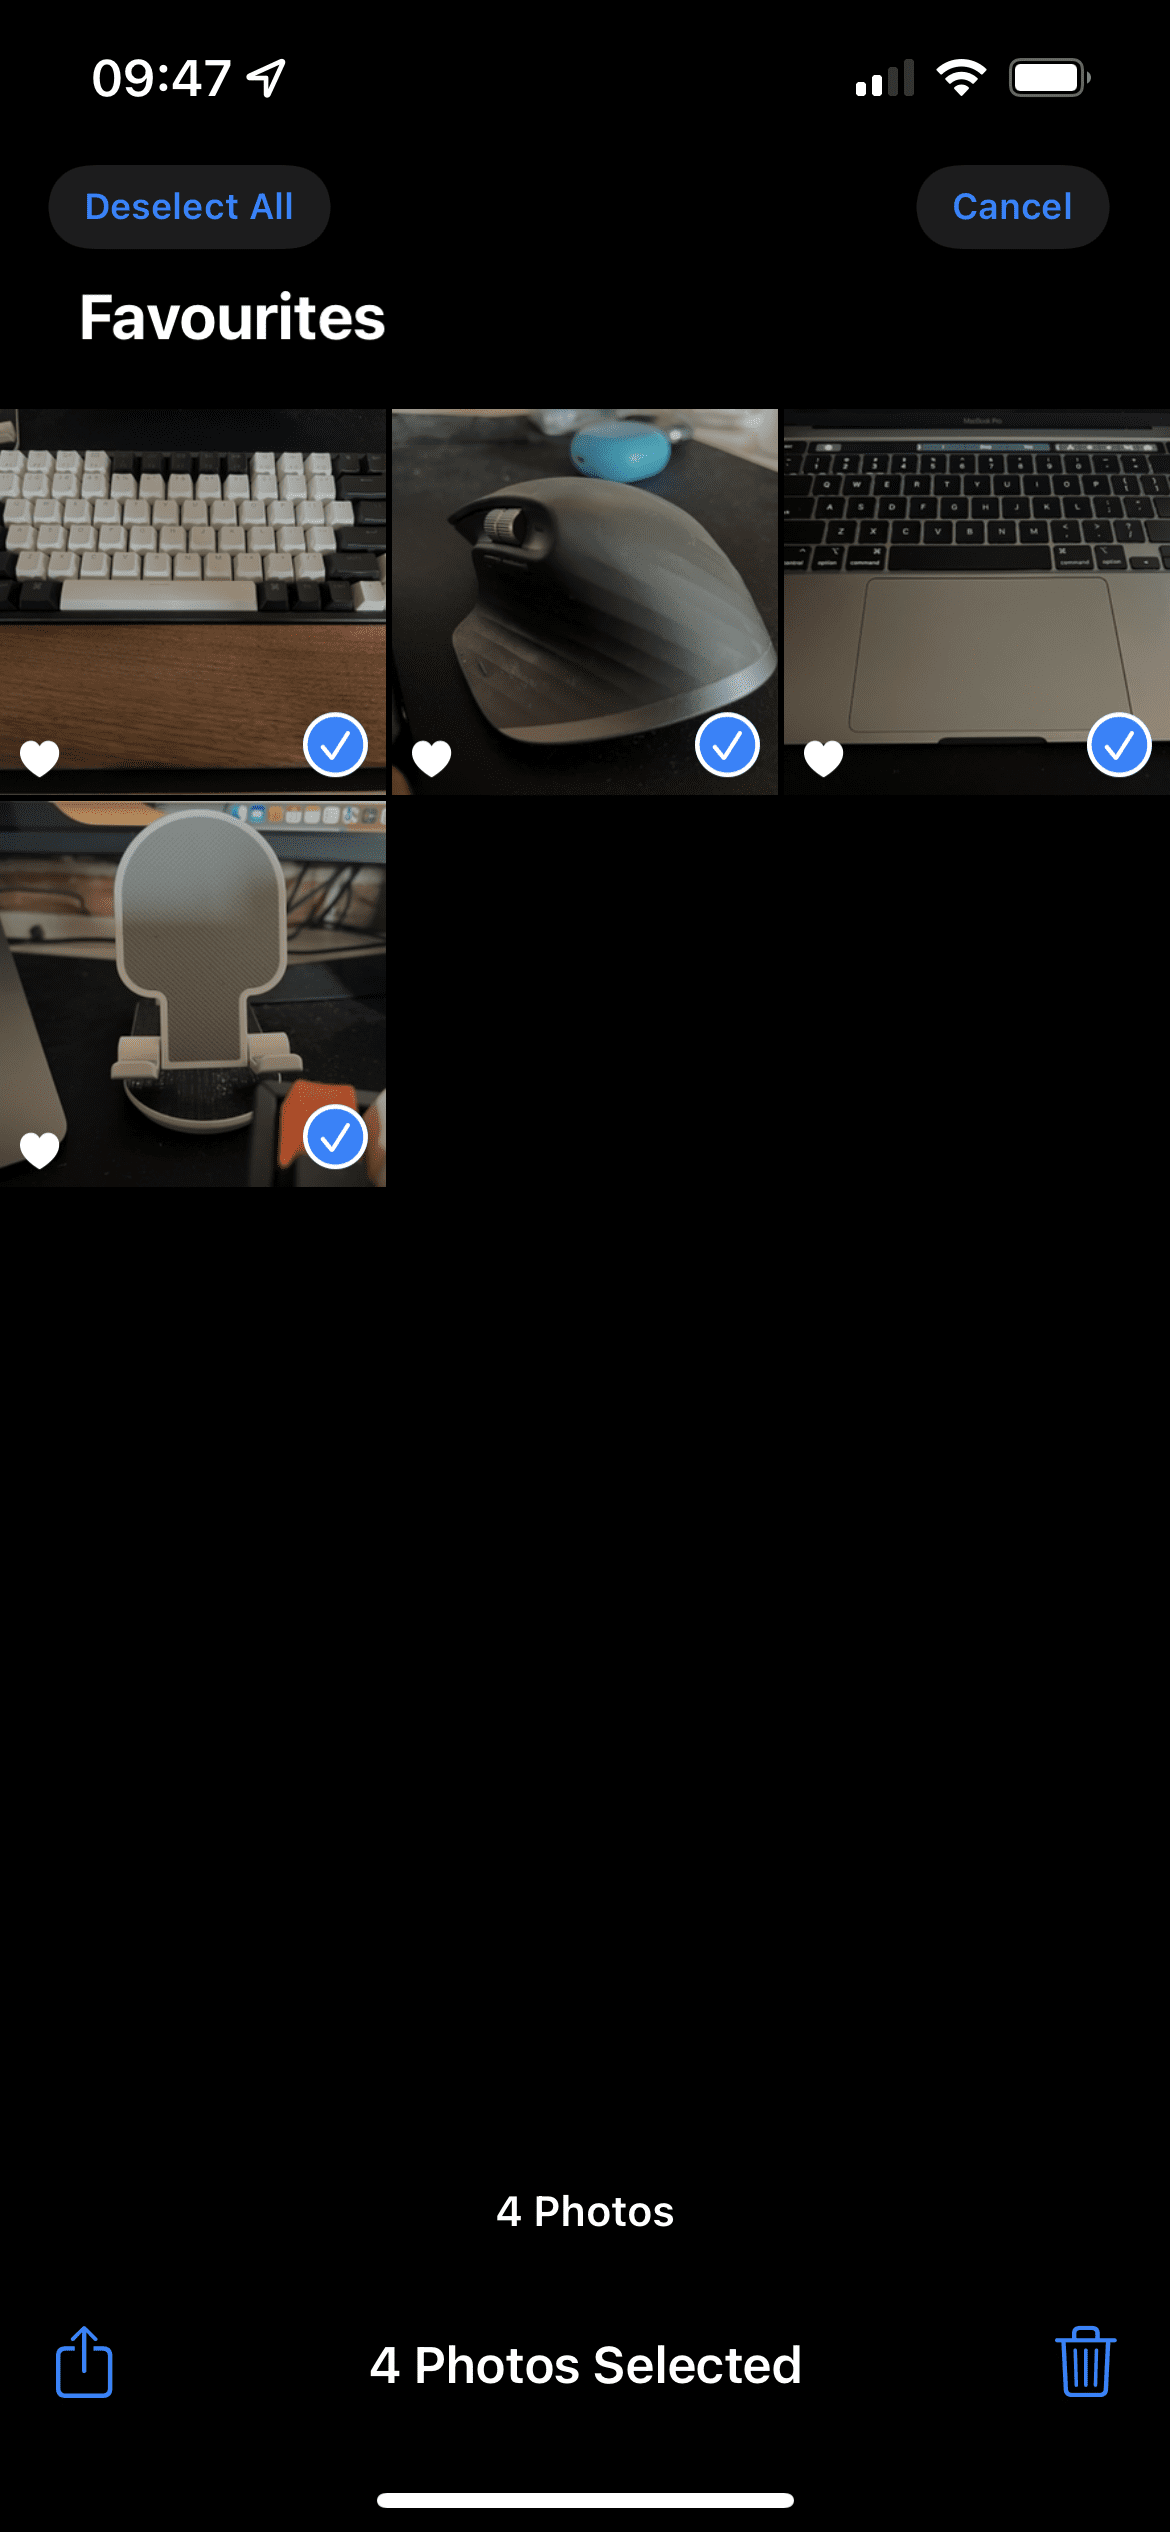
Step 4: After selecting the files, tap on the ‘Share’ icon. You can find it in the bottom-left corner of the screen.
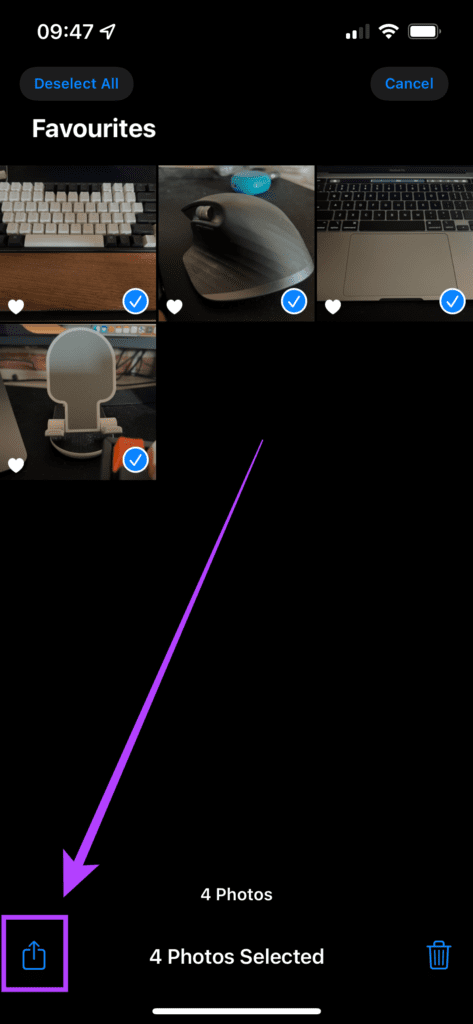
Step 5: Scroll down till you find the ‘Hide’ option. Select it.

Step 6: You will now see a prompt asking whether you want to hide the media. Select ‘Hide Photos.’ The photos app will hide all those files.

This is how to move photos/videos to hidden album on your iPhone.
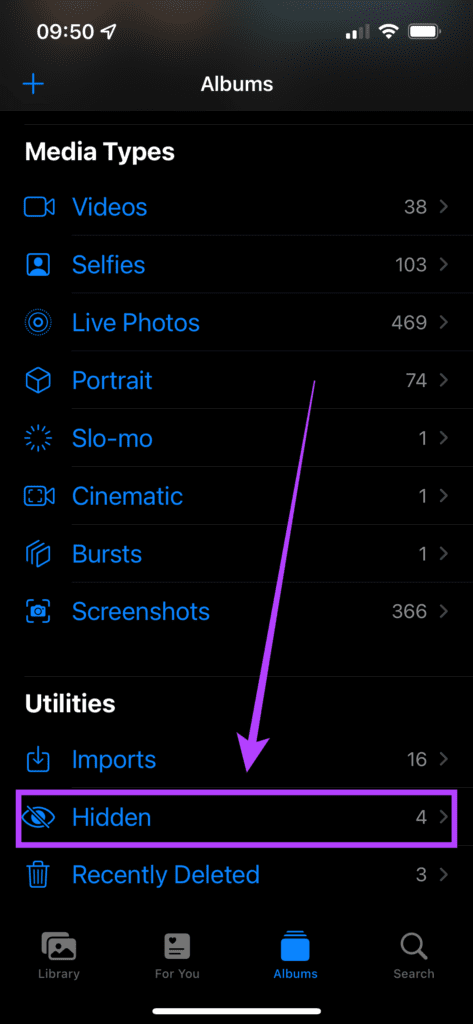
How to View Hidden Photos on iPhone
Open the Photos app on your iPhone and scroll down to the bottom. Select the Hidden option to access your photos.
The biggest caveat of this method though is that anyone can tap on the Hidden option to reveal all the photos you’ve hidden earlier. That beats the purpose of hiding photos and videos. Thankfully, with the latest version of iOS, Apple gives you the option to secure your hidden media using Face ID. Here’s how to enable it.
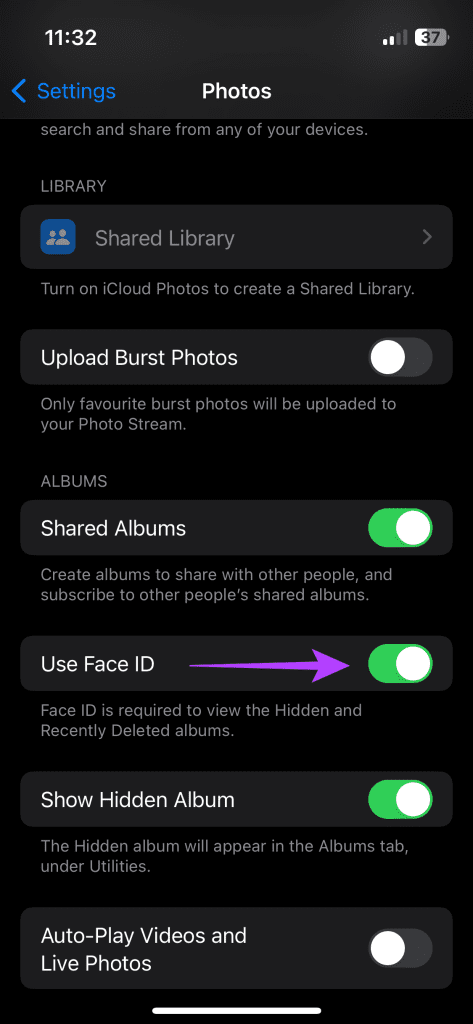
How to Lock Hidden Photos on iPhone
Open the Settings app on your iPhone and navigate to the Photos section. Enable the toggle next to Use Face ID.
How to Hide the Hidden Photos Album on iPhone
If you want to take things a step further, you can also hide the ‘Hidden’ folder itself. This will hide the secret folder on your iPhone.
Step 1: Open the ‘Settings’ app on your iPhone. Scroll down and tap on the ‘Photos’ option.

Step 2: Tap on the toggle next to ‘Hidden Album’ to disable it. This will prevent the ‘Hidden’ folder from appearing in the Photos app.
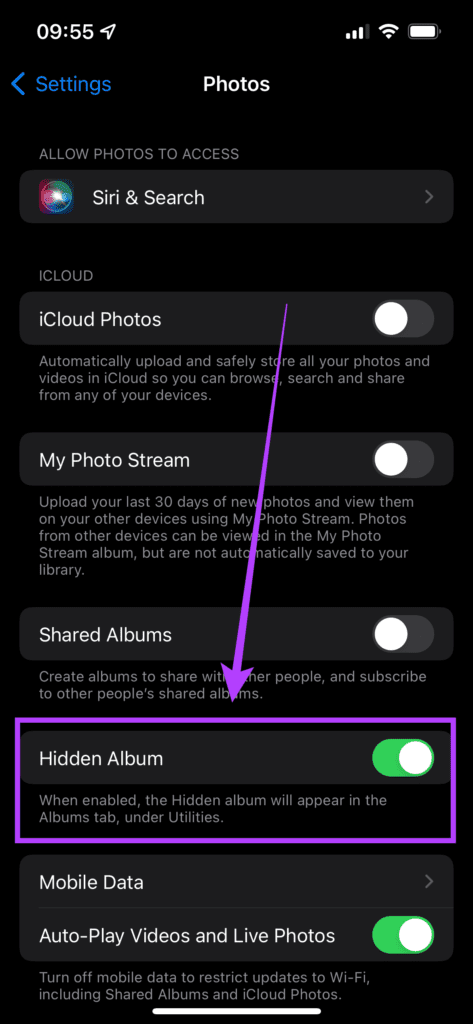
Now, your hidden photos and videos cannot be accessed directly from the Photos app. When you want to access the hidden media, head back to the Settings app, navigate to Photos, and toggle the Hidden Album switch back on. You will now see the Hidden folder again in the Photos app. Don’t forget to toggle it off once again after viewing the media.
Method 2: How to Lock Photos on Your iPhone Using the Notes App
If you don’t want to make it obvious that you’ve hidden photos or videos within the app, there’s a smart workaround that lets you hide photos within the Notes app on your iPhone. Here’s how to do it.
Step 1: Open the picture you want to hide within the Photos app. Tap on the Share button and select the Notes app.

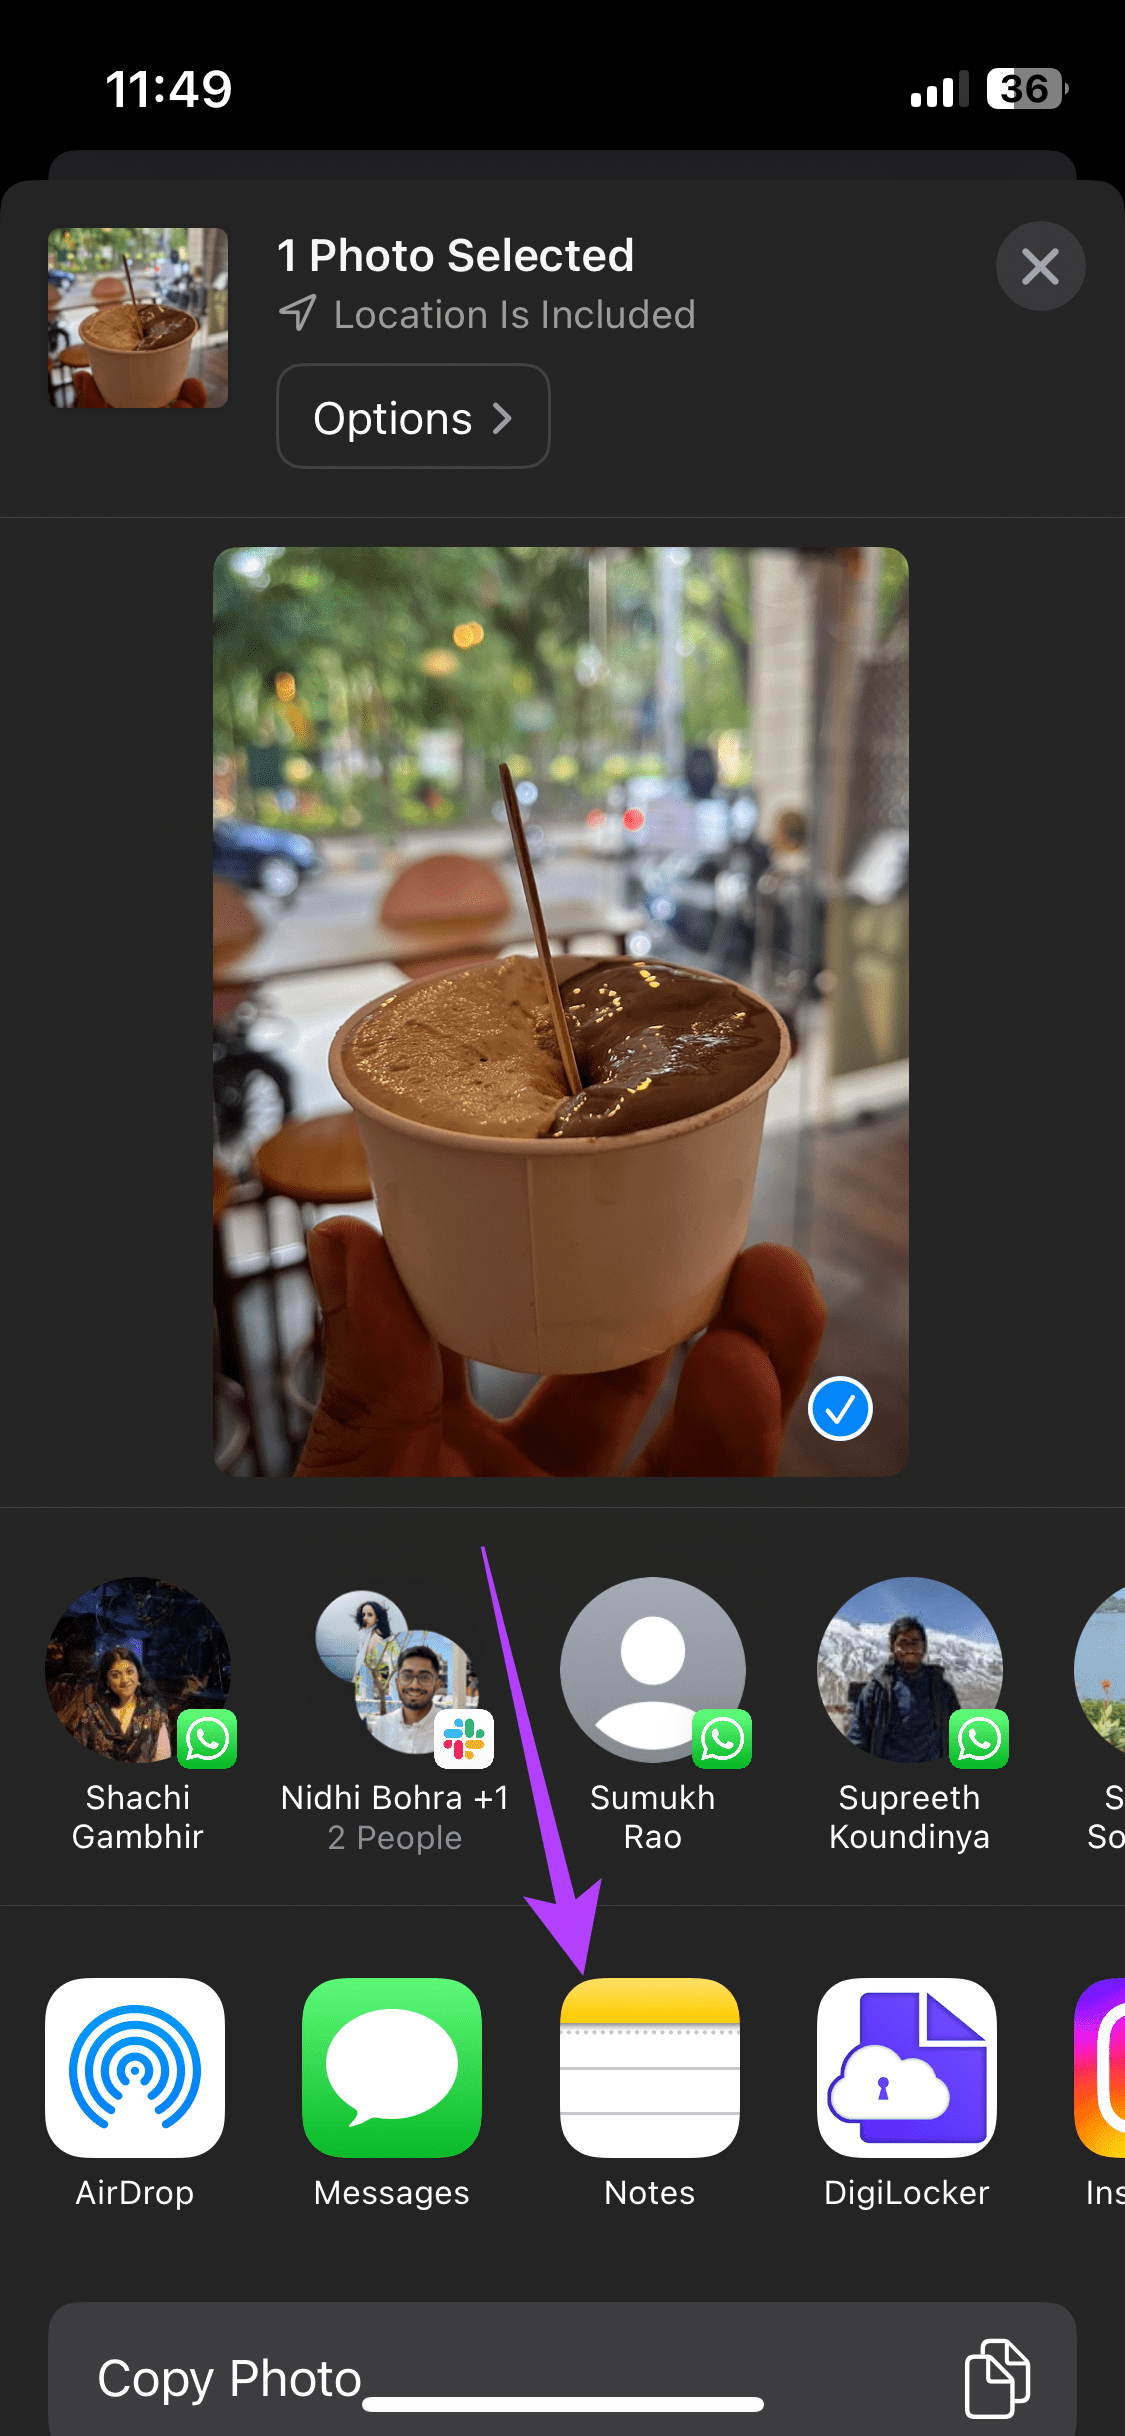
Step 2: Type any text you want or select where you want to save the note. Then, tap on Save.


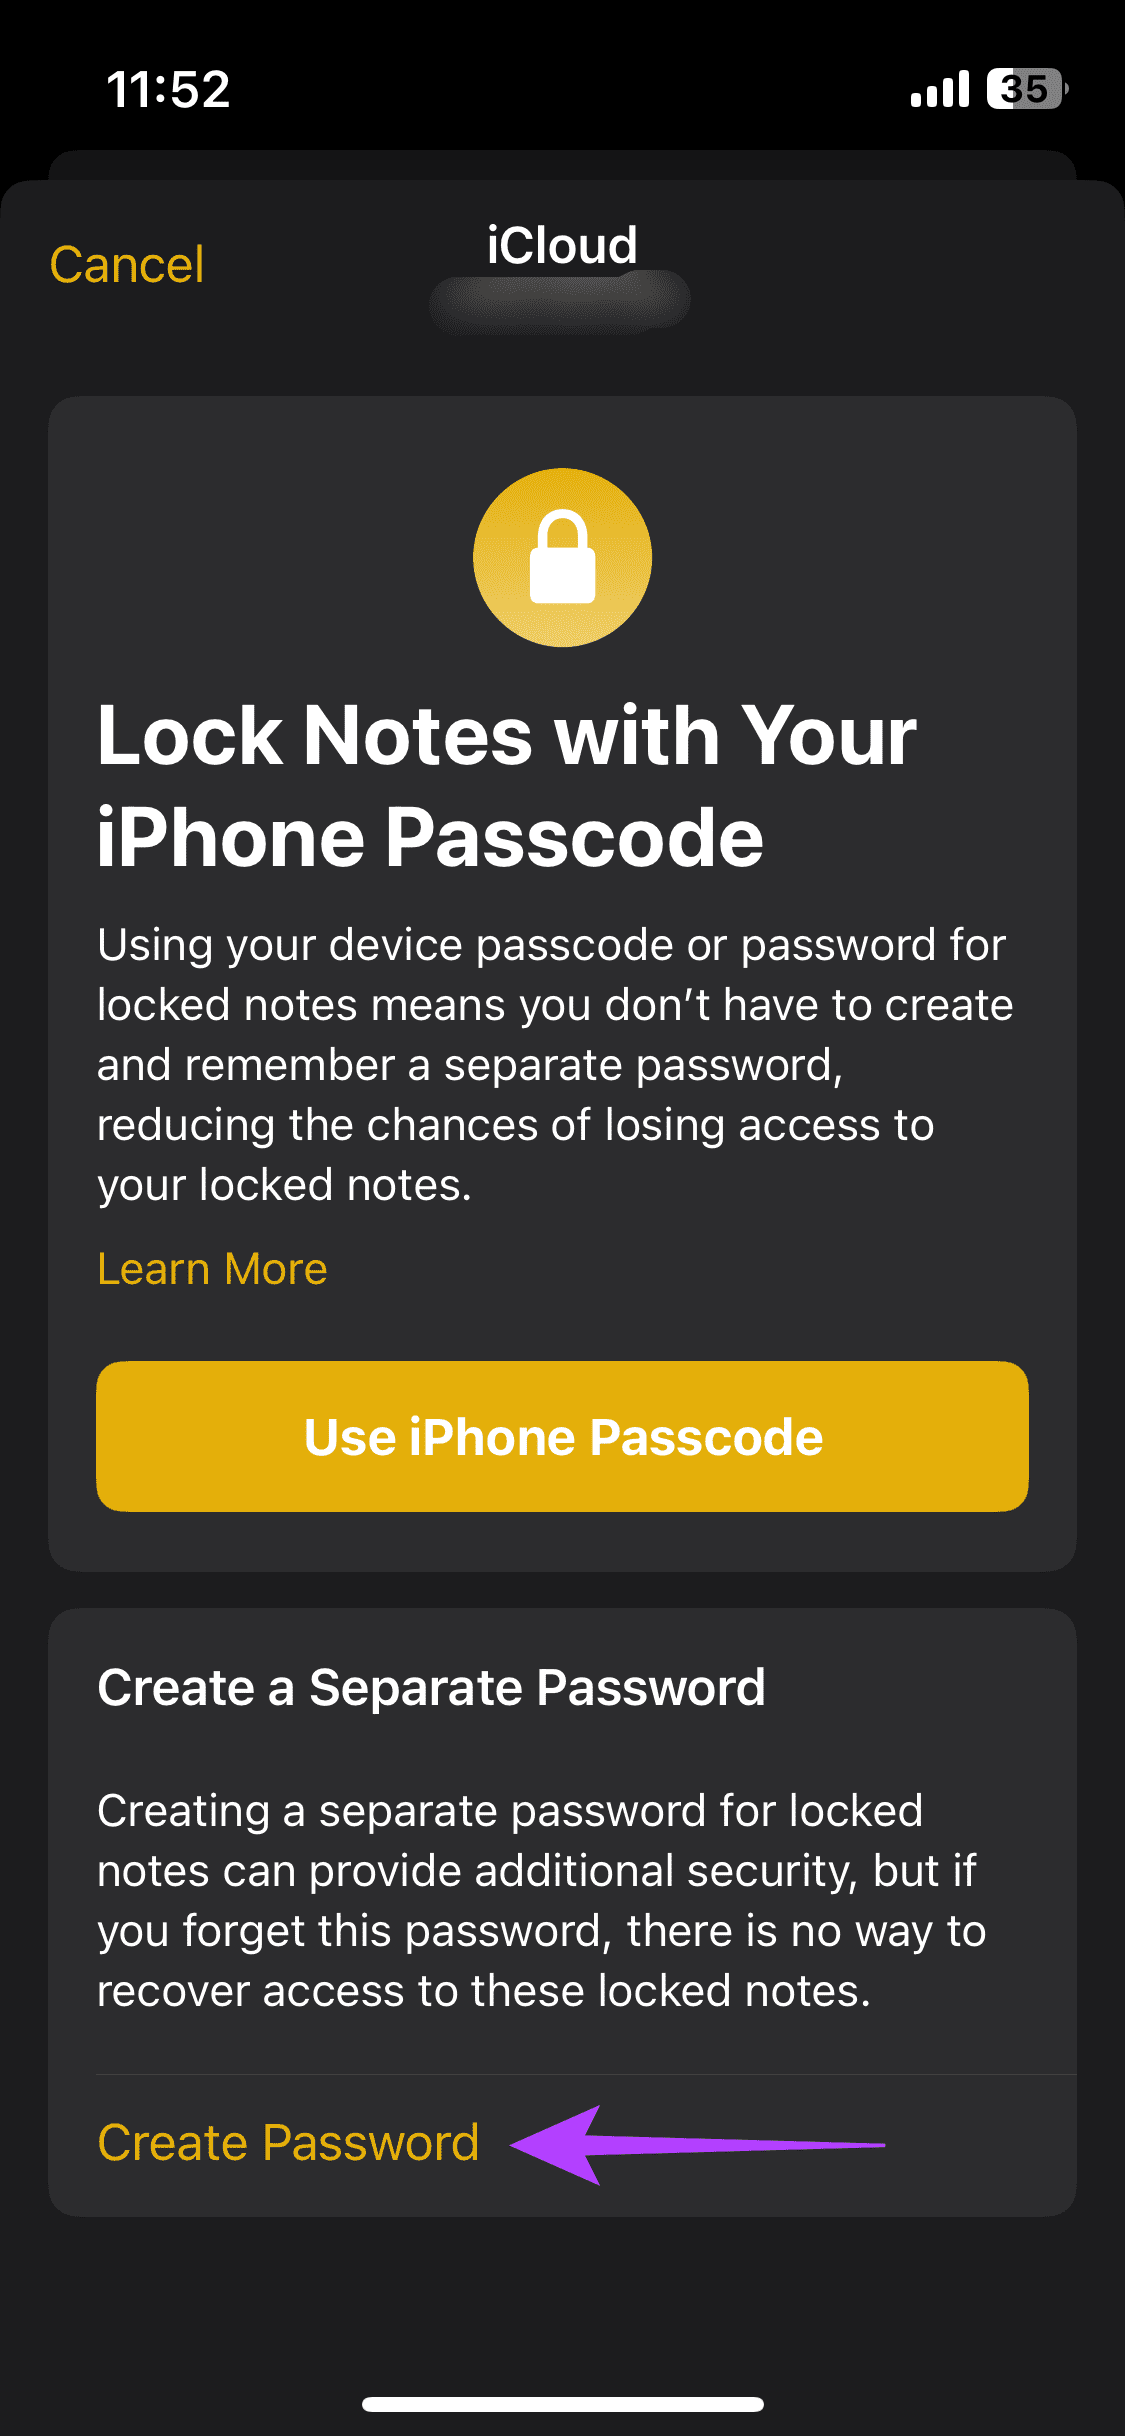
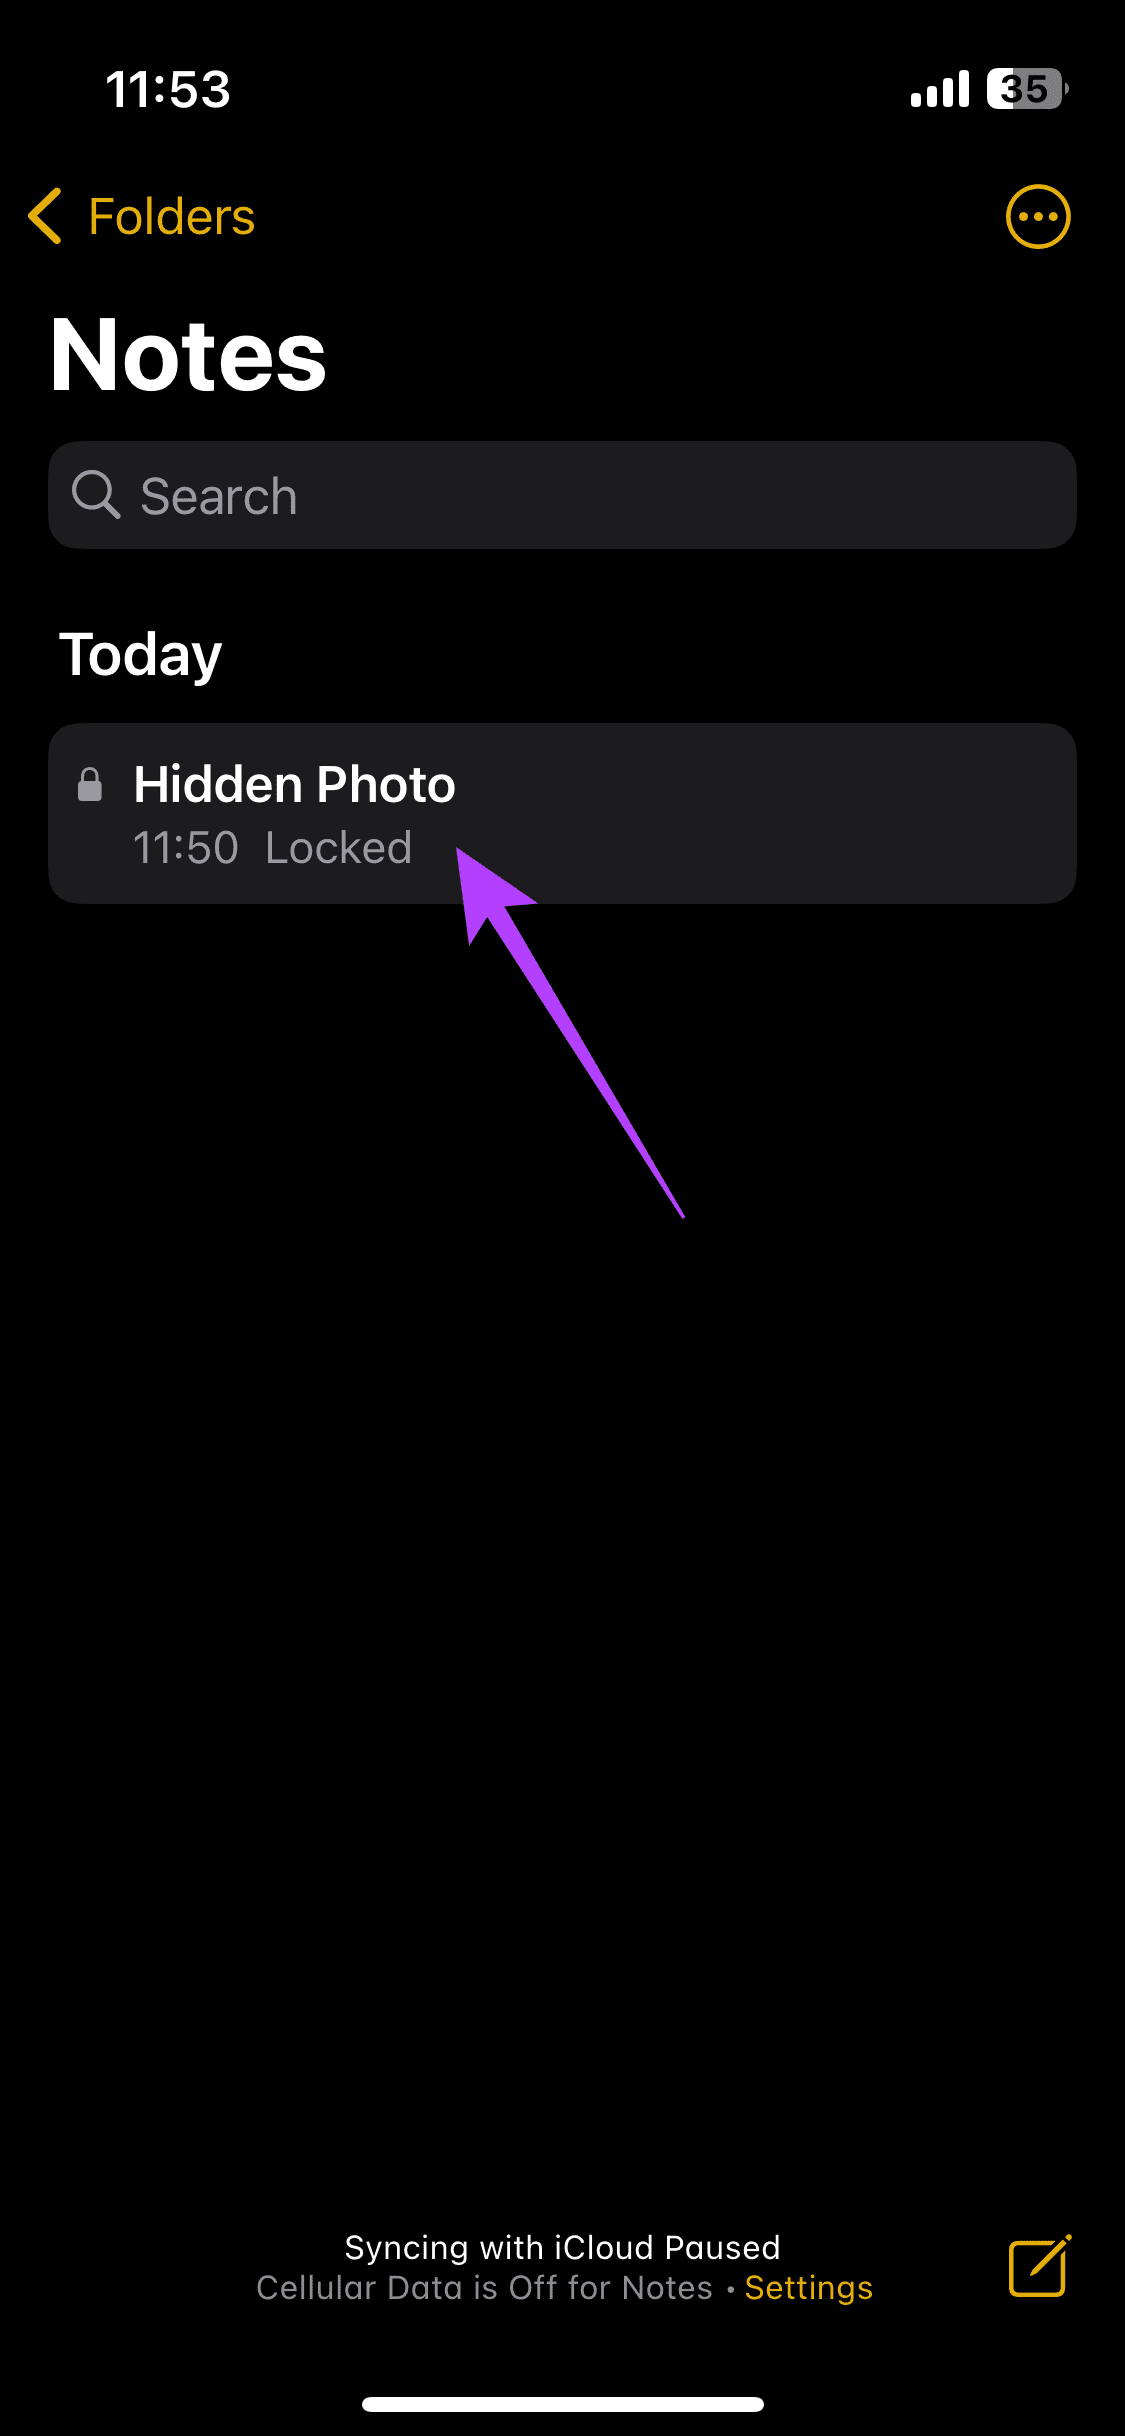
Step 3: Head to the Notes app on your iPhone. You will see the note you just saved with the picture. Press and hold onto the note and select Lock Note.
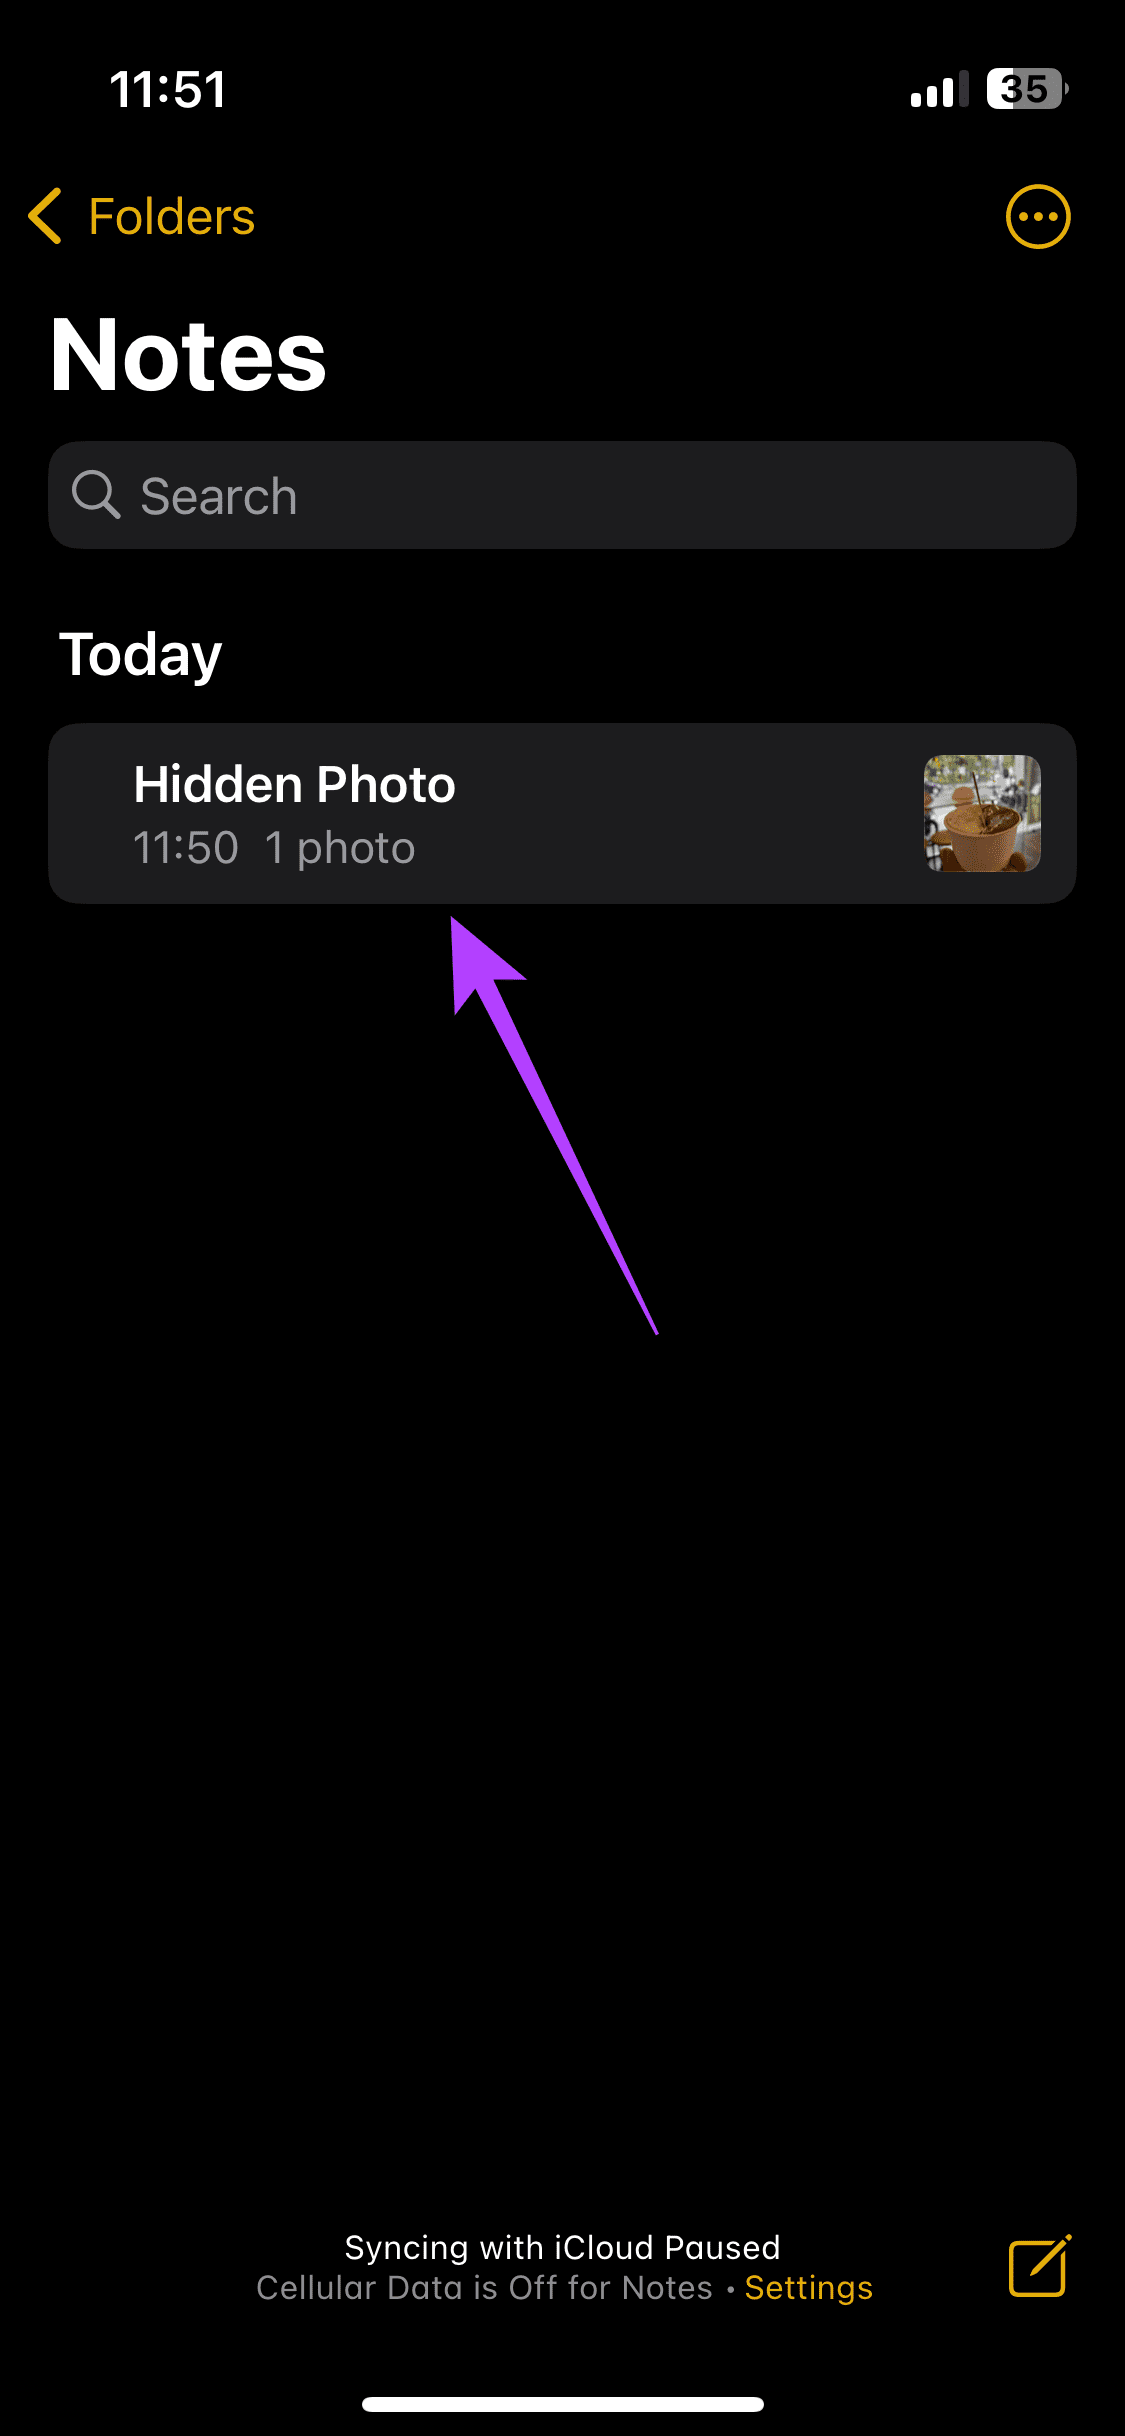
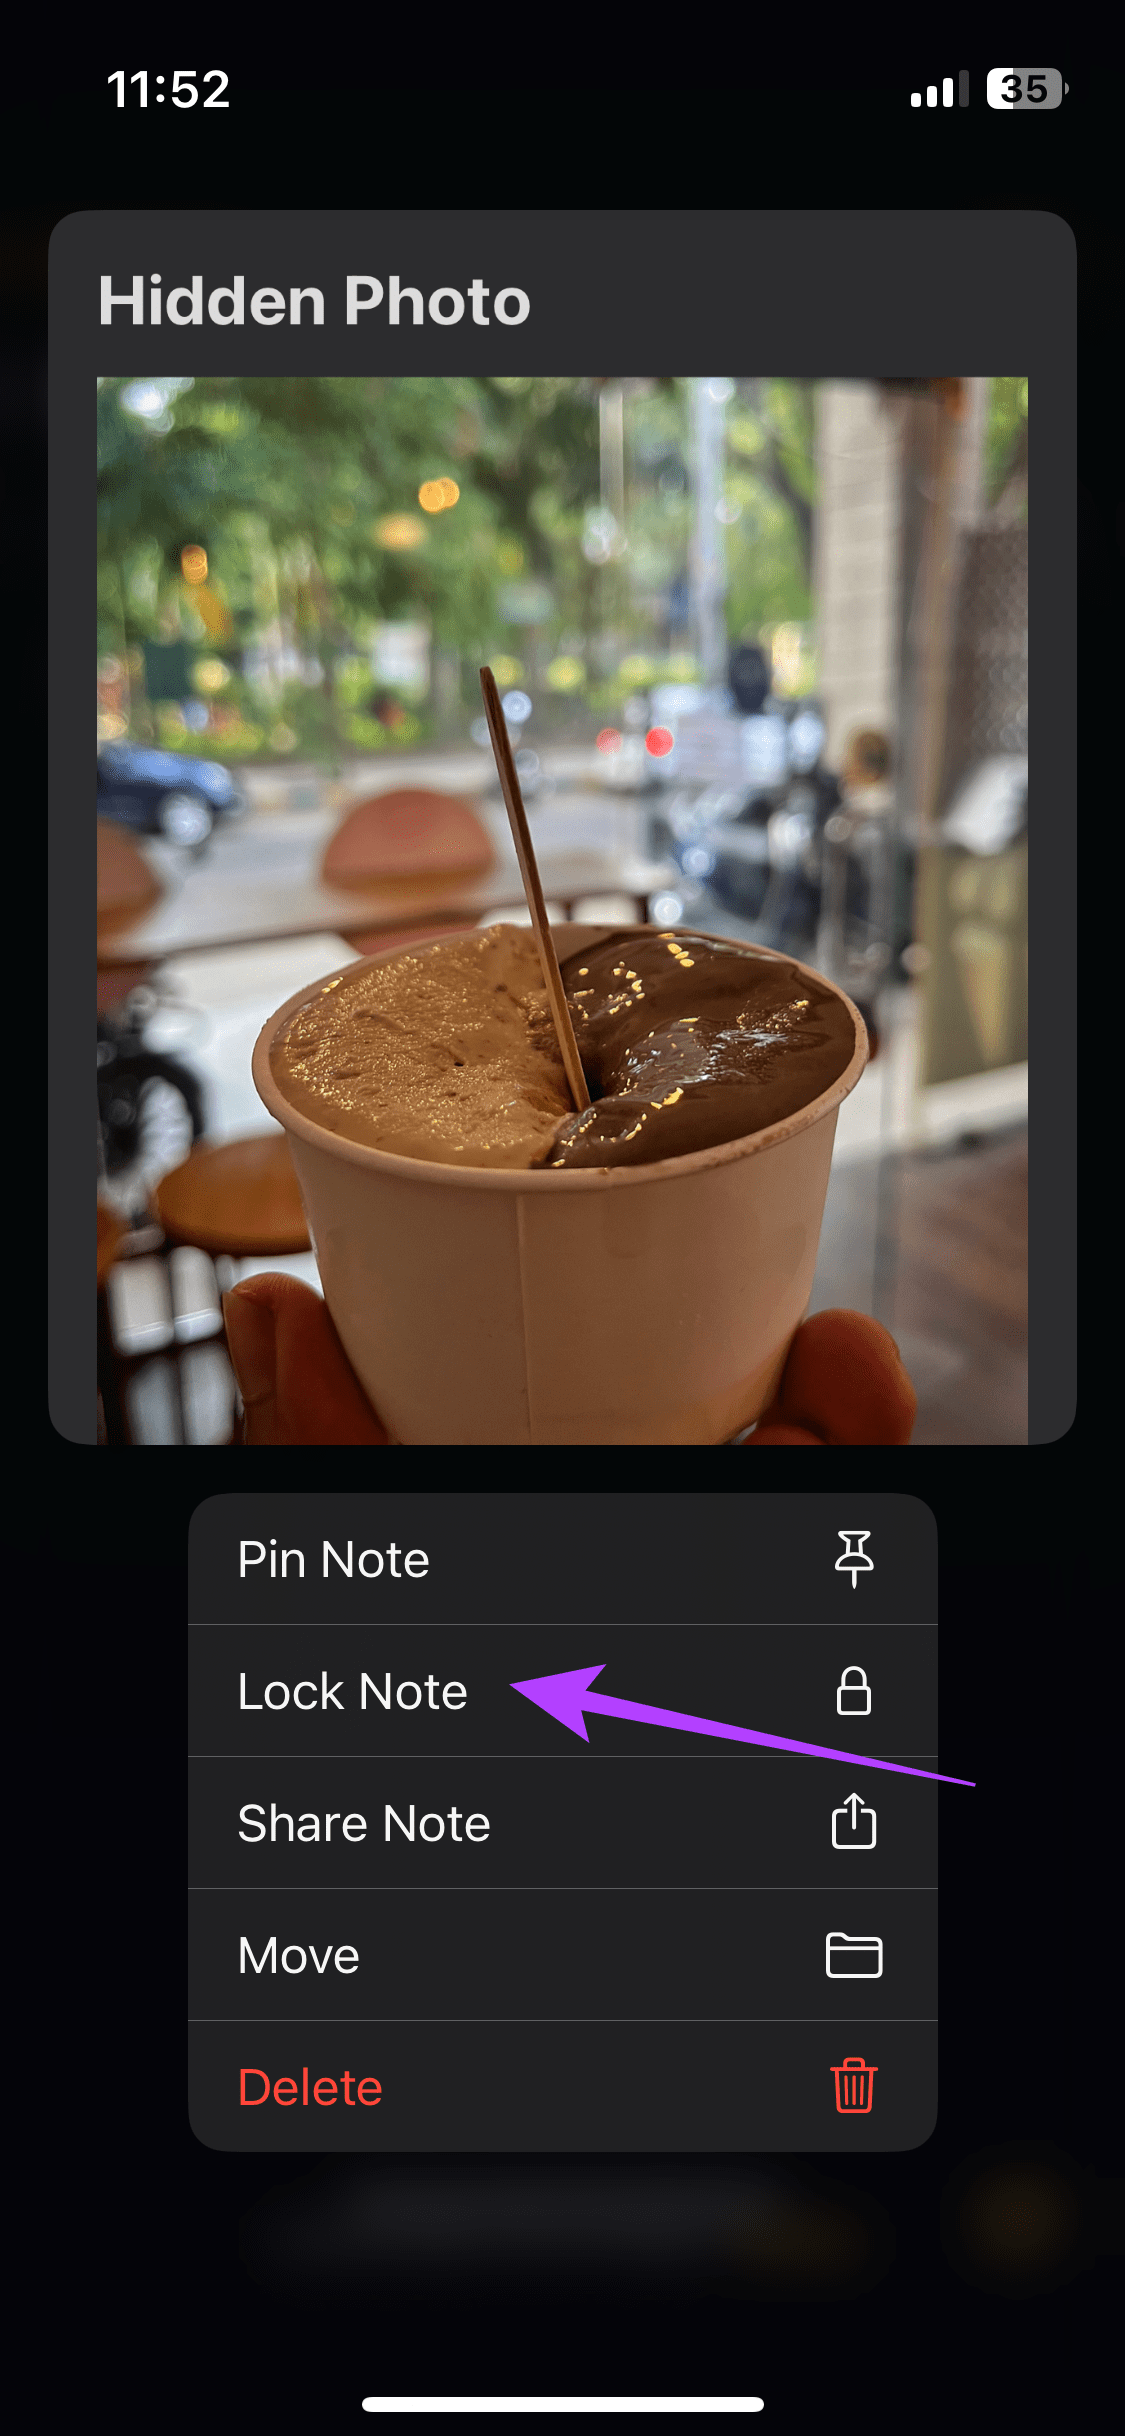
Choose whether you want to use your iPhone’s passcode or a separate one to access the note. Once done, tap on the locked note to open it. Enter your passcode and you can view the photo/video.
Method 3: 2 Best Apps to Hide Photos and Videos on iPhone
You can also use third-party apps from the App Store to hide your media files. While there are several such apps, we recommend Google Drive primarily because it’s safe. You can also use Photo Vault if you want a more seamless experience.
1. How to Hide Photos Using Google Drive App
Here’s how you can hide photos and videos on your iPhone in a more secure way using a password or Face ID on Google Drive.
Step 1: If you don’t have it already install the Google Drive app on your iPhone via the App Store using the button below.
Step 2: Log in with your Google account on the app. Tip: You can create a fresh account where you only want to store your sensitive photos and videos.
Step 3: Once you have logged in with your account, tap on the ‘Plus’ icon on the bottom right corner and select ‘Upload’.
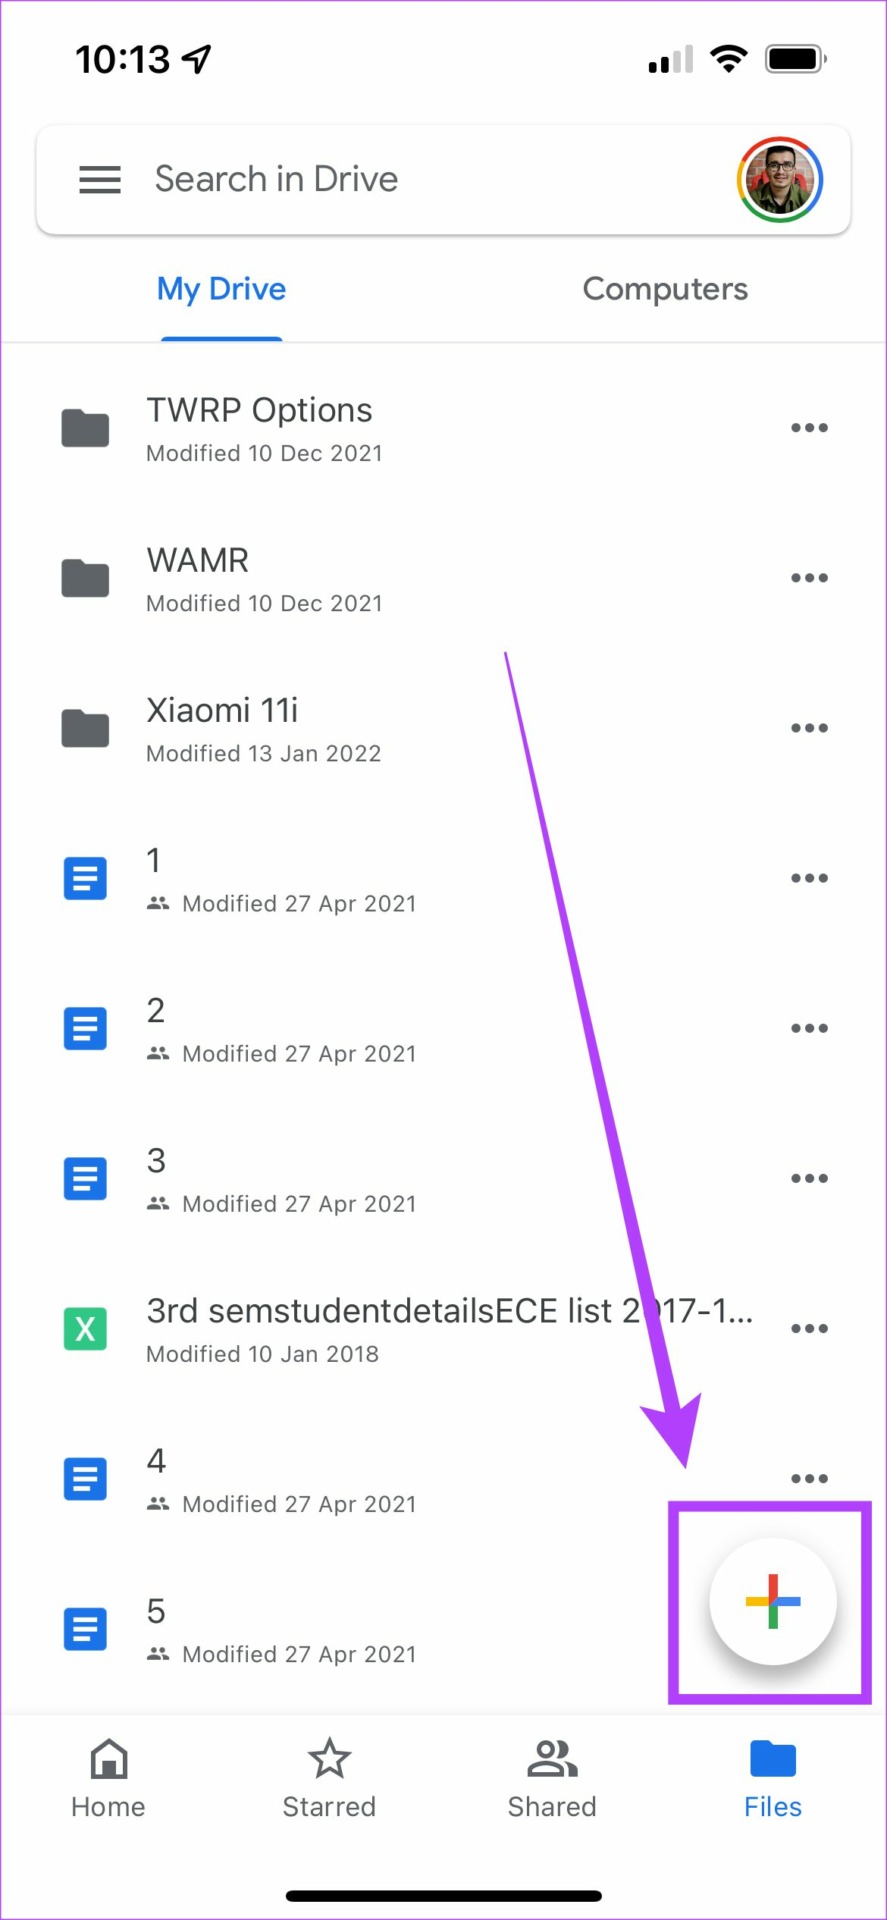

Step 4: Next, choose the ‘Photos and Videos’ option.
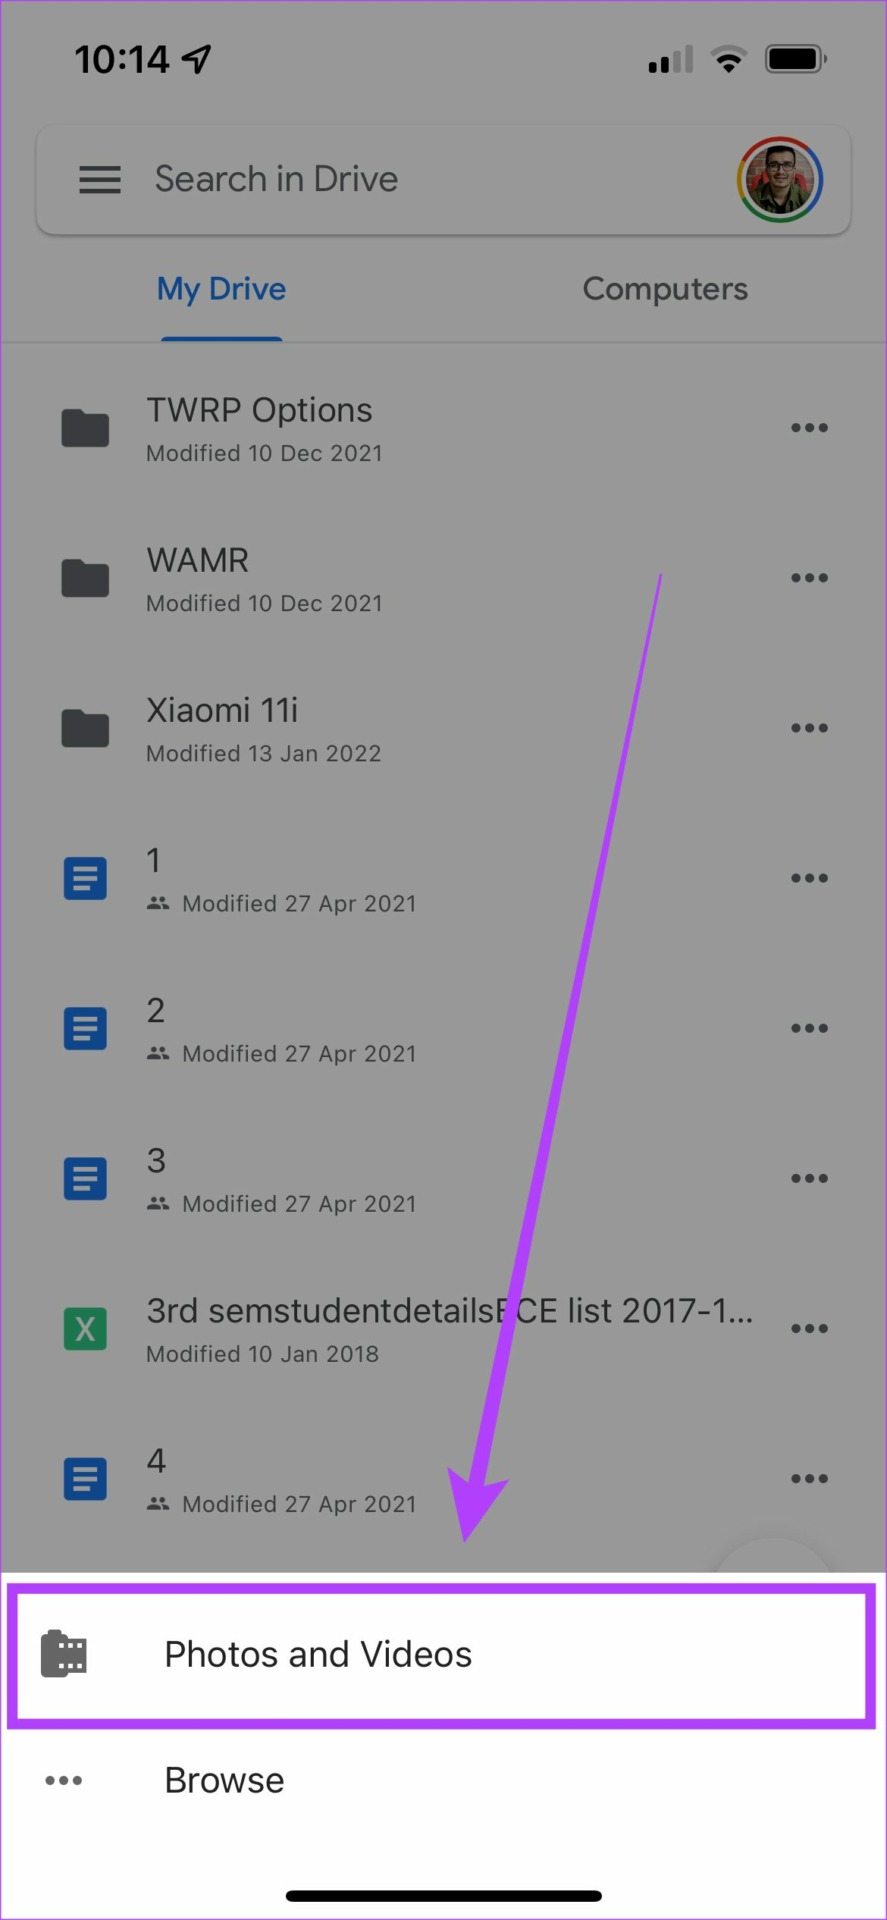
You will now see a list of all your albums. Select the relevant album and upload all the photos and videos you want to hide.

Step 5: After uploading the media, you can choose to save them offline for situations where you don’t have access to the internet. You can long-press on one of the files to select it and tap on the ‘Select All’ icon at the top. Or manually select each file and tap on the three dots on the top-right corner and select ‘Make available offline’.


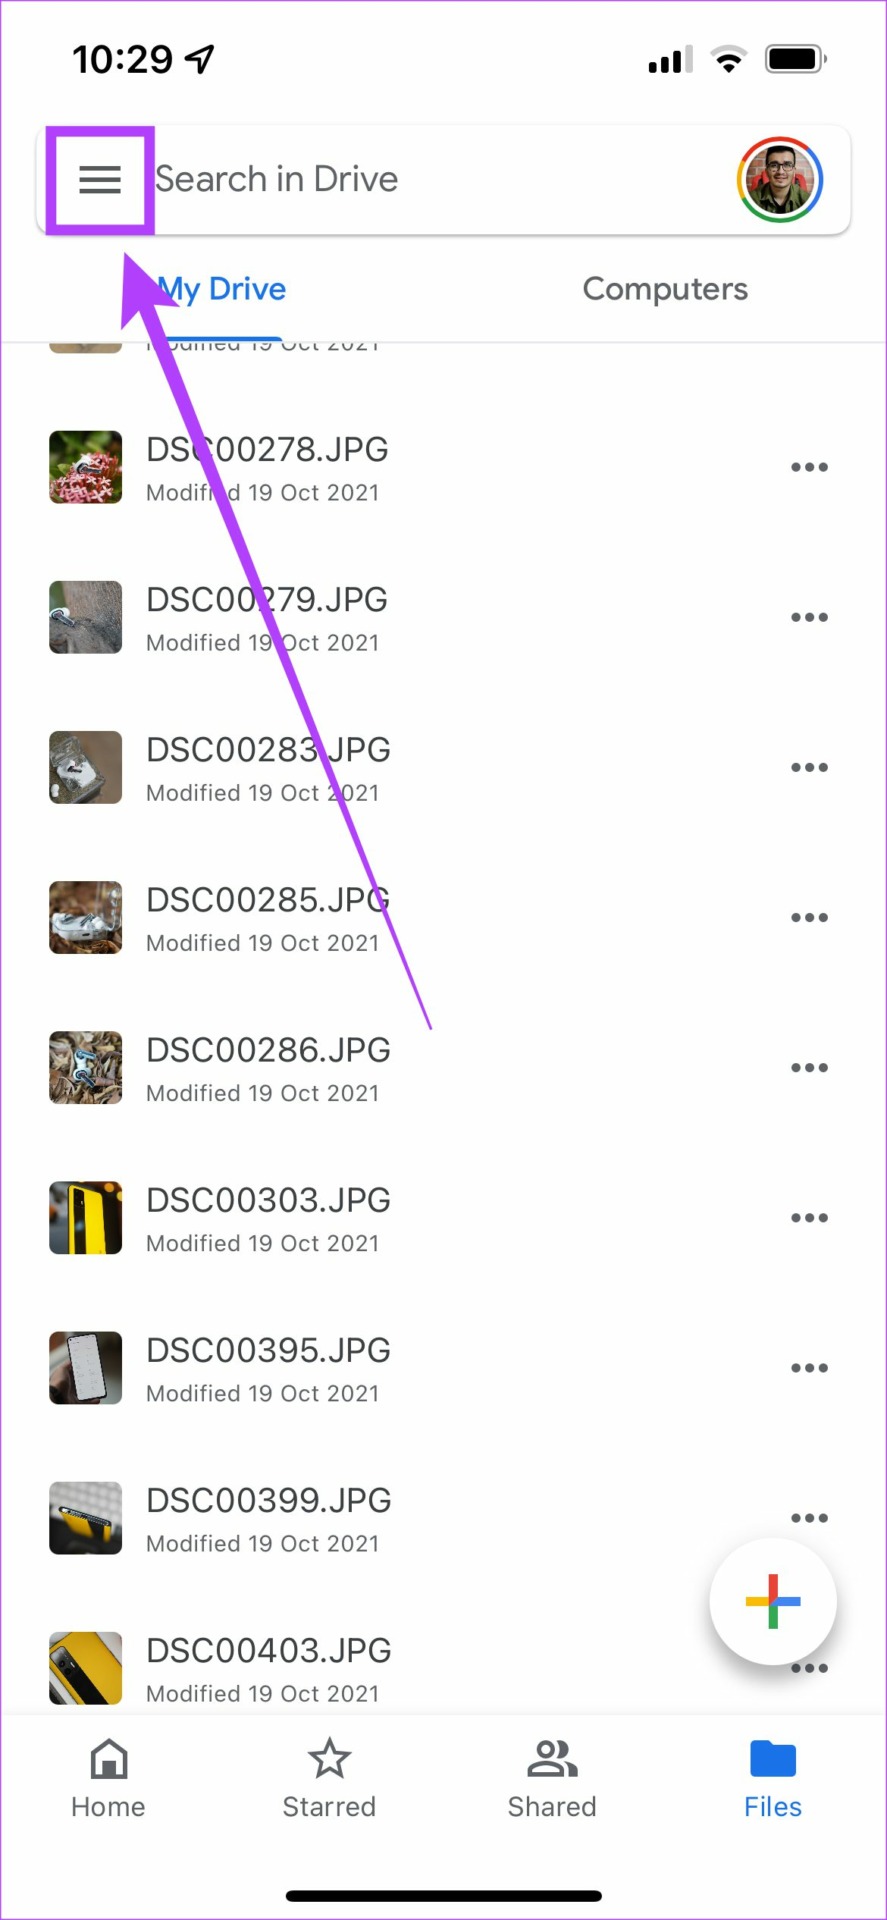
Step 6: Now comes the main part. To hide the photos and videos and prevent others from accessing the Google Drive app, tap on the hamburger menu on the top-left corner and got to ‘Settings’.

Step 7: Select ‘Privacy Screen’ and toggle it on. You’re all set!

The Google Drive app is now locked with your biometrics and will scan for Face ID each time you open it.

This will hide and protect your photos and videos. Don’t forget to delete the unwanted media files from the Photos app on your iPhone.
What We Like
What We Don’t Like
2. Hide Photos Using Photo Vault
The Google Drive app involves uploading your media files to the cloud in order to secure them. Photo Vault doesn’t require that and is hence, simpler to use. Simply download the app from the link below and follow the on-screen instructions to hide your photos and videos.
What We Like
What We Don’t Like
FAQs for Hiding Photos and Videos on iPhone
Hidden photos and videos will also be backed up to your iCloud. However, when you restore a backup, it will be restored into the hidden section itself so you will need a password to access them.
Yes, simply go to the Hidden folder, select the photo you want to unhide, and hit the Unhide button.
It totally depends on the app you use. Before you download an app, check its reviews as well as the ratings of the developer. You can also check the number of downloads to see if a large chunk of people have used the app.
Hide and Protect Your Photos and Videos
You can protect sensitive media files like documents, ID cards, etc. using this process, that too without downloading an app from an unrecognized developer and risking your data. If you’re wondering how to hide photos and videos on your iPhone in the best possible way, we would recommend using the Photos app, enabling Face ID to access hidden files, and then hiding the hidden folder itself.
Was this helpful?
Last updated on 10 August, 2023
Read Next
 3 Best Ways to Hide Photos and Videos on Samsung Galaxy Phones
You may want to keep private photos and videos from prying eyes on Samsung Galaxy phones.
3 Best Ways to Hide Photos and Videos on Samsung Galaxy Phones
You may want to keep private photos and videos from prying eyes on Samsung Galaxy phones.
 How to Hide Photos and Videos On Android with KeepSafe – Guiding Tech
In general terms, a mobile phone is a device on which you can make or receive calls and text messages.
How to Hide Photos and Videos On Android with KeepSafe – Guiding Tech
In general terms, a mobile phone is a device on which you can make or receive calls and text messages.
 Top 8 Ways to Fix Blurry iMessage Photos and Videos
Just like all other instant messaging services, iMessage also has the option to send photos and videos to your contacts.
Top 8 Ways to Fix Blurry iMessage Photos and Videos
Just like all other instant messaging services, iMessage also has the option to send photos and videos to your contacts.
 Top 7 Ways to Fix Photos and Videos Not Loading on Facebook Messenger
Facebook Messenger has all the bells and whistles you’d expect from a modern-day instant messaging app.
Top 7 Ways to Fix Photos and Videos Not Loading on Facebook Messenger
Facebook Messenger has all the bells and whistles you’d expect from a modern-day instant messaging app.
 3 Best Ways to Rename Photos and Videos on iPhone and iPad
Renaming photos and videos on your iPhone is important for efficient organization and easy retrieval.
3 Best Ways to Rename Photos and Videos on iPhone and iPad
Renaming photos and videos on your iPhone is important for efficient organization and easy retrieval.
 Top 11 Ways to Fix Twitter Not Uploading Photos and Videos
While Twitter had a fair share of up and downs recently, the social media network is still popular among users, businesses, celebrities, and politicians.
Top 11 Ways to Fix Twitter Not Uploading Photos and Videos
While Twitter had a fair share of up and downs recently, the social media network is still popular among users, businesses, celebrities, and politicians.
 Top 10 Ways to Fix Google Photos Not Playing Videos
Google Photos is the default gallery app on most Android phones.
Top 10 Ways to Fix Google Photos Not Playing Videos
Google Photos is the default gallery app on most Android phones.
 How to Unhide (or Hide) Videos in MX Player on Android
When it comes to playing videos on Android, few players do it better than the MX Player.
How to Unhide (or Hide) Videos in MX Player on Android
When it comes to playing videos on Android, few players do it better than the MX Player.
The article above may contain affiliate links which help support Guiding Tech. The content remains unbiased and authentic and will never affect our editorial integrity.