Basic Fixes:
- Restart the computer: A reboot forces all services and processes to shut down, fixing glitches and temporary bugs.
- Run a malware scan: Malware often triggers abnormal computer behavior, software, and hardware issues. You can use the built-in Windows Defender scan to remove the virus.
- Check for available updates: Update your operating system. Windows updates often come with bug fixes and, in most cases, will resolve minor Windows issues.
- Check for stuck volume key on your keyboard: If the slider key is stuck, the volume slider may not disappear from the screen, leading to the problem.
- Restart Windows Explorer: When you restart Windows Explorer, the computer resets explorer.exe, the process responsible for managing the user interface elements.
Fix 1: Disable and Re-enable Audio Device
An option to fix the non-disappearing volume slider is to disable and re-enable the audio device. This fix is very effective because it resets all related processes, including those connected to the volume slider. Follow the steps below.
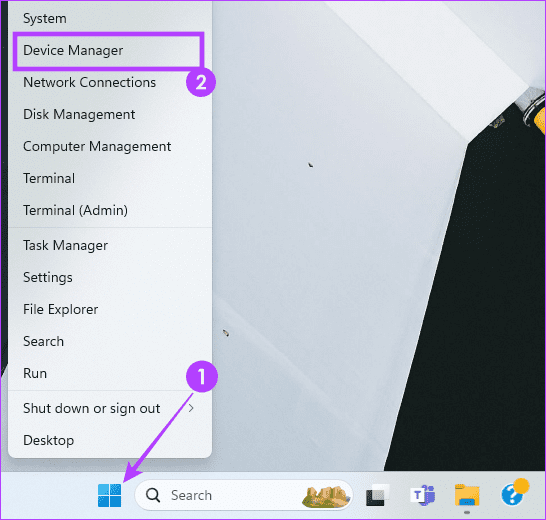
Step 1: Right-click the Start menu and click Device Manager.
Step 2: Expand the Sound, video and game controllers category, right-click on your Audio Device, and click Disable device.
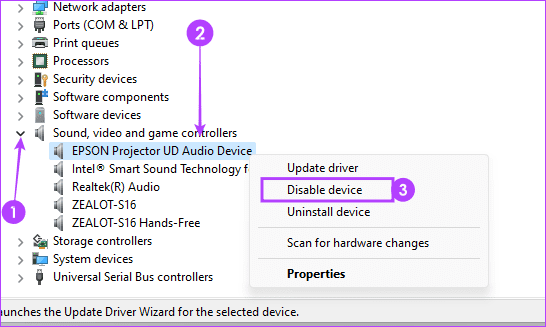
Step 3: Confirm your choice.
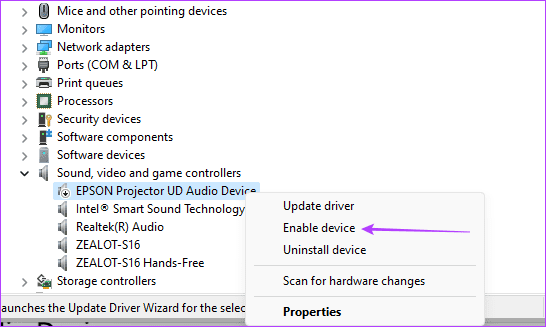
Step 4: Right-click on your Audio Device, and click Enable device.
Step 5: Confirm the solution works or move to a different fix.
Fix 2: Reset Audio Settings to Default Values
When you reset audio settings, you may fix the stuck volume slider problem because the reset will resolve conflicting configurations, remove corrupted settings, and clear software interference.
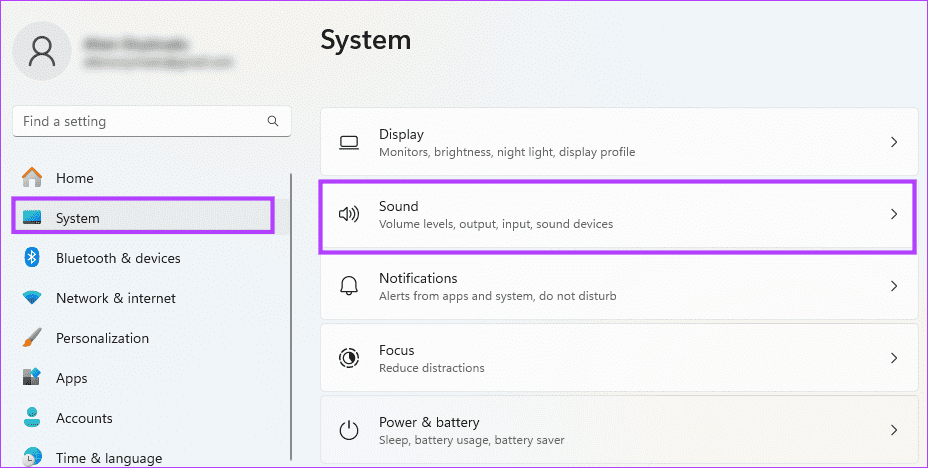
Step 1: Press Windows + I to open Settings.
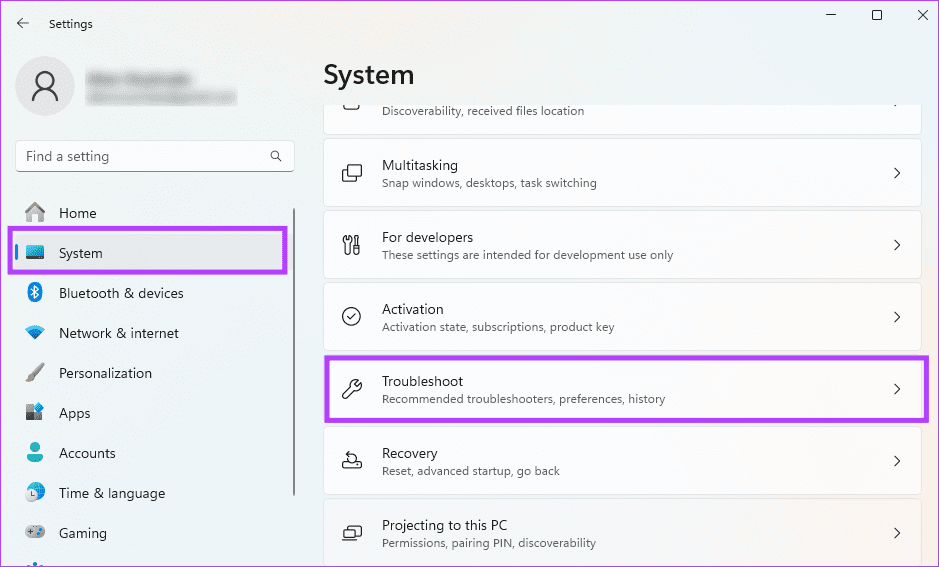
Step 2: Click System on the left pane, then click Sound on the right.
Step 3: Scroll down and click Volume Mixer.
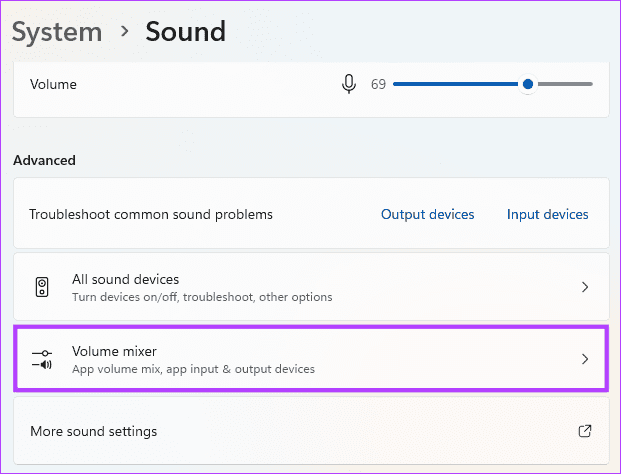
Step 4: Click the Reset button.

Step 5: Lastly, confirm the fix works or move on to a different solution.
Fix 3: Run the Audio Troubleshooter
Windows 11 comes with a built-in audio troubleshooter. This utility effectively scans the system for all errors related to sound. It will fix the problem or provide troubleshooting recommendations. You may run this tool using the steps below.
Step 1: Launch Windows 11 Settings by pressing Windows + I.
Step 2: Click the System option on the right pane, then select Troubleshoot on the left.
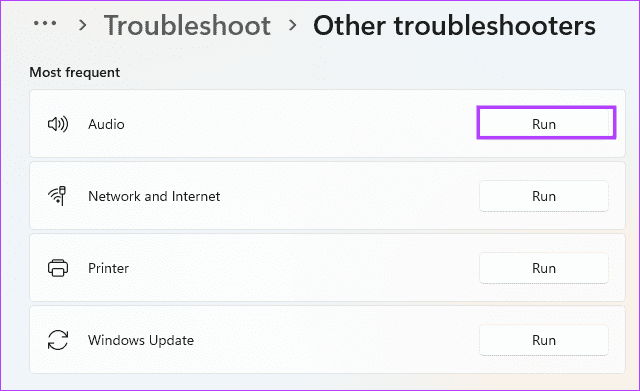
Step 3: Click Other troubleshooters.

Step 4: Click the Run button for the Audio troubleshooter.
Step 5: Follow the wizard to complete the process and confirm that the volume slider problem is fixed.
Once the troubleshooter is complete, check for volume-related problems. If there are, proceed to other fixes.
Fix 4: Reinstall your Audio Device
If re-enabling does not work, you should try reinstalling the device. Follow the steps below.
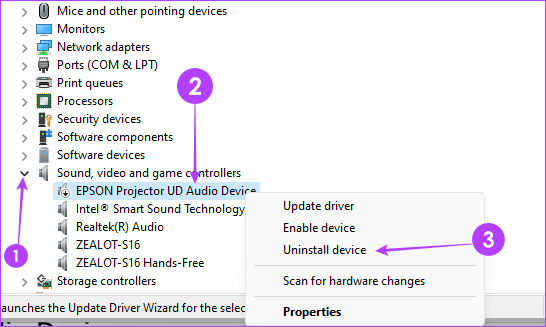
Step 1: Right-click the Start menu and click Device Manager.
Step 2: Expand the Sound, video and game controller category, right-click on your Audio Device, click Uninstall device, and confirm your choice.
Step 3: Restart the computer, and the device should automatically be reinstalled. Once done, confirm that the fix was successful.
Was this helpful?
Last updated on 21 August, 2024
Read Next
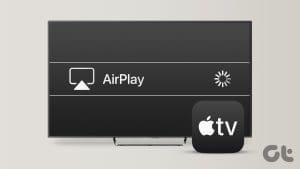 5 Best Fixes for Apple TV Stuck on AirPlay Screen
You can use the AirPlay functionality on your Apple TV to stream media from your iPhone or iPad on your TV screen.
5 Best Fixes for Apple TV Stuck on AirPlay Screen
You can use the AirPlay functionality on your Apple TV to stream media from your iPhone or iPad on your TV screen.
 4 Fixes for X (Twitter) Stuck on the Loading Screen
Basic Fixes Log into X (Twitter) for desktop and authenticate your account: If you have recently made any changes to your account using the X (Twitter) app, access it on
4 Fixes for X (Twitter) Stuck on the Loading Screen
Basic Fixes Log into X (Twitter) for desktop and authenticate your account: If you have recently made any changes to your account using the X (Twitter) app, access it on
 Top 5 Ways to Fix Windows 10 Stuck on Welcome Screen
It’s common for Windows computers to get stuck during usage or on either end of the power spectrum—startup and shutdown.
Top 5 Ways to Fix Windows 10 Stuck on Welcome Screen
It’s common for Windows computers to get stuck during usage or on either end of the power spectrum—startup and shutdown.
 4 Ways to Fix Windows 11 Stuck on Shutting Down Screen
Try These Things First Try to force shutdown: Sometimes the problem can occur due to a temporary bug or glitch.
4 Ways to Fix Windows 11 Stuck on Shutting Down Screen
Try These Things First Try to force shutdown: Sometimes the problem can occur due to a temporary bug or glitch.
 3 Eays to Fix Windows 10 Full Screen Start Menu When It’s Stuck
Fix 1: Turn off the Full-Screen Setting Microsoft offers a native setting that allows users to switch from the normal Start Menu to the expanded one.
3 Eays to Fix Windows 10 Full Screen Start Menu When It’s Stuck
Fix 1: Turn off the Full-Screen Setting Microsoft offers a native setting that allows users to switch from the normal Start Menu to the expanded one.
 5 Ways to Fix Windows 11 Stuck on Restarting Screen
Try Basic Fixes Perform a force shutdown: While your Windows PC is stuck on restarting, press and hold the Windows key + X + power button until it turns off
5 Ways to Fix Windows 11 Stuck on Restarting Screen
Try Basic Fixes Perform a force shutdown: While your Windows PC is stuck on restarting, press and hold the Windows key + X + power button until it turns off
 6 Ways to Fix Windows PC Stuck on Please Wait for GPSVC Screen
Fix 1: Restart Your PC Sometimes, temporary glitches with your system can cause Windows to become stuck on the "Please wait for the gpsvc" screen.
6 Ways to Fix Windows PC Stuck on Please Wait for GPSVC Screen
Fix 1: Restart Your PC Sometimes, temporary glitches with your system can cause Windows to become stuck on the "Please wait for the gpsvc" screen.
 6 Best Fixes for Windows 10 Stuck in Automatic Repair Loop
Windows 10 PC runs fun until a bad system update, a corrupted file, and even a driver update can cause your it to stop working abruptly.
6 Best Fixes for Windows 10 Stuck in Automatic Repair Loop
Windows 10 PC runs fun until a bad system update, a corrupted file, and even a driver update can cause your it to stop working abruptly.
The article above may contain affiliate links which help support Guiding Tech. The content remains unbiased and authentic and will never affect our editorial integrity.