Fix 1: Change USB Drive Policy to Better Performance
By default, Windows 11 employs the Quick Removal policy for all USB devices. Changing the USB policy for your device to Better Performance can improve data transfer speeds on Windows 11. Here’s how to do the same.
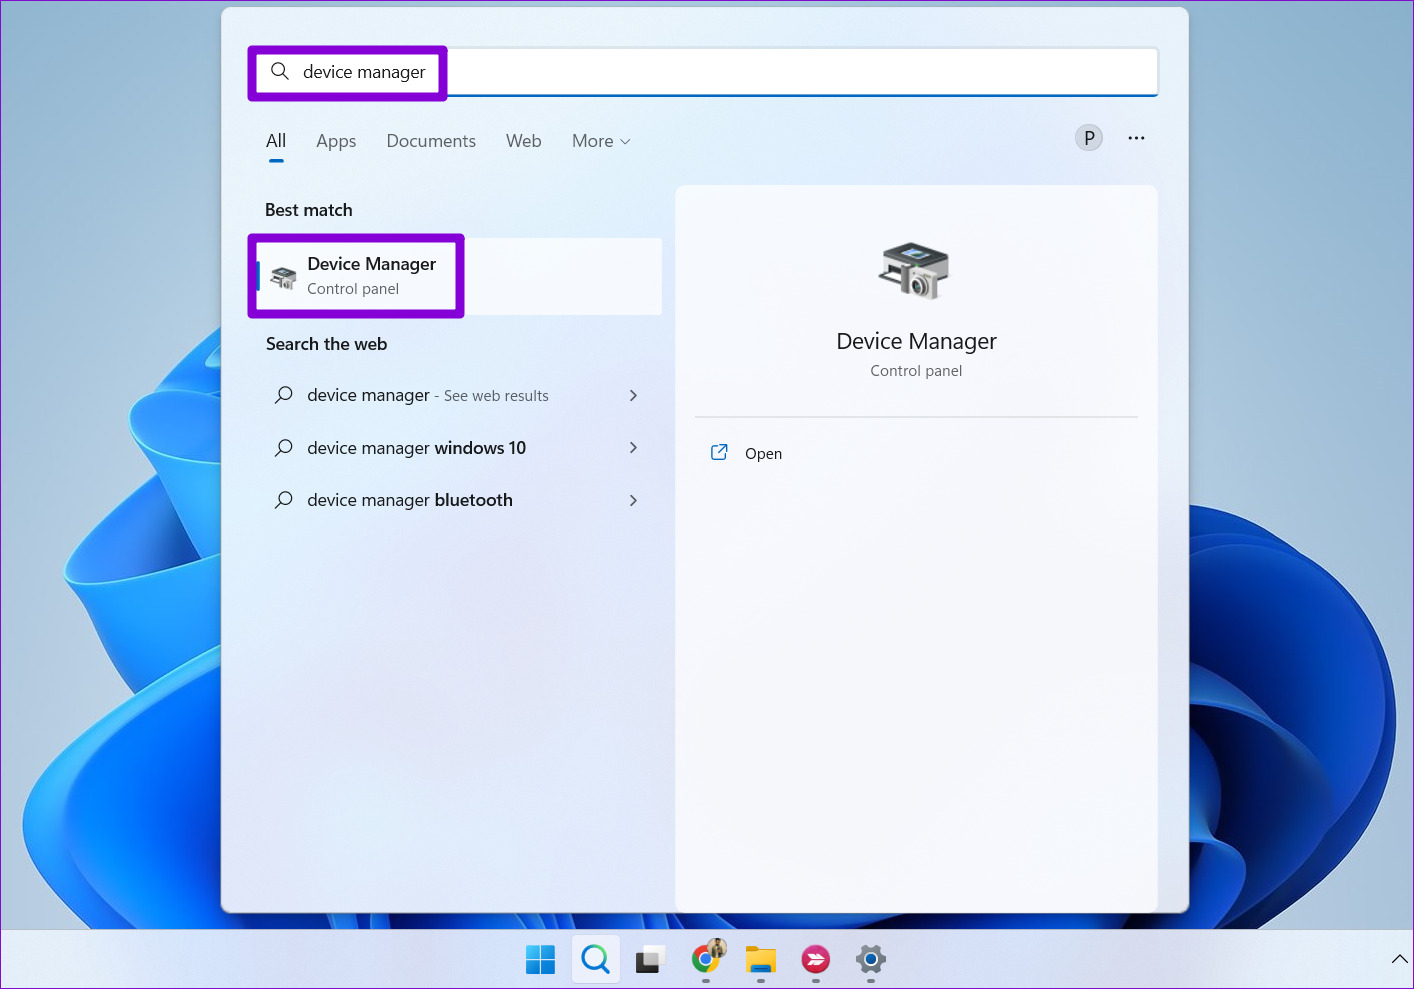
Step 1: Click the search icon on the taskbar, type device manager, and press Enter.
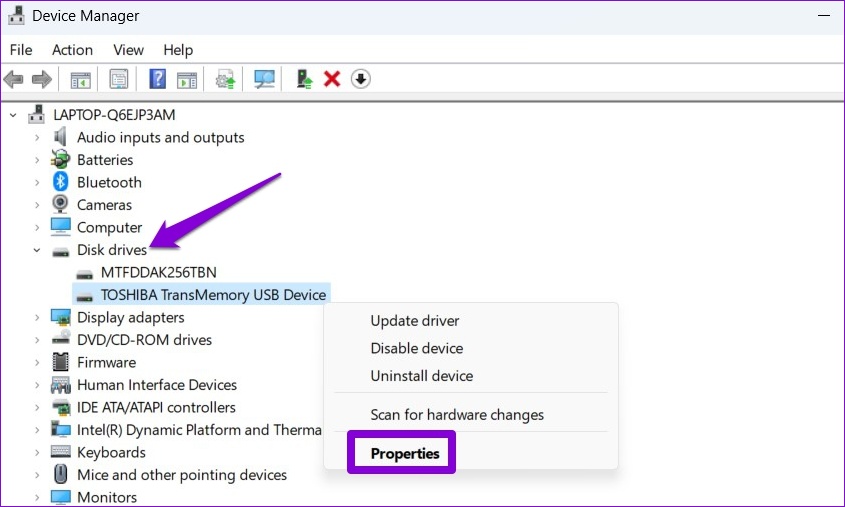
Step 2: Expand Disk drives, right-click on your USB drive, and select Properties.
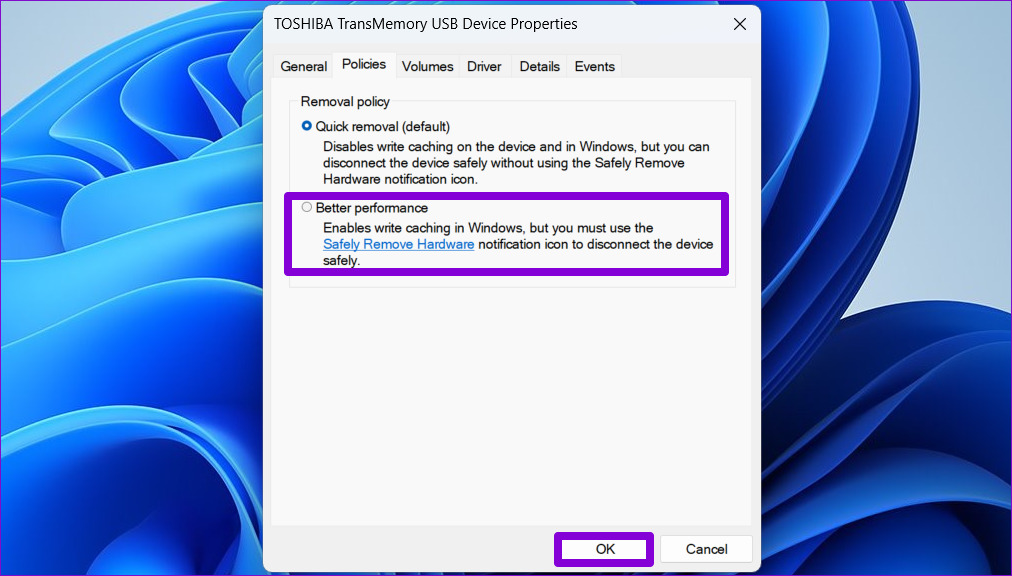
Step 3: In the Device Properties window, navigate to the Policies tab and select Better performance. Then, hit OK.
Fix 2: Check the USB Device for Errors
Problems with your USB device can cause slow file transfer speeds on Windows. You can scan your storage device for file system errors or bad sectors to see if that helps.
Step 1: Press the Windows key + E to open File Explorer.
Step 2: Navigate to This PC, right-click on your drive, and select Properties.

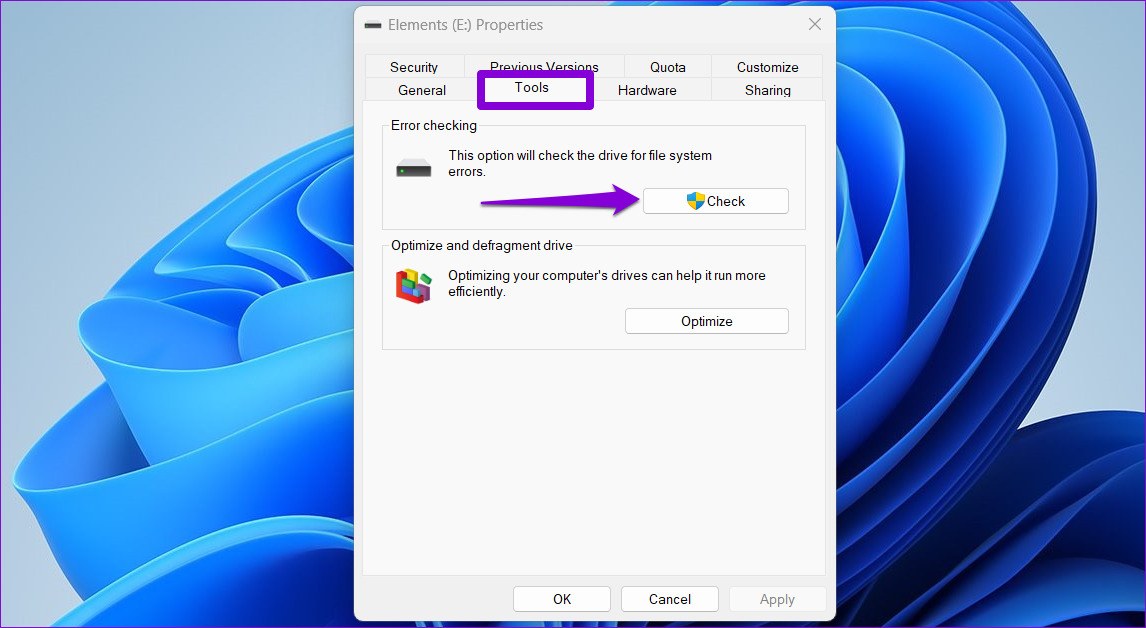
Step 3: Under the Tools tab, click the Check button next to Error checking.
Step 4: Select Scan drive.
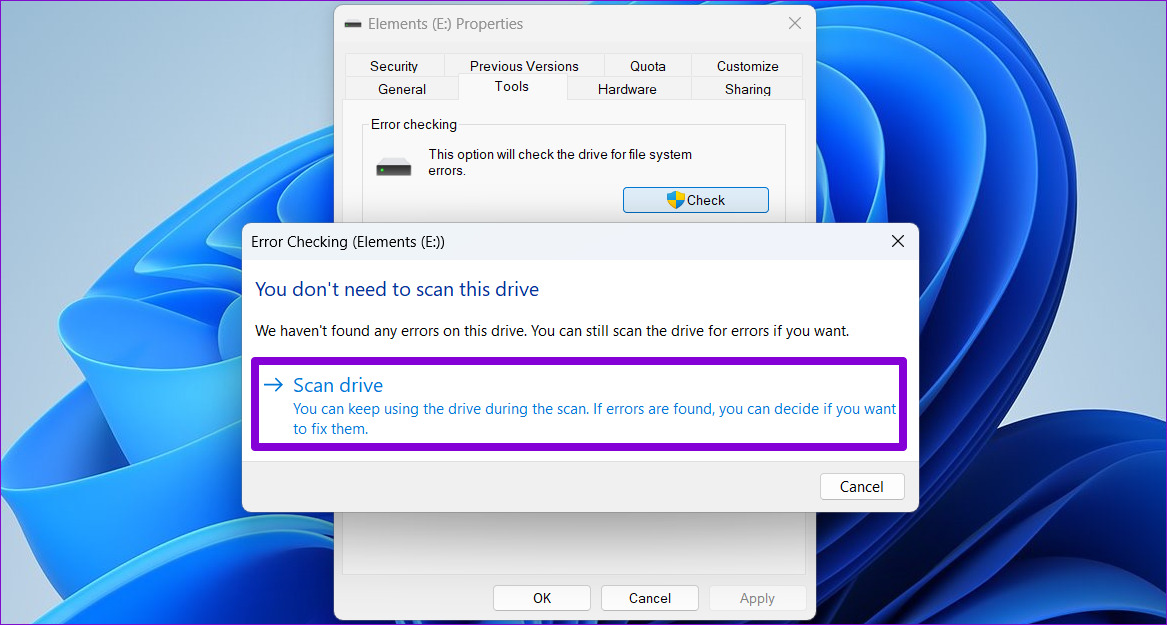
If Windows finds any issues with your drive, follow the on-screen prompts to resolve them.
Fix 3: Change File System for USB Device to NTFS
Another thing to look at is the file system your USB drive uses. If it uses the FAT32 file system, you must wait longer while transferring large files to and from your drive. In that case, you can change the file system for your drive from FAT32 to NTFS to get better transfer speeds.
Since this process necessitates formatting the drive, ensure you back up all your drive content before proceeding.
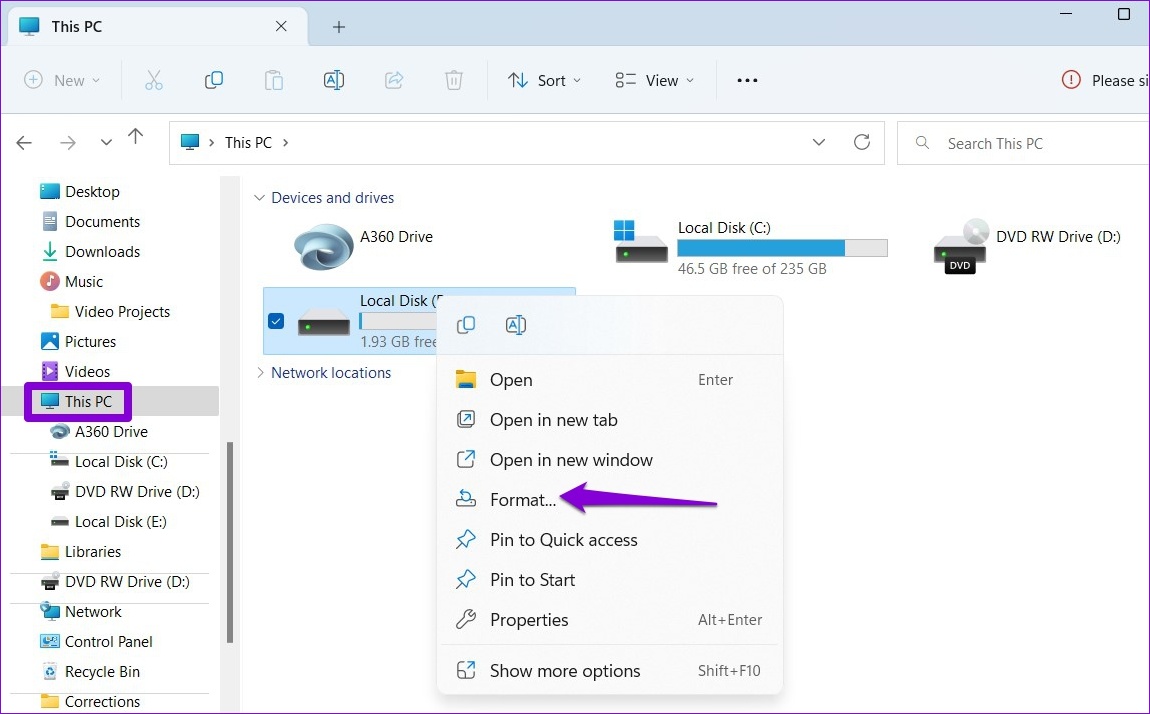
Step 1: Press the Windows key + E to launch File Explorer and navigate to This PC using the left pane.
Step 2: In the right pane, right-click on your USB device and select Format.
Step 3: Select NTFS under File system and click Start.
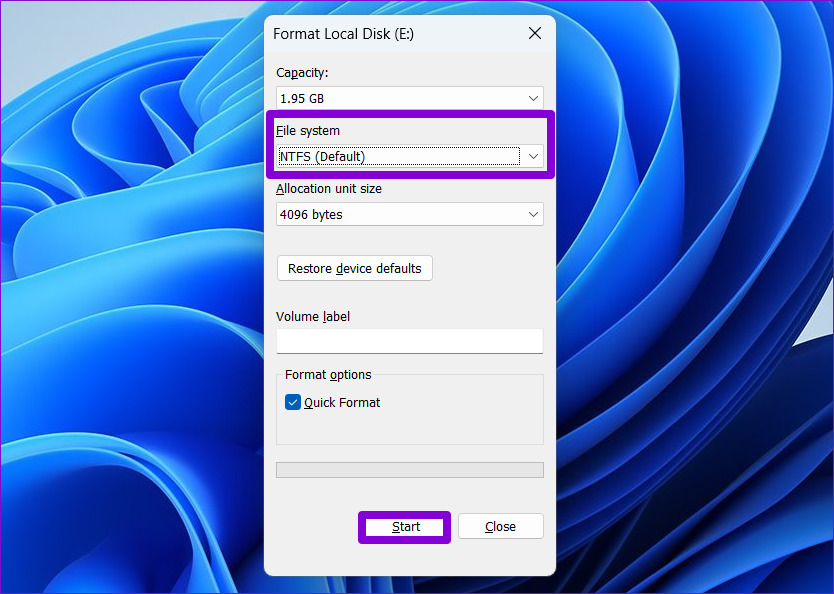
You should notice an improvement in file transfer speeds after formatting your USB drive to the NTFS file system.
Fix 4: Restart Optimize Drives Service
Optimize Drives is a Windows service that helps the system run more efficiently by optimizing files on storage drives. If this service is not running, you could experience slow USB file transfer speeds in Windows 11. Here’s what you can do to fix it.
Step 1: Press the Windows key + R to launch the Run command, type services.msc, and press Enter.
Step 2: In the Services window, locate and double-click on the Optimize drives service to open its properties.
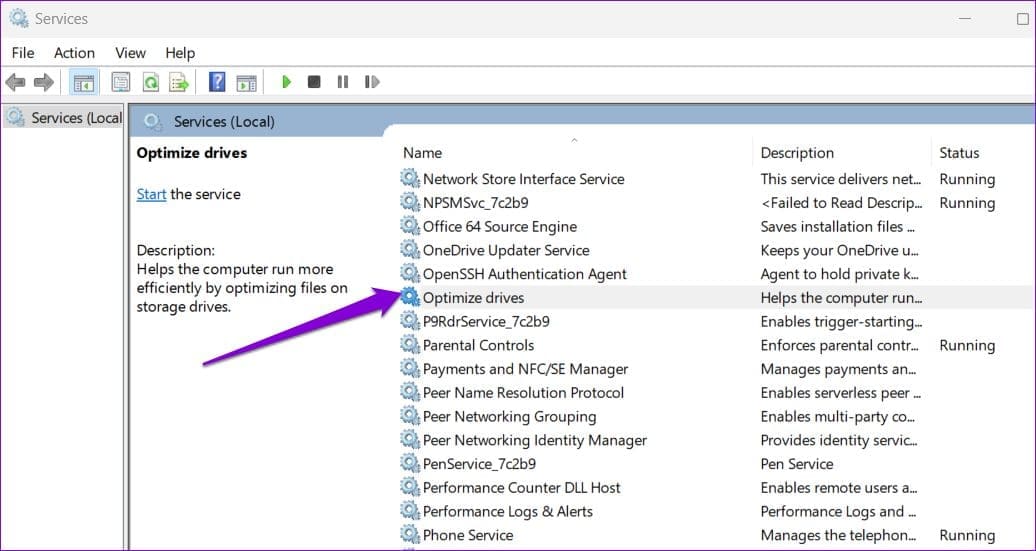
Step 3: Change the Startup type to Automatic and click Apply, followed by OK.

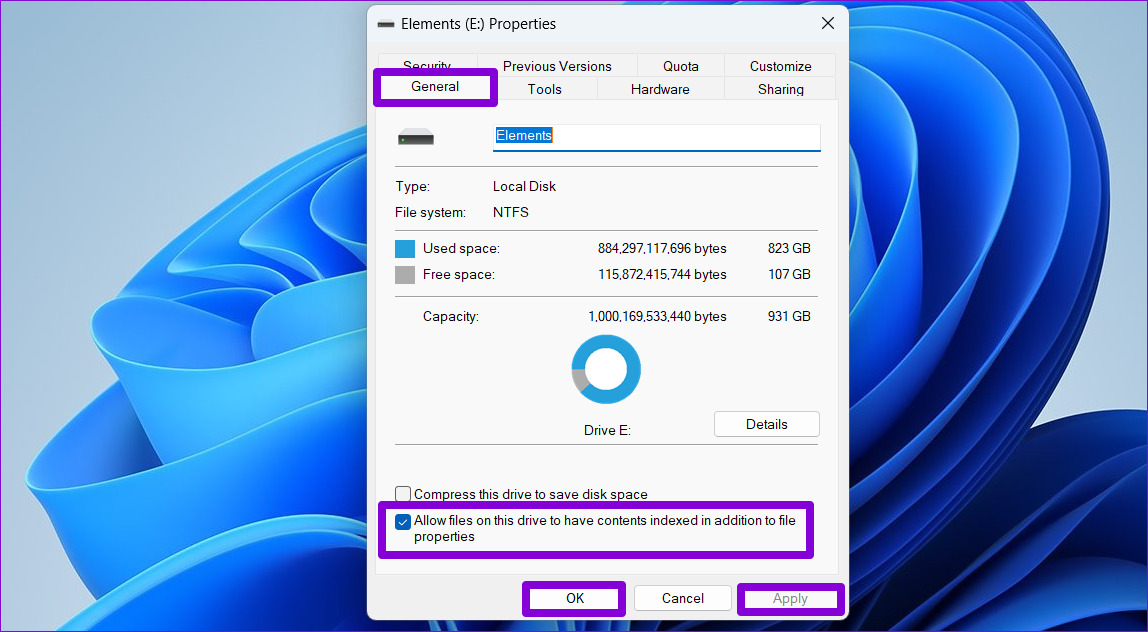
Fix 5: Disable Drive Indexing
Drive Indexing is a useful feature that lets you quickly search for files on your external drive. However, this feature can also slow down other operations. To avoid that, disable the drive indexing feature for your USB drive by following the steps below.
Step 1: Press the Windows key + E to launch File Explorer, right-click on your drive, and select Properties.
Step 2: Under the General tab, uncheck the Allow files on this drive to have contents indexed in addition to file properties box. Then, hit Apply, followed by OK.
Fix 6: Update USB Drivers
Outdated or faulty USB drivers can also slow down USB file transfers in Windows. In that case, updating the USB device drivers should help fix the issue.
Step 1: Open Device Manager using the search menu and double-click on Universal Serial Bus controllers to expand it.
Step 2: Right-click on the first USB Root Hub > select Update driver from the list.
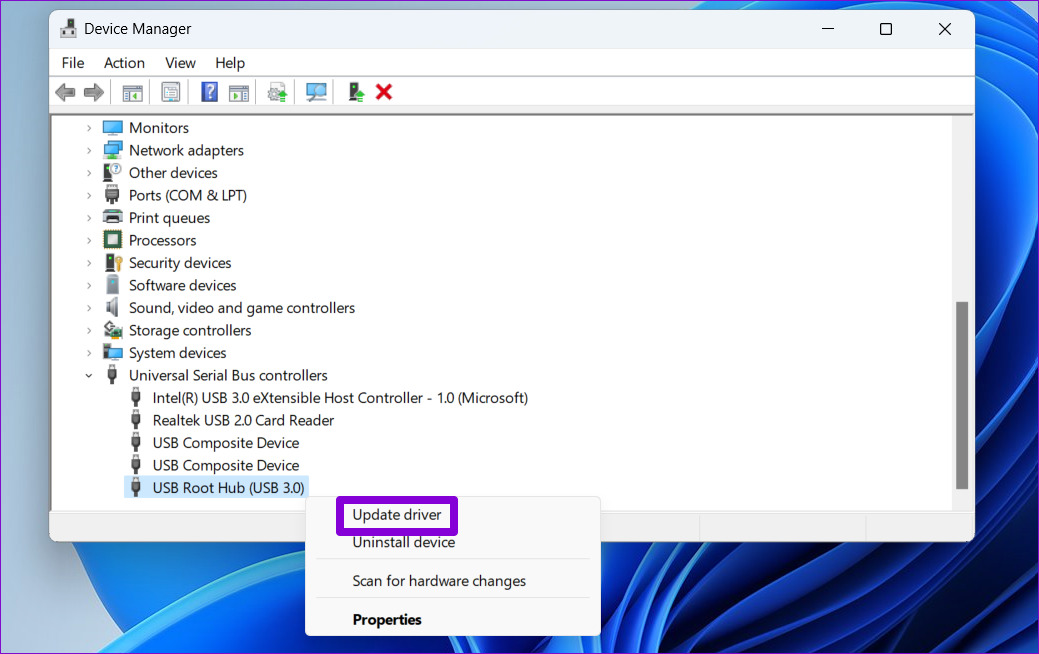
Then, follow the on-screen instructions to finish the process. If your PC has multiple USB ports, update each of them using the steps outlined above.
Was this helpful?
Last updated on 24 April, 2024
Read Next
 7 Ways to Fix Microsoft Edge Running Slow on Windows 11
Basic Fixes Update or reinstall Microsoft Edge: Open the Microsoft Store, search Microsoft Edge browser, and click Update.
7 Ways to Fix Microsoft Edge Running Slow on Windows 11
Basic Fixes Update or reinstall Microsoft Edge: Open the Microsoft Store, search Microsoft Edge browser, and click Update.
 5 Ways to Fix Slow Startup Times on Windows 10 and 11
Basic Fixes Install Windows Updates: Microsoft regularly releases updates that bring security patches, new features, and performance improvements to your Windows PC.
5 Ways to Fix Slow Startup Times on Windows 10 and 11
Basic Fixes Install Windows Updates: Microsoft regularly releases updates that bring security patches, new features, and performance improvements to your Windows PC.
 8 Ways to Fix Slow Internet Speed on Windows 11
https://youtu.be/JSqfxm-5XZI Fix 1: Turn Off the Metered Connection Setting your internet connection as metered on Windows can prevent apps from using the internet proficiently, leading to slow internet speeds.
8 Ways to Fix Slow Internet Speed on Windows 11
https://youtu.be/JSqfxm-5XZI Fix 1: Turn Off the Metered Connection Setting your internet connection as metered on Windows can prevent apps from using the internet proficiently, leading to slow internet speeds.
 6 Ways to Fix Slow Search on Windows 11
Fix 1: Restart the Windows Search Service The Windows Search service is a small program that provides search results for files, mail, and other important content.
6 Ways to Fix Slow Search on Windows 11
Fix 1: Restart the Windows Search Service The Windows Search service is a small program that provides search results for files, mail, and other important content.
 5 Ways to Fix Slow Download Speeds on Windows 11
Basic Fixes Connect to a 5GHz network: When you work with a dual-band Wi-Fi router, it's a good idea to choose a faster 5GHz Wi-Fi frequency band for better internet
5 Ways to Fix Slow Download Speeds on Windows 11
Basic Fixes Connect to a 5GHz network: When you work with a dual-band Wi-Fi router, it's a good idea to choose a faster 5GHz Wi-Fi frequency band for better internet
 4 Ways to Fix Slow Download Speed in Microsoft Edge for Windows
Basic Yet Essential Fixes Check internet speed: If your internet speed is slow or bandwidth is less, all downloads will get slow.
4 Ways to Fix Slow Download Speed in Microsoft Edge for Windows
Basic Yet Essential Fixes Check internet speed: If your internet speed is slow or bandwidth is less, all downloads will get slow.
 4 Ways to Fix Slow Download Speed in Epic Games Launcher on Windows 11
https://youtu.be/w8E4d-rCMUQ Basic Fixes: Check the Epic Server Status: Epic Games Launcher also relies on multiple servers to operate, and It’s possible that a server might be out of order or
4 Ways to Fix Slow Download Speed in Epic Games Launcher on Windows 11
https://youtu.be/w8E4d-rCMUQ Basic Fixes: Check the Epic Server Status: Epic Games Launcher also relies on multiple servers to operate, and It’s possible that a server might be out of order or
 How to Fix a Slow Windows 10 Desktop Right-Click (Context) Menu
The desktop right-click menu, otherwise known as the desktop context menu, provides instant access to numerous useful options ranging from aligning desktop icons to customizing display settings.
How to Fix a Slow Windows 10 Desktop Right-Click (Context) Menu
The desktop right-click menu, otherwise known as the desktop context menu, provides instant access to numerous useful options ranging from aligning desktop icons to customizing display settings.
The article above may contain affiliate links which help support Guiding Tech. The content remains unbiased and authentic and will never affect our editorial integrity.