Basic Fixes
- Close and restart the Recovery Drive app: Launch the Task Manager app by pressing Ctrl + Shift + Esc. Right-click Recovery Media Creator and select End task. Retry to create the recovery drive.
- Replug or change the USB drive: Plug out the connected USB drive and insert it into a different port. Alternatively, use a different USB drive (at least 8GB in size) to create a Windows 11 recovery drive.
- Copy and delete files on USB: Copy a random file on the USB drive, delete it, and retry creating the recovery drive.
Fix 1: Format the USB Drive in FAT32 Format
Windows Recovery Drive app requires a USB drive with a FAT32 file system to create a recovery disk. If your USB drive has an NTFS file system, format it to fix the “can’t create a recovery drive” error.
Note: Ensure backing up your USB data, as formatting will erase all its contents.
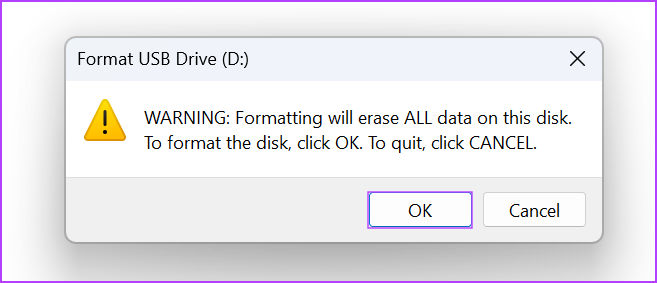
Step 1: Connect your USB drive, open the File Explorer app (press the Windows + E keys), and right-click the USB drive to Format it.

Step 2: Select FAT32 from the File system drop-down menu and click Start.

Step 3: Click OK to confirm your action.
Fix 2: Delete Previous Windows Installation Files
If you have kept old system files while updating Windows, it can interfere with the recovery drive creation. Launch the Disk Cleanup utility to delete previous Windows installation files.
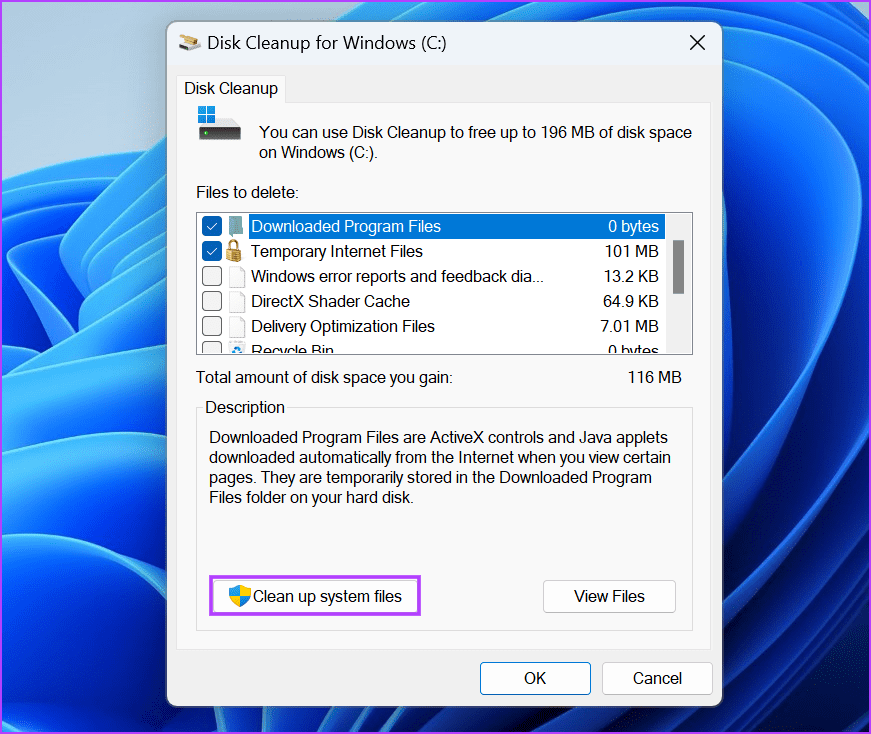
Step 1: Type cleanmgr in the Windows search menu and click Disk Cleanup to launch it.

Step 2: Select the Windows installation drive and click OK.

Step 3: Next, click Clean up system files and approve the UAC prompt.
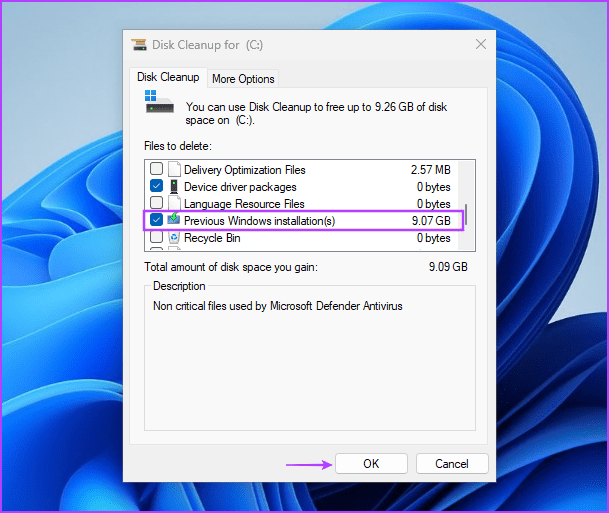
Step 4: Select Previous Windows installation(s) and click OK. Wait for the utility to clean up selected files and re-create the recovery drive.
Fix 3: Turn off Hyper-V
Disabling Windows Hyper-V is another nifty trick to resolve the “We can’t create a recovery driver” error. Configure Windows Optional features to turn it off.
Step 1: Press the Windows key and search Optional features to open the system setting.
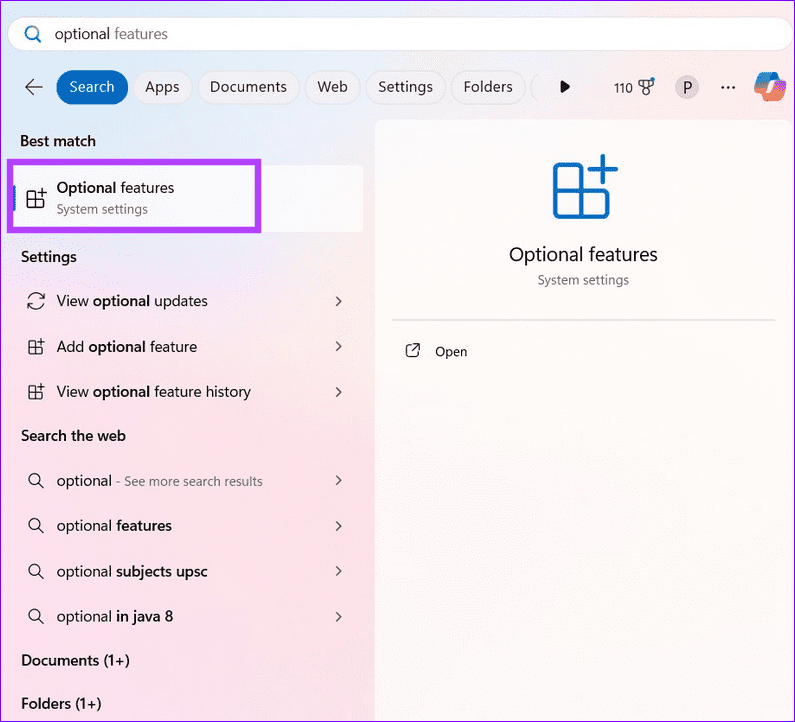
Step 2: Scroll to the bottom and click More Windows features.
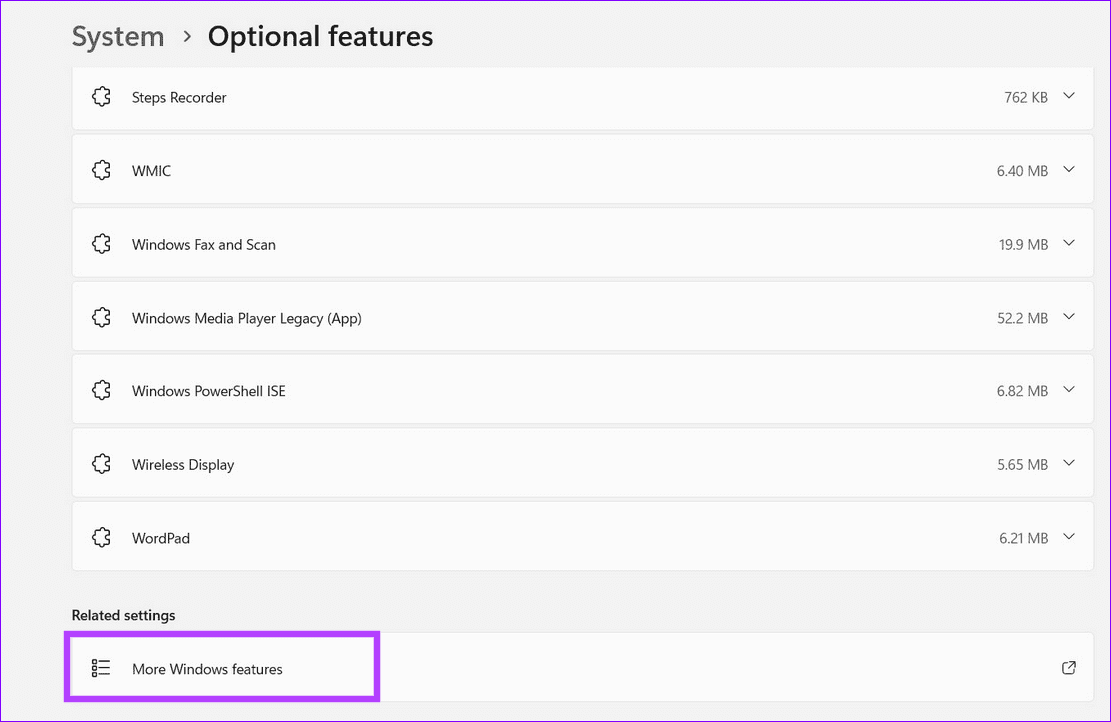
Step 3: Uncheck Hyper-V in the popup and click OK to save changes. Click Restart Now when prompted to apply changes and retry creating a recovery drive.

Fix 4: Repair Corrupt System Files With SFC and DISM
If system files are missing or Windows components are damaged, one or more system apps (e.g., Recovery Drive) can fail to launch or work properly. Running the SFC and DISM scans should repair it.
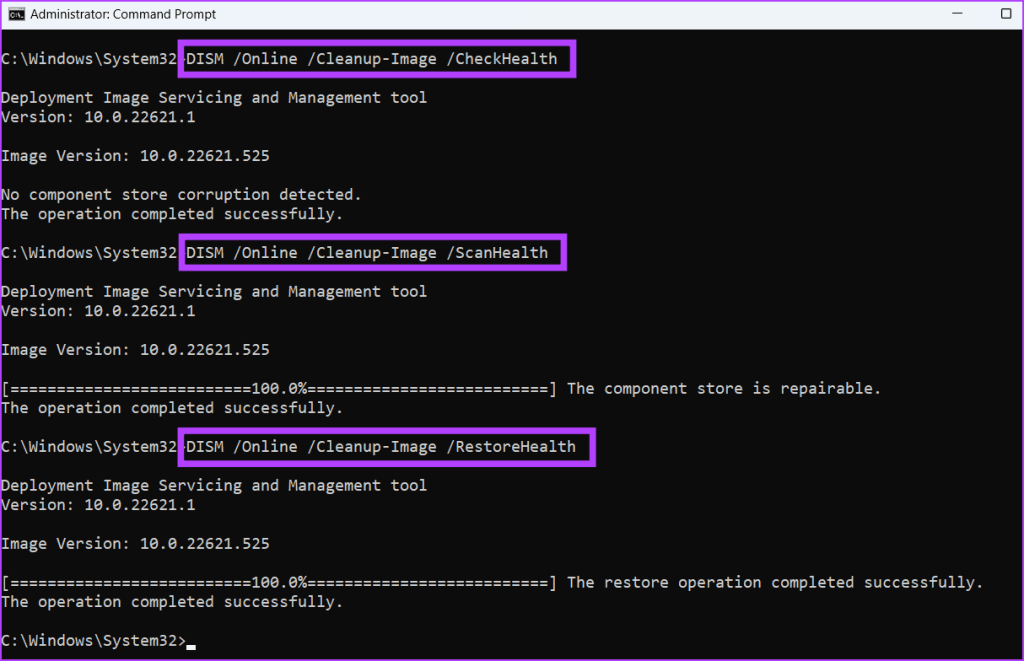
Step 1: Press the Windows key, search cmd, and click Run as administrator.

Step 2: Copy-paste the following command and press Enter:
SFC /scannow

Step 3: Next, execute the below commands sequentially and restart your Windows 11 PC.
DISM /Online /Cleanup-Image /CheckHealth
DISM /Online /Cleanup-Image /ScanHealth
DISM /Online /Cleanup-Image /RestoreHealth
Fix 5: Disable Microsoft Services Temporarily
Certain Microsoft virtualization services are known to create recovery drive issues on Windows 11. Disabling them manually should restore normalcy.
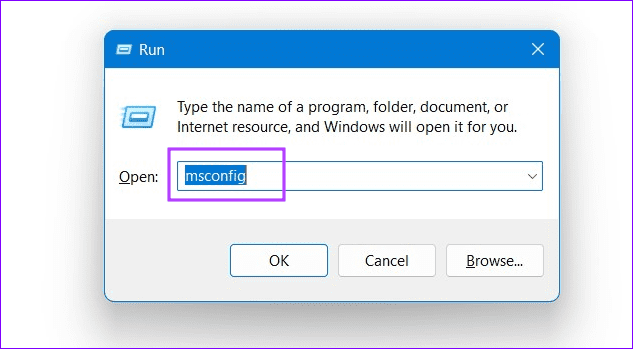
Step 1: Press the Windows + R keys simultaneously to open the Run dialog, type msconfig, and hit Enter.
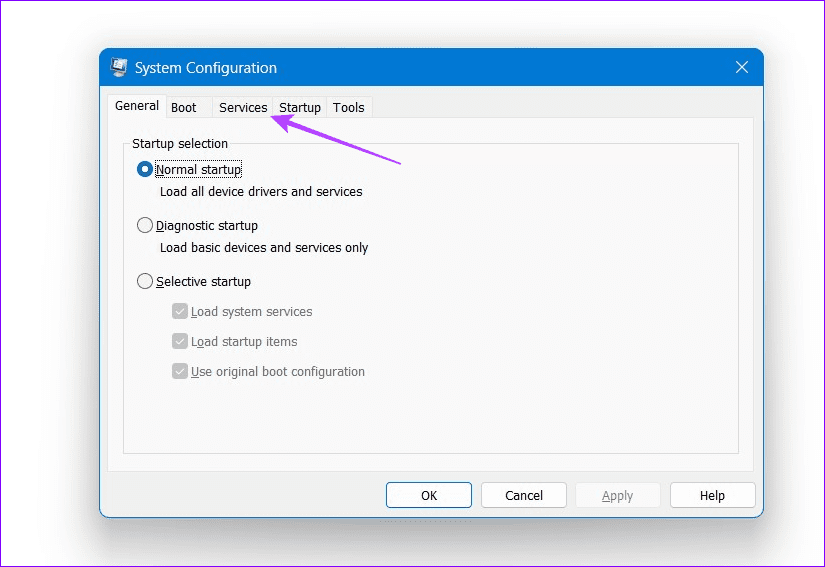
Step 2: Click the Services tab and uncheck Application Virtualization Services Agent, Application Virtualization Client, and Client Virtualization Handler.
Step 3: Click Apply to save changes and reboot the PC.
Note: Once you successfully create the recovery drive after disabling the listed services, re-enable them to avoid encountering other Microsoft errors.
Alternative: Use Windows Media Creation Tool to Create a Bootable Flash Drive
If you fail to create a recovery drive, you can utilize the Windows Media Creation tool to create a bootable flash drive instead.
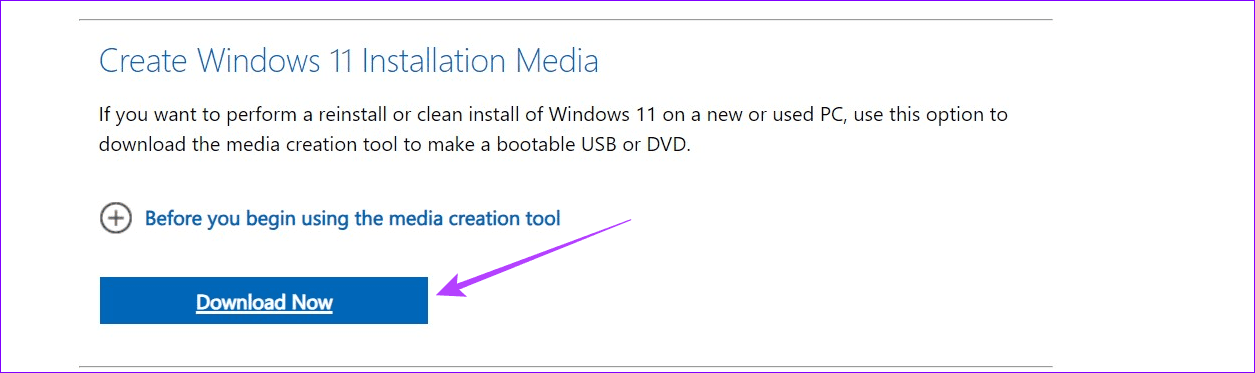
Step 1: Access the Windows 11 download page and click Download Now to download the Windows 11 Media Creation tool.
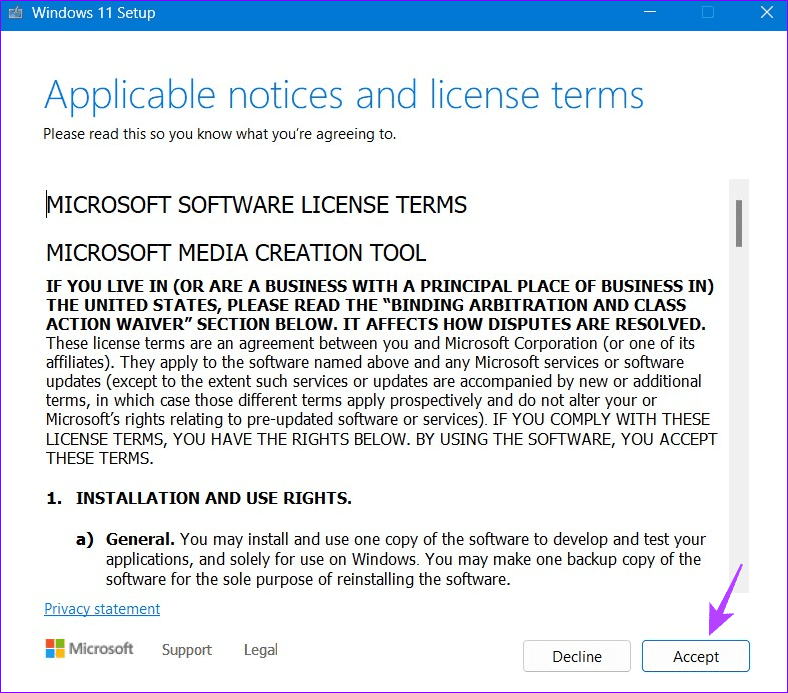
Step 2: Install and launch the Media Creation utility and Accept its terms.
Step 3: Pick your desired Language with Windows Edition, and click Next.
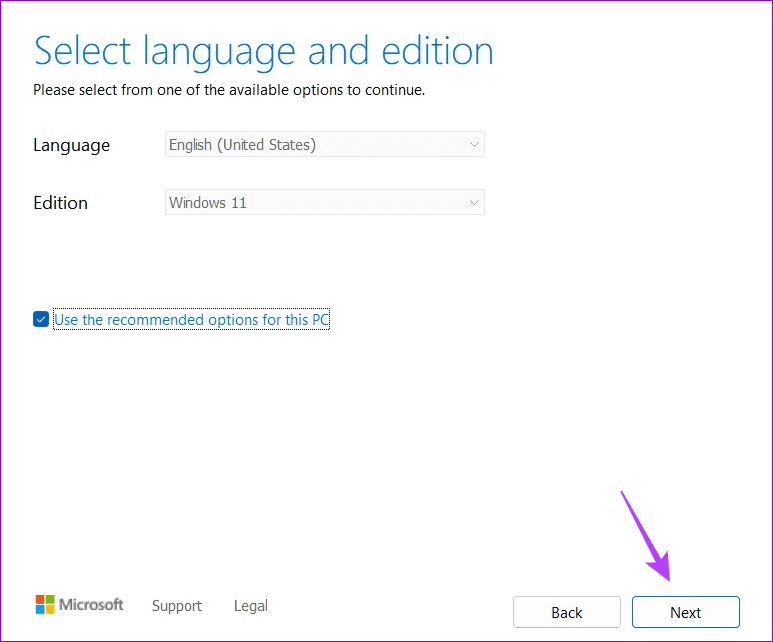
Tip: Enable Use the recommended options for this PC to select the suitable language and Windows edition automatically.
Step 4: Select USB flash drive, click Next, and highlight your connected drive on the next page.

Step 5: Click Finish to finalize creating the bootable flash drive. You can now easily boot from the USB drive anytime.
Was this helpful?
Last updated on 21 May, 2024
2 Comments
Leave a Reply
Read Next
 How to Create and Use a Recovery Drive on Windows 11
How to Create a Windows 11 USB Recovery Drive Microsoft bundles the Recovery Drive app in Windows 11 to help you create a recovery disk.
How to Create and Use a Recovery Drive on Windows 11
How to Create a Windows 11 USB Recovery Drive Microsoft bundles the Recovery Drive app in Windows 11 to help you create a recovery disk.
 Reviewing the Free EaseUS Data Recovery Software For Windows
Till date, we have talked about quite a few file recovery tools that help us to restore files that are deleted accidentally from our computer.
Reviewing the Free EaseUS Data Recovery Software For Windows
Till date, we have talked about quite a few file recovery tools that help us to restore files that are deleted accidentally from our computer.
 GT Explains: Difference Between Recovery Drive and System Image in Windows 10
Windows offers multiple ways to take a backup of your precious data on your computer.
GT Explains: Difference Between Recovery Drive and System Image in Windows 10
Windows offers multiple ways to take a backup of your precious data on your computer.
 A Complete Guide to Fixing Android Recovery Mode Not Working
When was the last time your Android phone struggled to boot into Recovery mode?
A Complete Guide to Fixing Android Recovery Mode Not Working
When was the last time your Android phone struggled to boot into Recovery mode?
 A Guide to Fixing Mac Not Connecting to Wi-Fi in macOS Recovery
If your Mac acts up or keeps crashing, the built-in Recovery mode can be useful.
A Guide to Fixing Mac Not Connecting to Wi-Fi in macOS Recovery
If your Mac acts up or keeps crashing, the built-in Recovery mode can be useful.
 5 Ways to Fix Can’t Create a New Folder on Windows 11
Basic Fixes Run a Windows security scan: Malicious files may prevent you from creating a new folder.
5 Ways to Fix Can’t Create a New Folder on Windows 11
Basic Fixes Run a Windows security scan: Malicious files may prevent you from creating a new folder.
 5 Fixes for “Word Experienced an Error Trying to Open the File” Error in Windows
Fix 1: Unblock Your Word File Microsoft Word may fail to open a document if it has been altered by third-party software.
5 Fixes for “Word Experienced an Error Trying to Open the File” Error in Windows
Fix 1: Unblock Your Word File Microsoft Word may fail to open a document if it has been altered by third-party software.
 4 Ways to Fix Discord No Route Error on Windows 10 and Windows 11
Try Basic Fixes Restart your router: Since the "No Route" error mainly occurs when there's an interruption with your internet connection, you can start by restarting your router.
4 Ways to Fix Discord No Route Error on Windows 10 and Windows 11
Try Basic Fixes Restart your router: Since the "No Route" error mainly occurs when there's an interruption with your internet connection, you can start by restarting your router.
The article above may contain affiliate links which help support Guiding Tech. The content remains unbiased and authentic and will never affect our editorial integrity.


Some of the things were stuff that I had already tried. (sigh)
I do appreciate your attention to detail.
You might want to expand on the Hyper V stuff… It took me a couple of minutes to realize that my machine wasn’t using it. (yes, that is a nit! )
Again, thanks for all the info.
I tried a 64GB USB 2 flash drive. No joy.
formatted it, No Joy. Copied small file in, ejected drive, retried – no joy.
did your scannow cmd (running as admin) – repeated.
Ran the DISM stuff, repeated – did long reformat – repeated, no joy.
Bought new USB 3.0 64GB flash drive.
Repeated: rebuild attempt(no joy)/ formatted/retried- no joy. copied small file, deleted, retried – no joy.
I’ve tried this with several different USB drive, verifying that I CAN read/write to them, doing quick format and full format.
Any other advice? Please?
Hi,
Kindly try these nifty tricks as well:
1- Launch the Recovery Drive tool and uncheck ‘ Back up system files to the recovery drive’. Click Next, select your connected USB Drive, and select Next > Create. When the recovery drive creation completes (irrespective of whether you see an error or the process completes), click the Back button in the upper left corner instead of clicking Finish/Done.
Now, check the ‘Back up system files to the recovery drive’ option and follow the on-screen instructions to complete it.
2- Disable Windows Security: Press the Windows key, search Windows Security, and click to open it.
Select Virus & threat protection from the left sidebar, click Manage settings under ‘Virus & threat protection settings’, and toggle off Real-time protection. Retry creating the Recovery Drive.
3- Enable the Windows RE mode:
– Open Windows Settings, select System and click Recovery. Select Reset PC next to ‘Reset this PC’, and pick ‘ Keep my files’ to reinstall Windows while keeping your personal files. (this process will effectively repair the missing Winre.wim file located in C:\Windows\System32\Recovery, which is responsible for running the Recovery Drive app)
– Once reset, Press the Windows key, search Command prompt, and click Run as administrator.
– type ‘ reagentc /enable’ in the console and press Enter. Reopen the Recovery Drive tool to check if you can use it to create a recovery drive.