Try Basic Fixes
- Remove and add the picture again: Microsoft PowerPoint may fail to load an image if it is not added completely to the presentation file. Additionally, if you have added a picture link and the image file is moved to a different location before you saved the presentation, PowerPoint will not be able to find it. Try adding the images again to fix such issues.
- Save the file in a different location: If Microsoft PowerPoint is unable to load images even after you reinsert them, try saving the file in a different location and see if that helps. Open your PowerPoint presentation and press F12 to bring up the Save As dialog box. Select a different location for your file and click Save.
Fix 1: Disable Image Compression
Microsoft PowerPoint allows you to compress images in your presentation to reduce the overall file size. While this makes it easier to share presentations with others via email, it can also end up breaking some of the images in your presentation.
To avoid this, you need to prevent PowerPoint from compressing images in your file by following the steps below.
Step 1: Open Microsoft PowerPoint and click the File menu in the top-left corner.
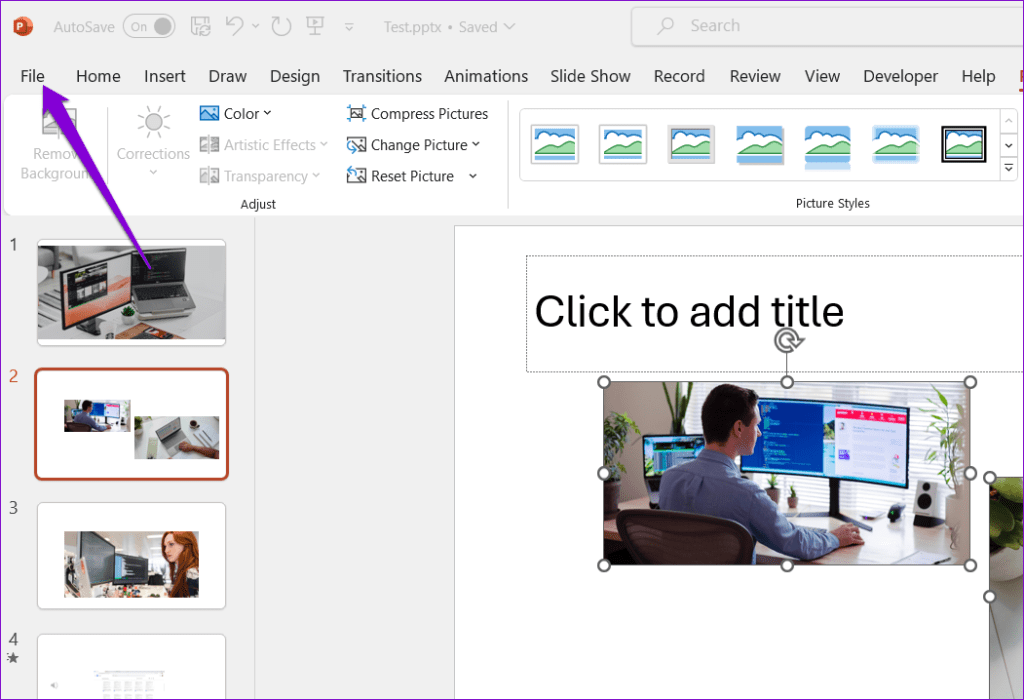
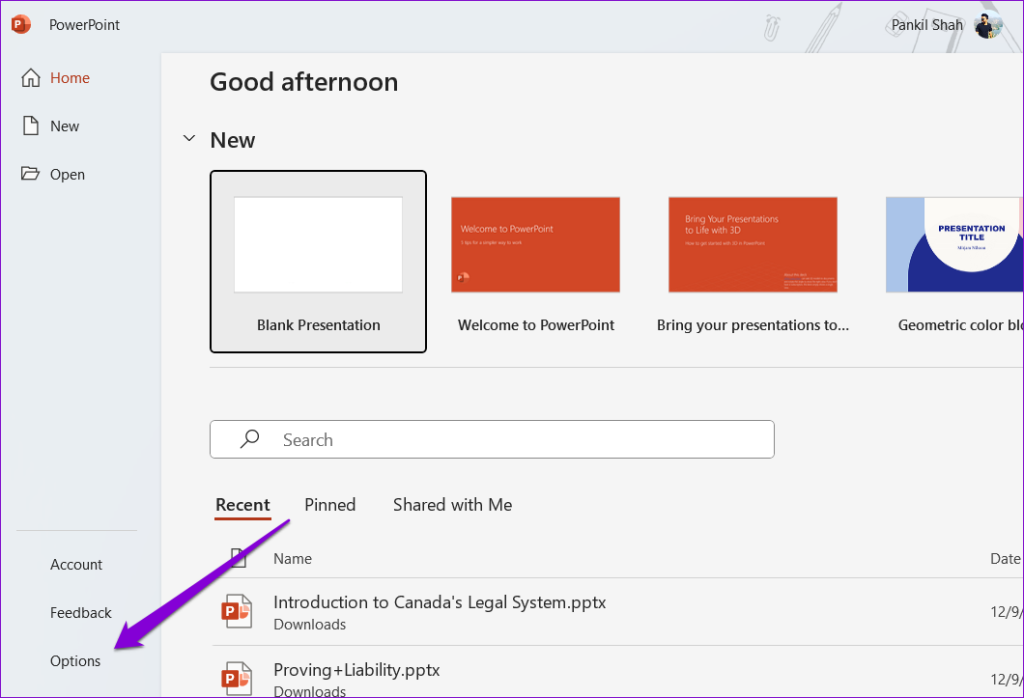
Step 2: Click on Options in the bottom left corner.
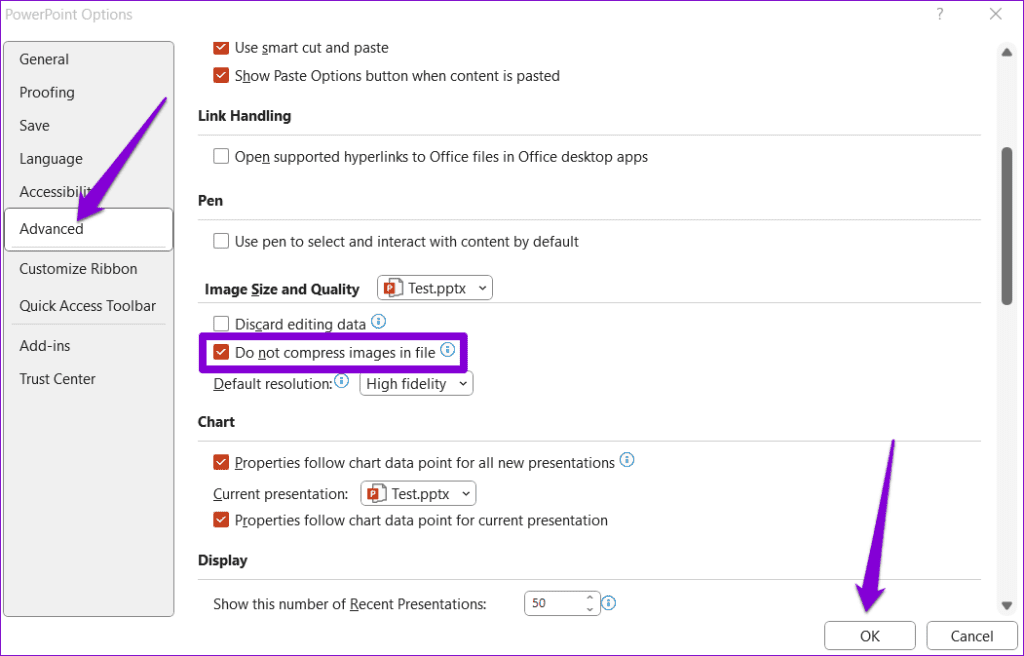
Step 3: Select the Advanced tab from the left sidebar. Scroll down to the Image Size and Quality section and tick the Do not compress images in file option. Then, click OK.
Fix 2: Allow PowerPoint to Download Online Content
Do you face problems with the stock or online images in PowerPoint? That could happen if you have prevented PowerPoint from downloading online content, causing the Stock Images and Online Pictures options to appear grayed out. Here’s how to fix that.
Step 1: In Microsoft PowerPoint, head to File > Options.
Step 2: In the PowerPoint Options window, click the General tab. Then, click the Privacy Settings button in the right pane.

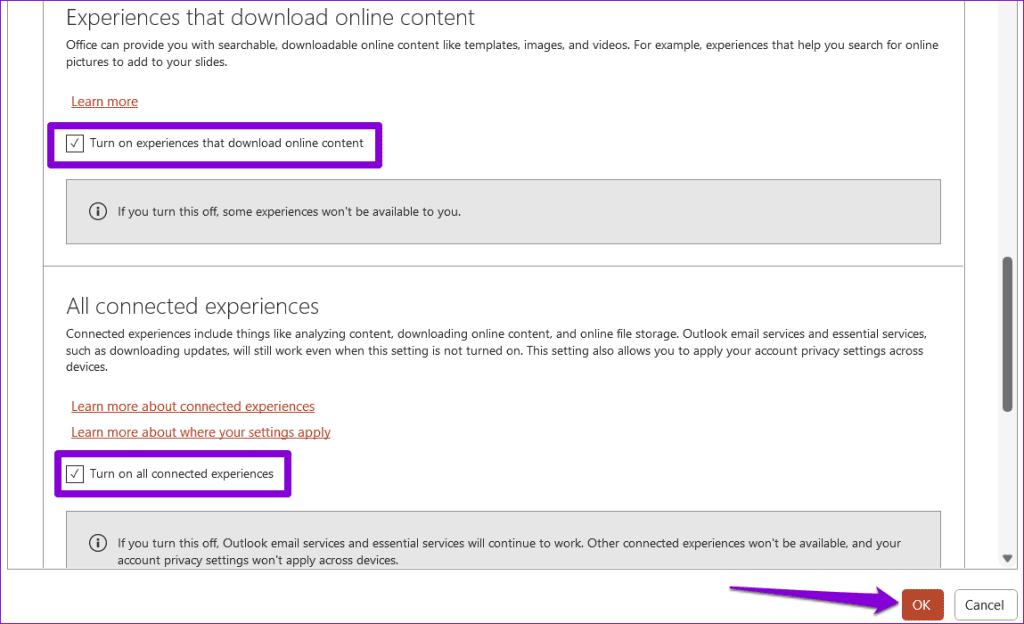
Step 3: Tick the checkboxes that read Turn on experiences that download online content and Turn on all connected experiences. Then, click OK.
Fix 3: Turn Off Hardware Acceleration
When you enable hardware acceleration in PowerPoint, it offloads some of the graphical processing tasks from your CPU to the GPU to achieve better performance. However, if this feature malfunctions, PowerPoint may have trouble loading images. You can try disabling this feature to see if that helps.
Step 1: In Microsoft PowerPoint, head to File > Options.
Step 2: In the Advanced tab, clear the checkbox that reads Disable Slide Show hardware graphics acceleration. Then, click OK.

Fix 4: Repair the Problematic File
If Microsoft PowerPoint does not display pictures only in a specific presentation, the file may be corrupt. You can try using the built-in file repair option in PowerPoint to fix the presentation.
Step 1: Open PowerPoint and press the Control + O keyboard shortcut. In the Open tab, click the Browse option.
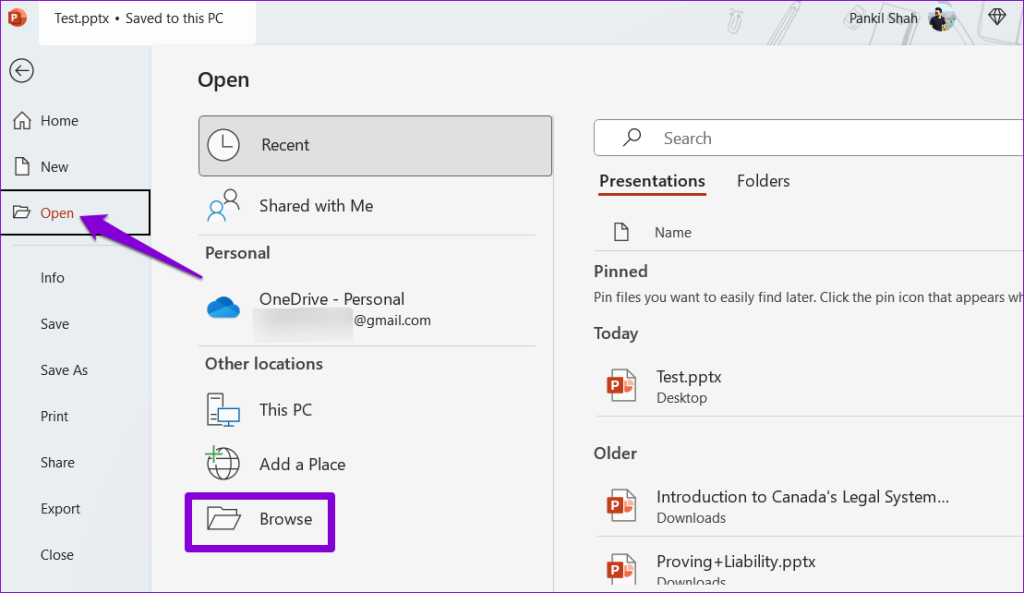
Step 2: Locate and select your PowerPoint file. Then, click the downward arrow next to Open to select Open and Repair.

Fix 5: Run the Office Repair Tool
If PowerPoint does not display pictures even after you update it, there may be a problem with its installation on your Windows PC. Fortunately, Microsoft includes an Office repair tool that can automatically fix such issues with Microsoft PowerPoint. Here’s how to run it.
Step 1: Press the Windows + R keyboard shortcut to open the Run dialog box. Type appwiz.cpl in the box and press Enter.
Step 2: In the Programs and Features window, select the Microsoft Office product on the list and click the Change button at the top.

Step 3: Select the Online Repair option and click Repair.

Was this helpful?
Last updated on 18 July, 2024
1 Comment
Leave a Reply
Read Next
 Top 5 Ways to Fix Microsoft Teams Not Displaying Images on Windows
Preliminary Fixes Check the Internet Connection: A stable internet connection is crucial for Microsoft Teams to properly load images and other media content.
Top 5 Ways to Fix Microsoft Teams Not Displaying Images on Windows
Preliminary Fixes Check the Internet Connection: A stable internet connection is crucial for Microsoft Teams to properly load images and other media content.
 5 Fixes for Designer Not Working in Microsoft PowerPoint on Windows
Try Basic Fixes Check your Microsoft 365 subscription status: The Designer feature in PowerPoint is exclusive to Microsoft 365 subscribers.
5 Fixes for Designer Not Working in Microsoft PowerPoint on Windows
Try Basic Fixes Check your Microsoft 365 subscription status: The Designer feature in PowerPoint is exclusive to Microsoft 365 subscribers.
 7 Fixes for Animations Not Working in PowerPoint on Windows
Fix 1: Check Animation Order and Triggers Before you try anything else, it’s a good idea to check the set animation effects and triggers in your PowerPoint presentation.
7 Fixes for Animations Not Working in PowerPoint on Windows
Fix 1: Check Animation Order and Triggers Before you try anything else, it’s a good idea to check the set animation effects and triggers in your PowerPoint presentation.
 5 Fixes for Microsoft PowerPoint Not Playing Audio on Windows
Fix 1: Check the Volume Level in PowerPoint and Windows Your first step is double-checking the volume level in PowerPoint and on your Windows computer.
5 Fixes for Microsoft PowerPoint Not Playing Audio on Windows
Fix 1: Check the Volume Level in PowerPoint and Windows Your first step is double-checking the volume level in PowerPoint and on your Windows computer.
 4 Fixes When Videos in PowerPoint Are Not Playing
Basic Fixes: Confirm if the video plays outside PowerPoint: You want to ensure the video file isn't corrupt.
4 Fixes When Videos in PowerPoint Are Not Playing
Basic Fixes: Confirm if the video plays outside PowerPoint: You want to ensure the video file isn't corrupt.
 3 Fixes for iMessage Not Downloading Pictures on iPhone
Basic Fixes Free up internal storage of your iPhone: You can go to Settings > iPhone Storage and check which apps are taking up maximum storage.
3 Fixes for iMessage Not Downloading Pictures on iPhone
Basic Fixes Free up internal storage of your iPhone: You can go to Settings > iPhone Storage and check which apps are taking up maximum storage.
 6 Ways to Fix Microsoft PowerPoint Not Saving Files on Windows
Fix 1: Ensure the File Is Not Opened Elsewhere Having a PowerPoint file open in multiple apps can prevent you from editing it.
6 Ways to Fix Microsoft PowerPoint Not Saving Files on Windows
Fix 1: Ensure the File Is Not Opened Elsewhere Having a PowerPoint file open in multiple apps can prevent you from editing it.
 6 Ways to Fix “PowerPoint Found a Problem With Content” on Windows
Fix 1: Repair the Presentation File When you receive the "PowerPoint found a problem with content" error, PowerPoint offers the option to repair the file.
6 Ways to Fix “PowerPoint Found a Problem With Content” on Windows
Fix 1: Repair the Presentation File When you receive the "PowerPoint found a problem with content" error, PowerPoint offers the option to repair the file.
The article above may contain affiliate links which help support Guiding Tech. The content remains unbiased and authentic and will never affect our editorial integrity.


I tried all 5 fixes and the powerpoint presentation still has red x can not display image.