Google Chrome continuous to top the browser popularity charts and is often the go-to browser for many users. That said, it isn’t devoid of missteps and issues. Google Chrome is infamous for chalking up the big pie of the device RAM. We have seen Google Chrome slowing down over time due to the memory leak issue.
You must have noticed random behaviors such as opening a new tab taking a longer time, Google Chrome throwing a blank screen for a couple of seconds, and a sluggish scrolling performance during web browsing. Each issue is related to the memory leak problem in Google Chrome. Let’s troubleshoot it.
1. Use Task Manager (Windows)
A Task Manager on Windows 10 allows you to see how much resources Google Chrome is taking upon the device. Sometimes, you will be surprised to see how much RAM and CPU usage Google Chrome is taking to deliver a smooth performance. Follow the steps below.
Step 1: Use Ctrl + Alt + Delete key combination on the keyboard.
Step 2: Select Task Manager from the following menu.
Step 3: You will notice Google Chrome along with the other processes it’s running in the background.

Right-click on Chrome from the list to select it and hit the End Task button at the bottom. That will close all running Chrome processes, free up RAM space, and allow you to relaunch Chrome. You should also take a look at other processes running in the background.
2. Use Activity Monitor (Mac)
Activity Monitor is Mac’s version of Task Manager. You can opt for Activity Monitor on Mac to keep track of Google Chrome RAM usage and close it.
Step 1: Use the Command + Space keys on Mac and search for Activity Monitor.
Step 2: Open the Activity Monitor and look for Google Chrome.
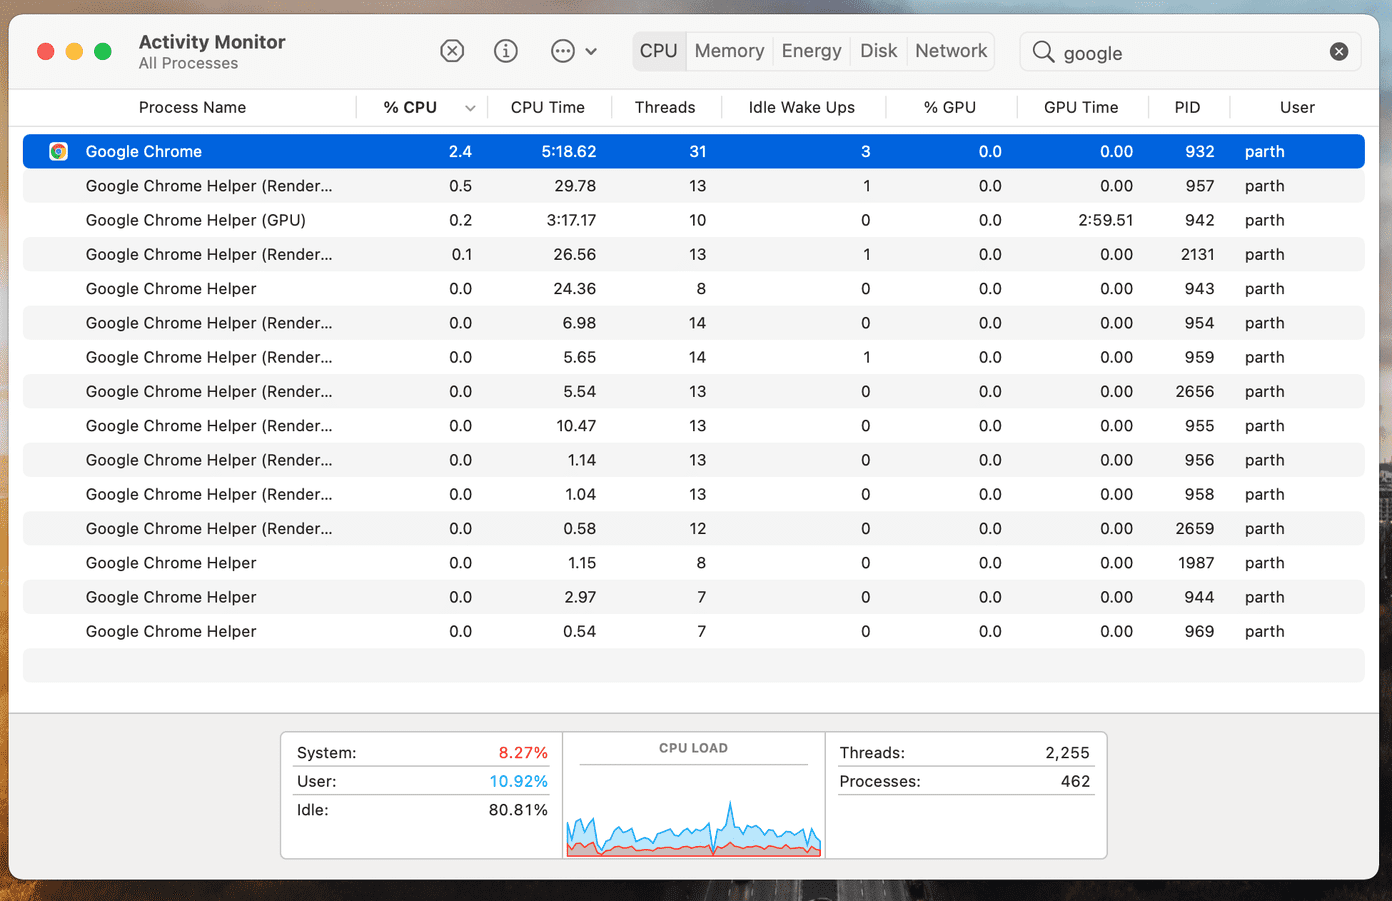
Step 3: If you notice huge CPU usage spikes, then select the app and click on the ‘X’ icon at the top.
The process will force quit the app completely.
3. Use Google Chrome’s Task Manager
Do you know Google Chrome comes with a built-in task manager? It’s available on both Windows and Mac. The Task Manager and Activity Monitor trick completely closes the application, but what if a culprit tab is causing the memory leak issue on Google Chrome?
In such cases, you can use Google Chrome’s built-in task manager. Go through the steps below.
Step 1: Open Google Chrome and right-click on the tab bar.
Step 2: Select Task Manager from the following pop-up menu.

Step 3: It will open the task manager and you can see the amount of RAM used by Chrome tabs, extensions, and services.

Step 4: Select the process with unnecessary high RAM usage and hit the End Process button at the bottom.
4. Disable Chrome Extensions
Extensions play a vital role in the Chrome experience. You will be perfectly fine with popular extensions, but if you have a habit of using unknown ones, then you need to keep track of it. Some might not be actively maintained, could be out of date, or develop incompatibilities with new Chrome builds.
First up, you can use the Chrome Task Manager and disable an extension that’s leaking memory on Chrome. Another way is to remove every extension installed on the browser. Go through the steps below.
Step 1: Open Google Chrome, tap on the three-dot menu at the top.
Step 2: Navigate to More tools > Extensions.

Step 3: It will open the Extension menu. Tap on the Remove button and remove Chrome extensions.
5. Reset All Chrome Settings
It can help because there are times when tweaking the wrong settings can eventually cause issues with Chrome, especially if you’re enabling beta features.
You can fix all of that by resetting Chrome.
Step 1: Launch Chrome and open Settings.
Step 2: Scroll down and click Advanced to open all settings.

Step 3: Scroll down to the Reset and clean up section and click Restore settings to their original defaults.
That will open a window with a warning stating that all Chrome settings will be reset. Just select Reset settings to continue.
Just remember that this will disable all of your extensions, clear temporary data, and wipe out all cookies. However, it won’t affect bookmarks, history, and saved passwords.
6. Use Chrome Malware Scanner
If none of the above tricks worked, your system might have malware that’s interfering with Chrome. The good news is, Google has integrated an anti-malware scanner that will scan your computer and find any problems.
Step 1: Open Chrome and go to Settings.
Step 2: Scroll down and click Advanced to open all settings.
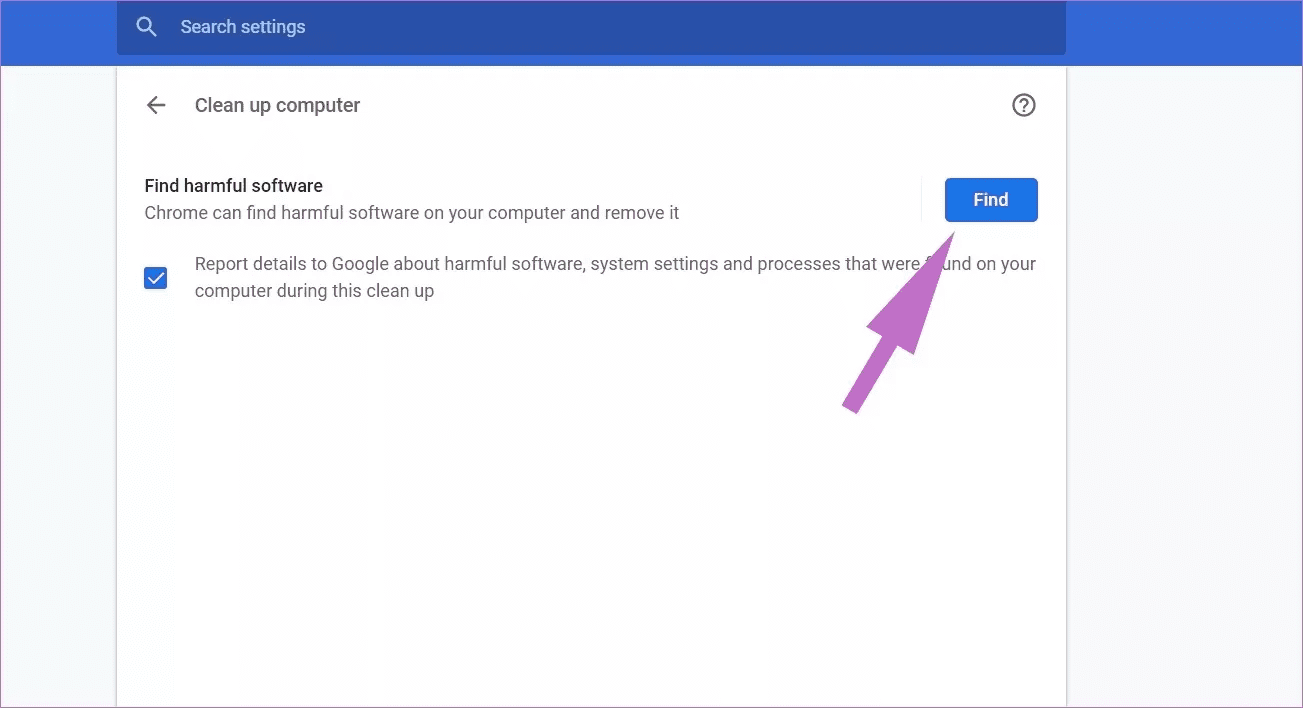
Step 3: Scroll down to the Reset and clean up section and click Clean up computer.
That will open a window where you can launch the Chrome malware scan. Just select the Find button to start the scan.
7. Update Google Chrome
A recent Chrome update might have messed up the memory management on the device. Thankfully, the Chrome software team is quick to resolve such issues with a patch.
Step 1: Open Google Chrome on the device.
Step 2: Click on the three-dot menu at the upper right corner and open Settings.

Step 3: Navigate to the About Chrome menu and update Google Chrome to the latest version.
Enjoy a Smooth Chrome Experience
Google Chrome memory leak is a headache, especially when you are on the verge of getting things done. Follow the steps above and troubleshoot the Chrome memory leak issue on Windows and Mac. Do let us know which trick worked for you in the comments below.
Next up: Getting too much notification from the Google Chrome browser? Read the post below to learn why it’s happening and how to fix it.
Was this helpful?
Last updated on 13 July, 2021
Read Next
 6 Ways to Fix Google Chrome Error Code: Out of Memory on Windows
Basic Fixes Restart PC: Restart your PC to fix temporary bugs and glitches.
6 Ways to Fix Google Chrome Error Code: Out of Memory on Windows
Basic Fixes Restart PC: Restart your PC to fix temporary bugs and glitches.
 3 Ways to Fix Safari High Memory Usage on Mac
Basic Fixes Close irrelevant tabs: Close the tabs that you don't use frequently in Safari.
3 Ways to Fix Safari High Memory Usage on Mac
Basic Fixes Close irrelevant tabs: Close the tabs that you don't use frequently in Safari.
 6 Ways to Fix Firefox Using a Lot of Memory on Windows Device
Basic Fixes: Restart your Windows PC: Restarting the system can help fix several issues as it helps to close all system services and start them afresh.
6 Ways to Fix Firefox Using a Lot of Memory on Windows Device
Basic Fixes: Restart your Windows PC: Restarting the system can help fix several issues as it helps to close all system services and start them afresh.
 5 Ways to Fix “Your Computer Is Low on Memory” Error on Windows 10 and Windows 11
Try Basic Fixes Close unwanted apps and programs: Start by closing any unwanted apps and programs on your computer, especially the ones consuming a major chunk of your PC’s memory.
5 Ways to Fix “Your Computer Is Low on Memory” Error on Windows 10 and Windows 11
Try Basic Fixes Close unwanted apps and programs: Start by closing any unwanted apps and programs on your computer, especially the ones consuming a major chunk of your PC’s memory.
 4 Ways to Fix DirectX ‘Could Not Allocate Sufficient Memory’ Error on Windows 11
Common Fixes Launch the Windows Memory Diagnostic tool: Press the Windows key, search Windows Memory Diagnostic tool, and click to open it.
4 Ways to Fix DirectX ‘Could Not Allocate Sufficient Memory’ Error on Windows 11
Common Fixes Launch the Windows Memory Diagnostic tool: Press the Windows key, search Windows Memory Diagnostic tool, and click to open it.
 9 Ways to Fix Memory Integrity Is Off Error on Windows 11/10
Fix 1: Review Incompatible Drivers Step 1: Press the Windows key, type Windows Security, and hit Enter.
9 Ways to Fix Memory Integrity Is Off Error on Windows 11/10
Fix 1: Review Incompatible Drivers Step 1: Press the Windows key, type Windows Security, and hit Enter.
 6 Ways to Reduce Microsoft Teams Memory Usage in Windows 10 or 11
Fix 1: Disable GPU Hardware Acceleration in Teams GPU hardware acceleration is enabled by default in Microsoft Teams for smooth performance.
6 Ways to Reduce Microsoft Teams Memory Usage in Windows 10 or 11
Fix 1: Disable GPU Hardware Acceleration in Teams GPU hardware acceleration is enabled by default in Microsoft Teams for smooth performance.
 4 Ways to Increase Dedicated Video Memory (VRAM) in Windows 10/11
Method 1: Upgrade to a Dedicated GPU The best way to increase the dedicated Video RAM (VRAM) on your Windows is by upgrading the Graphics card in your PC.
4 Ways to Increase Dedicated Video Memory (VRAM) in Windows 10/11
Method 1: Upgrade to a Dedicated GPU The best way to increase the dedicated Video RAM (VRAM) on your Windows is by upgrading the Graphics card in your PC.
The article above may contain affiliate links which help support Guiding Tech. The content remains unbiased and authentic and will never affect our editorial integrity.