Basic Fixes:
- Name the Hosts file correctly: Naming is essential. You should ensure the file is named Hosts and not Host, as this may trigger the problem.
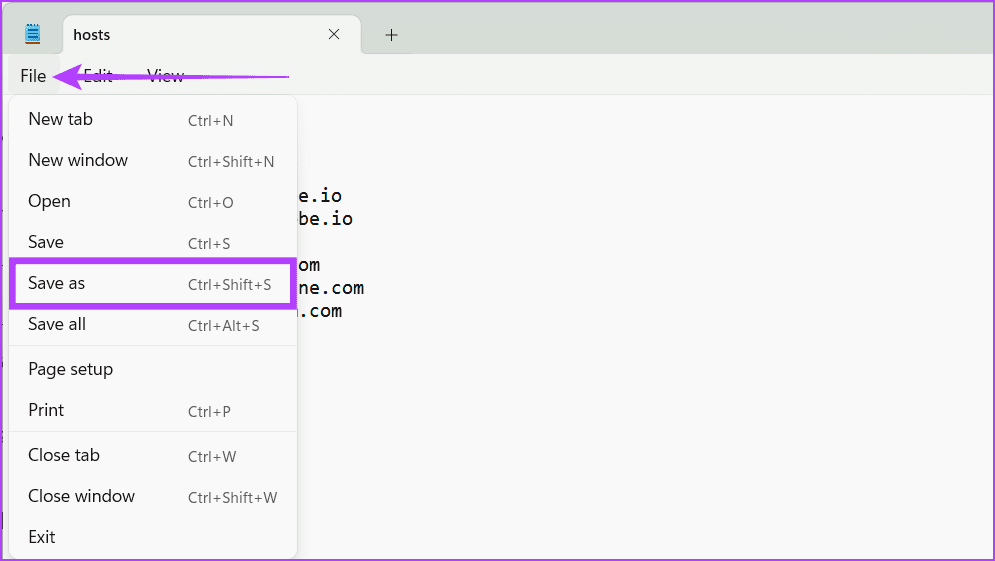
- Ensure the file is encoded with ANSI or UTF-8 without BOM: If the Hosts file is not encoded correctly in ANSI or UTF-8 format, it can lead to errors. The Hosts file should be encoded in ANSI or UTF-8 without BOM. You can do this by navigating File > Save As.
- Remove unnecessary white spaces: There should be no unneeded whitespace. The format on all lines should be an IP address, horizontal tab, or a single space, followed by your hostname.
- Confirm to include all URL variants: You must ensure that all URL variants, such as www, HTTP, and HTTP.
- Check for permission issues: If the Hosts file on your device is not functioning as anticipated, check for permission-related problems. To operate optimally, the Hosts file must have the Read and Read & Execute permissions.
Fix 1: Flush DNS Cache
The DNS cache stores information about previously visited websites, and if this data becomes outdated or corrupted, it can lead to conflicts with the Hosts file entries. By flushing the DNS cache, you are clearing this stored information and forcing the system to re-query and update the DNS records.
Step 1: Press Windows + S on your keyboard > type Command Prompt > click Run as administrator > select Yes when prompted.
Step 2: Enter the below-mentioned command in your Command Prompt window and hit Enter.
ipconfig /flushdns

Now, you can see a confirmation message saying, “You’ve successfully flushed the DNS.” Once you see it, restart your device to apply the changes and check if this fixes the problem.
Fix 2: Disable the Proxy
Disabling the proxy lets the system use the hosts file directly. This means it can find website addresses based on the information in the hosts file. This is useful when you want exact control over resolving domain names. It ensures that the information in the hosts file is used first so the system can find addresses more reliably and accurately. Here’s how to do so:
Step 1: Press the Windows + I keys > open the Settings app.
Step 2: Head to Network & Internet > select Proxy.

Step 3: Under Automatic proxy setup, turn off the toggle for Automatically detect settings.

Step 4: Under Manual proxy setup, click Edit next to Use a proxy server.

Step 5: Turn off the toggle for Use a proxy server > click Save.

Fix 3: Reset the Hosts File
The Hosts file is responsible for mapping hostnames to IP addresses, and if corrupted or misconfigured over time, it can lead to connectivity problems. One viable solution when encountering issues with its functionality is to reset the Hosts file. Here’s how to do so:
Step 1: Press the Windows key on your keyboard. In the search box, type This PC > click Open.

Step 2: To find the Hosts file, enter the location below in the address bar and press Enter.
C:\Windows\System32\drivers\etc
Step 3: Right-click on the hosts file and select the Delete icon.

Step 4: Click Continue on the pop-up and select Yes in the prompt.
Step 5: Now, head to a new folder. Right-click in the empty area, select New, and choose Text Document.

Step 6: Open the file and paste the below information into it.
#

127.0.0.1 localhost

::1 localhost

127.0.0.1 3ca52znvmj.adobe.io

127.0.0.1 cc-api-data.adobe.io

127.0.0.1 ic.adobe.io

127.0.0.1 genuine.adobe.com

127.0.0.1 prod.adobegenuine.com

127.0.0.1 assets.adobedtm.com
Step 7: Click File > select Save As.
Step 8: Rename the file to hosts. Ensure that the Encoding is UTF-8 and click Save.

Step 9: Now, copy the hosts file and paste it into the new folder.
Grant the required permissions and restart your device. This should fix your Windows Hosts file.
Fix 4: Reset NetBIOS Cache
If the Hosts file is not working properly, resetting the NetBIOS cache can help. The NetBIOS cache is like a storage place for names and their matching IP addresses. If this storage gets messed up, it can cause problems finding addresses, which affects the Hosts file.
Step 1: Open Command prompt with admin rights.
Step 2: Type the below mentioned in the CMD window and hit Enter.
nbtstat -R

Fix 5: Disable DNS Over HTTPS (DOH)
The DoH protocol encrypts DNS queries, potentially bypassing local DNS configurations, such as those specified in the Hosts file. This encryption can interfere with the system’s ability to resolve domain names according to the entries in the Hosts file. To disable it, follow the steps below.
Note: We use Chrome but the steps are similar for other web browsers like Firefox.
Step 1: Launch the Chrome browser > click the three-dot icon > choose Settings.
Step 2: Navigate to Privacy and security from the left and choose Security on the right.

Step 3: Scroll down and toggle off Use secure DNS.

Was this helpful?
Last updated on 23 July, 2024
Read Next
 How to Locate and Edit Hosts File on Windows
Where Is the Hosts File Located in Windows The host files are stored locally on your computer within the C drive.
How to Locate and Edit Hosts File on Windows
Where Is the Hosts File Located in Windows The host files are stored locally on your computer within the C drive.
 4 Fixes When the Windows File Explorer Stuck at ‘Working on It’
Basic Fixes: Update Windows: It's nice to start with a Windows Update since this will fix minor glitches that may trigger the problem.
4 Fixes When the Windows File Explorer Stuck at ‘Working on It’
Basic Fixes: Update Windows: It's nice to start with a Windows Update since this will fix minor glitches that may trigger the problem.
 4 Fixes for “Compress to ZIP File” Option Not Working in Windows 11
Try Basic Fixes Try another file or folder: Compressing another file or folder should help confirm if it's a system-wide issue.
4 Fixes for “Compress to ZIP File” Option Not Working in Windows 11
Try Basic Fixes Try another file or folder: Compressing another file or folder should help confirm if it's a system-wide issue.
 5 Fixes for “Word Experienced an Error Trying to Open the File” Error in Windows
Fix 1: Unblock Your Word File Microsoft Word may fail to open a document if it has been altered by third-party software.
5 Fixes for “Word Experienced an Error Trying to Open the File” Error in Windows
Fix 1: Unblock Your Word File Microsoft Word may fail to open a document if it has been altered by third-party software.
 5 Fixes for the “Outlook Data File Has Reached the Maximum Size” Error in Windows
Fix 1: Compact the Microsoft Outlook Data File Compacting your Outlook data file removes unused space and purges redundant information from the data file, effectively reducing its size.
5 Fixes for the “Outlook Data File Has Reached the Maximum Size” Error in Windows
Fix 1: Compact the Microsoft Outlook Data File Compacting your Outlook data file removes unused space and purges redundant information from the data file, effectively reducing its size.
 6 Fixes For ‘Path too Long’ Error When Extracting a ZIP File in Windows 10 and 11
Fix 1: Restart Windows Explorer Windows Explorer offers interface support for many system apps, and if it encounters a glitch, you may have trouble with File Explorer.
6 Fixes For ‘Path too Long’ Error When Extracting a ZIP File in Windows 10 and 11
Fix 1: Restart Windows Explorer Windows Explorer offers interface support for many system apps, and if it encounters a glitch, you may have trouble with File Explorer.
 4 Fixes for OneDrive Not Showing Up in File Explorer on Windows
Fix 1: Restart Windows Explorer Windows Explorer is a system process that handles the graphical user interface for File Explorer.
4 Fixes for OneDrive Not Showing Up in File Explorer on Windows
Fix 1: Restart Windows Explorer Windows Explorer is a system process that handles the graphical user interface for File Explorer.
 4 Ways to Fix File Explorer Not Working on Windows 11
Try Basic Fixes Scan for malware: It's possible that a malicious virus has affected your PC, disrupting regular operations on Windows 11.
4 Ways to Fix File Explorer Not Working on Windows 11
Try Basic Fixes Scan for malware: It's possible that a malicious virus has affected your PC, disrupting regular operations on Windows 11.
The article above may contain affiliate links which help support Guiding Tech. The content remains unbiased and authentic and will never affect our editorial integrity.