Fix 1: Open Excel in Safe Mode
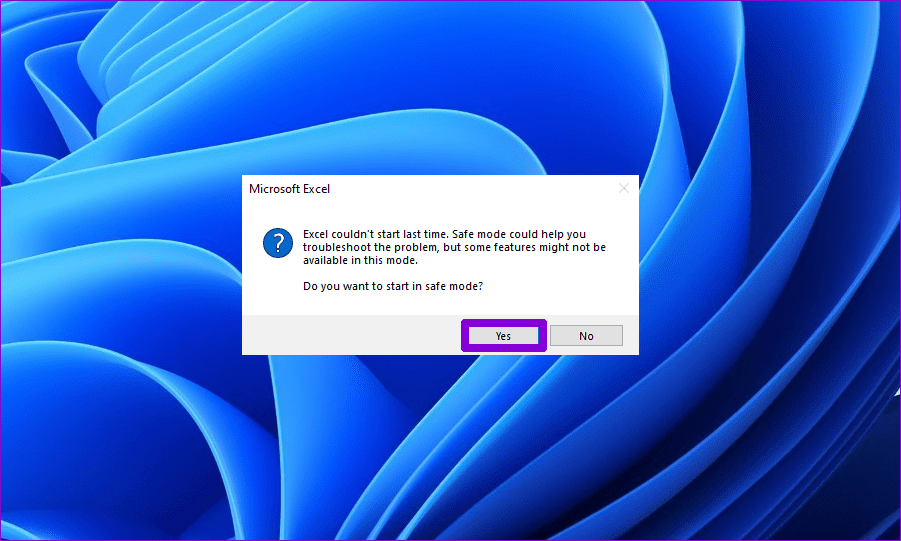
Opening Microsoft Excel in safe mode can help you troubleshoot all kinds of errors and issues. Hence, try that first. When the “Excel couldn’t start last time” error message appears, click Yes to open Excel in safe mode.
If you have already dismissed the error message, press the Windows + R keyboard shortcut to open the Run dialog. Type excel -safe in the box and press Enter to open Excel in safe mode.
If you don’t experience problems, one of your add-ins is likely preventing Excel from opening in normal mode. In that case, you will need to disable all of your add-ins and re-enable them one at a time.
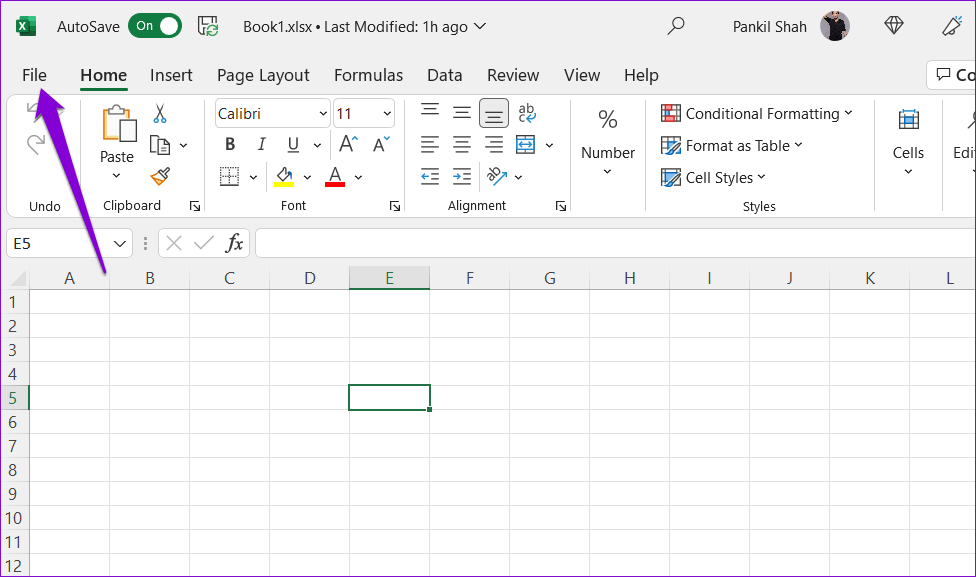
Step 1: Open Microsoft Excel on your computer and click the File menu in the top-left corner.
Step 2: Click Options at the bottom-left corner.

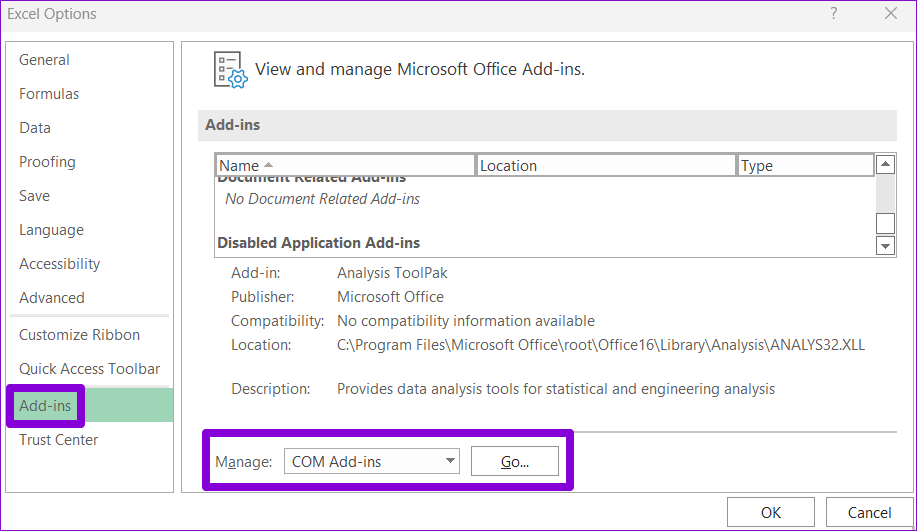
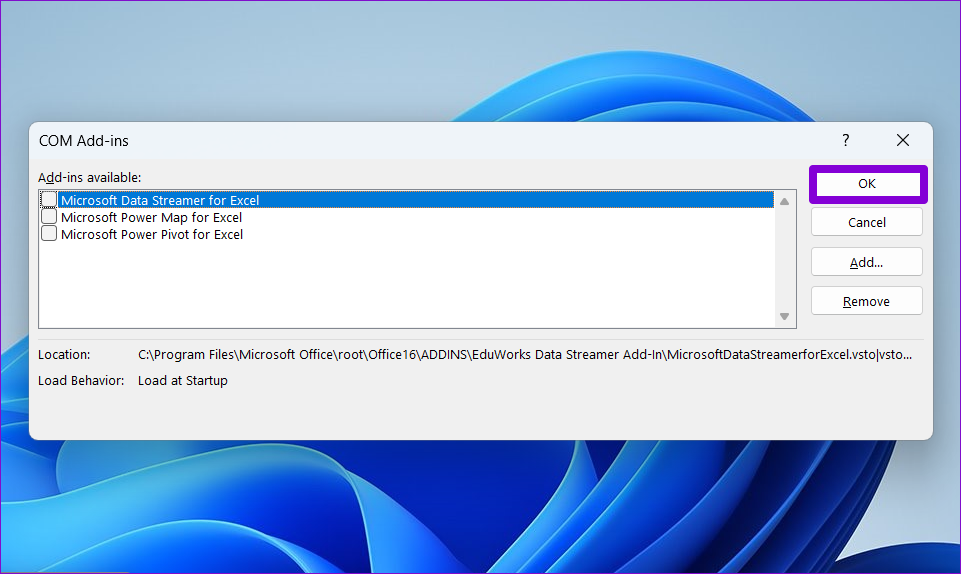
Step 3: Switch to the Add-ins tab and select COM Add-ins in the Manage drop-down menu. Then, click the Go button next to it.
Step 4: Clear all the checkboxes and click OK.
After disabling add-ins, restart Excel, and re-enable your add-ins one at a time. Try using Excel after enabling each add-in. Once you find the troublesome add-in, consider removing it.
Fix 2: Empty the Excel Application Startup Folder
When you open Microsoft Excel on your PC, it loads various account-specific configuration settings, templates, and other essential data. If this data has become corrupted or inaccessible, you may encounter errors like “Excel couldn’t start last time” on your PC.
To fix this, you need to empty the files in the Excel startup folder. Doing so will force Excel to recreate the missing files, effectively resolving any problems.
Step 1: Press the Windows key + R to open the Run dialog box. Type %appdata%\Microsoft\Excel in the box and press Enter.
Step 2: In the File Explorer window, press the Ctrl + A keyboard shortcut to select all the files and click the trash icon at the top.

Fix 3: Reset Excel Options
One of your Excel preferences may be causing the program to misbehave and trigger errors. Instead of going through each Excel setting individually, it’s easier to reset them using the Registry Editor.
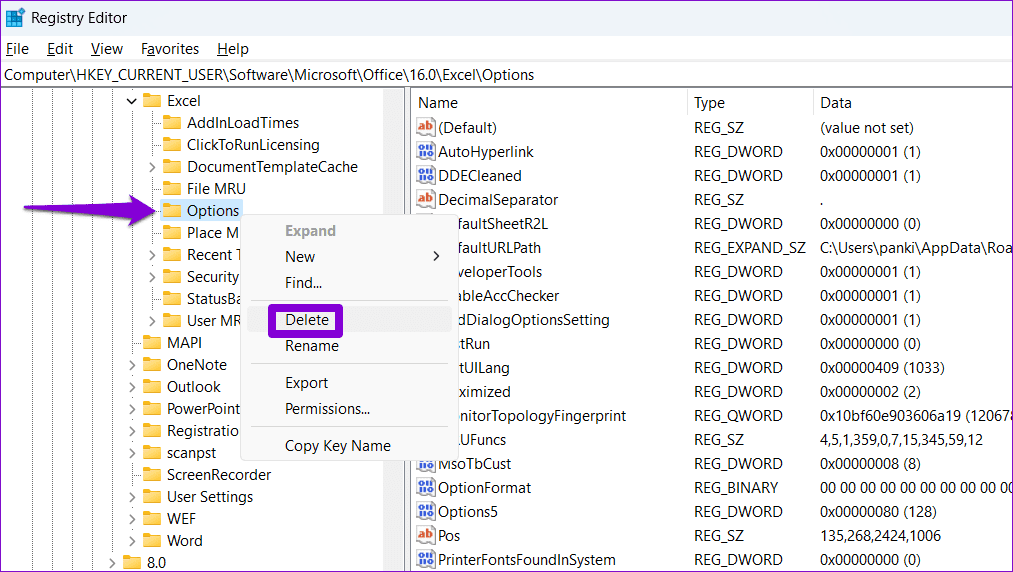
Step 1: Press the Windows key + R to open the Run dialog box. Type regedit in the box and press Enter.
Step 2: Paste the following path in the address bar at the top and press Enter.
HKEY_CURRENT_USER\SOFTWARE\Microsoft\Office\16.0\Excel
Step 3: Right-click the Options key and select Delete. Select Yes to confirm.
Restart your PC after this and try using Excel again.
Fix 4: Run the Office Repair Tool
If nothing works or if you experience similar issues with other Office apps, you can consider running Microsoft’s Office repair tool. It will scan all your Office apps, including Excel, for any issues and fix them.
Step 1: Press the Windows + R keyboard shortcut to open the Run dialog box. Type appwiz.cpl in the text box and press Enter.
Step 2: Locate and select the Microsoft Office suite. Then, click the Change option at the top.

Step 3: Select the Online Repair option and click Repair.

Was this helpful?
Last updated on 18 July, 2024
Read Next
 8 Best Fixes for WhatsApp Couldn’t Start Error on iPhone
WhatsApp has several useful features that have made it one of the most popular messaging platforms globally.
8 Best Fixes for WhatsApp Couldn’t Start Error on iPhone
WhatsApp has several useful features that have made it one of the most popular messaging platforms globally.
 5 Fixes for ‘WhatsApp Couldn’t Complete Backup’ Error on Android and iPhone
Fix 1: Initiate Backup Manually At times, minor network or app-related issues can interrupt the WhatsApp backup process and throw the "Couldn't complete backup" error.
5 Fixes for ‘WhatsApp Couldn’t Complete Backup’ Error on Android and iPhone
Fix 1: Initiate Backup Manually At times, minor network or app-related issues can interrupt the WhatsApp backup process and throw the "Couldn't complete backup" error.
 4 Ways to Fix “Couldn’t Preview File” Error on Google Drive
Try Basic Fixes Check if the file format is supported: It's important to note that Google Drive cannot preview every file format.
4 Ways to Fix “Couldn’t Preview File” Error on Google Drive
Try Basic Fixes Check if the file format is supported: It's important to note that Google Drive cannot preview every file format.
 5 Ways to Fix WhatsApp Status Couldn’t Send Error
Try Basic Fixes Try another image or video: Uploading another image or video will help verify whether the issue is related to the specific media file.
5 Ways to Fix WhatsApp Status Couldn’t Send Error
Try Basic Fixes Try another image or video: Uploading another image or video will help verify whether the issue is related to the specific media file.
 4 Ways to Fix the Couldn’t Post Comment Error on Instagram App
Basic Fixes Check network connection: Ensure there's no problem with your Wi-Fi or cellular network.
4 Ways to Fix the Couldn’t Post Comment Error on Instagram App
Basic Fixes Check network connection: Ensure there's no problem with your Wi-Fi or cellular network.
 4 Ways to Fix “We Couldn’t Connect to the Update Service” Issue on Windows
Basic Fixes Restart PC: Restart your PC to fix temporary bugs and glitches.
4 Ways to Fix “We Couldn’t Connect to the Update Service” Issue on Windows
Basic Fixes Restart PC: Restart your PC to fix temporary bugs and glitches.
 5 Fixes for “Application Was Unable to Start Correctly (0xc0000142)” Error for Office Apps
Fix 1: Run the Office App as Administrator Lack of relevant permissions can prevent Office apps from accessing essential files, triggering the "The application was unable to start correctly (0xc0000142)"
5 Fixes for “Application Was Unable to Start Correctly (0xc0000142)” Error for Office Apps
Fix 1: Run the Office App as Administrator Lack of relevant permissions can prevent Office apps from accessing essential files, triggering the "The application was unable to start correctly (0xc0000142)"
 5 Ways to Fix Instagram Couldn’t Refresh Feed
Basic Fixes Check network connection: Ensure there's no problem with your Wi-Fi or cellular network.
5 Ways to Fix Instagram Couldn’t Refresh Feed
Basic Fixes Check network connection: Ensure there's no problem with your Wi-Fi or cellular network.
The article above may contain affiliate links which help support Guiding Tech. The content remains unbiased and authentic and will never affect our editorial integrity.