Try Basic Fixes
- Update or reinstall the problematic software: Compatibility issues with your app or program can trigger the “DLL is not designed to run on Windows” error on your PC. If this error only affects a specific app or program, try updating or reinstalling it and see if it helps.
- Scan for malware: The presence of malware on your PC could also prevent DLL files from running correctly on your Windows 10 or 11 PC and cause such problems. To overrule this, run a full system scan using Windows Defender or a reliable third-party antivirus program.
- Install Windows updates: Microsoft frequently releases updates for your Windows PC to add new features, improve performance, and fix bugs and issues. It’s a good idea to install any pending Windows Updates and see if that helps.
Fix 1: Check for Permission Issues
A lack of necessary permissions is a common reason you may encounter the “DLL is not designed to run on Windows” error while running an app or program. Here’s how to fix that.
Step 1: Click the search icon on the taskbar, type the name of the program that’s giving you the error, and select Open file location.

Step 2: Right-click on the .EXE file of the program and select Properties.

Step 3: Under the Security tab, click the Edit button.

Step 4: Select Users and tick the Allow checkbox for Full control. Then, hit Apply > OK.

Fix 2: Run the SFC and DISM Scans
Corrupt or damaged system files on your computer can also cause such errors. You can run the built-in SFC (System File Checker) and DISM (Deployment Image Servicing and Management) scans to fix the damaged files causing the error.
Step 1: Right-click on the Start icon and select Terminal (Admin) from the list.

Step 2: In the console, type the following command and press Enter.
SFC /scannow

Step 3: Run the following commands one by one and press Enter after each one to run the DISM scan:
DISM /Online /Cleanup-Image /CheckHealth
DISM /Online /Cleanup-Image /ScanHealth
DISM /Online /Cleanup-Image /RestoreHealth

Now, restart your PC to check if the issue persists.
Fix 3: Repair the Visual C++ Redistributable Packages
Several popular Windows apps and programs rely on Visual C++ runtime libraries to provide essential features and operate smoothly. However, if there is a problem with the Visual C++ redistributable package on your computer, you may get the error “DLL is not designed to run on Windows” while opening or using a program. Here’s how to can fix that.
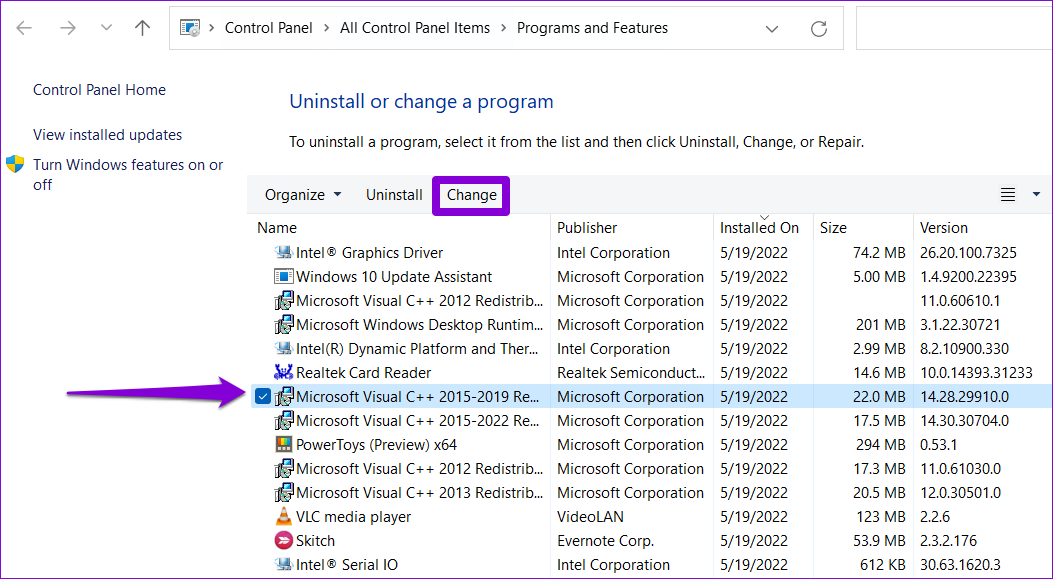
Step 1: Press the Windows + R keyboard shortcut to open the Run dialog box. Type appwiz.cpl and press Enter.
Step 2: Select the Microsoft Visual C++ Redistributable package and click Change. Repeat this process to repair all the packages.
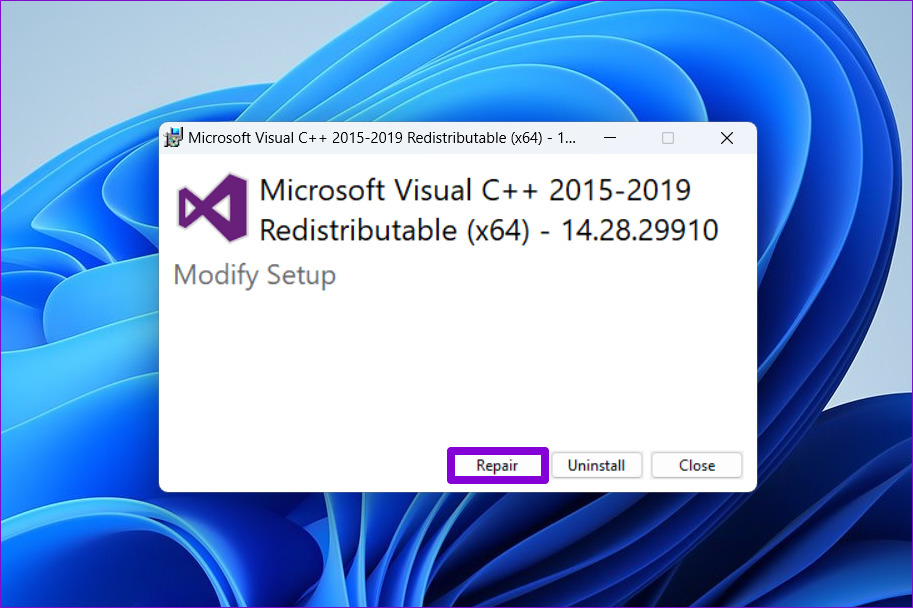
Step 3: Hit the Repair button and wait for the process to complete.
Fix 4: Re-Register the Problematic DLL File Using Command Prompt
Another thing you can do to resolve this error is to re-register the problematic DLL file. Here’s how:
Step 1: Right-click on the Start icon and select Terminal (Admin) from the list.
Step 2: In the console, type regsvr32, followed by the name of the DLL file. For instance, if you were to re-register the msxml3.dll file, your command would be this:
regsvr32 msxml3.dll
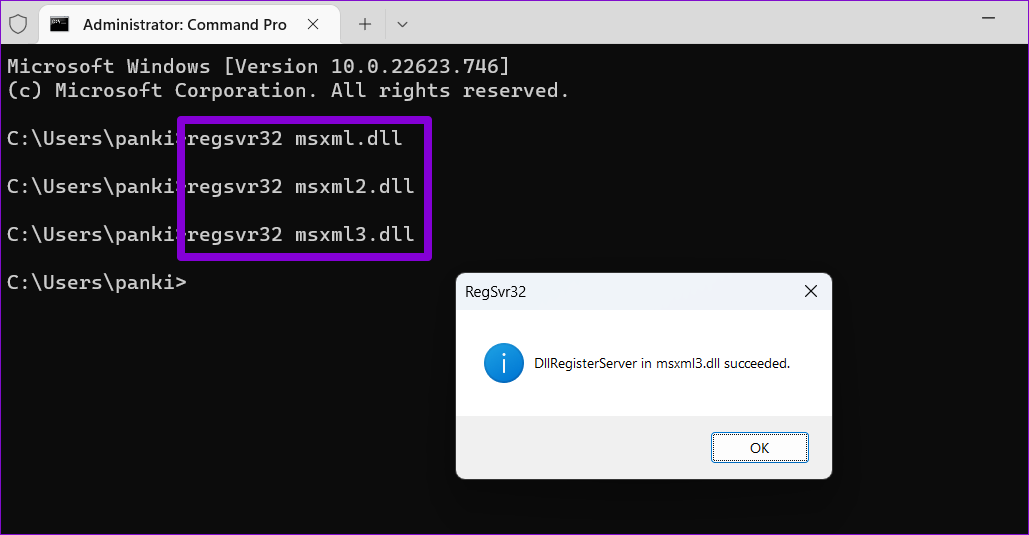
Exit the Terminal window and check if Windows still shows the error.
Fix 5: Perform a System Restore
Lastly, if the “DLL is not designed to run on Windows” error has only started appearing recently, use system restore to revert your PC to a point when it was working properly. Here’s how.
Step 1: Click the search icon on the taskbar, type create a restore point, and press Enter.

Step 2: Navigate to the System Protection tab and click the System Restore button.

Step 3: Select the Recommended restore option and click the Next button at the bottom.

Step 4: Click Finish and allow Windows to restore to the specified restore point.

Was this helpful?
Last updated on 03 September, 2024
Read Next
 4 Fixes for Excel Has Run Into an Error Problem on Windows
Fix 1: Open Excel in Safe Mode Opening Excel in safe mode can help you determine whether one of your add-ins is interfering with Excel and causing it to malfunction.
4 Fixes for Excel Has Run Into an Error Problem on Windows
Fix 1: Open Excel in Safe Mode Opening Excel in safe mode can help you determine whether one of your add-ins is interfering with Excel and causing it to malfunction.
 Top 7 Fixes for We’ve Run Into an Issue Error in Microsoft Teams on Windows
Microsoft Teams is a popular business collaboration app among Windows users, and for good reason.
Top 7 Fixes for We’ve Run Into an Issue Error in Microsoft Teams on Windows
Microsoft Teams is a popular business collaboration app among Windows users, and for good reason.
 4 Ways to Fix “This App Can’t Run on Your PC” Error in Windows 11
https://youtu.be/7WuW8HnSp9Q Try Basic Fixes Launch the app as an administrator: If an app lacks the necessary permissions to work on your computer, it could fail to launch and trigger the
4 Ways to Fix “This App Can’t Run on Your PC” Error in Windows 11
https://youtu.be/7WuW8HnSp9Q Try Basic Fixes Launch the app as an administrator: If an app lacks the necessary permissions to work on your computer, it could fail to launch and trigger the
 Top 5 Ways to Fix a D3D11-Compatible GPU is Required to Run the Engine Error on Windows 11
Preliminary Fixes Update DirectX: Updating DirectX can resolve compatibility issues and errors related to the D3D11 GPU.
Top 5 Ways to Fix a D3D11-Compatible GPU is Required to Run the Engine Error on Windows 11
Preliminary Fixes Update DirectX: Updating DirectX can resolve compatibility issues and errors related to the D3D11 GPU.
 5 Fixes for “Word Experienced an Error Trying to Open the File” Error in Windows
Fix 1: Unblock Your Word File Microsoft Word may fail to open a document if it has been altered by third-party software.
5 Fixes for “Word Experienced an Error Trying to Open the File” Error in Windows
Fix 1: Unblock Your Word File Microsoft Word may fail to open a document if it has been altered by third-party software.
 7 Best Fixes for Windows Update Error 0x800f081f in Windows 11
Microsoft regularly releases Windows updates to introduce new features and fix known issues.
7 Best Fixes for Windows Update Error 0x800f081f in Windows 11
Microsoft regularly releases Windows updates to introduce new features and fix known issues.
 6 Ways to Run Disk Cleanup on Windows 11
Method 1: Run the Disk Cleanup Utility From the Control Panel The Control Panel app houses a majority of crucial system tools and Windows settings.
6 Ways to Run Disk Cleanup on Windows 11
Method 1: Run the Disk Cleanup Utility From the Control Panel The Control Panel app houses a majority of crucial system tools and Windows settings.
 6 Ways to Fix Unable to Run EXE Files on Windows 11
Fix 1: Scan for Malware Malware infections can often disrupt Windows operations and prevent EXE files from running on your PC.
6 Ways to Fix Unable to Run EXE Files on Windows 11
Fix 1: Scan for Malware Malware infections can often disrupt Windows operations and prevent EXE files from running on your PC.
The article above may contain affiliate links which help support Guiding Tech. The content remains unbiased and authentic and will never affect our editorial integrity.