Display drivers facilitate communication between the Windows operating system (or any OS) with your GPU. But if the display driver encounters an issue, you will see unexpected errors like the ‘Display Driver Failed to Start’ error.

Notable reasons behind this error include problematic connections, outdated or corrupt drivers, registry issues, and hardware problems. Try these ten methods to resolve the error and make the graphics card run flawlessly.
1. Restart Graphics Drivers
Before diving into more advanced fixes, restart your Windows PC’s graphics drivers. This method applies to all GPU manufacturers so that it will work in PCs with NVIDIA, AMD, or Intel GPUs.
Press the Windows + Ctrl + Shift + B keyboard shortcut at once to initiate the restart. Your screen will flicker and might even go dark for a few seconds. After that, the display will reappear.
If you use an external display with a laptop, the external display connection will not be restored after the restart. You will have to open the Settings app and reconfigure to extend or duplicate the screen on the external display.
2. Use a Powered VGA-USB Adapter
The ‘display driver failed to load’ error causes Windows to switch to the basic display driver. However, if you use a basic VGA-USB adapter to connect an external monitor via USB, you must switch to a powered VGA-USB adapter. This is because newer GPUs do not support the VGA standard.
So, if you need to connect to a monitor with old input options like VGA, use a powered VGA-USB adapter. Also, inspect all the physical cable connections of the components, including the GPU.
3. Update the Graphics Card Driver
Outdated and corrupt drivers can produce errors and poorly work with newer OS updates. So, you must update them using Device Manager. Here’s how:
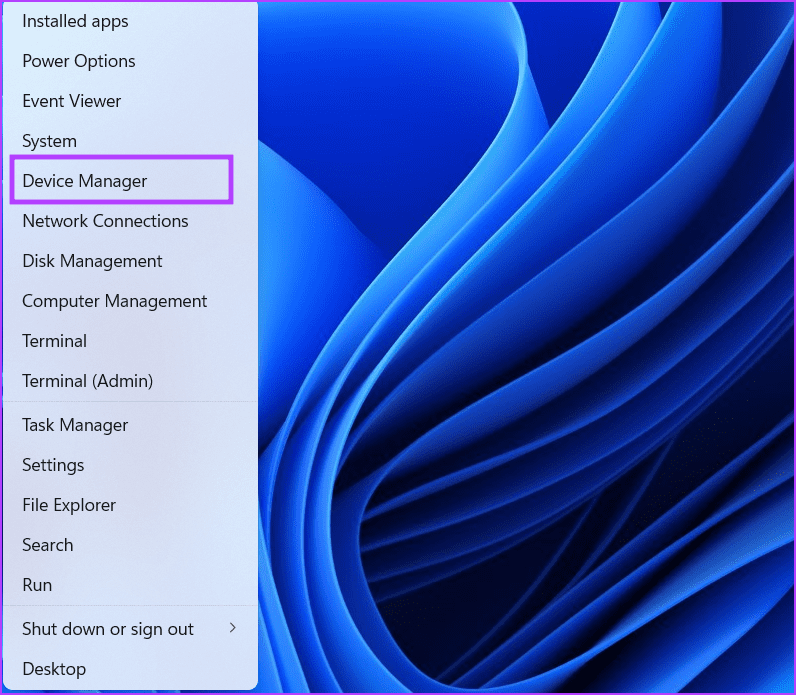
Step 1: Press the Windows key + X shortcut to open the Power User menu. Click on the Device Manager option.
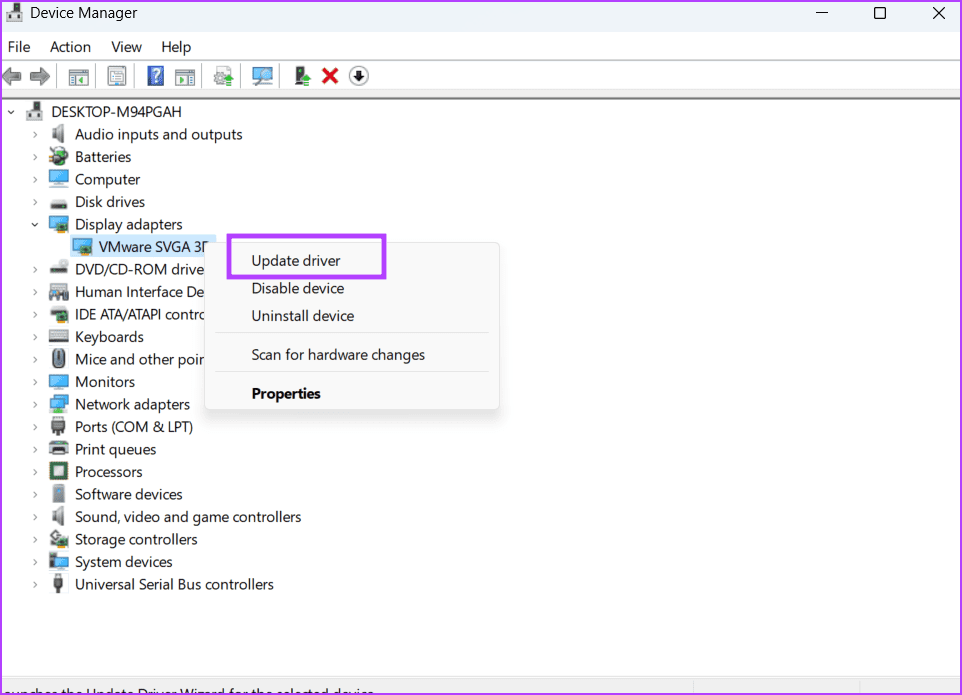
Step 2: Click on the Display adapters option. Then, right-click on the GPU name and select the Update driver option.
Step 3: Click on the ‘Search automatically for drivers’ option. Wait for it to download and install the latest GPU drivers for your PC.

Step 4: Close the Device Manager.
4. Run the Hardware and Devices Troubleshooter
Hardware and Devices Troubleshooter can identify and fix issues with your PC. Microsoft intends to remove the tool, but you can still access it using Command Prompt. Here’s how:
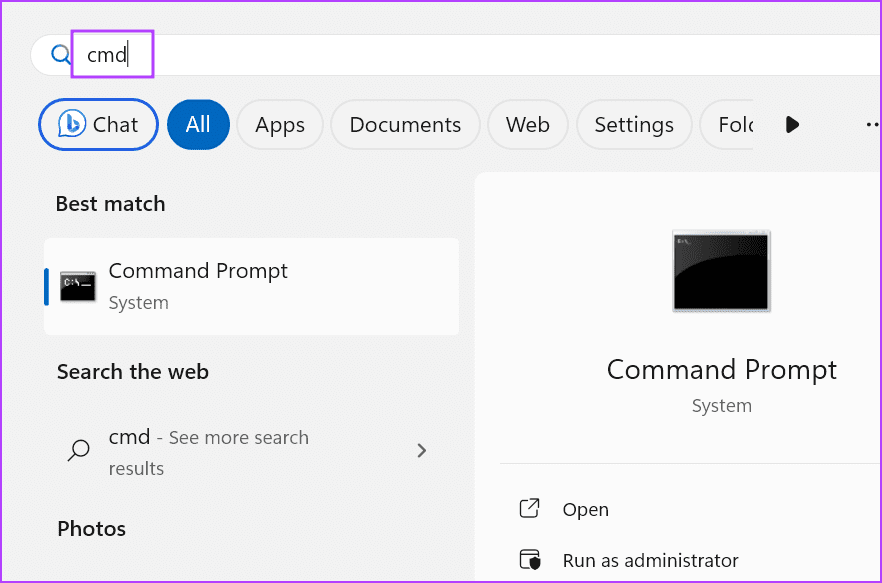
Step 1: Press the Windows key to open the Start menu. Type cmd in the search box and simultaneously press Ctrl + Shift + Enter keyboard shortcut.
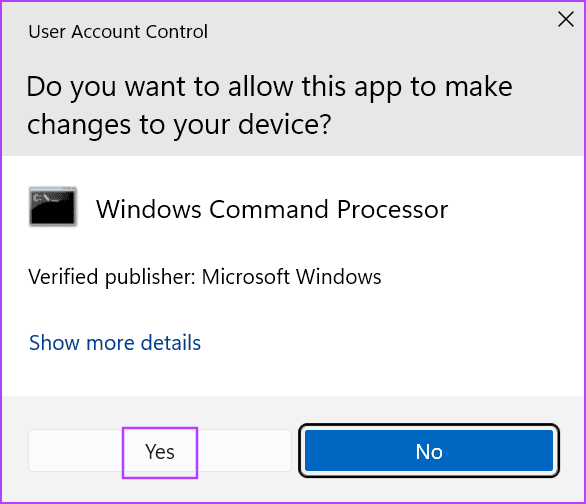
Step 2: The User Account Control window will launch. Click on the Yes button to open the Command Prompt with admin privileges.
Step 3: Type the following command and press Enter to launch the Hardware and Devices troubleshooter:
Msdt.exe -id devicediagnostic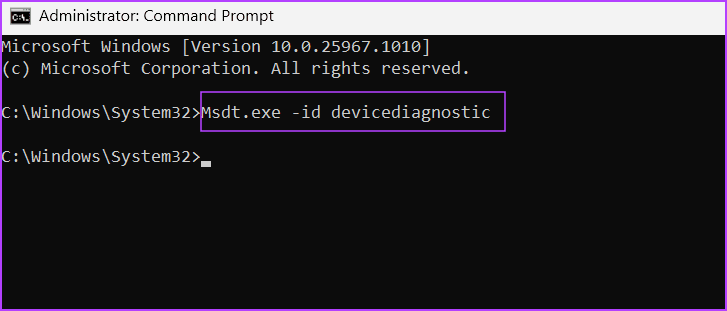
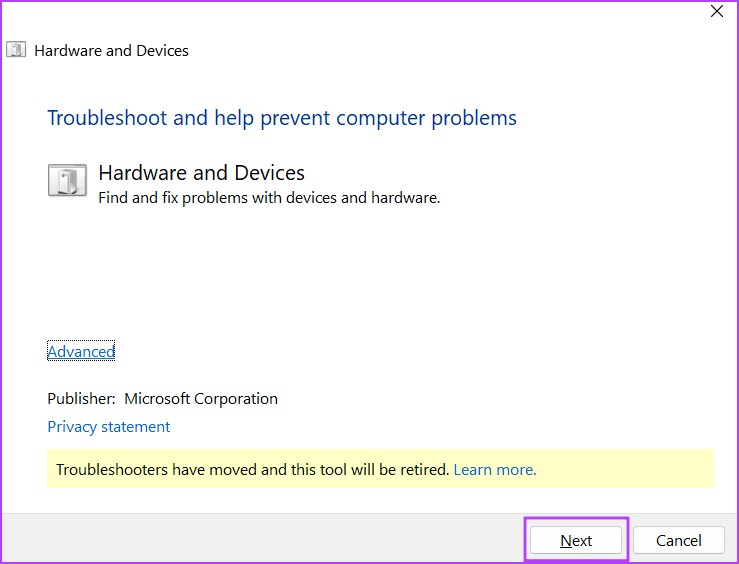
Step 4: Click on the Next button.
Step 5: Wait for the utility to identify and automatically fix problems on your PC.
Step 6: Close the troubleshooter window.
5. Tweak Windows Performance Settings
You must change the Windows Performance settings to fix your PC’s ‘display driver failed to load’ issue. This method worked wonders for some users whose Desktop Window Management program crash was the reason behind the display driver problem. Here’s how:
Step 1: Press the Windows key to open the Start menu. Type the following command in the search box and press Enter to launch the advanced setting window:
%windir%\system32\SystemPropertiesPerformance.exe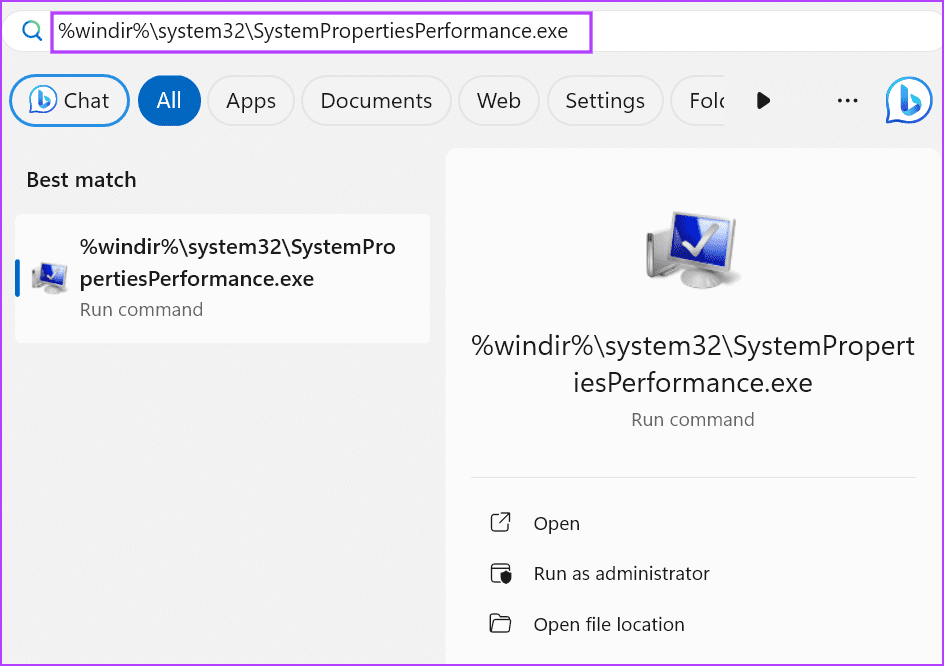
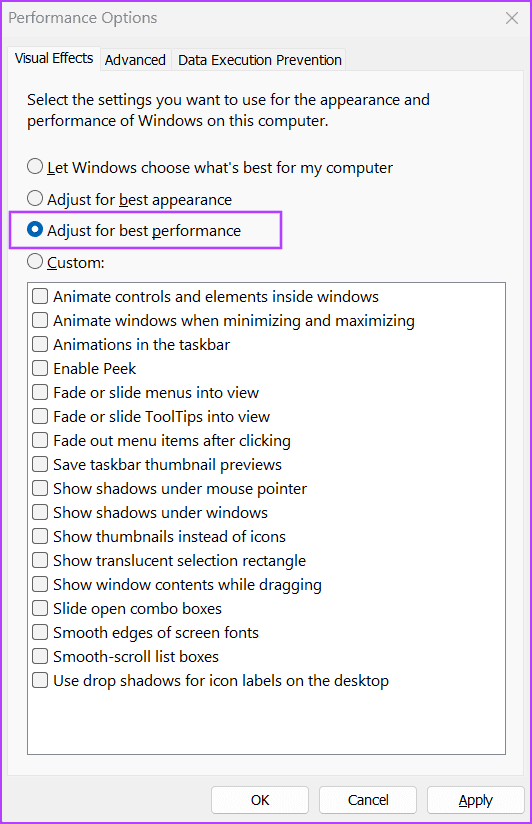
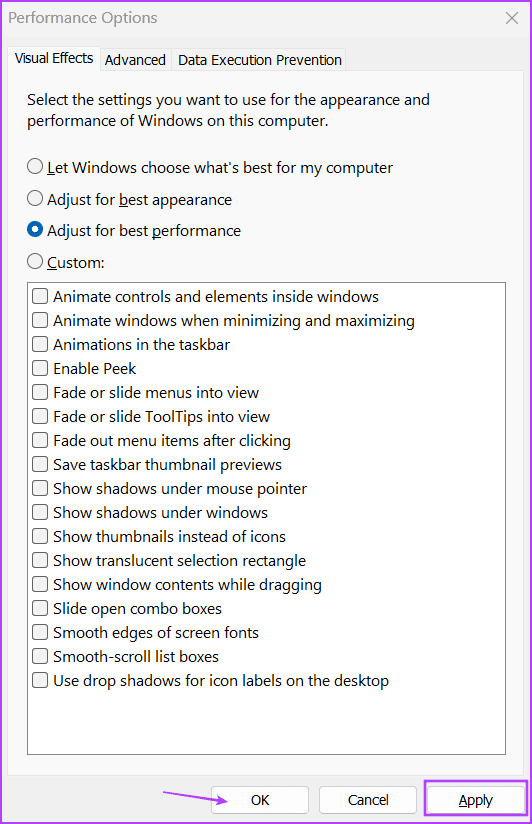
Step 2: Click on the ‘Adjust for best performance’ radio button.
Step 3: Click on the Apply button and then click on the OK button.
Step 4: Restart your PC.
6. Remove Graphics Card Driver Using DDU and Manually Reinstall
If updating the graphics card drivers and running the hardware and devices troubleshooter doesn’t have any effect, and you still see the ‘failed to initialize display adapter’ error, you must remove and reinstall the GPU drivers. For this, you can use the Display Driver Uninstaller (DDU) tool, which wipes all the remnant files related to the GPU drivers. Here’s how:
Step 1: Download the portable version of the Display Driver Uninstaller (DDU) tool.
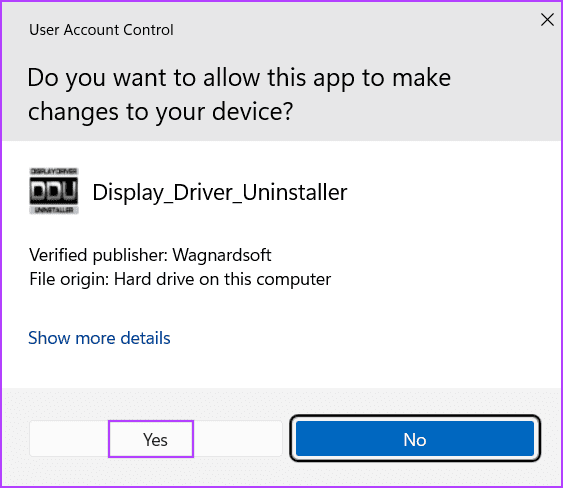
Step 2: Extract the tool and launch it using the executable file. When the User Account Control window pops up, click on the Yes button.
Step 3: Click on the Select device type drop-down list. Then click on the GPU option.
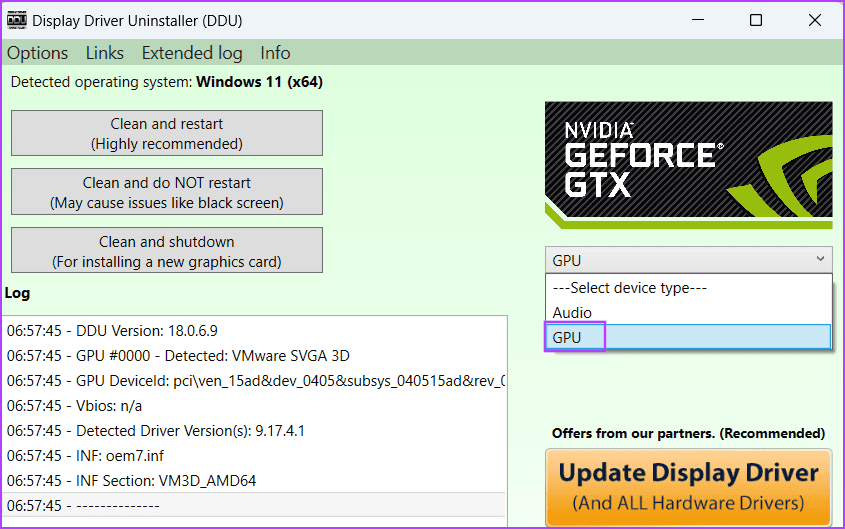
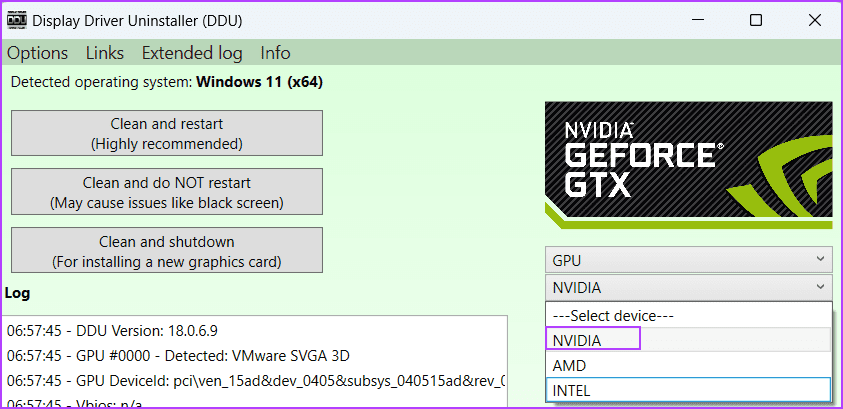
Step 4: Click on the device drop-down list to expand it. Select your GPU name in the list.
Step 5: Click on the Clean and restart option.
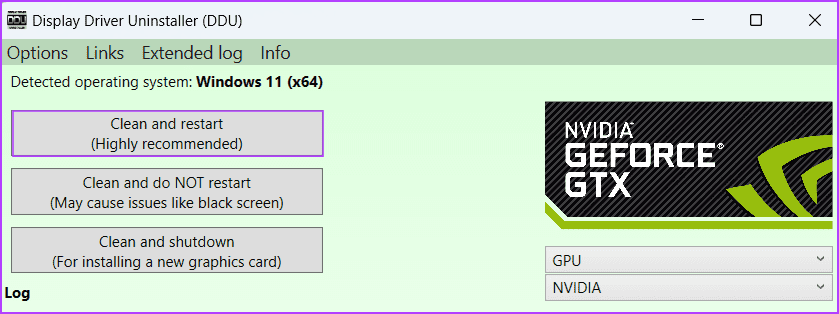
Step 6: Display Driver Uninstaller will start the GPU driver removal process and restart your PC.
Download the latest version of the graphics drivers from your GPU manufacturer’s website and install it on your PC.
7. Modify the System Registry
You can modify the TDR values to resolve this bothersome graphics driver in Windows 11. This change will make Windows wait longer for a response from the GPU. But before doing that, create a registry backup and export it to an external storage drive. Then, repeat the following steps:
Step 1: Press the Windows key to open the Start menu. Type cmd in the search box and simultaneously press Ctrl + Shift + Enter keyboard shortcut.
Step 2: The User Account Control window will open. Click on the Yes button to launch the Command Prompt with admin privileges.
Step 3: Type the following command and press Enter to set a timeout of 60 seconds:
reg add "HKEY_LOCAL_MACHINE\SYSTEM\CurrentControlSet\Control\GraphicsDrivers" /v TdrDelay /t REG_DWORD /d 60 /fStep 4: Execute the following command to increase the time before Windows throws a bug-check:
reg add "HKEY_LOCAL_MACHINE\SYSTEM\CurrentControlSet\Control\GraphicsDrivers" /v TdrDdiDelay /t REG_DWORD /d 60 /f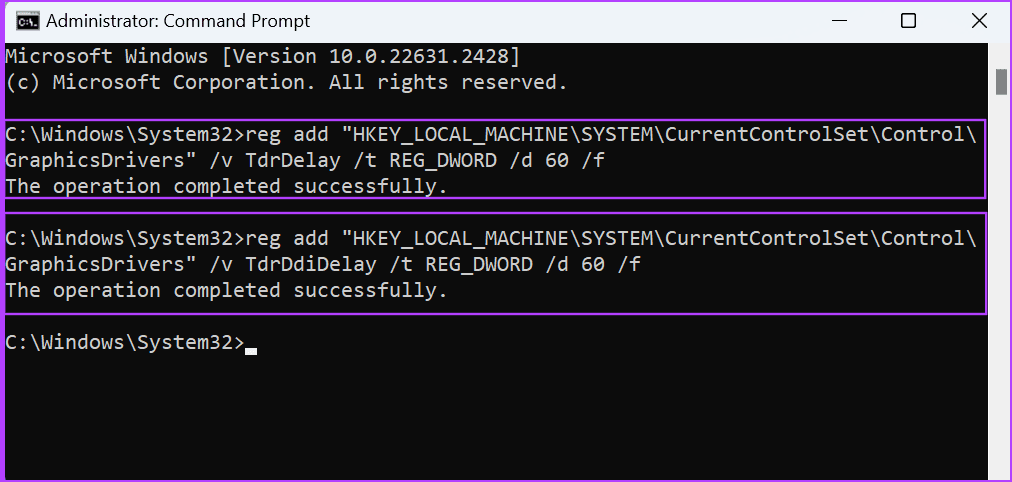
Step 5: Close the Command Prompt window and restart your PC.
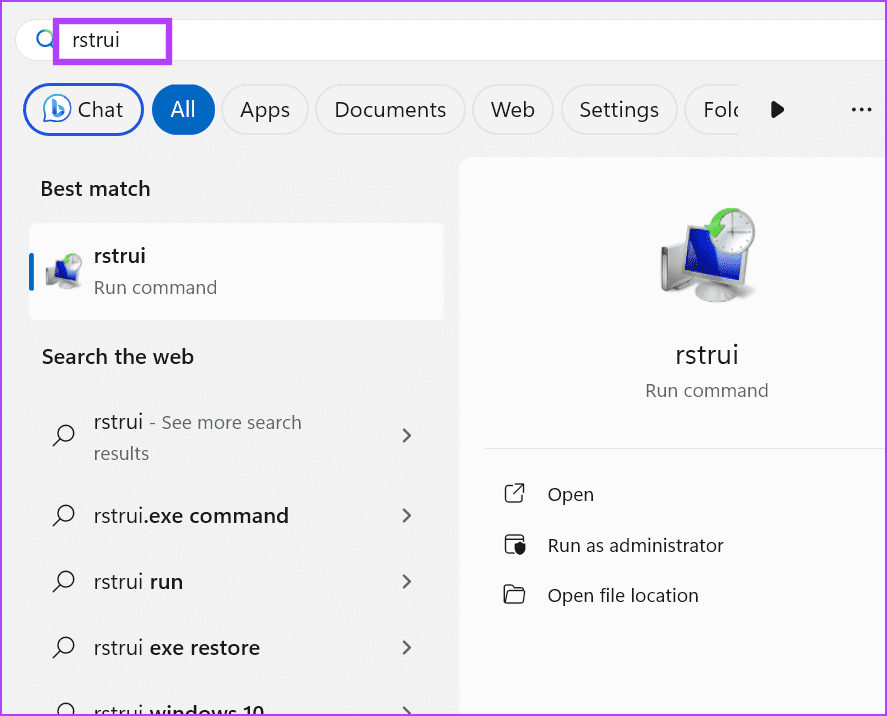
8. Use System Restore
If modifying the registry failed to impact the error, try applying a System Restore point. Here’s how:
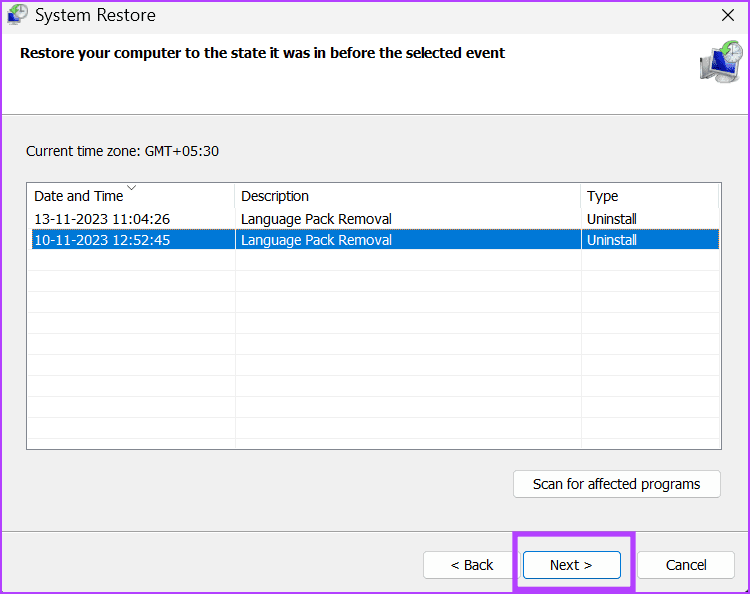
Step 1: Press the Windows key to open the Start menu. Type rstrui in the search bar and press Enter to open the System Restore window.
Step 2: Click on the Next button.
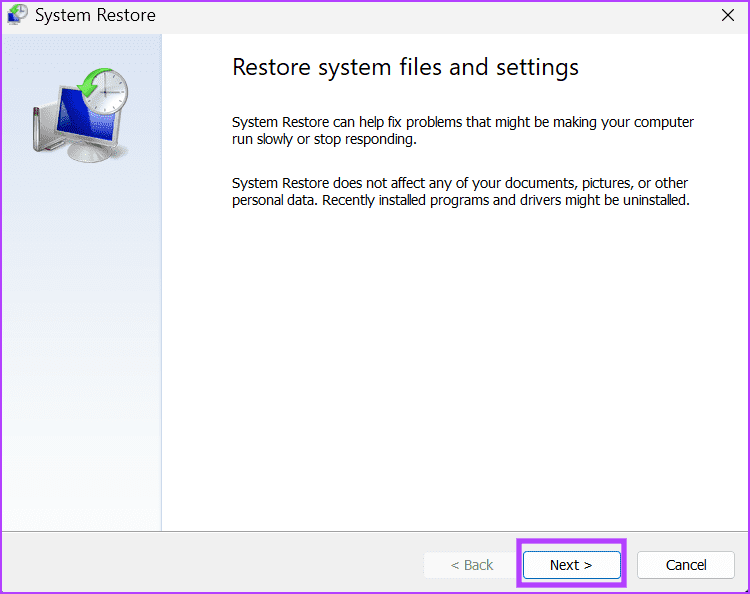
Step 3: Pick a restore point from the list and follow the on-screen instructions to apply the restore points on your PC.
9. Reset Your PC
Performing an In-place Upgrade is a great way to keep all the personal files and installed apps. But since it will keep the installed drivers, it is better to reset your PC. You can choose to save the personal files but will have to install the GPU drivers and all other programs manually. Here’s how to do it:
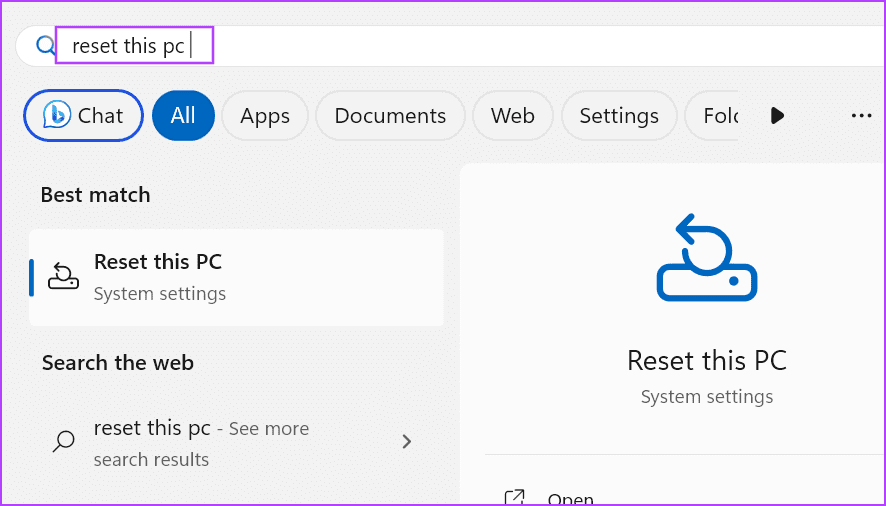
Step 1: Press the Windows key to open the Start menu. Type reset this pc in the search bar and press Enter to open the Settings app.
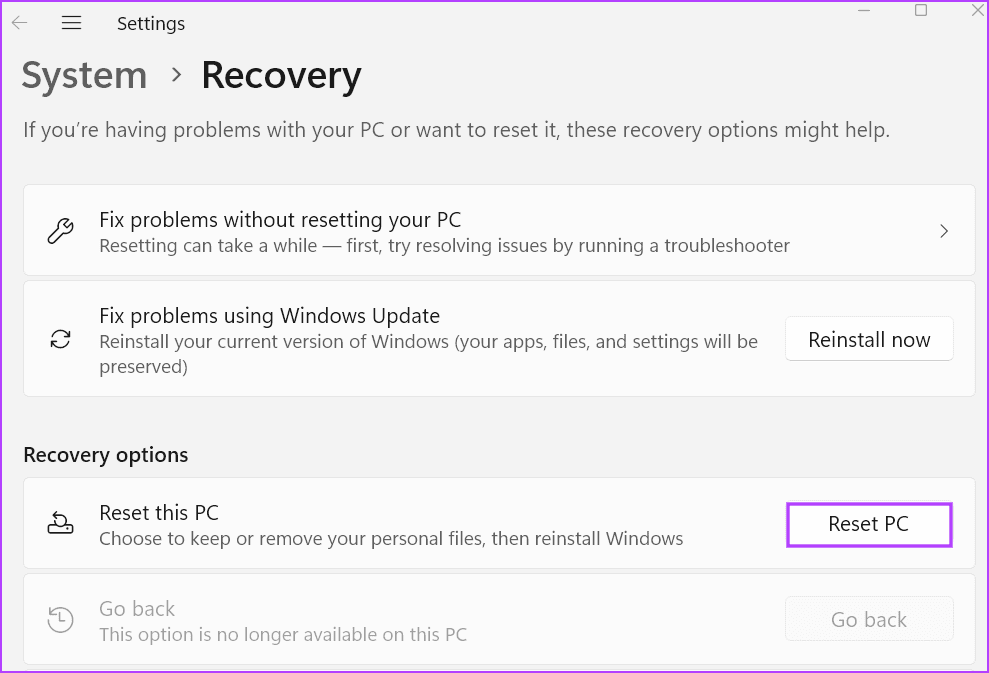
Step 2: Go to the Recovery options section. Click on the Reset PC button.
Step 3: Select the Keep my files in the Reset this PC window to save your personal files from deletion.
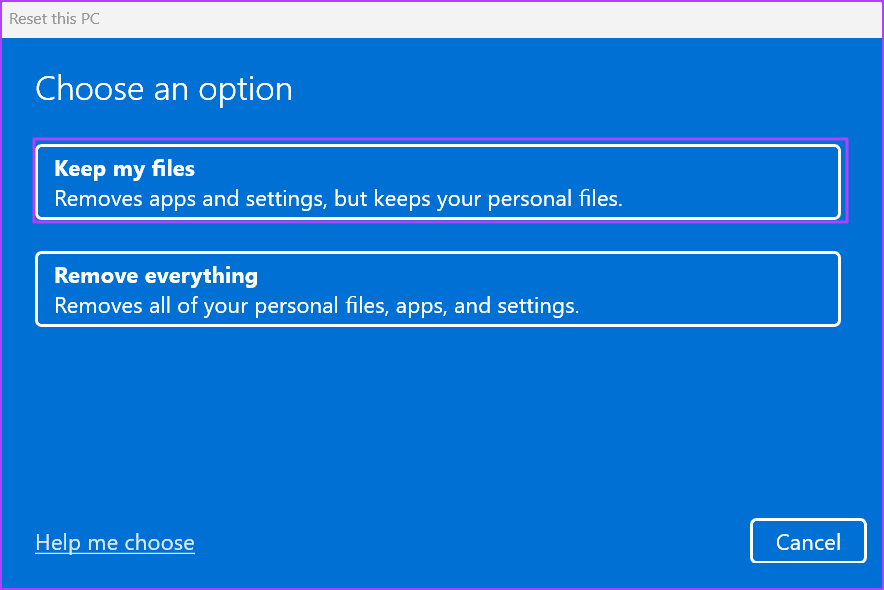
Follow the on-screen instructions to begin the reset process. Your PC will restart several times to reinstall Windows and boot to the lock screen.
After logging in, download and install all the system drivers from your OEM manufacturer’s website or using the driver disk or ISO file provided by your manufacturer. In the case of a custom PC, you must download drivers for each component separately.
10. Get Your GPU and PSU Checked
After exhausting all the software-related fixes, if you still face the display driver issue, it’s time to get the GPU inspected by a technician for hardware defects. Some users also face issues due to a weak or faulty power supply unit, so ensure get that checked and replaced, if required.
Fix GPU Issues
These were the ten methods to fix the ‘Display Driver Failed to Start’ error in Windows 10 and 11 PCs. Restart GPU drivers, inspect physical connections, and use a powered VGA-USB adapter. After that, update or reinstall the drivers, adjust the Windows performance settings, and modify the system registry. Lastly, do a system reset and replace faulty hardware.
Was this helpful?
Last updated on 22 November, 2023
Read Next
 5 Ways to Fix Printer Driver Is Unavailable Error on Windows 11
Fix 1: Run the Printer Troubleshooter Windows 11 includes several troubleshooters that can help you fix common system-level issues.
5 Ways to Fix Printer Driver Is Unavailable Error on Windows 11
Fix 1: Run the Printer Troubleshooter Windows 11 includes several troubleshooters that can help you fix common system-level issues.
 Top 5 Ways to Fix the nvlddmkm.sys Failed Error in Windows
Preliminary Fixes Plug the GPU Into Another PCIe Slot: The nvlddmkm.sys failed error is often related to GPU issues.
Top 5 Ways to Fix the nvlddmkm.sys Failed Error in Windows
Preliminary Fixes Plug the GPU Into Another PCIe Slot: The nvlddmkm.sys failed error is often related to GPU issues.
 5 Ways to Fix “A Driver Cannot Load on This Device” Error on Windows 11
Fix 1: Update the Problematic Driver If a driver is incompatible, Windows may fail to load it.
5 Ways to Fix “A Driver Cannot Load on This Device” Error on Windows 11
Fix 1: Update the Problematic Driver If a driver is incompatible, Windows may fail to load it.
 4 Ways to Fix “Windows Could Not Find a Driver for Your Network Adapter” Error
Fix 1: Enable Network Adapter Windows may fail to communicate with the network adapter if you've previously disabled it.
4 Ways to Fix “Windows Could Not Find a Driver for Your Network Adapter” Error
Fix 1: Enable Network Adapter Windows may fail to communicate with the network adapter if you've previously disabled it.
 4 Ways to Fix Graphics Device Driver Error Code 22 on Windows
Fix 1: Enable and Update the Graphics Driver You may see error code 22 on Windows if you have previously disabled the graphics driver or if it's outdated.
4 Ways to Fix Graphics Device Driver Error Code 22 on Windows
Fix 1: Enable and Update the Graphics Driver You may see error code 22 on Windows if you have previously disabled the graphics driver or if it's outdated.
 4 Ways to Fix “App Removal Failed” Error 0x80073CFA in Windows 11
Fix 1: Reset the Problematic App If the 0x80073CFA error only occurs while uninstalling a specific app, try resetting it first.
4 Ways to Fix “App Removal Failed” Error 0x80073CFA in Windows 11
Fix 1: Reset the Problematic App If the 0x80073CFA error only occurs while uninstalling a specific app, try resetting it first.
 6 Ways to Fix Failed to Load Web Page Error in Steam for Windows
Fix 1: Terminate Steam Processes and Reopen the App The "Failed to load web page" error in Steam can occur if one of the app processes is experiencing issues.
6 Ways to Fix Failed to Load Web Page Error in Steam for Windows
Fix 1: Terminate Steam Processes and Reopen the App The "Failed to load web page" error in Steam can occur if one of the app processes is experiencing issues.
 Top 9 Ways to Fix Failed to Obtain IP Address Error on Android
Is your Android phone showing the ‘Failed to obtain IP address’ error while connecting to a Wi-Fi network?
Top 9 Ways to Fix Failed to Obtain IP Address Error on Android
Is your Android phone showing the ‘Failed to obtain IP address’ error while connecting to a Wi-Fi network?
The article above may contain affiliate links which help support Guiding Tech. The content remains unbiased and authentic and will never affect our editorial integrity.

