Fix 1: Turn Off Hardware Acceleration
The Hardware Acceleration in Discord allows the app to use your GPU instead of your CPU for graphics-intensive tasks. Although this feature is supposed to reduce the load on your CPU, it can sometimes cause more harm than good. You may disable hardware acceleration in Discord to see if that helps.
Step 1: Open the Discord app and click the gear-shaped icon at the bottom-left corner to open the User Settings menu.

Step 2: In the Advanced tab, turn off the toggle next to Hardware Acceleration.

Fix 2: Disable Discord Overlay
Discord’s overlay feature makes it easy for you to chat with your friends without leaving your game screen. However, this convenience can come at a cost, as the overlay feature can be resource-intensive, leading to Discord using excessive CPU, GPU, and memory.
To turn off the Discord overlay feature, use these steps:
Step 1: Open the settings menu in Discord.
Step 2: Select the Game Overlay tab from the left pane. Then, turn off the toggle next to Enable in-game overlay.

Fix 3: Turn Off Voice Processing Features on Discord
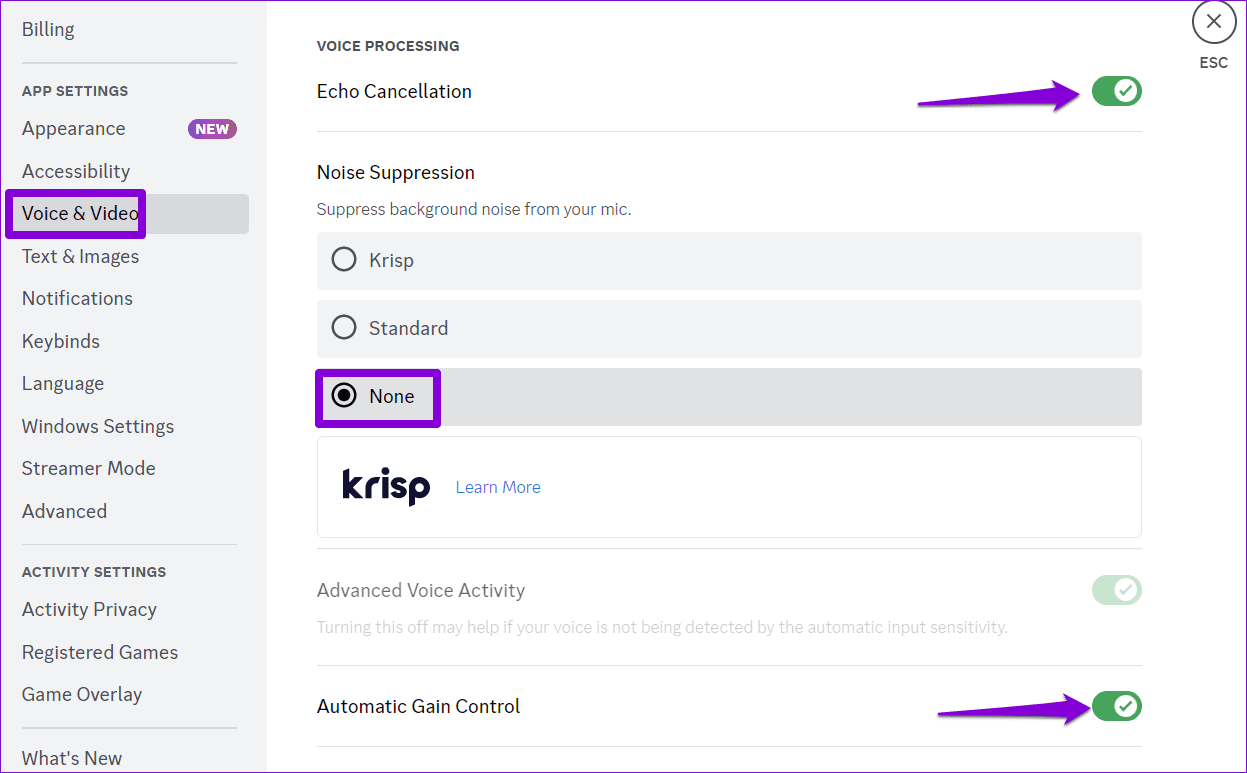
Discord’s voice processing features, such as Echo Cancellation, Noise Suppression, Advanced Voice Activity, and others, can contribute to high CPU usage on Windows. While they may make your Discord experience better, but they can be resource intensive. Here’s how to turn them off.
Step 1: Open the settings menu in Discord.
Step 2: Select the Voice & Video tab from the left sidebar. Under Voice Processing, turn off the toggle next to Echo Cancellation, set Noise Suppression to None, and disable Automatic Gain Control.
Fix 4: Enable Reduced Motion on Discord
Another thing you can do is enable the Reduced Motion feature, which lowers the intensity of animations and effects. This will make Discord use relatively less CPU and RAM.
Step 1: Open the settings menu in Discord.
Step 2: Switch to the Accessibility tab and turn on the toggle next to Enable Reduced Motion.

Fix 5: Modify Advanced Boot Options
If you are experiencing high CPU usage with other apps and programs too, you should check the advanced boot options on Windows and make sure your PC is not limited to using just one core of your processor. Here’s how:
Step 1: Press the Windows key + R to open the Run dialog box. Type msconfig in the text box and press Enter.
Step 2: Switch to the Boot tab and click the Advanced options button.

Step 3: Tick the Number of processors checkbox and use the drop-down menu to increase the number of processors your system can use. Then, click OK to save the changes.

Restart your PC after that to check if the issue persists.
Fix 6: Clear Discord Cache
Another reason why Discord may use too much CPU on Windows is if the existing cache data associated with the app is corrupt. So, you may clear the Discord cache data to check that.
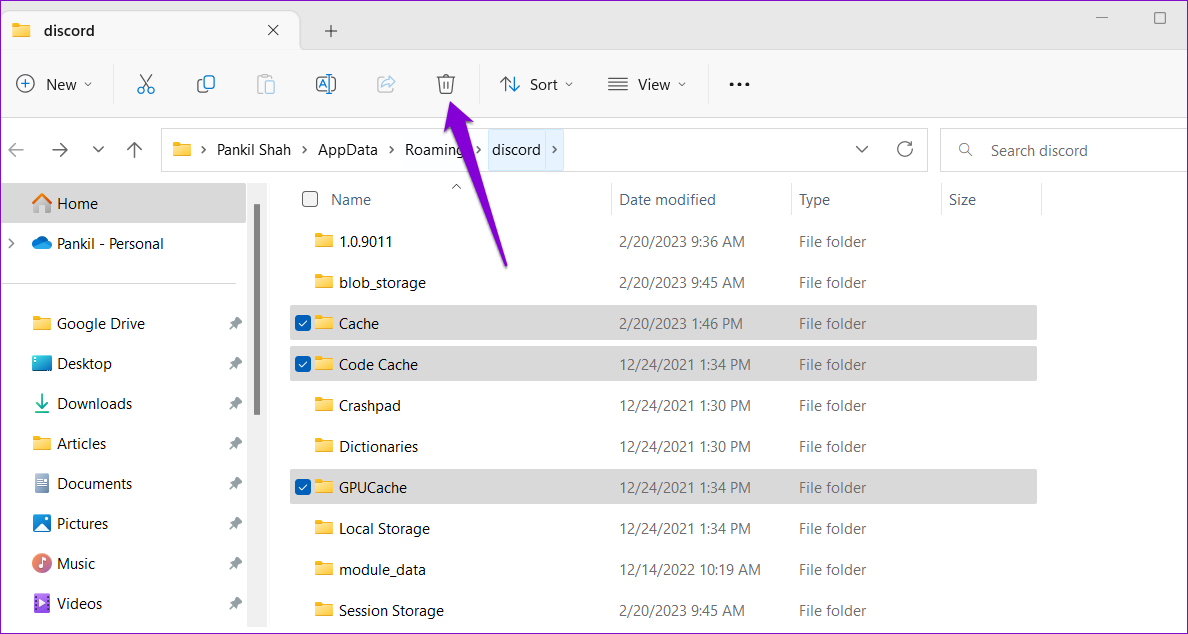
Step 1: Press the Windows + R keyboard shortcut to open the Run dialog box. Type %appdata%/discord in the box and press Enter.
Step 2: In the File Explorer window that opens, select the Cache, Code Cache, and GPUCache folders. Then, click the trash icon at the top to delete them.
Was this helpful?
Last updated on 15 August, 2024
Read Next
 5 Ways to Fix Windows Explorer High CPU Usage on Windows 11
Try Basic Fixes Restart the Windows Explorer process: There's a chance that Windows Explorer's high CPU usage is a one-time glitch.
5 Ways to Fix Windows Explorer High CPU Usage on Windows 11
Try Basic Fixes Restart the Windows Explorer process: There's a chance that Windows Explorer's high CPU usage is a one-time glitch.
 5 Ways to Fix High CPU Usage on Windows 11
Try Basic Fixes Wait for Windows to finish updates: If Windows is in the process of checking, downloading, or installing any updates in the background, CPU usage may increase during
5 Ways to Fix High CPU Usage on Windows 11
Try Basic Fixes Wait for Windows to finish updates: If Windows is in the process of checking, downloading, or installing any updates in the background, CPU usage may increase during
 Windows Audio Device Graph Isolation: Fix High CPU Usage
What is Windows Audio Device Graph Isolation Windows Audio Device Graph Isolation, also known as audiodg.exe, is a process that handles digital signal processing, including advanced sound enhancement effects, on
Windows Audio Device Graph Isolation: Fix High CPU Usage
What is Windows Audio Device Graph Isolation Windows Audio Device Graph Isolation, also known as audiodg.exe, is a process that handles digital signal processing, including advanced sound enhancement effects, on
 6 Ways to Fix Windows Modules Installer Worker High CPU Usage
If you've ever found your computer's fan working overtime and the CPU usage going sky-high, you're not alone.
6 Ways to Fix Windows Modules Installer Worker High CPU Usage
If you've ever found your computer's fan working overtime and the CPU usage going sky-high, you're not alone.
 4 Ways to Fix Microsoft Edge High Memory and CPU Usage
Basic Fixes Restart the Microsoft Edge browser - You should restart the browser as it may fix minor bugs and glitches that trigger the problem.
4 Ways to Fix Microsoft Edge High Memory and CPU Usage
Basic Fixes Restart the Microsoft Edge browser - You should restart the browser as it may fix minor bugs and glitches that trigger the problem.
 How to Reduce CPU and RAM Usage in Microsoft Teams on Windows 11
Common Fixes Update or reinstall the Microsoft Teams app: Open the Microsoft Store, search Microsoft Teams, and click Update (if available).
How to Reduce CPU and RAM Usage in Microsoft Teams on Windows 11
Common Fixes Update or reinstall the Microsoft Teams app: Open the Microsoft Store, search Microsoft Teams, and click Update (if available).
 5 Ways to Fix Google Chrome High Disk Usage on Windows
Basic Fixes Restart Chrome: Open Task Manager, end the process for Google Chrome, and reopen the browser.
5 Ways to Fix Google Chrome High Disk Usage on Windows
Basic Fixes Restart Chrome: Open Task Manager, end the process for Google Chrome, and reopen the browser.
 3 Ways to Fix Safari High Memory Usage on Mac
Basic Fixes Close irrelevant tabs: Close the tabs that you don't use frequently in Safari.
3 Ways to Fix Safari High Memory Usage on Mac
Basic Fixes Close irrelevant tabs: Close the tabs that you don't use frequently in Safari.
The article above may contain affiliate links which help support Guiding Tech. The content remains unbiased and authentic and will never affect our editorial integrity.