If you’ve ever found your computer’s fan working overtime and the CPU usage going sky-high, you’re not alone. The culprit might be the ‘Windows Modules Installer Worker’ process, notorious for hogging your CPU and slowing things down. This article will guide you to fix ‘Windows Modules Installer Worker’ high CPU usage on Windows 11.
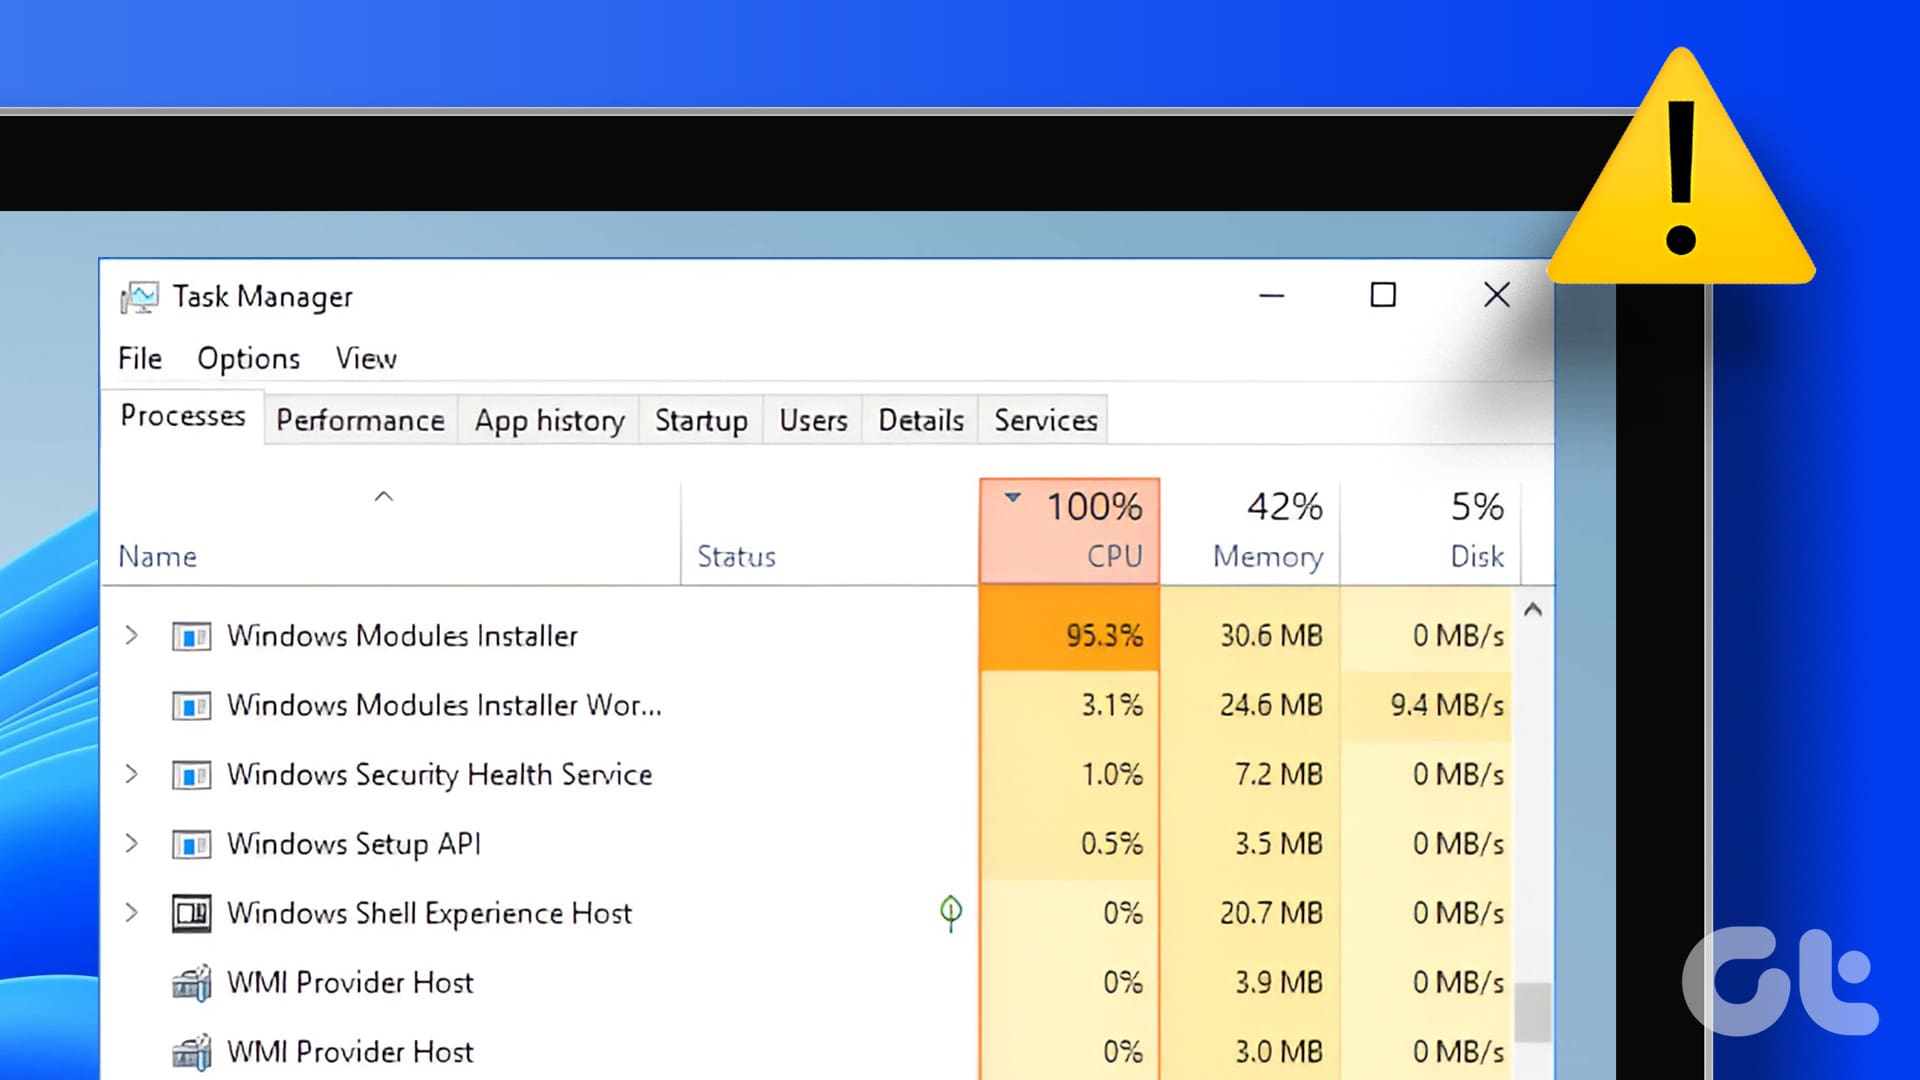
Now, you might be wondering, what is a ‘Windows Modules Installer Worker’? Also known as TiWorker.exe, it is a core system process in Windows responsible for installing, modifying, or removing system updates, and sometimes it gets a little too enthusiastic, causing an unwelcome spike in CPU usage and slowing down your computer. With this understanding, let’s begin.
1. Restart Your Computer
If you see TiWorker.exe using so much CPU, a simple yet effective initial step is to restart your computer. Restarting helps clear temporary files, reset system processes, and resolve minor glitches that may contribute to excessive CPU usage.
While it may seem like a basic troubleshooting step, restarting your computer is a fundamental measure that can be surprisingly effective in addressing various software-related issues, including CPU usage.
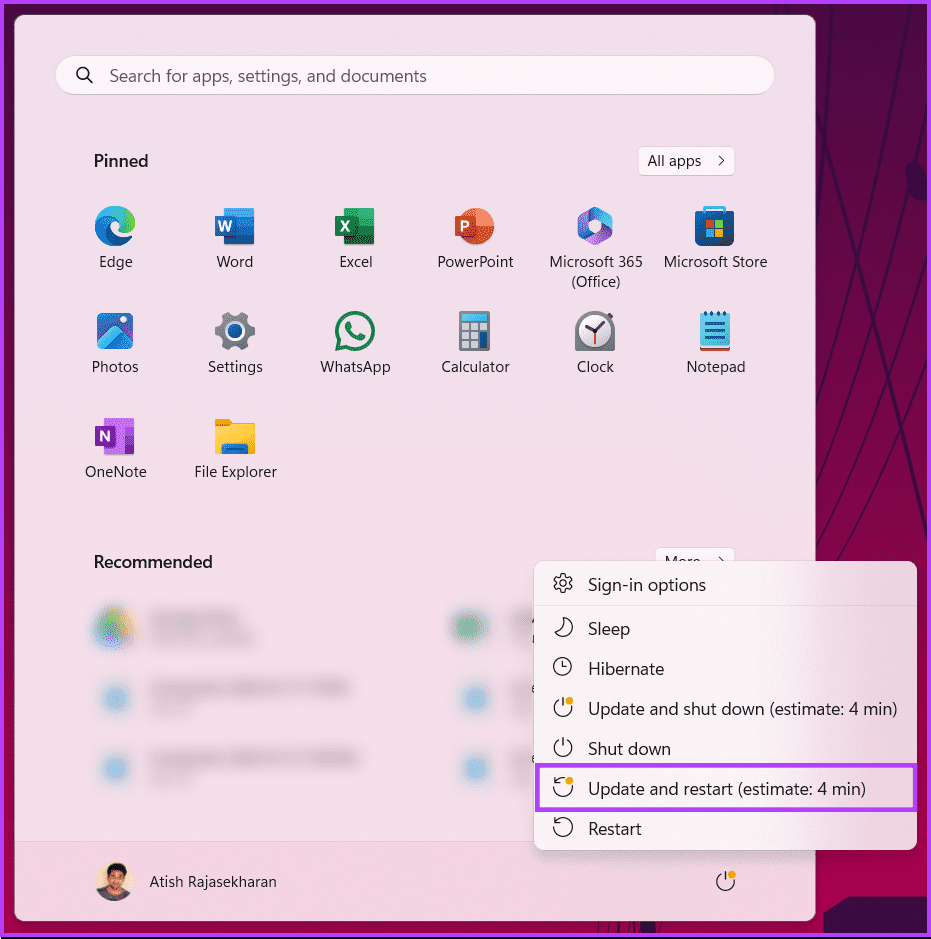
Step 1: Press the Windows key on your keyboard or click on the Windows icon on the desktop.
Step 2: Click on the power button and choose Restart.
Once your PC restarts, check if the high disk usage persists. If it does, move on to the following method to fix it.
Also Read: Top fixes for Windows Defragmenter not working
2. Run Windows Update Troubleshooter
This method checks for and helps you troubleshoot any Windows Update errors and reports them back to you. The steps are easy and straightforward to follow.
Step 1: Press the Windows key on your keyboard. Then, type Settings and click Open.

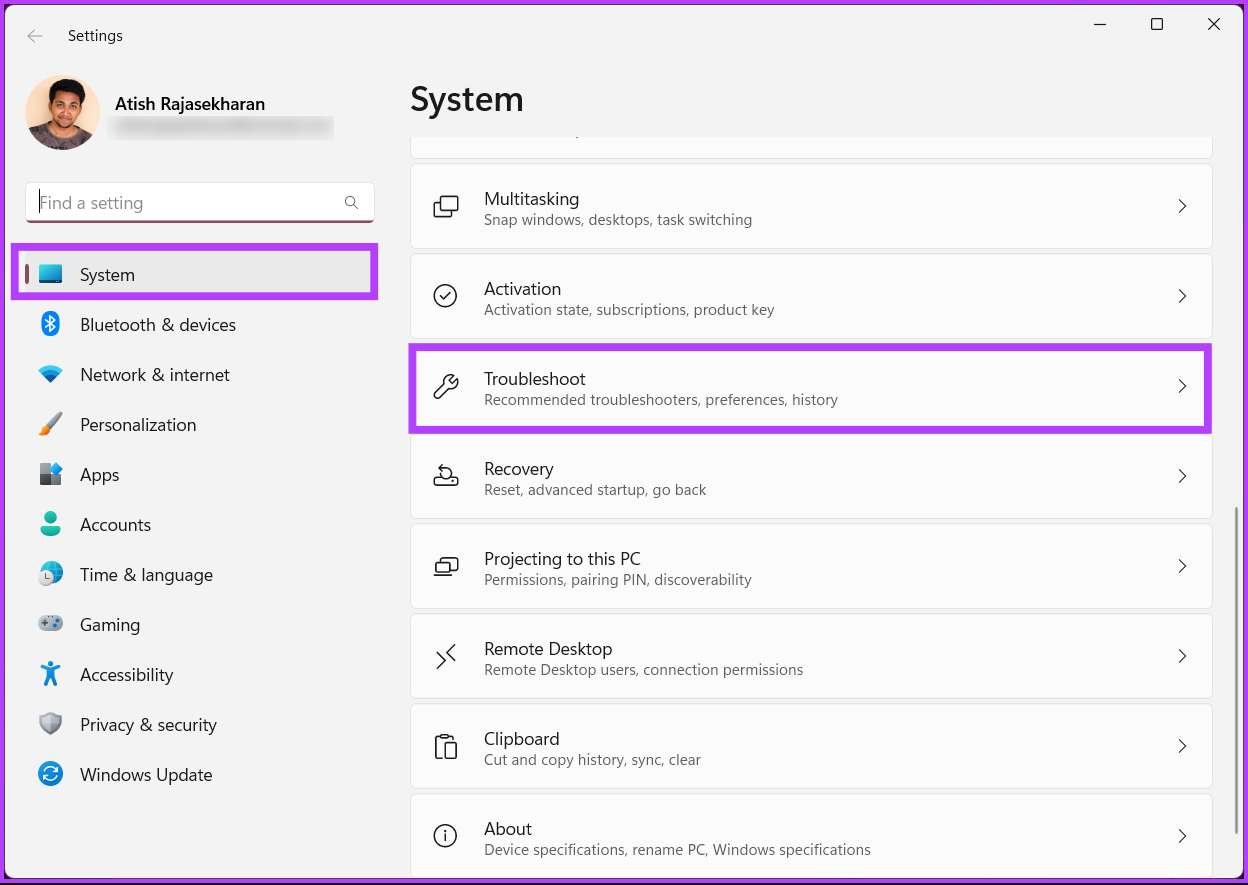
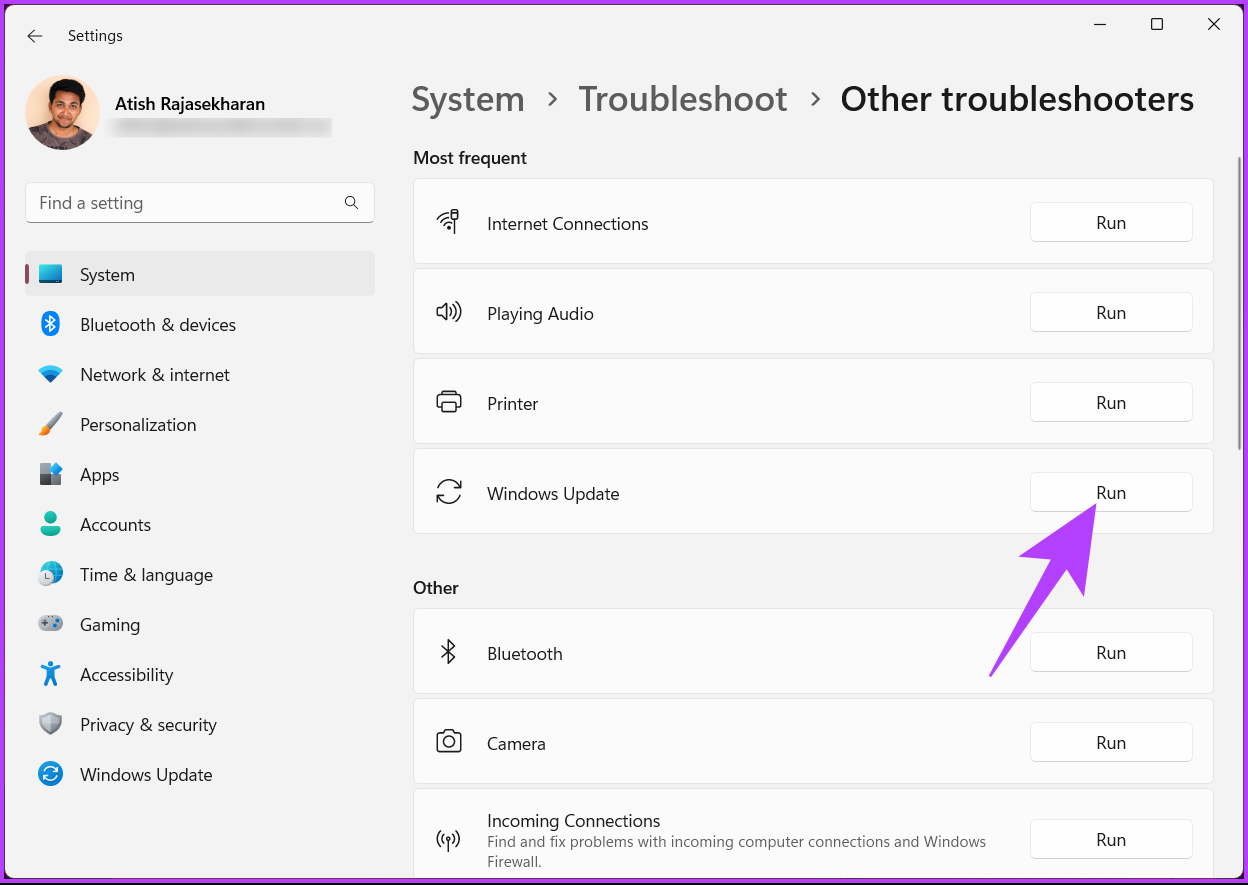
Step 2: Select System from the sidebar, scroll down, and click on Troubleshoot.
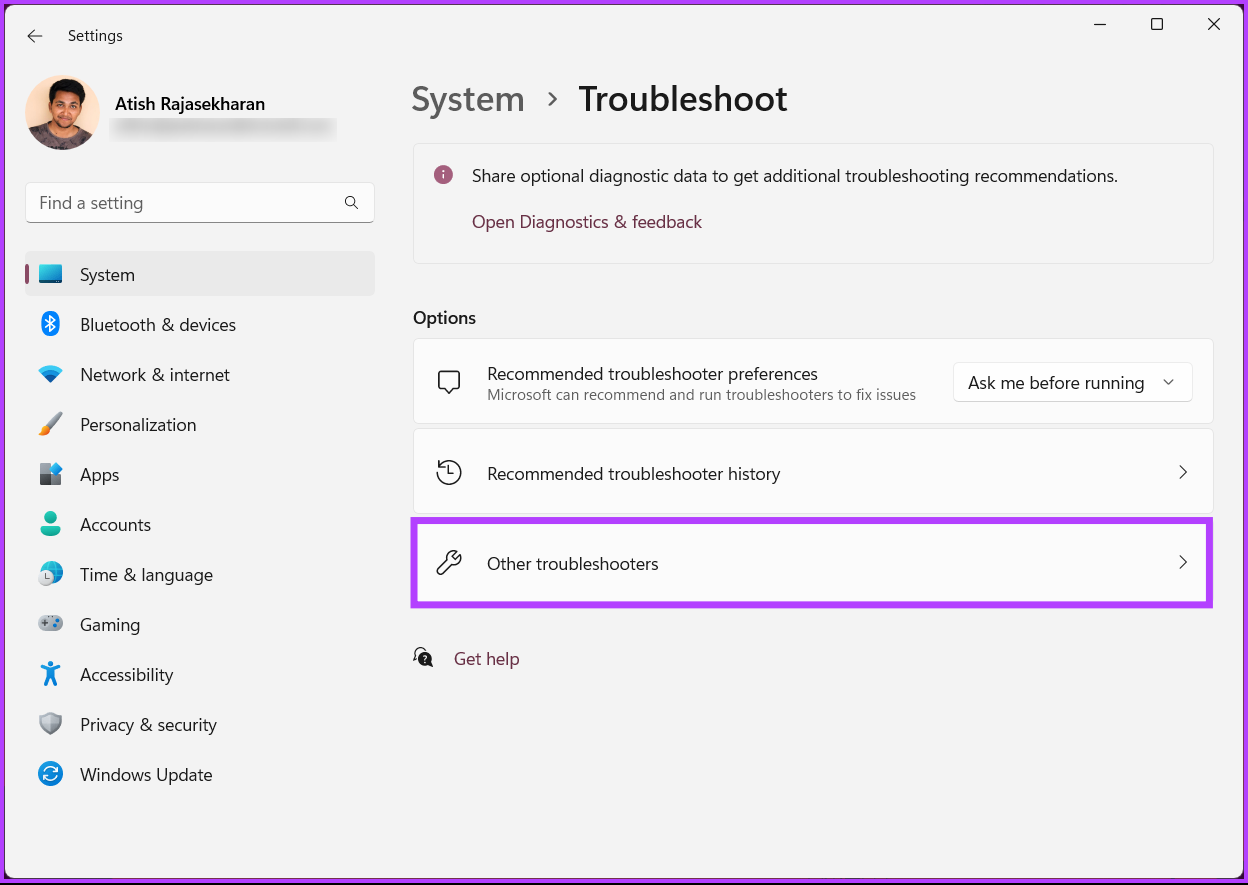
Step 3: Under Troubleshoot, select Other troubleshooters.
Step 4: Finally, click on the Run button next to Windows Update.
The troubleshooter will run a few tests, review the errors, and fix them quickly. Once done, go ahead and check if the issue persists; if it does, move on to the following method.
3. Repair Corrupted Windows Files
We will execute this fix in a two-step format. Firstly, we will run an SFC (System File Checker) scan followed by a DISM (Deployment Image Servicing and Management) scan to find and fix the corrupt files on your system.
Fix 1: Using SFC Scan
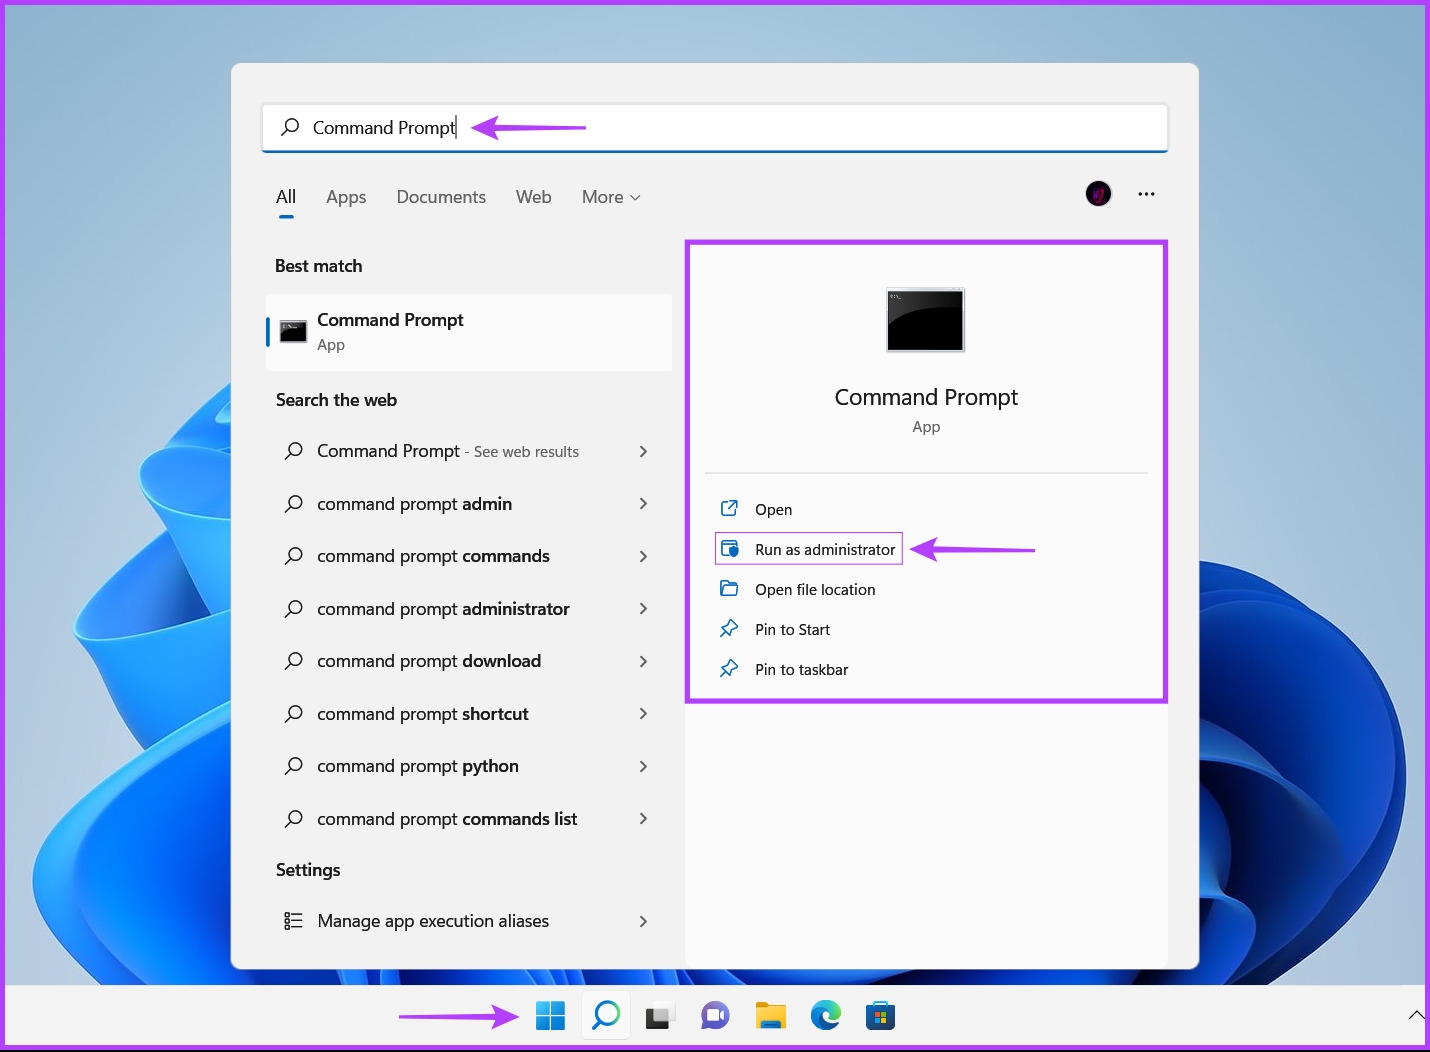
Step 1: Press the Windows + S keys and type Command Prompt. Then, from the results for Command Prompt, click on ‘Run as administrator.’
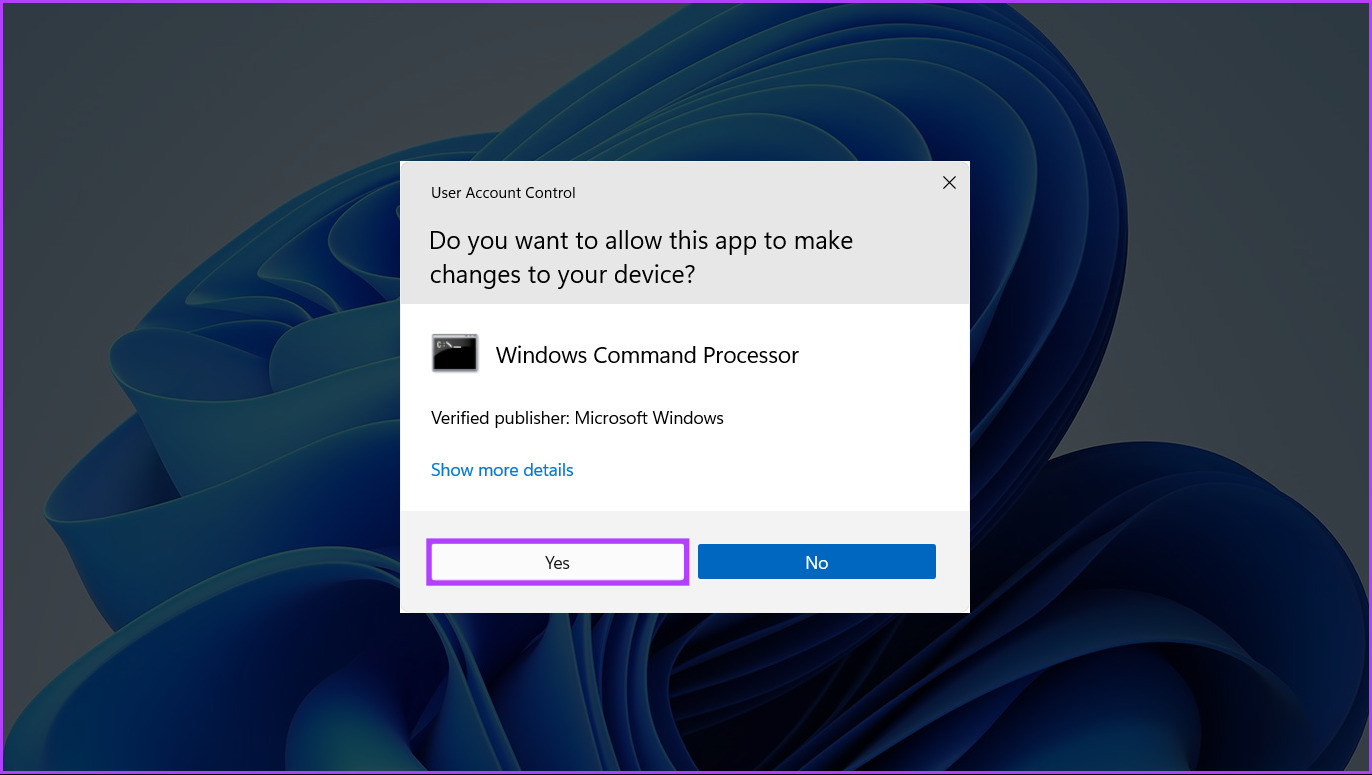
Step 2: Click on Yes when a User Account Control (UAC) prompt appears on the screen.
Step 3: Type the following command into the Terminal window and press Enter.
SFC /scannow
Running this command instructs Windows to scan for corrupted DLLs (Dynamic Link Libraries) and other vital system files on your PC. Furthermore, running this command replaces the broken system files with functioning ones if any corruption is detected.

After the SFC scan is complete, you’ll see a message indicating whether it found any problems that need fixing.
If the SFC scan found no issues, you would get a message saying, “Windows Resource Protection did not find any integrity violations.” However, if any issues relating to corrupted configuration files are discovered, it will automatically repair them.

That’s it. It’s time to run the DISM scan once you have completed the SFC scan; keep reading.
Fix 2: Using DISM Scan
Running a DISM command scans for corruption and repair issues with the operating system, including Windows update errors. Although this scan might seem similar to the SFC scan, a DISM scan is more advanced. DISM also scans the recovery and boot sectors for corruption and can be used to restore the resiliency of your files if any corruption is detected.
To perform a DISM scan on your PC, execute all the commands listed below (one command at a time) by copying and pasting them into Command Prompt and pressing the Enter key.
DISM /Online /Cleanup-Image /CheckHealth
DISM /Online /Cleanup-Image /ScanHealth
DISM /Online /Cleanup-Image /RestoreHealth
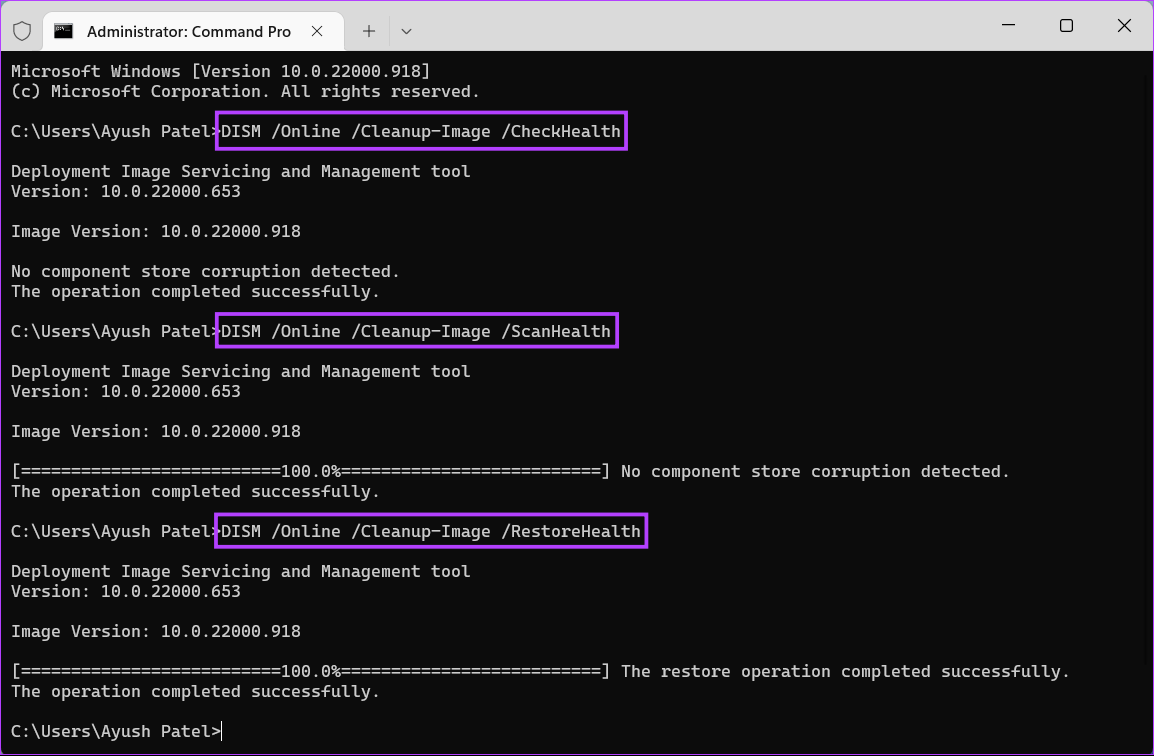
This DISM scan might take some time. Restart your PC after completing both scans to see if it helps fix the ‘Windows Modules Installer Worker’ high CPU usage. If this didn’t fix the issue, maybe the next fix would; continue reading.
4. Restart the Windows Update Service
Windows Update Services ensures your device checks for, downloads, and installs the latest updates automatically. However, if these services are not set to automatic, they might not work.
This could be why you see TiWorker.exe using so much CPU. To fix this, ensure Windows Update Services are set to automatic. Follow the below steps to do it.
Step 1: Go to Search, type Services, and open the app from the search results.
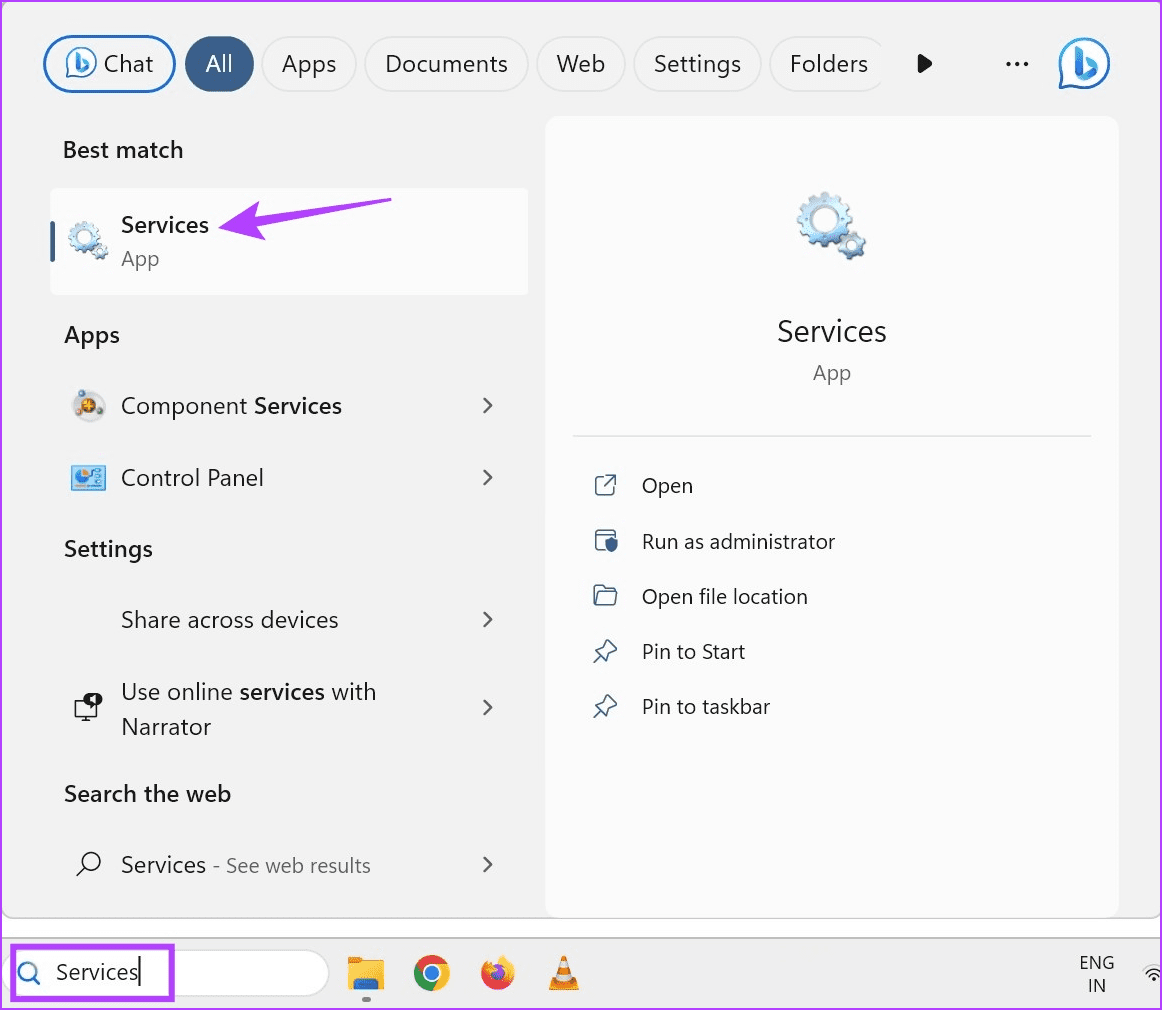
Step 2: Here, double-click on Windows Update.

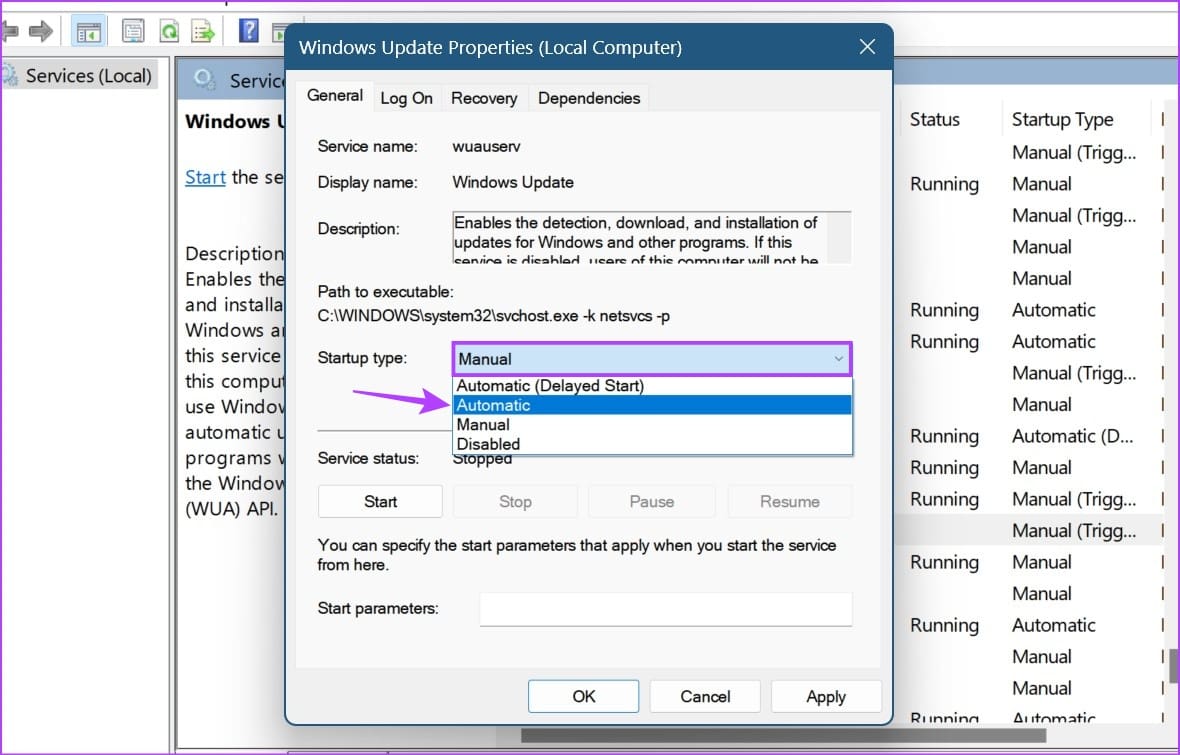
Step 3: Go to the General tab, click on the Startup type drop-down menu, and select Automatic.
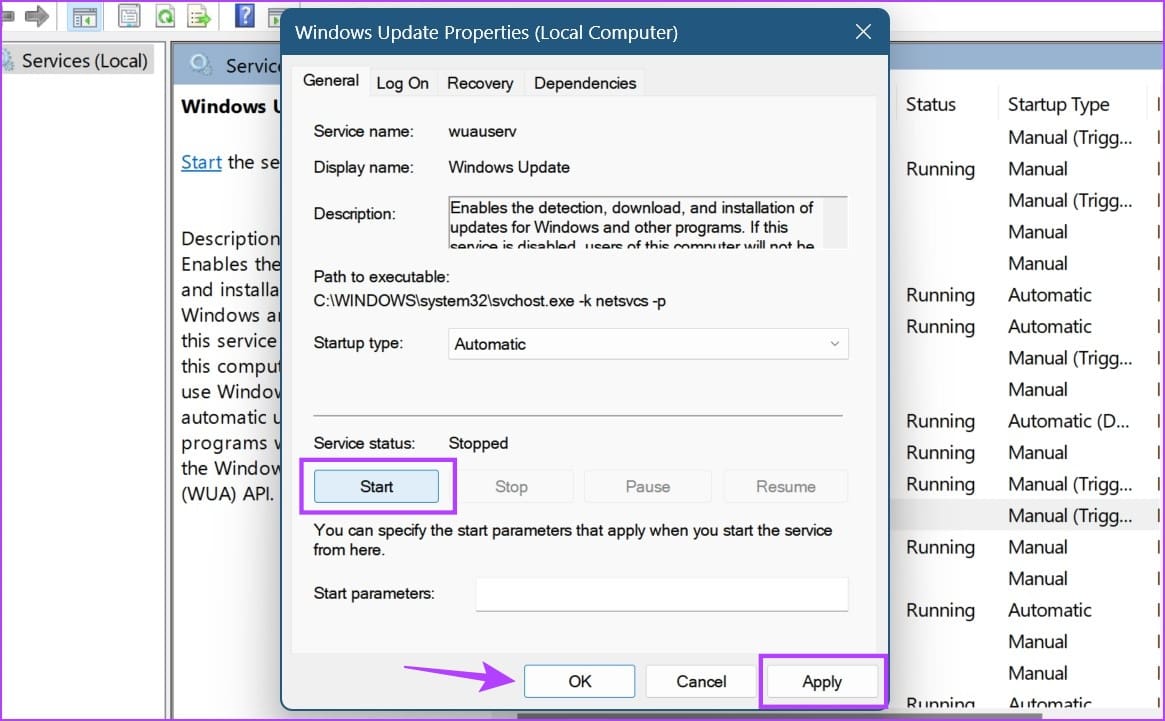
Step 4: Then click on Start.
Step 5: Once done, click on Apply and OK.
Note: If the service is already running, click on the Stop button. Wait for a few seconds, ensure that the Startup type is set to Automatic, and click on Start.
This will restart Windows Update Services and set it to Automatic. Now, restart your PC and see if the CPU usage has gone down. If it doesn’t, move on to the following method.
Also Read: How to fix the error code 0xc0000001 in Windows
5. Clear the SoftwareDistribution Folder
This is a critical folder consisting of multiple Windows Update files. If any file gets damaged or modified, you may see a ‘Windows Modules Installer Worker’ high disk usage issue. There’s a way to tackle this problem. Jump to the steps below.
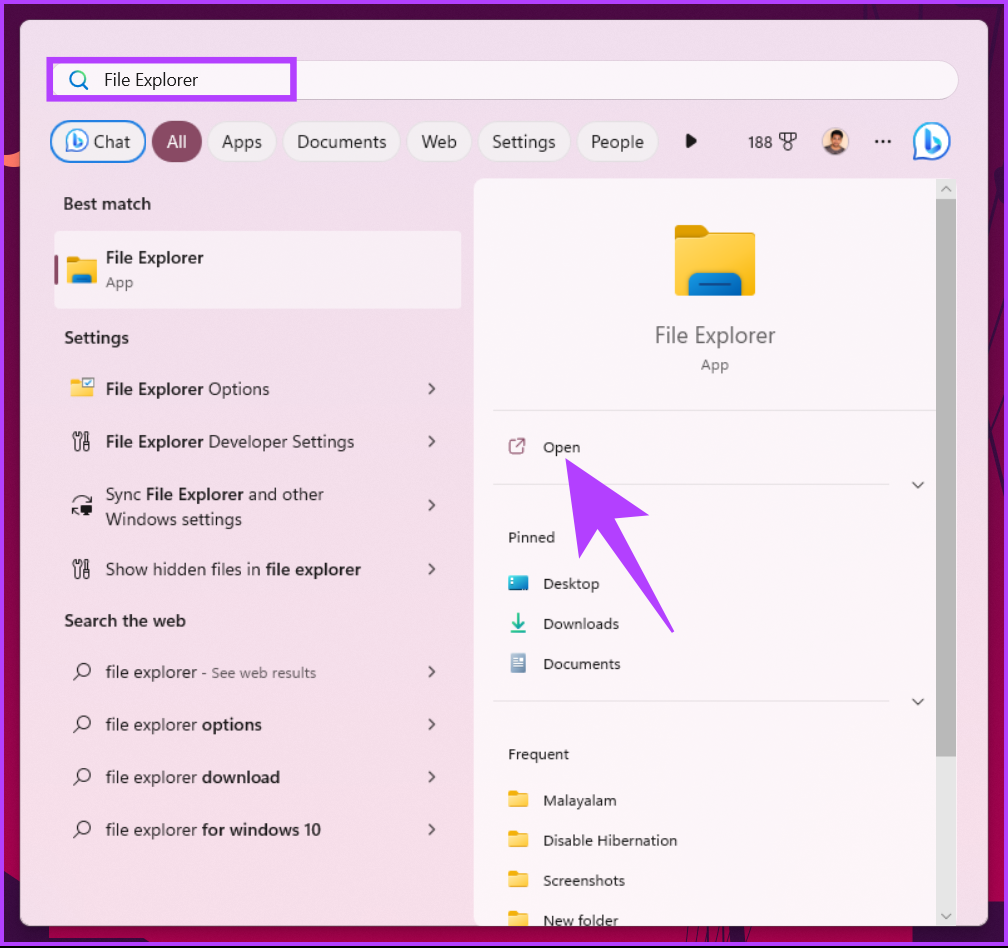
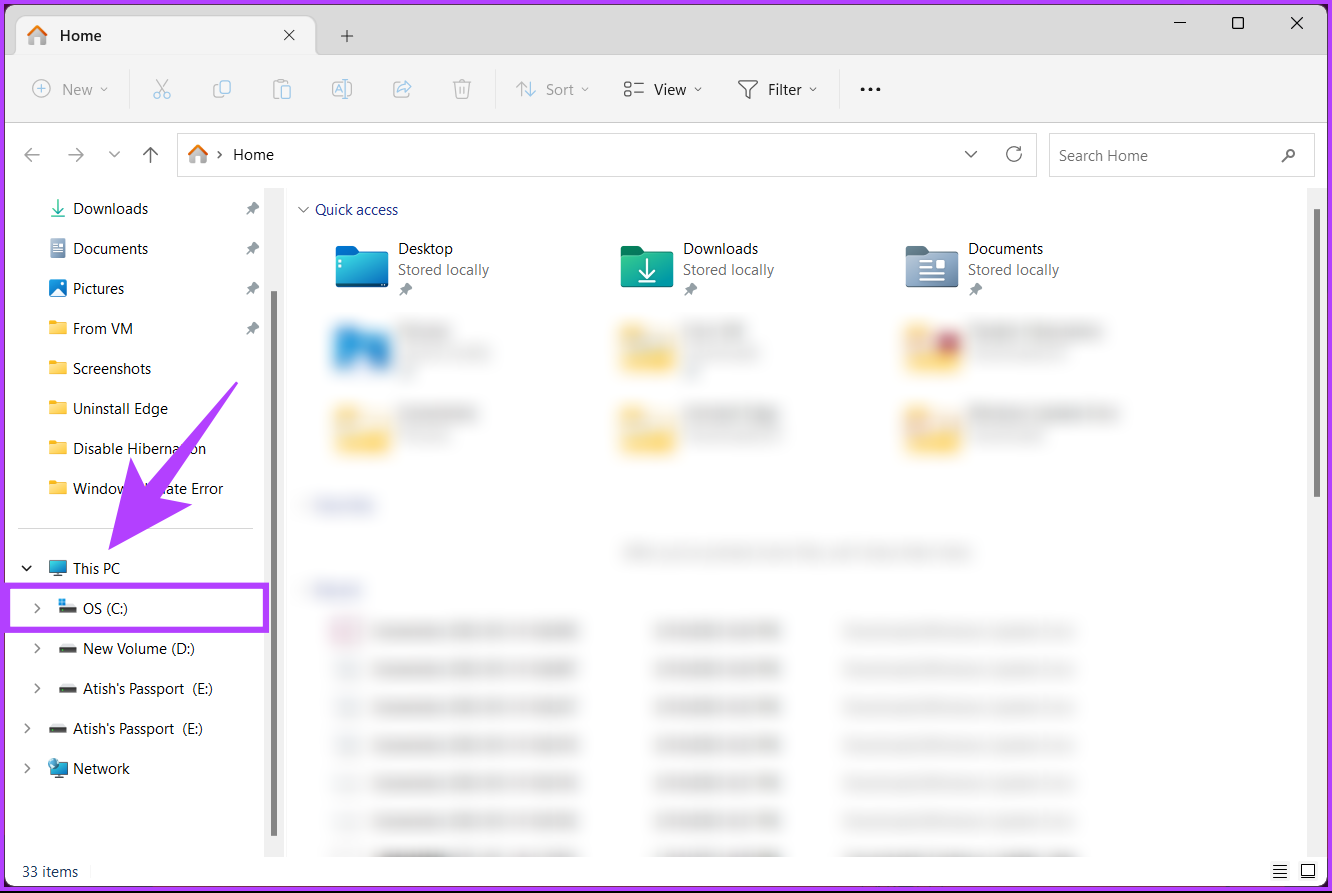
Step 1: Press the Windows key on your keyboard. Then, type File Explorer and click Open.
Step 2: Go to This PC from the side pane and select OS (C:).
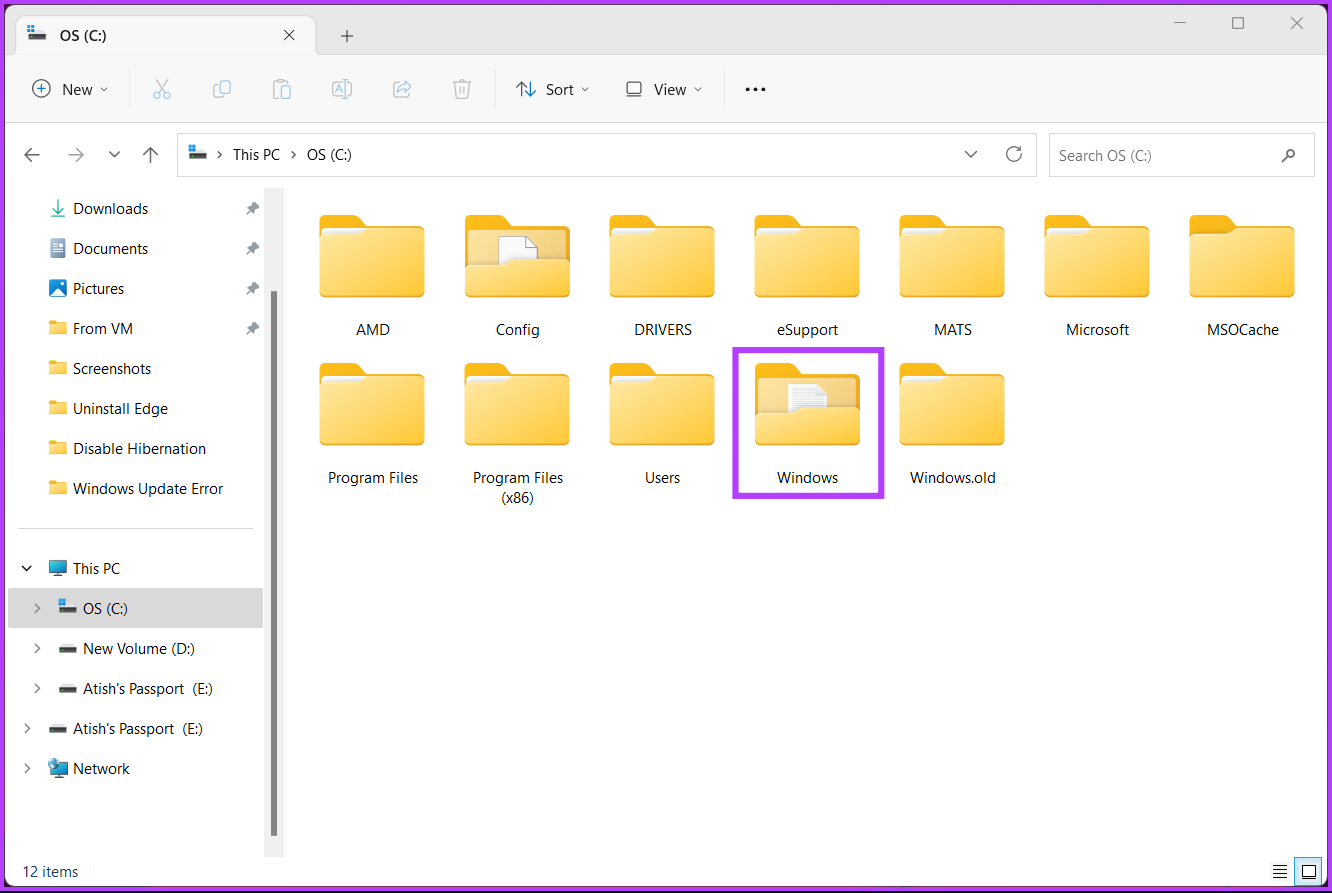
Step 3: Select the Windows folder.
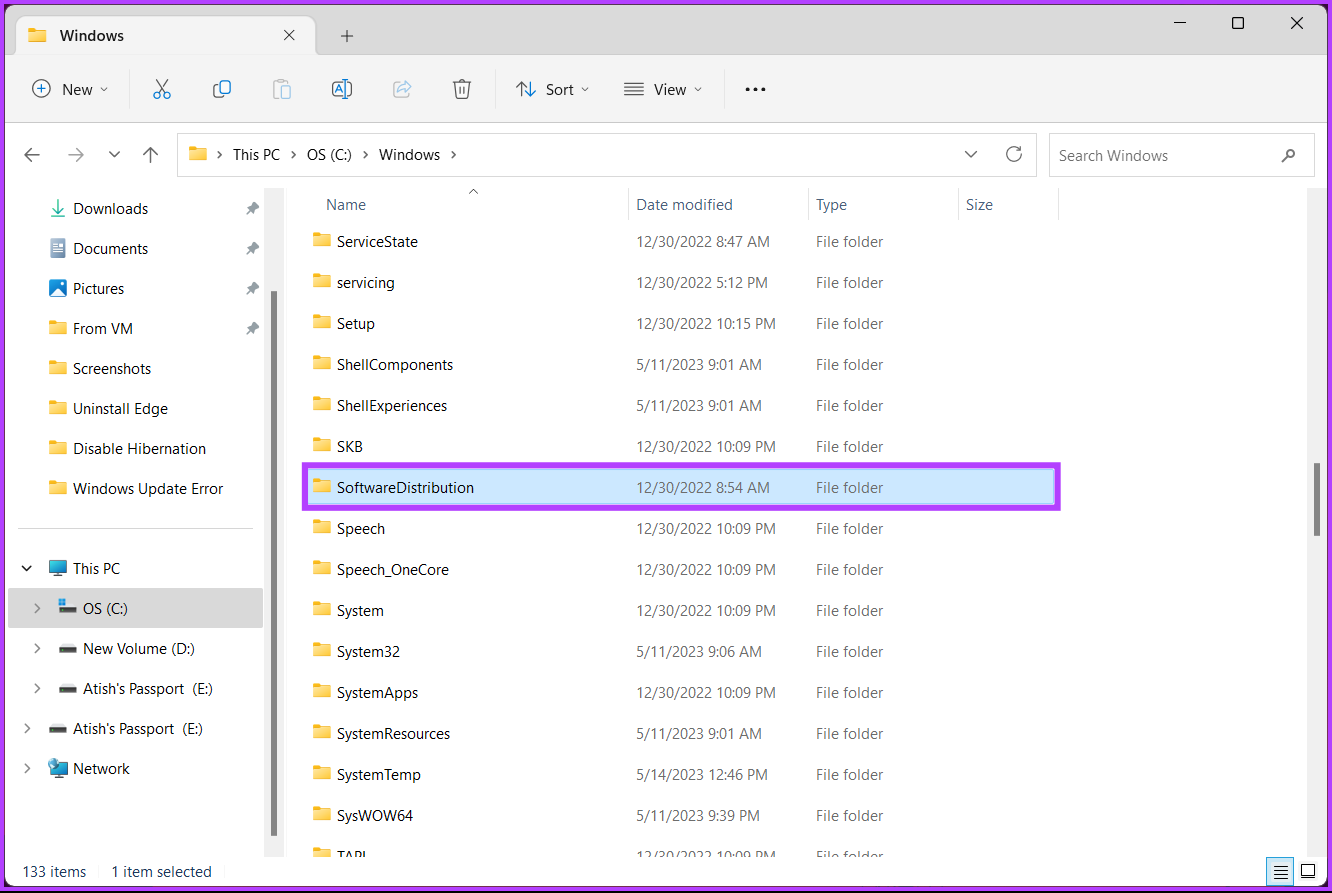
Step 4: Scroll down and select the SoftwareDistribution folder.
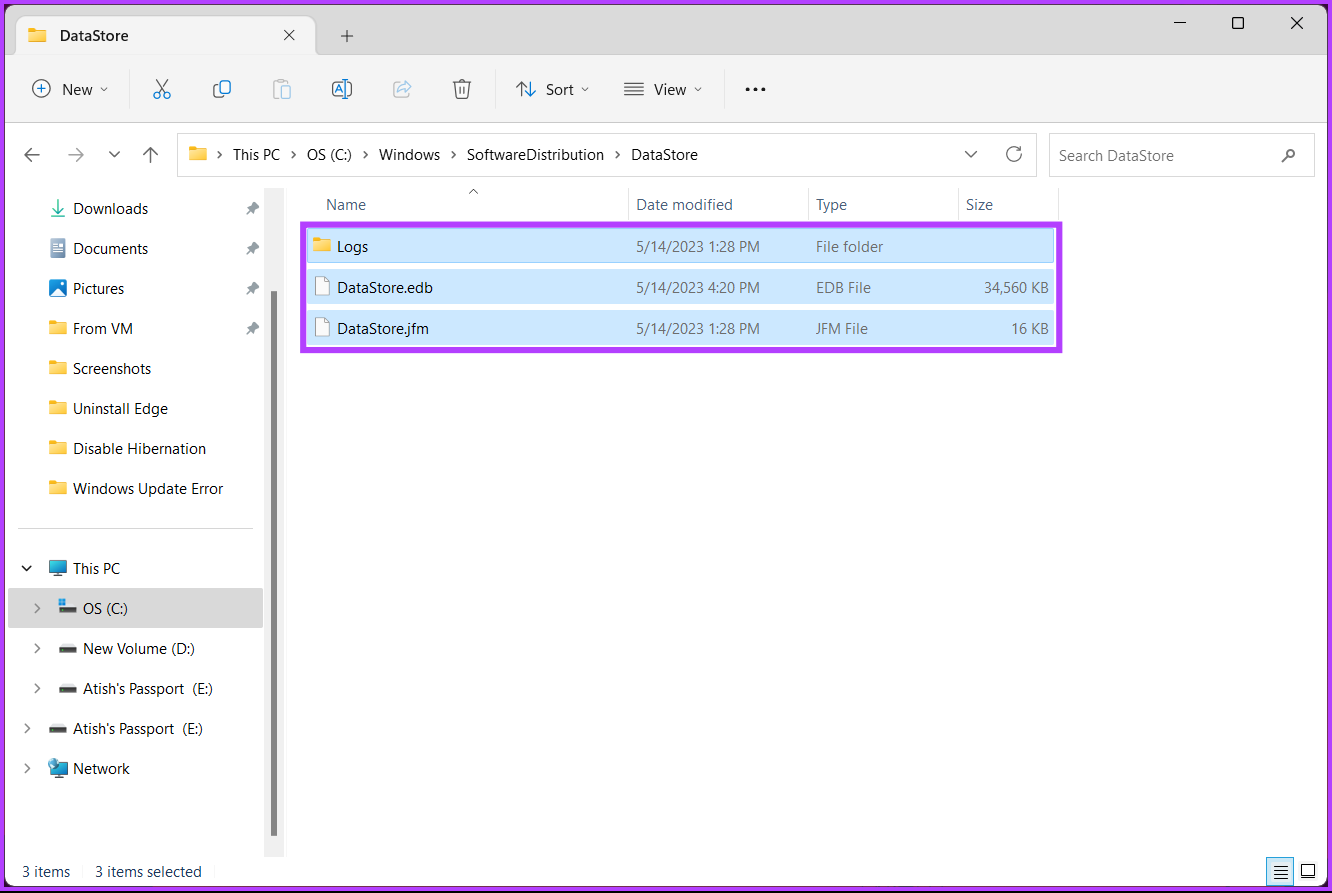
Step 5: Go to the DataStore folder.
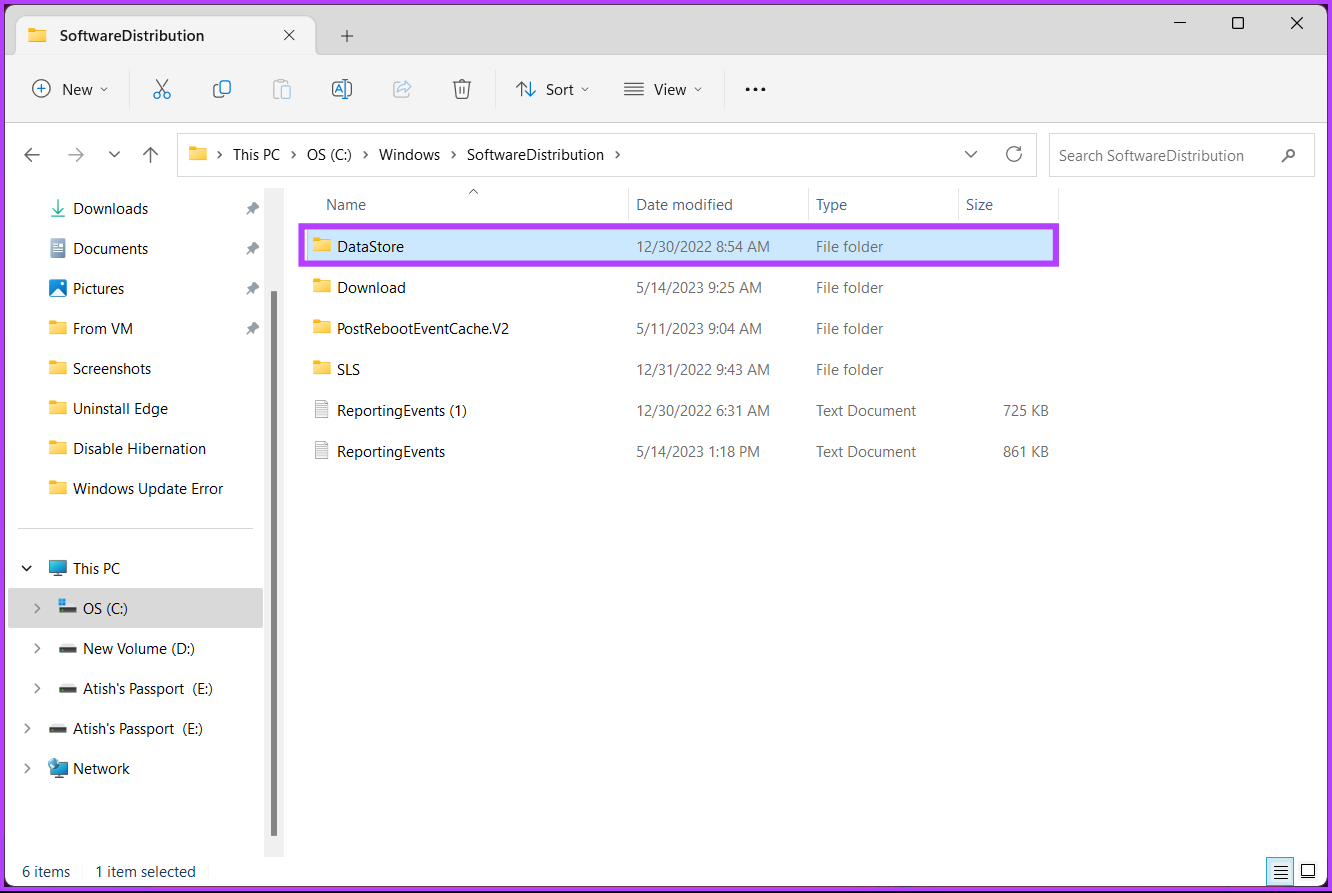
Step 6: Delete all the files and folders under the DataStore folder.
Tip: To delete, press Ctrl + A to select all the files and press the Delete key on your keyboard.
Step 7: Once done, go back to the SoftwareDistribution folder. Now, go to the Downloads folder.
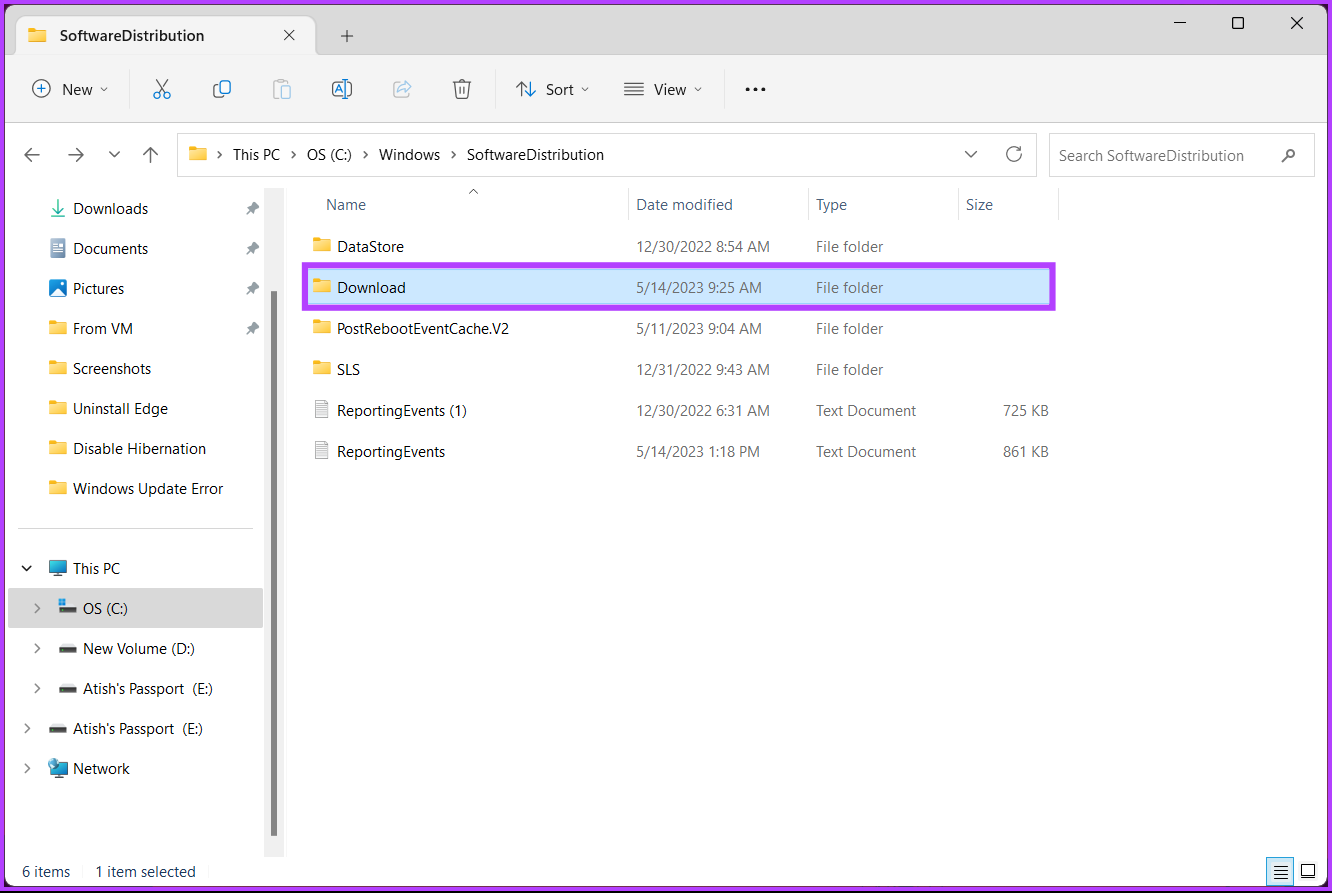
Step 8: Delete all the files and folders under the Download folder.
Note: Press Ctrl + A to select all the files and press the Delete key on your keyboard.

Once done, close the window and restart your computer. And that’s it! The high disk usage should be gone when the system boots back up. If this method doesn’t help, move on to the following fix.
6. Disable Windows Update
If the ‘Windows Modules Installer Worker’ high disk usage issue persists, disable Windows Update completely. However, it is not recommended as a long-term solution, as certain (if not all) updates are crucial for security and performance. With this in mind, let’s begin with the steps.
Step 1: Press the Windows key on your keyboard. Then, type Services, and open the app from the search results.
Step 2: Here, right-click on Windows Update.
Step 3: From the context menu, choose Stop.

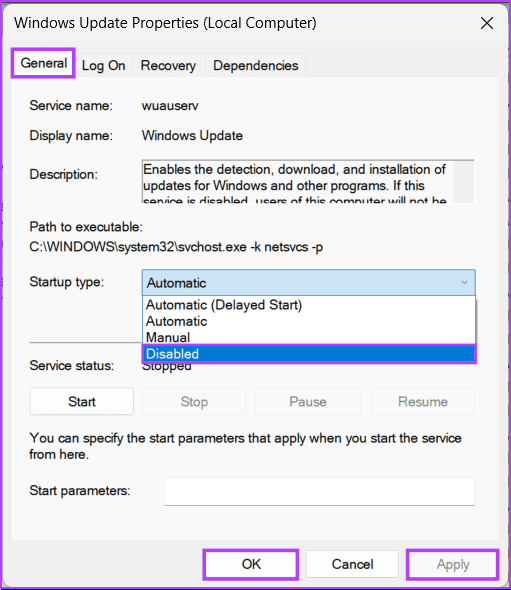
Step 4: Now, double-click on the Windows Update service to open its Properties window.
Step 5: In the Windows Update Properties (Local Computer) pop-up, click the Startup type under the General tab and select Disabled from the drop-down.
Step 6: Finally, click Apply and then OK.
That’s it. Now, close the Services window(s) and restart your PC. Once your PC comes back online, the ‘Windows Modules Installer Worker’ high disk usage should be resolved. If none of the above fixes help, try the system restore feature to go back to the previous state or reset your Windows 11 PC, or reach out to Windows support to get the issue fixed once and for all.
FAQs on Fixing Windows Modules Installer Worker High CPU Usage
Yes, it’s normal for ‘Windows Modules Installer Worker’ to use CPU while installing updates. However, the CPU usage should return to normal once the update process is complete. If it persists, there might be an issue.
The duration varies based on the size and complexity of the installed updates. However, it should not persist for an excessively long time. If it does, it could indicate a problem.
Fix High CPU Usage
Now that you know how to fix ‘Windows Modules Installer Worker’ high CPU usage, bid farewell to the performance hiccups that might have slowed your Windows experience and ensure a smoother and more responsive system. You may also want to learn how to fix if the Windows 11 power plan keeps changing.
Was this helpful?
Last updated on 17 February, 2024
Read Next
 5 Ways to Fix Windows Explorer High CPU Usage on Windows 11
Try Basic Fixes Restart the Windows Explorer process: There's a chance that Windows Explorer's high CPU usage is a one-time glitch.
5 Ways to Fix Windows Explorer High CPU Usage on Windows 11
Try Basic Fixes Restart the Windows Explorer process: There's a chance that Windows Explorer's high CPU usage is a one-time glitch.
 5 Ways to Fix High CPU Usage on Windows 11
Try Basic Fixes Wait for Windows to finish updates: If Windows is in the process of checking, downloading, or installing any updates in the background, CPU usage may increase during
5 Ways to Fix High CPU Usage on Windows 11
Try Basic Fixes Wait for Windows to finish updates: If Windows is in the process of checking, downloading, or installing any updates in the background, CPU usage may increase during
 4 Ways to Fix Microsoft Edge High Memory and CPU Usage
Basic Fixes Restart the Microsoft Edge browser - You should restart the browser as it may fix minor bugs and glitches that trigger the problem.
4 Ways to Fix Microsoft Edge High Memory and CPU Usage
Basic Fixes Restart the Microsoft Edge browser - You should restart the browser as it may fix minor bugs and glitches that trigger the problem.
 Windows Audio Device Graph Isolation: Fix High CPU Usage
What is Windows Audio Device Graph Isolation Windows Audio Device Graph Isolation, also known as audiodg.exe, is a process that handles digital signal processing, including advanced sound enhancement effects, on
Windows Audio Device Graph Isolation: Fix High CPU Usage
What is Windows Audio Device Graph Isolation Windows Audio Device Graph Isolation, also known as audiodg.exe, is a process that handles digital signal processing, including advanced sound enhancement effects, on
 6 Fixes for Discord’s High CPU Usage on Windows
Fix 1: Turn Off Hardware Acceleration The Hardware Acceleration in Discord allows the app to use your GPU instead of your CPU for graphics-intensive tasks.
6 Fixes for Discord’s High CPU Usage on Windows
Fix 1: Turn Off Hardware Acceleration The Hardware Acceleration in Discord allows the app to use your GPU instead of your CPU for graphics-intensive tasks.
 How to Reduce CPU and RAM Usage in Microsoft Teams on Windows 11
Common Fixes Update or reinstall the Microsoft Teams app: Open the Microsoft Store, search Microsoft Teams, and click Update (if available).
How to Reduce CPU and RAM Usage in Microsoft Teams on Windows 11
Common Fixes Update or reinstall the Microsoft Teams app: Open the Microsoft Store, search Microsoft Teams, and click Update (if available).
 5 Ways to Fix Google Chrome High Disk Usage on Windows
Basic Fixes Restart Chrome: Open Task Manager, end the process for Google Chrome, and reopen the browser.
5 Ways to Fix Google Chrome High Disk Usage on Windows
Basic Fixes Restart Chrome: Open Task Manager, end the process for Google Chrome, and reopen the browser.
 3 Ways to Fix Safari High Memory Usage on Mac
Basic Fixes Close irrelevant tabs: Close the tabs that you don't use frequently in Safari.
3 Ways to Fix Safari High Memory Usage on Mac
Basic Fixes Close irrelevant tabs: Close the tabs that you don't use frequently in Safari.
The article above may contain affiliate links which help support Guiding Tech. The content remains unbiased and authentic and will never affect our editorial integrity.
