What is Windows Audio Device Graph Isolation
Windows Audio Device Graph Isolation, also known as audiodg.exe, is a process that handles digital signal processing, including advanced sound enhancement effects, on your Windows computer. It’s like a manager that organizes audio tasks and prevents problems from crashing your whole system.
It also helps improve your computer’s performance by ensuring all audio tasks run smoothly. Users can adjust specific audio parameters, such as bass, or even create custom sound effects. However, sometimes, even this program can cause issues on your system, leading to high CPU and GPU usage.
7 Ways to Fix Windows Audio Device Graph Isolation High CPU Usage
Try Basic Fixes
- Make sure Windows is updated to the latest version.
- Restart windows to terminate any process that is stuck.
- Close Windows Audio Device Graph Isolation using Task Manager
- Update Audio Driver
- Troubleshoot in Safe Mode to know if the issue is because of third-party apps.
- You can always restore your PC to a previous working state if nothing works out.
Method 1. Use Audio Troubleshooter on Windows
Thankfully, Windows 11 offers GetHelp App, which you can use to identify and resolve almost any issue with your system’s audio components.
Step 1: Open the Get Help App on your PC, and type Troubleshoot audio issues.
Step 2: The app will instantly offer a troubleshooting wizard that can start with your consent. Click on Yes, and get started.

Once the program runs, it will give you suggestions. Agree on what suits you and see if the issue is solved. If not, we suggest you perform the steps again, but choose a different sound source this time.
Method 2: Check if Apps or Mic Usage Spikes the CPU Usage
One of the reported causes of this spike is the apps when it comes to software and the microphone when it comes to hardware.
Some users have reported that apps like Nvida broadcast through the Logitech app are spiking their PC’s GPU. Some even reported that a spike in CPU usage showed up whenever the Microphone was connected.
If that is the case, you can uninstall or update the app. For Microphone, you need to check on another PC or replace it.
Method 3. Check the Origin of Windows Audio Device Graph Isolation
Once malware enters your system, it can act as a system program, such as Windows Audio Device Graph Isolation, to run discreetly in the background. Since it runs in the background, it can consume many resources and slow down your system.
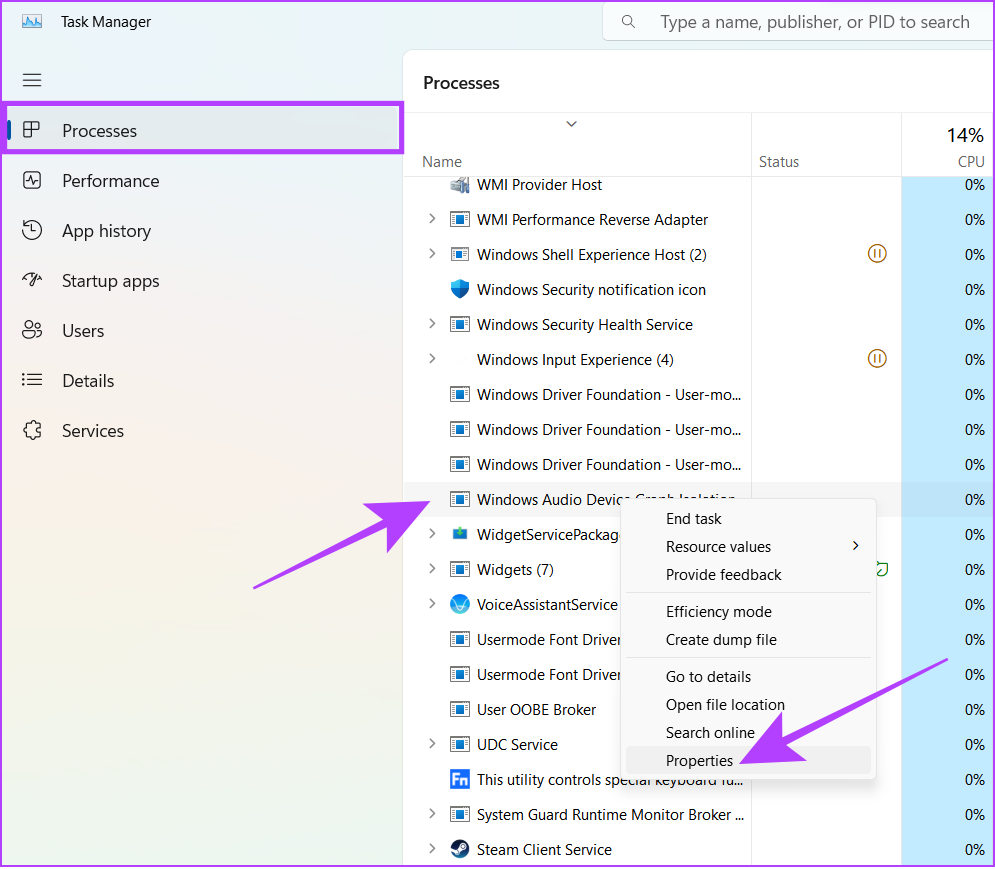
Step 1: Open Task Manager using the key combination Ctrl + Shift + Esc.
Step 2: Switch to Processes and look for the Windows Audio Device Graph Isolation process.
Tip: You can use the search bar to quickly locate the program by searching audiodg.
Step 3: Right-click over the Windows Audio Device Graph Isolation process and select Properties.
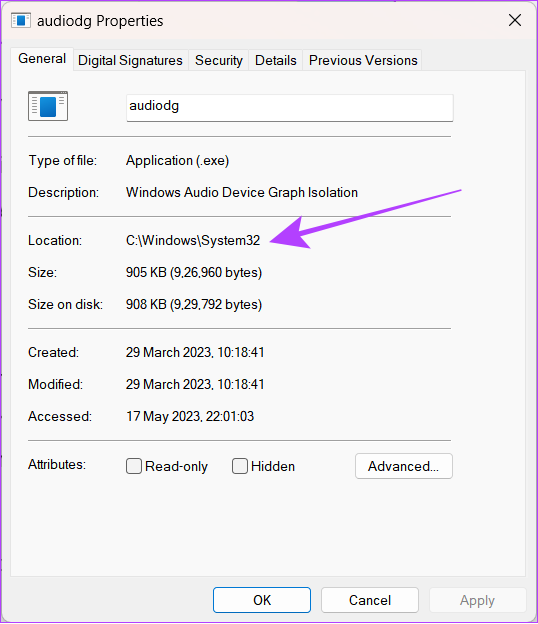
Step 4: Click on the General tab and look at what’s mentioned next to Location.
If the process directs you to the C:\Windows\System32 path, it indicates authenticity. Otherwise, it can be some malicious program acting as a system app. We recommend you perform a system-wide malware scan to check this as a safety measure.
Method 4. Recheck Any Recent Changes Made to System
As you know, Windows Audio Device Graph Isolation is a system application; any changes you make will affect the entire system. While you might not have made any changes manually, they might have been made by some applications or even as a result of any changes you have made to the hardware.
1. Uninstall Suspicious and Recently Installed Software
It’s always suggested that you install applications from authorized sources, or your PC’s security will be at risk. Hence, if you are suspicious or started facing high CPU and GPU usage after installing a specific application, we suggest uninstalling the program on your Windows PC and checking if you are still facing the issue.
2. Unplug and Replug the Headset or Speakers
It can do more harm than good if you haven’t gotten the right headset or speaker for your Windows machine. The device might put more pressure on the system through Windows Audio Device Graph Isolation. Unplug the connection and see if you are still facing the issue.
Additionally, if you recently changed the GPU of your Windows machine or have made many other hardware changes, you might see the audio drivers consuming maximum CPU and GPU power.
Method 5. Disable All Audio Enhancements
While audio enhancements are significant for improving sound quality, they can also be very demanding on your PC. Hence, disable them and see if your PC returns to normal.
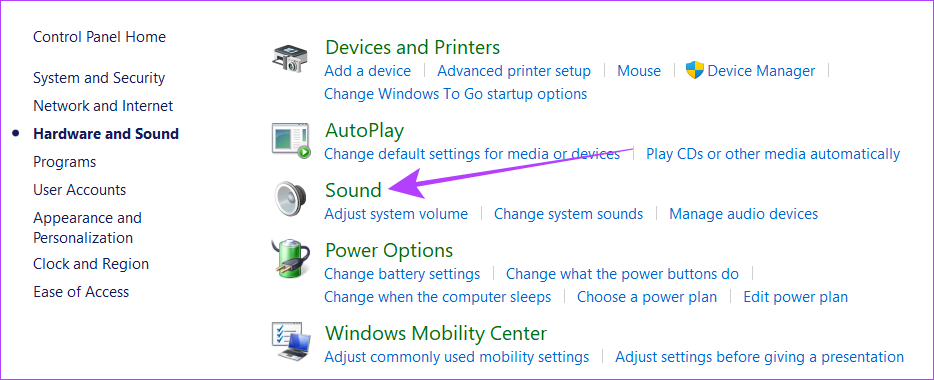
Step 1: Open Windows search, type Control Panel, and open it from the results.
Step 2: Click on Hardware and Sound, and then on Sound.
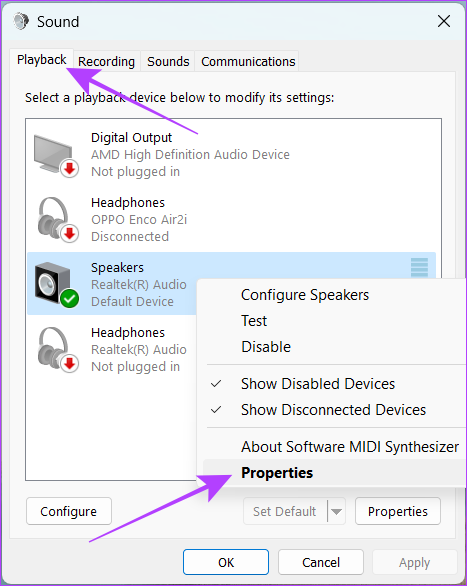
Step 4: Switch to Playback > right-click the current sound source and click on Properties.
Step 5: Navigate to the Advanced tab and uncheck Enable audio enhancements.
Tip: To relieve further pressure on your system, you can also uncheck Allow hardware acceleration of audio with this device.

Step 6: Now, click on the Apply button followed by Ok.
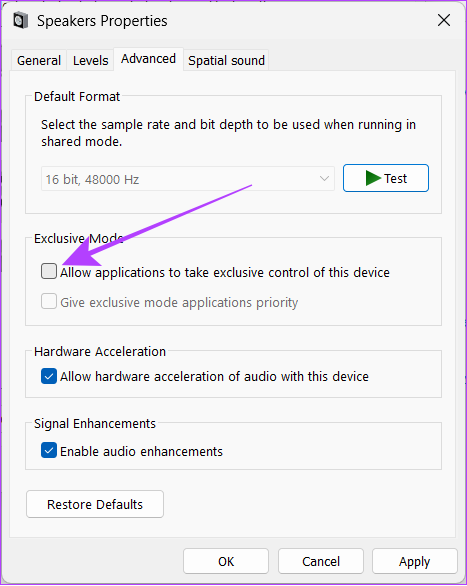
Method 6. Disable Exclusive Mode (Sound)
Windows comes with an Exclusive Mode, enabling third-party applications to bypass the system’s audio processing engine and utilize the resources the app wants. This might be the reason for the high CPU and GPU usage of the Windows Audio Device Graph Isolation (audiodg.exe) application.
Step 1: Go to Sound settings using Control Panel, then switch to the Playback tab.
Step 2: Right-click the current audio device and select Properties.
Step 3: Go to the Advanced tab and uncheck Allow applications to take exclusive control of this device. Click on Apply, followed by Ok.
Method 7. Turn Off Automatic Volume Adjustment
Windows automatically adjusts the volume levels depending on what you hear. For example, using a communication app that can take calls will automatically reduce the PC’s volume.
Step 1: Right-click the speaker icon on the system tray, and Click on Sound settings.
Step 2: Scroll to Advanced settings and click More sound settings.
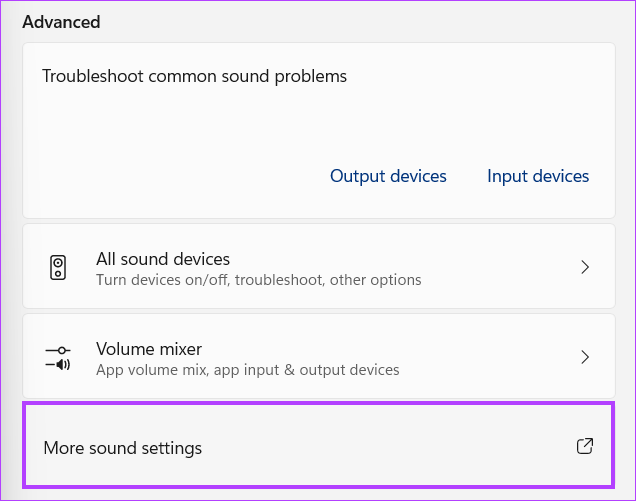
Step 3: Head over to the Communications tab and choose Do nothing.
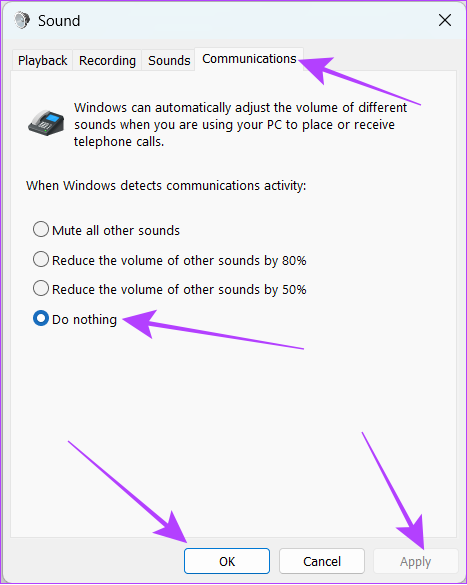
Step 4: Click on Apply and then OK to apply changes.
FAQs
Should I Disable the Windows Audio Device Graph Isolation Process?
Windows audio device graph isolation (audiodg.exe) is a system program that ensures all the audio functions work flawlessly. Disabling it won’t benefit you and might even impact the sound output.
Why Is My System Using 50% of My CPU?
Apart from the audio drivers consuming high system resources, there can be many reasons for high CPU usage. These can include some apps installed from unauthorized sources, bugs in Windows, or running resource-intensive applications. You can find and close such apps using the Task Manager.
Does 100% CPU Usage Damage PCs?
CPUs are designed to operate without damage, even at their maximum capacity. However, performance will suffer when the CPU is used 100% constantly.
How Much CPU Usage Is Normal?
CPU usage depends on the kind of application you are running. However, if you’re not actively running any programs, your CPU utilization should typically range from 1% to 10%, as these will be the system applications running in the background. If your idle PC shows any higher CPU usage than that, it could indicate a potential issue that needs to be addressed.
Was this helpful?
Last updated on 31 July, 2024
Read Next
 5 Ways to Fix Windows Explorer High CPU Usage on Windows 11
Try Basic Fixes Restart the Windows Explorer process: There's a chance that Windows Explorer's high CPU usage is a one-time glitch.
5 Ways to Fix Windows Explorer High CPU Usage on Windows 11
Try Basic Fixes Restart the Windows Explorer process: There's a chance that Windows Explorer's high CPU usage is a one-time glitch.
 5 Ways to Fix High CPU Usage on Windows 11
Try Basic Fixes Wait for Windows to finish updates: If Windows is in the process of checking, downloading, or installing any updates in the background, CPU usage may increase during
5 Ways to Fix High CPU Usage on Windows 11
Try Basic Fixes Wait for Windows to finish updates: If Windows is in the process of checking, downloading, or installing any updates in the background, CPU usage may increase during
 6 Ways to Fix Windows Modules Installer Worker High CPU Usage
If you've ever found your computer's fan working overtime and the CPU usage going sky-high, you're not alone.
6 Ways to Fix Windows Modules Installer Worker High CPU Usage
If you've ever found your computer's fan working overtime and the CPU usage going sky-high, you're not alone.
 6 Fixes for Discord’s High CPU Usage on Windows
Fix 1: Turn Off Hardware Acceleration The Hardware Acceleration in Discord allows the app to use your GPU instead of your CPU for graphics-intensive tasks.
6 Fixes for Discord’s High CPU Usage on Windows
Fix 1: Turn Off Hardware Acceleration The Hardware Acceleration in Discord allows the app to use your GPU instead of your CPU for graphics-intensive tasks.
 4 Ways to Fix Microsoft Edge High Memory and CPU Usage
Basic Fixes Restart the Microsoft Edge browser - You should restart the browser as it may fix minor bugs and glitches that trigger the problem.
4 Ways to Fix Microsoft Edge High Memory and CPU Usage
Basic Fixes Restart the Microsoft Edge browser - You should restart the browser as it may fix minor bugs and glitches that trigger the problem.
 How to Reduce CPU and RAM Usage in Microsoft Teams on Windows 11
Common Fixes Update or reinstall the Microsoft Teams app: Open the Microsoft Store, search Microsoft Teams, and click Update (if available).
How to Reduce CPU and RAM Usage in Microsoft Teams on Windows 11
Common Fixes Update or reinstall the Microsoft Teams app: Open the Microsoft Store, search Microsoft Teams, and click Update (if available).
 5 Ways to Fix Google Chrome High Disk Usage on Windows
Basic Fixes Restart Chrome: Open Task Manager, end the process for Google Chrome, and reopen the browser.
5 Ways to Fix Google Chrome High Disk Usage on Windows
Basic Fixes Restart Chrome: Open Task Manager, end the process for Google Chrome, and reopen the browser.
 3 Ways to Fix Safari High Memory Usage on Mac
Basic Fixes Close irrelevant tabs: Close the tabs that you don't use frequently in Safari.
3 Ways to Fix Safari High Memory Usage on Mac
Basic Fixes Close irrelevant tabs: Close the tabs that you don't use frequently in Safari.
The article above may contain affiliate links which help support Guiding Tech. The content remains unbiased and authentic and will never affect our editorial integrity.