For the most part, most users don’t have to constantly access their Wi-Fi router’s admin page. But when the situation demands it, you can easily log in and adjust various settings. Unfortunately, some users may have trouble accessing the router admin page through their web browser.
The primary reasons behind this error include using an incorrect IP address, VPN conflicts, browser glitches, and incorrect network settings. Try these ten methods to access the router admin page without any problems.
1. Use the Correct IP Address to Access the Router
Usually, the IP address to access the Wi-Fi router is ‘192.168.0.1’. But that isn’t the case with every Wi-Fi router manufacturer. Case in point, Netgear routers, which use the ‘192.168.1.1’ IP address.
So, we recommend visiting the official website of your router manufacturer or checking out various forums to learn about its IP address. You can flip the router (if it is not wall-mounted) to check for the IP address and other details at the bottom, too. Then, open a web browser, paste the correct IP address, and search for it.
2. Modify the URL String to Use HTTPS
Accessing the router admin page using the older HTTP protocol can be blocked by web browsers as it is not secure. To securely access the admin page, you must edit the URL to use HTTPS.
Modify the URL ‘http://192.168.0.1’ to ‘https://192.168.0.1’ (or whichever is the correct IP address). Search for the URL and check if the router’s admin page opens. If it doesn’t, proceed with the steps outlined below to access the router admin page.
3. Disable VPN
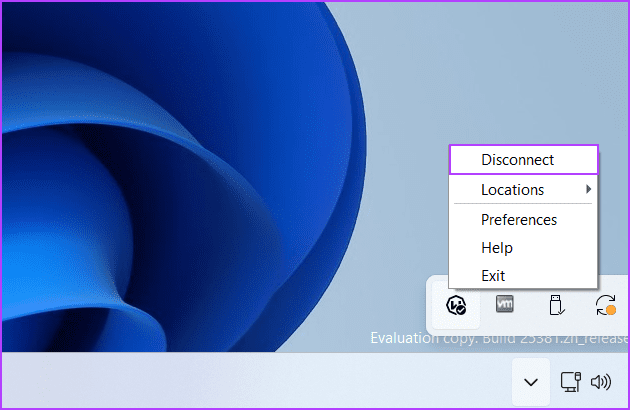
Using a VPN connection can come in the way of accessing the router admin page. So, disconnect from the VPN connection to rule out this possibility. Here’s how:
Step 1: Go to the right-hand side of the taskbar and click on the arrow icon.

Step 2: Right-click on the VPN app icon and select the Disconnect option.
To disable a custom VPN, use the Settings app. While you’re at it, uninstall any unnecessary VPN apps from your PC, too.
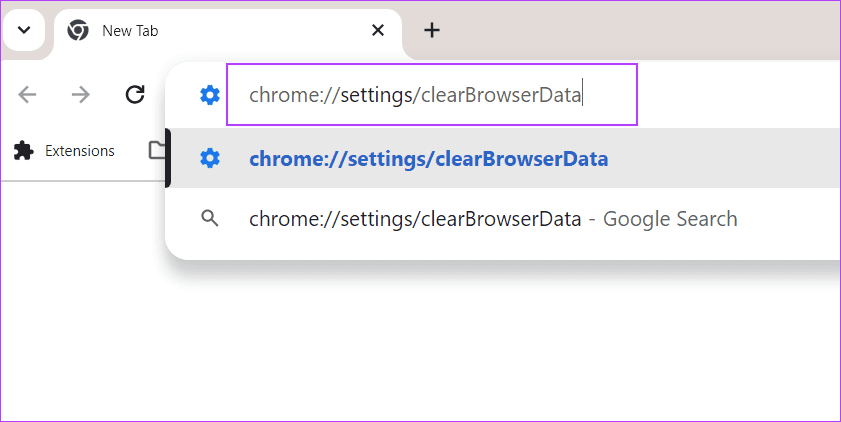
4. Wipe the Browser’s Cookies and Cache
Corrupt browser cookies and cache can prevent you from accessing certain URLs. So, wipe the cookies and cache and force the browser to build a fresh one. Here’s how:
Step 1: Press the Ctrl + T to open a new tab. Type chrome://settings/clearBrowserData in the URL bar and press Enter.
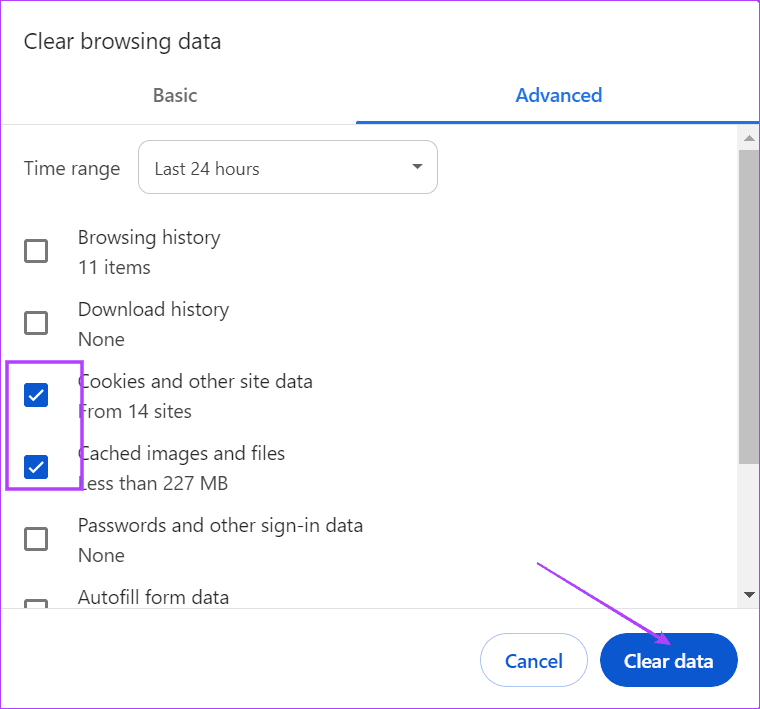
Step 2: Select the ‘Cookies and other site data’ and ‘Cached images and files’ option. Click on the Clear Data button.
Step 3: Restart the browser.
5. Switch to a Different Browser
If clearing the cookies and cache doesn’t fix your problem, switch to a different browser. Chrome is the default preference of many, but you can use Edge (which is also a Chromium-based browser). You can also switch to a non-Chromium browser like Mozilla Firefox to see if it solves the ‘can’t access default gateway’ problem.
6. Use Ethernet To Access the Login Page
Wi-Fi routers have multiple LAN ports that you can use to connect to your PC directly. Disconnect your PC from the Wi-Fi network and plug in the LAN cable. You won’t need to enter any IP address or password because the Wi-Fi router is already configured.
Now, type the router’s admin page IP address in a web browser search bar and check if it comes up.
7. Tweak the TCP/IP Network Connection Settings
If you manually configured your network adapter’s TCP/IP connection settings, you must revert it to the default settings. Here’s how:
Step 1: Press the Windows key to open the Start menu. Type network connections in the search box and press Enter to open the tool.
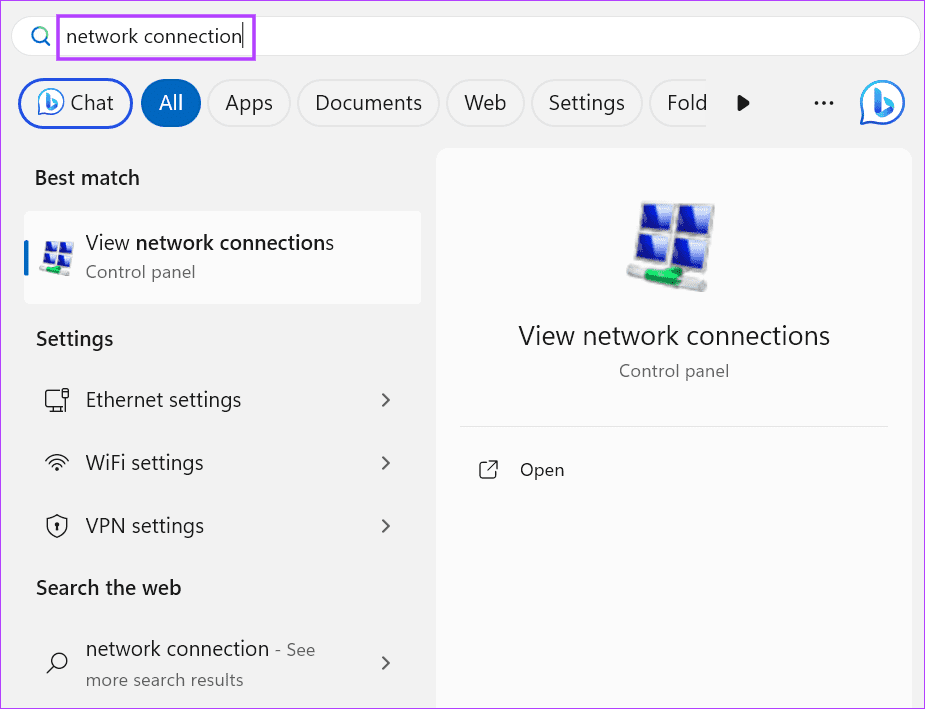
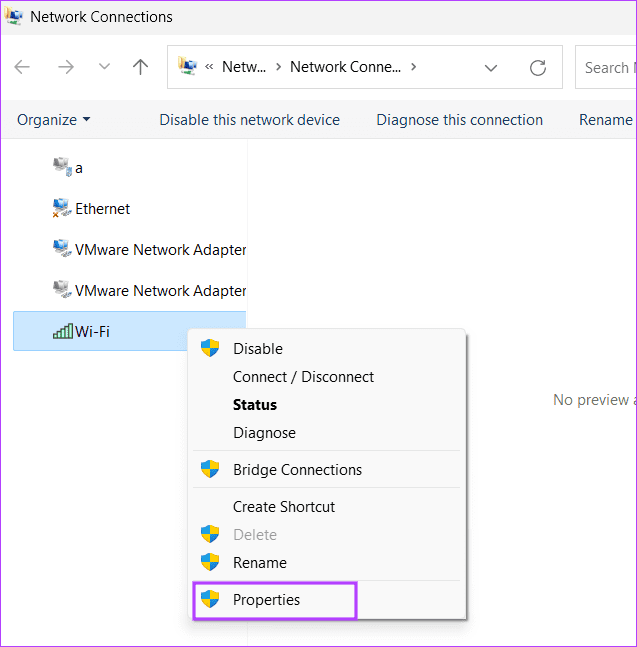
Step 2: Right-click on the network adapter. Then click on the Properties button.
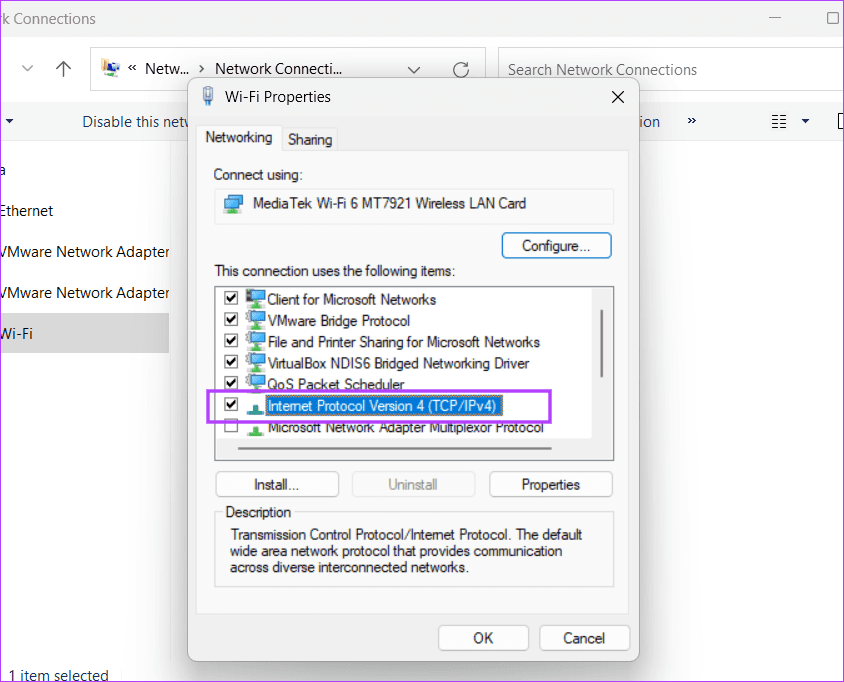
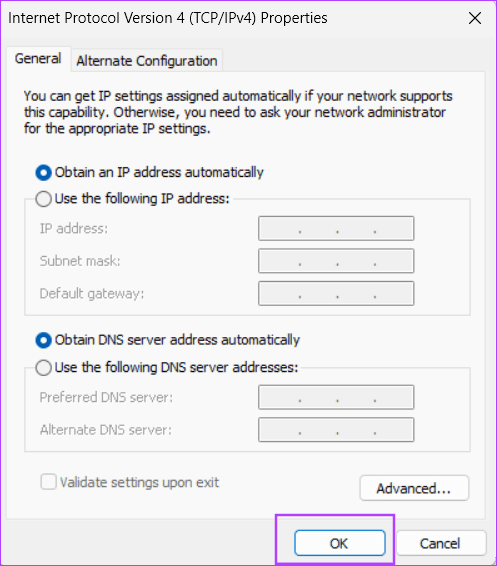
Step 3: Double-click on the ‘Internet Protocol Version 4 (TCP/IPv4)’ option.
Step 4: Select the ‘Obtain an IP address automatically’ option. Then select the ‘Obtain DNS server address automatically’ option.
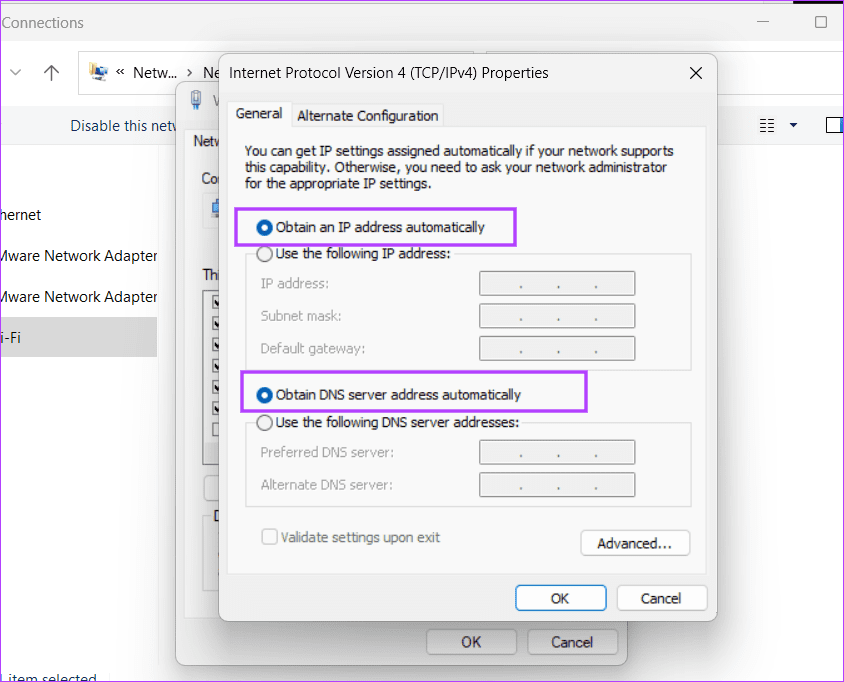
Step 5: Click on the OK button.
Step 6: Close the Network Connections window and try accessing the router’s admin page again.
8. Disable Virtual Networks
Virtualization software creates a virtual network adapter to share the host PC’s internet connection with the virtual machine. If you no longer need these virtual adapters, disable them from your PC. Here’s how:
Step 1: Press the Windows key to open the Start menu. Type network connections in the search box and press Enter to open the tool.
Step 2: Right-click on the network adapter. Select the Disable option.
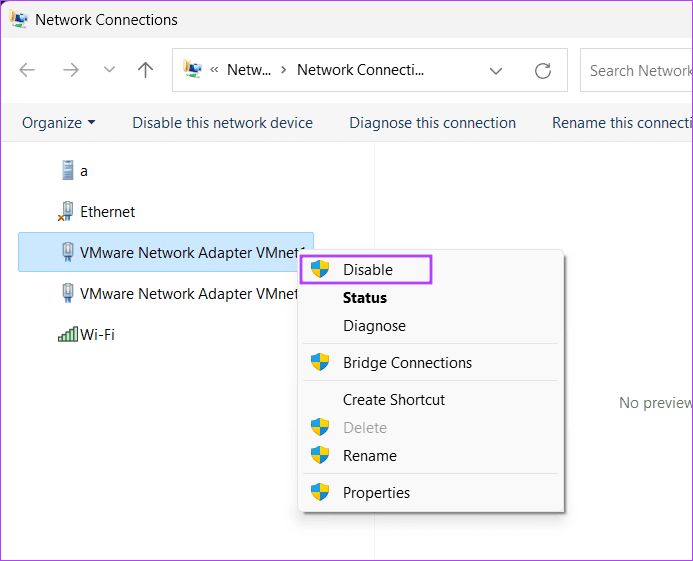
Step 3: Close the Network Connections window.
9. Reset Network Connection
If disabling virtual network adapters and changing the TCP/IP settings didn’t have any effect, you must reset the network connection on your Windows PC. It will reinstall all the network adapters, and you will have to sign in again to a Wi-Fi network. Here’s how:
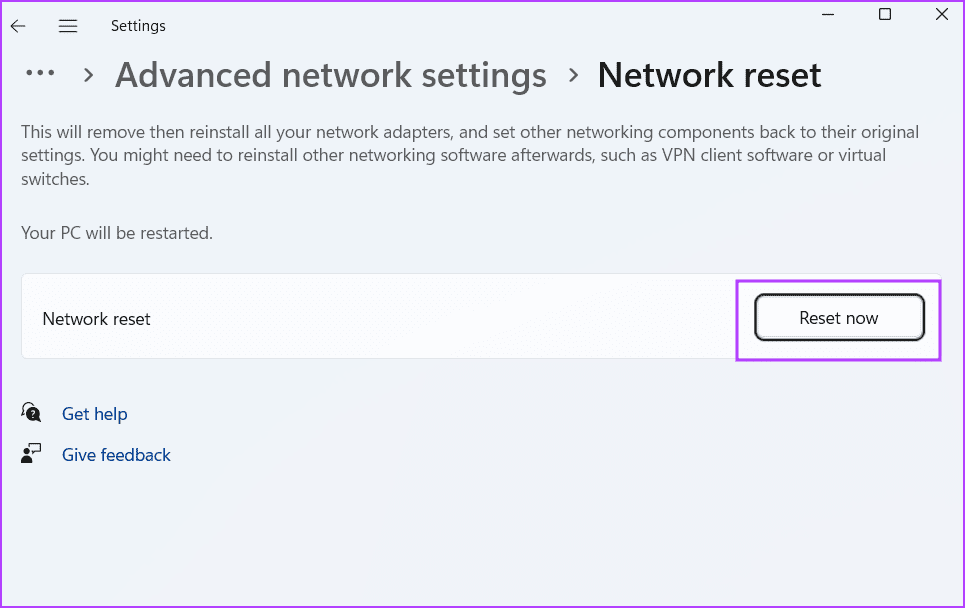
Step 1: Press the Windows key to open the Start menu. Type network reset in the search box and press Enter to open the Settings app.

Step 2: Click on the Reset now button.
Step 3: Click on the Yes button.
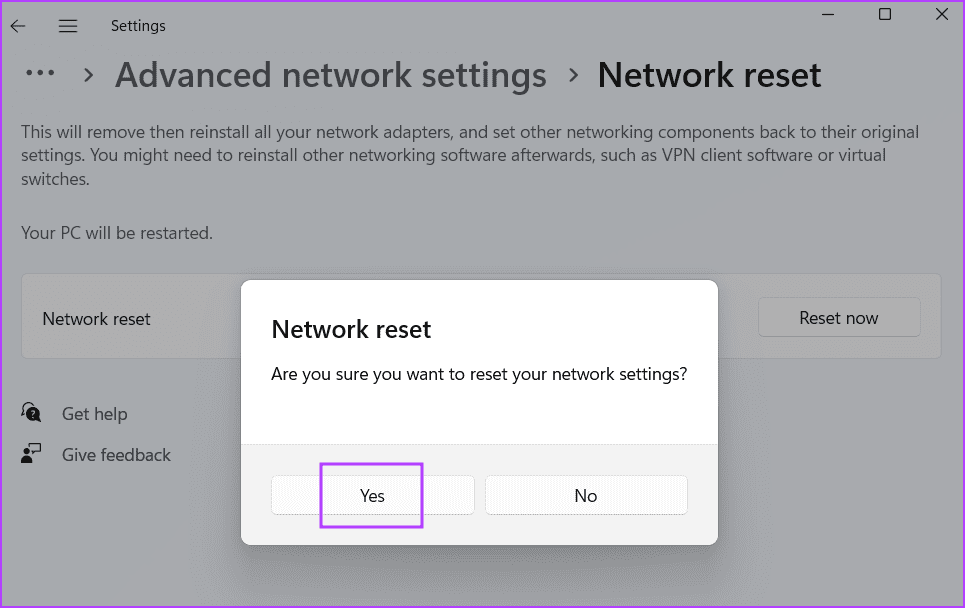
Wait for your PC to restart and apply the changes.
10. Manually Reset the Wi-Fi Router
The last resort is to reset the Wi-Fi router manually. Most routers have a dedicated reset button at the back or the bottom (depending on the model). Some routers have a caved-in reset button, which you need to press with a sharp object like a paper clip to initiate the reset.
Press the reset button for 10 seconds, and wait for the router lights to go blank for a moment. Once done, the LEDs will stop flashing. After the reset finishes, re-configure the router via an ethernet cable or Wi-Fi connection.
Fix Router Troubles
These were the ten methods to fix the ‘can’t access router admin page’ issue on a Windows 11 PC. Use the correct IP address, clear browser cookies, and change the browser. Disable VPN, configure TCP/IP settings, reset the network connection, and if nothing gives, try hard resetting the router. Do let us know which method worked for you in the comments below.
Was this helpful?
Last updated on 28 January, 2024
Read Next
 2 Ways to Access the Page Setup Dialog Box in Microsoft Word
Method 1: Using the Microsoft Word Ruler The Microsoft Word ruler has several uses, including quickly accessing the Page Setup dialog box. Here's how: Step 1: Click the Start button
2 Ways to Access the Page Setup Dialog Box in Microsoft Word
Method 1: Using the Microsoft Word Ruler The Microsoft Word ruler has several uses, including quickly accessing the Page Setup dialog box. Here's how: Step 1: Click the Start button
 How to Reset Admin Password in Windows 11/10
Method 1: Reset Microsoft Account Password Windows now uses Microsoft Account to sign into your computer.
How to Reset Admin Password in Windows 11/10
Method 1: Reset Microsoft Account Password Windows now uses Microsoft Account to sign into your computer.
 The Complete Guide to Facebook Group Admin Roles and Responsibilities
Any group without a leader can quickly spiral to chaos.
The Complete Guide to Facebook Group Admin Roles and Responsibilities
Any group without a leader can quickly spiral to chaos.
 How to Make Someone Server Admin or Owner on Discord
How to Make Someone Server Admin on Discord You can grant someone admin privileges on Discord via the PC or mobile app.
How to Make Someone Server Admin or Owner on Discord
How to Make Someone Server Admin on Discord You can grant someone admin privileges on Discord via the PC or mobile app.
 7 Fixes for Wi-Fi Login Page Not Showing Up on Mac and Windows
https://youtu.be/ZVvbLZKKXKk Fix 1: Forget the Network and Reconnect to It Try forgetting the network so you can reconnect to it.
7 Fixes for Wi-Fi Login Page Not Showing Up on Mac and Windows
https://youtu.be/ZVvbLZKKXKk Fix 1: Forget the Network and Reconnect to It Try forgetting the network so you can reconnect to it.
 6 Fixes for ‘You Do Not Have Sufficient Access to Uninstall’ Error in Windows
Method 1: Attempt Uninstallation With Admin Rights You need to locate the application's uninstaller file and re-attempt the uninstallation with administrator privileges.
6 Fixes for ‘You Do Not Have Sufficient Access to Uninstall’ Error in Windows
Method 1: Attempt Uninstallation With Admin Rights You need to locate the application's uninstaller file and re-attempt the uninstallation with administrator privileges.
 3 Ways to Access the WindowsApps Folder on Windows
https://youtu.be/Sug1OVa0Q3A Method 1: Gain Access to the WindowsApps Folder via File Explorer The easiest way to open the WindowsApps folder is through File Explorer.
3 Ways to Access the WindowsApps Folder on Windows
https://youtu.be/Sug1OVa0Q3A Method 1: Gain Access to the WindowsApps Folder via File Explorer The easiest way to open the WindowsApps folder is through File Explorer.
 Top 8 Ways to Fix Wi-Fi Login Page Not Showing on iPhone
Public Wi-Fi networks have become ubiquitous.
Top 8 Ways to Fix Wi-Fi Login Page Not Showing on iPhone
Public Wi-Fi networks have become ubiquitous.
The article above may contain affiliate links which help support Guiding Tech. The content remains unbiased and authentic and will never affect our editorial integrity.