4 Ways to Clear Facebook Search Suggestions on iPhone or Android
Facebook uses your search history to show better search results and suggestions. So, to get rid of search suggestions, erase your Facebook search history. There are four ways to do so.
Method 1: Clear Your Recent Searches From Search Bar
Step 1: Launch the Facebook app.
Step 2: Tap the search bar at the top-right corner of the screen. A list of recent search suggestions will appear; tap See all to view all searches.

Step 3: Now, either,
- Tap X to clear a particular search, or
- Tap Clear All > Clear All again to clear your Facebook search history.

Now, your Facebook app will not offer you search suggestions for the removed item or anything (if you’ve erased the complete history).
Method 2: Clear Search History From Accounts Center
Step 1: Launch the Facebook app > tap the Menu icon at the bottom-right corner (iPhone/iPad) or top-right corner (Android).
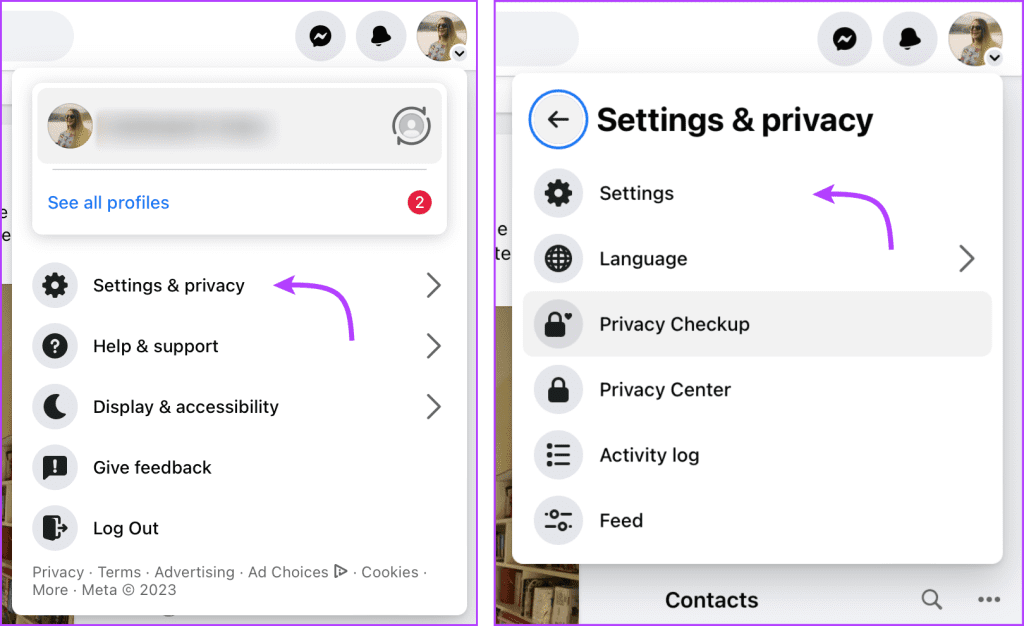
Step 2: Scroll down and select Settings & Privacy.

Step 3: Tap Settings from the menu > choose See more in Accounts Center.

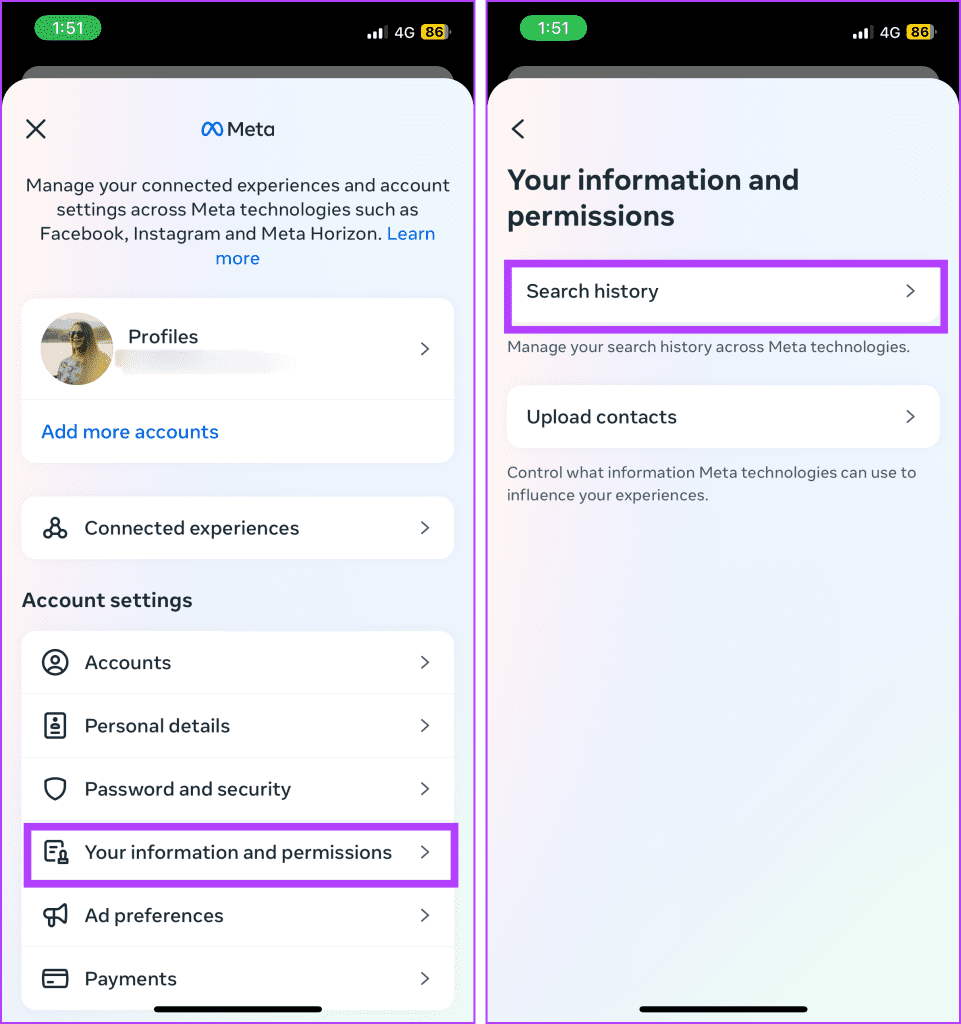
Step 4: Here, select Your information and permissions > tap Search history.

Step 5: You can either,
- Tap Clear all searches, or
- Select the account and tap X to clear the individual search.

Note: If your searches still appear after taking these steps, log out and log in to Facebook. Your searches will be cleared.
Method 3: Delete a Search From Your Facebook Activity Log
Step 1: Launch Facebook > tap your profile picture at the top-right corner.
Step 2: Tap the three-dot icon under your profile.

Step 3: Select Activity log. Scroll down to Logged actions and other activity > tap View logged actions.

Step 4: Tap Filters > select Categories > select Search history.

Step 5: You can either,
- Delete all searches: Tap Clear searches at the top.
- Delete one search: Tap the three-dot icon next to it > Delete.

Alternatively, you can launch Facebook → tap on three horizontal lines (hamburger menu) at the bottom-right corner (iPhone/iPad), top-right corner (Android) → Settings & Privacy → Settings → Privacy → Activity Log → Logged actions and other activity → Filter → Search History.
Method 4: Automatically Delete Facebook Search History
If you don’t want to manually remove Facebook search history every time, you can schedule it to auto-delete.
Step 1: Open Facebook > tap the menu (three-line) icon > Settings & Privacy.
Step 2: Select Settings > tap See more in Accounts Center.
Step 3: Next, tap Your information and permissions > select Search history.
Step 4: Tap Keep searches for > select a preferred option > tap confirm.

Clear FB Search Suggestions on macOS or Desktop
Method 1: Clear Your Recent Searches From Your Search Bar
Step 1: Open the browser of your choice > log in to your Facebook account.
Step 2: Click the search bar at the top-left corner > click Edit from the drop-down menu.

Step 3: Here, you can:
- Delete all searches: Click Clear searches at the top.
- Delete one search: Click the three-dot icon next to it > Delete.

Method 2: Clear Search History From Accounts Center
Step 1: Log in to your Facebook account.
Step 2: Click your profile picture at the top-right corner > click Settings and Privacy > Settings.
Step 3: Select See more in Accounts Center.

Step 4: Click Your information and permissions > select Search history.

Step 5: You can:
- Click Clear all searches, or
- Select the account and click X to clear the individual search.

Method 3: Automatically Delete FB Search History
Step 1: Open Facebook > tap on Profile image > Settings & Privacy > Settings > See more in Accounts Center.
Step 2: Click Your information and permissions > select Search history.
Step 3: Click Keep searches for.
Step 4: Select a preferred option > click Confirm.

Note: Suggested for You is a separate feature that employs the search history to give you suggestions of pages or people. And deleting search history doesn’t really help you manage this feature. Although you can’t completely turn off the Suggested for You feature, there are some ways to avoid it.
FAQs
No, clearing search suggestions will not affect the autocomplete feature on Facebook. Regardless of the status of your search history, autocomplete will work based on your recent and frequent searches.
Unfortunately, Facebook does not provide an option to disable search suggestions entirely. Although, you can regularly clear your search history or automate it, to keep your search bar free from unwanted suggestions.
While FB’s algorithm might draw ideas from search suggestions, both features are managed separately. So, clearing your search suggestions does not affect the suggestions you see in your News Feed or other sections of Facebook.
Was this helpful?
Last updated on 03 June, 2024
Read Next
 How to Clear Instagram Search Suggestions on Android and iPhone
How to Delete a Single Instagram Search Suggestion If you only want to remove one entry from your search history on Instagram or remove individual entries manually, here's how to
How to Clear Instagram Search Suggestions on Android and iPhone
How to Delete a Single Instagram Search Suggestion If you only want to remove one entry from your search history on Instagram or remove individual entries manually, here's how to
 4 Fixes for Google Search Suggestions Not Showing in Safari on Mac
Basic Fixes Force quit and relaunch Safari: Click the Apple logo > Force Quit > Select Safari > Force Quit.
4 Fixes for Google Search Suggestions Not Showing in Safari on Mac
Basic Fixes Force quit and relaunch Safari: Click the Apple logo > Force Quit > Select Safari > Force Quit.
 How to Appear on Someone’s Instagram Suggestions
Method 1: Follow the User on Instagram One of the easiest ways to pop up on someone's suggested friends is by following them on Instagram.
How to Appear on Someone’s Instagram Suggestions
Method 1: Follow the User on Instagram One of the easiest ways to pop up on someone's suggested friends is by following them on Instagram.
 How to Turn Off Follow Suggestions on Instagram
Turn Off Follow Suggestion on Instagram On Mobile After understanding how Instagram suggests other accounts to follow, here is a guide on how to disable this feature in the app.
How to Turn Off Follow Suggestions on Instagram
Turn Off Follow Suggestion on Instagram On Mobile After understanding how Instagram suggests other accounts to follow, here is a guide on how to disable this feature in the app.
 5 Ways to Fix iPad and iPhone Stuck on Siri Suggestions
Basic Fixes: Connect to a charger and restart the iPhone: Restarting your device helps close all features and functions and start them over again.
5 Ways to Fix iPad and iPhone Stuck on Siri Suggestions
Basic Fixes: Connect to a charger and restart the iPhone: Restarting your device helps close all features and functions and start them over again.
 A Guide to Using the Search Bar and Search Operators in Microsoft Outlook
How to Use the Microsoft Outlook Search Bar There are two ways to use the Microsoft Outlook Search bar.
A Guide to Using the Search Bar and Search Operators in Microsoft Outlook
How to Use the Microsoft Outlook Search Bar There are two ways to use the Microsoft Outlook Search bar.
 How to Clear Your Amazon Search History
Delete Amazon Search and Browsing History From Web Search history is different from the browsing history.
How to Clear Your Amazon Search History
Delete Amazon Search and Browsing History From Web Search history is different from the browsing history.
 Prime Video: Clear Continue Watching, Search, and Watch History
Clear Continue Watching on Amazon Prime Video The new Prime Video interface lacks an Edit button for managing its Continue Watching section.
Prime Video: Clear Continue Watching, Search, and Watch History
Clear Continue Watching on Amazon Prime Video The new Prime Video interface lacks an Edit button for managing its Continue Watching section.
The article above may contain affiliate links which help support Guiding Tech. The content remains unbiased and authentic and will never affect our editorial integrity.