Basic Fixes
- Check the USB Port or USB Hub: You can check whether the USB port or your USB Hub is working fine while connecting your Hard Drive with your Android TV.
Fix 1: Eject and Reconnect Your Hard Drive
You may have disconnected the hard drive from our Android TV without ejecting it first.
Step 1: If you have disconnected the hard drive, connect it again with your Android TV.
Step 2: Select the Notification icon on the top-right side of the home screen of your Android TV.

Step 3: Select your Hard Drive from the right menu. Then, select Eject from the right menu.
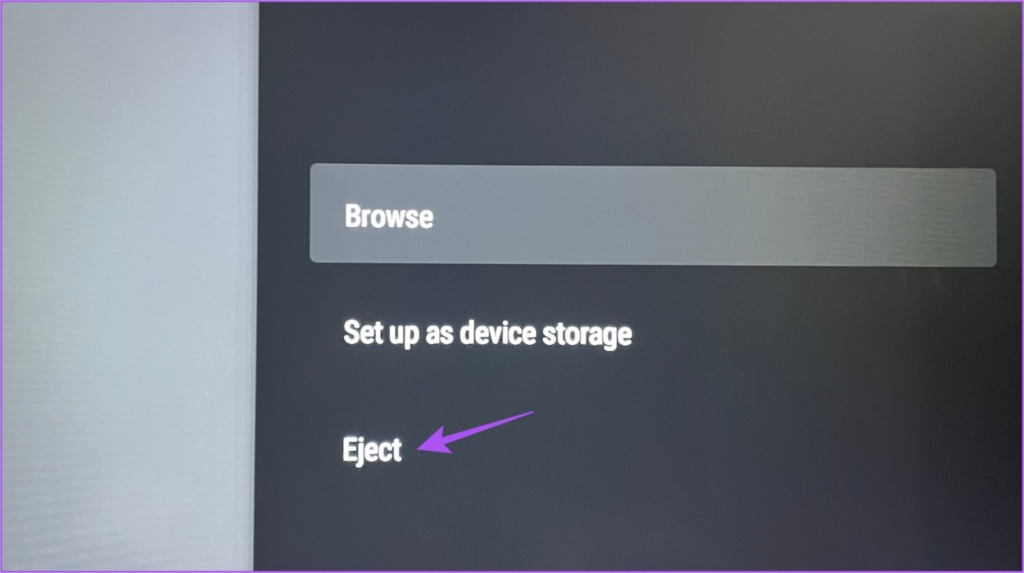
Step 4: After the hard drive is ejected, connect it again and check if the problem is solved.
Fix 2: Check if Your Hard Drive Uses MBR Partition
Many new hard drives and SSDs usually rely on a partitioning format called GPT (GUID Partition Table). The GPT format allows the entire capacity of the hard drive to be used on computers.
You need to connect your hard drive to your computer and check if it supports the MBR or Master Boot Record format for partitioning as this format might be supported by your Android TV.
For Windows
Step 1: Connect the hard drive to your Windows PC.
Step 2: Type Command Prompt in the Search Bar and then click on Run as administrator.

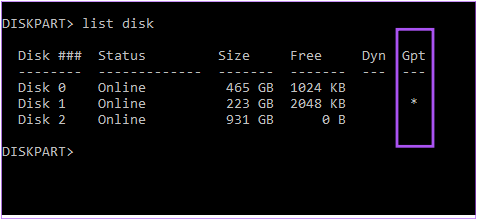
Step 3: In the Command Prompt window, type diskpart and press Enter.
Step 4: Next, type list disk and press Enter.
If you see an asterisk (*) symbol below GPT next to the name of your hard drive, it means that it supports GPT partitioning.
If your hard drive doesn’t support the MBR format, here’s how to convert it from GPT.
Step 1: Run Command Prompt as administrator on your Windows PC.
Step 2: In the Command Prompt window, type diskpart and press Enter.
Step 3: Type list disk and press Enter. Then, note down the number of your disk that supports the GPT format.

Step 4: Type Select Disk (disk number) and press Enter.

Step 5: Type Clean and press Enter. Do note that this step will erase all the contents of your hard drive.

For Mac
Step 1: Connect the hard drive to your Mac.
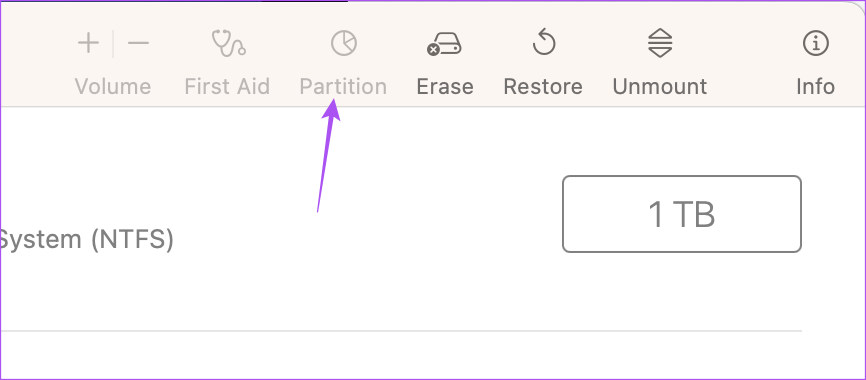
Step 2: Open Disk Utility on your Mac. Then, in the Disk Utility window, click on your hard drive name from the left menu.

Step 3: See if the option for Partition is enabled or not.
If not, your hard drive already supports the MBR format. Here are the steps to convert the partition format from GPT to MBR on your Mac, if required.
Step 1: Open Terminal on your Mac, type diskutil list and press Enter.
Step 2: Note down the disk number of your hard drive. Then, type the following command in the Terminal window and press Return.
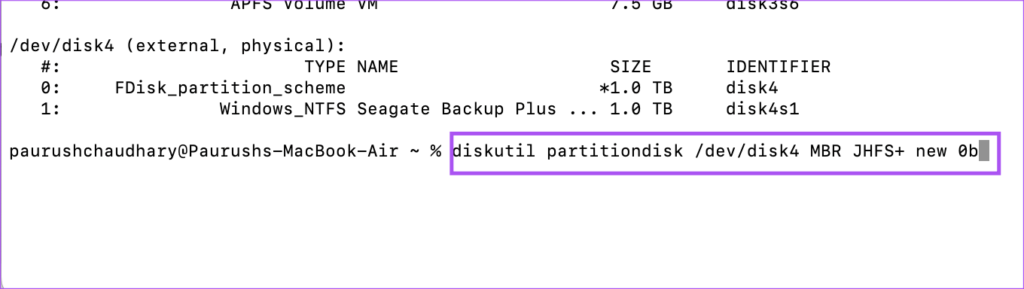
diskutil partitiondisk /dev/disk0 MBR JHFS+ new 0bAfter that, eject the hard drive and check if the problem is solved.
Was this helpful?
Last updated on 23 April, 2024
Read Next
 3 Fixes for Netflix App Not Showing in Play Store on Android TV
Basic Fixes Check for Netflix app support: Newer versions of the Netflix app don't run properly on older Android TV models that have stopped receiving software updates.
3 Fixes for Netflix App Not Showing in Play Store on Android TV
Basic Fixes Check for Netflix app support: Newer versions of the Netflix app don't run properly on older Android TV models that have stopped receiving software updates.
 4 Fixes for Google Photos Not Showing in Ambient Mode on Google TV
Basic Fixes Check your Google account: Open Settings > Accounts and sign in > Check the Google account you are using.
4 Fixes for Google Photos Not Showing in Ambient Mode on Google TV
Basic Fixes Check your Google account: Open Settings > Accounts and sign in > Check the Google account you are using.
 4 Fixes for WhatsApp Not Showing Contacts (Android and iPhone)
Basic Fixes: Force close and restart WhatsApp: Open background apps and force WhatsApp to close.
4 Fixes for WhatsApp Not Showing Contacts (Android and iPhone)
Basic Fixes: Force close and restart WhatsApp: Open background apps and force WhatsApp to close.
 4 Fixes for Speedometer or Speed Limits Not Showing in Google Maps on Android
Common Fixes Check feature availability - Speedometer or Speed limits may be unavailable in your region.
4 Fixes for Speedometer or Speed Limits Not Showing in Google Maps on Android
Common Fixes Check feature availability - Speedometer or Speed limits may be unavailable in your region.
 4 Fixes for Instagram Story Views Not Showing
Basic Fixes Use a public account: Go to your profile > Settings and activity > Account privacy > disable Private account.
4 Fixes for Instagram Story Views Not Showing
Basic Fixes Use a public account: Go to your profile > Settings and activity > Account privacy > disable Private account.
 8 Best Fixes for Google Messages App Not Showing Contact Names on Android
The Google Messages app can help you send text messages and react to them as well.
8 Best Fixes for Google Messages App Not Showing Contact Names on Android
The Google Messages app can help you send text messages and react to them as well.
 4 Fixes for Android Not Showing Contact Names for Incoming Calls
https://youtu.be/42YJeJ_T88c Fix 1: Allow the Phone App to Access Your Contacts Like most apps, the Phone app on your Android also requires permission to access your contact list.
4 Fixes for Android Not Showing Contact Names for Incoming Calls
https://youtu.be/42YJeJ_T88c Fix 1: Allow the Phone App to Access Your Contacts Like most apps, the Phone app on your Android also requires permission to access your contact list.
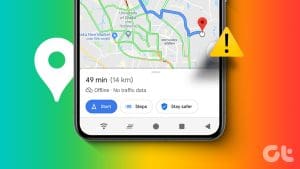 3 Fixes for Google Maps Not Showing Traffic on Android and iPhone
Try Basic Fixes Ensure Google Maps is not in offline mode: While offline mode can help you navigate without an internet connection, no traffic data is available in this mode.
3 Fixes for Google Maps Not Showing Traffic on Android and iPhone
Try Basic Fixes Ensure Google Maps is not in offline mode: While offline mode can help you navigate without an internet connection, no traffic data is available in this mode.
The article above may contain affiliate links which help support Guiding Tech. The content remains unbiased and authentic and will never affect our editorial integrity.