If your Wi-Fi driver uninstalled itself, you might not be able to see the corresponding adapter in Device Manager or the network icon on your toolbar. If you just restart the PC, it might solve the issue, but that’s usually only a temporary fix. The “uninstallation” is usually Windows Update replacing the driver, a power-saving setting turning off the adapter, or corrupted driver files. Here’s what to do.
Fix 1 – Recover if the Wi-Fi Driver Keeps Deleting Itself
The first thing to do is to get the driver back up and running so it can actually be managed.
Step 1. Right-click on the “Start” button and go to “Device Manager.”
Step 2. In the toolbar at the top, choose “Scan for hardware changes” (it should be the last icon).

Step 3. Go to the “Network adapters” section and check for the Wi-Fi adapter. Its name is usually something like “Intel Wireless,” “Realtek Wireless LAN,” “Qualcomm,” or “MediaTek Wi-Fi 6.”
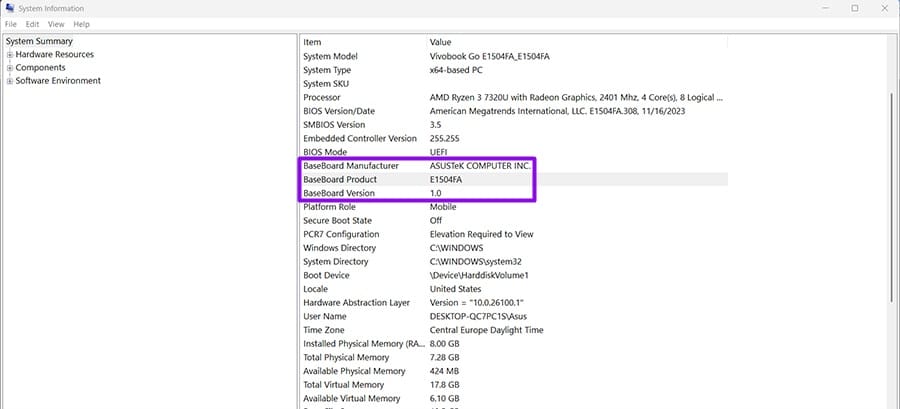
Step 4. If the adapter is missing from the list, connect to the internet in another way, then download the wireless driver for your exact motherboard model from the manufacturer’s support page.
You can find this in the “System Information” screen (which you can search for in the search bar). The motherboard will be listed as “BaseBoard.”
Step 5. Run the downloaded application or installer and follow the instructions.
Fix 2 – Stop Windows From Getting the Wi-Fi Driver Uninstalled Itself
Windows Update might use its own driver versions, which can swap out a working driver for one that fails to load. You can turn this off to possibly prevent the issue from reappearing, but Windows can still install some drivers automatically.
Step 1. Hit “Win + R” to get to the Run utility, then type in “sysdm.cpl” and hit “Enter.”
Step 2. Go to the “Hardware” tab and choose “Device installation settings.”
Step 3. Select “No (your device might not work as expected)” and choose “Save Changes.”

Step 4. Reinstall the driver from the manufacturer’s page and keep an eye on changes.
Fix 3 – Turn Off Power Management for the Adapter
Windows can shut down the wireless card to save power. This should only be a temporary measure (such as when laptops are low on battery), but it could lead to it the Wi-Fi seemingly uninstalling itself repeatedly.
Step 1. Go to Device Manager and expand “Network adapters.”
Step 2. Right-click on your Wi-Fi adapter and select “Properties.”
Step 3. Go to the “Power Management” tab and uncheck “Allow the computer to turn off this device to save power.”
Step 4. Hit “OK,” restart, then deliberately put the PC to sleep and wake it to test whether this was the problem.
Note that not all devices will have this tab available. If you can’t find it, you won’t be able to apply this fix.
Fix 4 – Roll Back or Swap the Driver Version
If the Wi-Fi driver uninstalled itself immediately after an update, the previous version could still be stored in the system.
Step 1. In Device Manager, double-click your wireless adapter and open the “Driver” tab.
Step 2. Click “Roll Back Driver” if you can and follow the prompts.

If the option is greyed out, go to Windows Update, then choose “Advanced options” and “Optional updates.” Find any wireless adapter entry listed in “Driver updates” and roll them back from there.
Fix 5 – Repair System Files and Reset the Network Settings
This is a bit of a longer shot, since corrupted files could interfere with various parts of the PC, but it’s a relatively simple check.
Step 1. Type “cmd” into the search bar and select “Run as administrator.”
Step 2. Type in “sfc /scannow” and hit “Enter,” then wait for the scan to finish.
Step 3. Run “DISM /Online /Cleanup-Image /RestoreHealth” and let it complete.
Step 4. If the driver still disappears, open “Settings,” go to “Network & internet,” then “Advanced network settings,” and choose “Network reset.”
Fix 6 – Clean Boot to Find the Culprit
Using a clean boot, Safe Mode, or removing all services allows you to check whether a third-party program is interfering.
Step 1. Hit “Win + R,” type in “msconfig,” and hit “Enter.”
Step 2. On the “Services” tab, check “Hide all Microsoft services,” then click “Disable all.”

Step 3. Open the “Startup” tab, click “Open Task Manager,” and disable the startup entries.

Step 4. Restart the PC and check if everything works. If your Wi-Fi connection is stable, go back to the services list and re-enable the items a few at a time. Once the problem returns, you can troubleshoot the exact app or service for solutions.
You can also enter Safe Mode by going to “Advanced start settings” and following the instructions for choosing Safe Mode with Networking. This allows you to quickly get a preview of the device’s “base” state without manually disabling settings.
Fix 7 – Check BIOS, Firmware, and the Card Itself
If none of the software fixes work, you may need to check firmware or hardware.
- Restart into BIOS/UEFI (usually “Del,” “F2,” or “F10” while the PC is booting) and confirm that wireless or LAN settings are enabled.
- Check the manufacturer’s support page for a newer BIOS or chipset firmware version and follow their update instructions.
Was this helpful?
Last updated on 31 July, 2026
Read Next
 6 Ways to Remove Residual Files After Uninstalling Software on Windows
Method 1: Delete Registry Keys Registry keys are a database that includes an app's configuration and installation data, such as the product key, custom install settings, etc.
6 Ways to Remove Residual Files After Uninstalling Software on Windows
Method 1: Delete Registry Keys Registry keys are a database that includes an app's configuration and installation data, such as the product key, custom install settings, etc.
 5 Things to Try If X (Twitter) Keeps Logging You Out
Try These Things First Disable VPN: If you're using a VPN connection, X may log you out due to unusual or suspicious account activity.
5 Things to Try If X (Twitter) Keeps Logging You Out
Try These Things First Disable VPN: If you're using a VPN connection, X may log you out due to unusual or suspicious account activity.
 3 Ways to Fix Windows 11 Screen Keeps Locking Automatically
Fix 1: Increase Lock Screen Timeout You can start by verifying the set lock screen timeout duration on your PC.
3 Ways to Fix Windows 11 Screen Keeps Locking Automatically
Fix 1: Increase Lock Screen Timeout You can start by verifying the set lock screen timeout duration on your PC.
 3 Ways to Fix Mouse Keeps Scrolling Automatically Windows 10 and Windows 11
https://youtu.be/1UZ3PWNr-lE Try Basic Fixes Disconnect and reconnect the mouse: Unplug your mouse cable or wireless adapter from your computer and reconnect it to a different port.
3 Ways to Fix Mouse Keeps Scrolling Automatically Windows 10 and Windows 11
https://youtu.be/1UZ3PWNr-lE Try Basic Fixes Disconnect and reconnect the mouse: Unplug your mouse cable or wireless adapter from your computer and reconnect it to a different port.
 5 Fixes for Driver Power State Failure in Windows 11
What Causes Driver Power State Failure?
5 Fixes for Driver Power State Failure in Windows 11
What Causes Driver Power State Failure?
 Can’t Save Excel Files on Mac? Try These 3 Fixes
Basic Fixes Check internet connectivity. If your Mac experiences internet issues, Microsoft Excel will remain stuck in the ‘Saving’ status.
Can’t Save Excel Files on Mac? Try These 3 Fixes
Basic Fixes Check internet connectivity. If your Mac experiences internet issues, Microsoft Excel will remain stuck in the ‘Saving’ status.
 LinkedIn Notifications Not Working – Try These Fixes
LinkedIn has gone dark.
LinkedIn Notifications Not Working – Try These Fixes
LinkedIn has gone dark.
 6 Ways to Fix Samsung Internet Browser Keeps Opening Automatically
Fix 1: Block Pop-Ups Blocking pop-ups on Samsung Internet is one of the most effective ways to stop the browser from opening on its own.
6 Ways to Fix Samsung Internet Browser Keeps Opening Automatically
Fix 1: Block Pop-Ups Blocking pop-ups on Samsung Internet is one of the most effective ways to stop the browser from opening on its own.
The article above may contain affiliate links which help support Guiding Tech. The content remains unbiased and authentic and will never affect our editorial integrity.