If you try to run Teams after an update, you might get an error such as “Microsoft Teams can’t find a required component to run,” with a button to install the WebView2 utility that doesn’t actually do anything. Even worse, searching for a download link online can lead to Windows stating that WebView2 is already on the PC.
This might sound confusing, but the fix should be relatively straightforward. Here’s what you can try.
How to Fix Microsoft Teams Can’t Find a Required Component to Run with WeBView2
The Windows registry contains information on the current version of WebView2 (or lack thereof), so you’ll need to fool Windows into thinking it doesn’t have it so you can reinstall it.
Part 1: Removing the Registry Entry
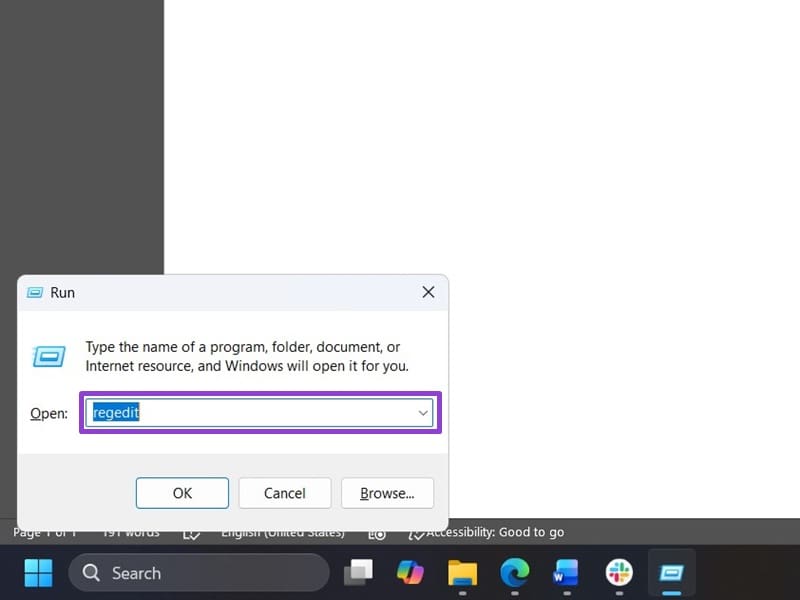
Step 1. Hit “Win + R” to open the Run utility. Type in “regedit” and hit “Enter.”
Step 2. Use the “Export” option in the “File” menu to create a current copy of the Registry in case anything goes wrong.

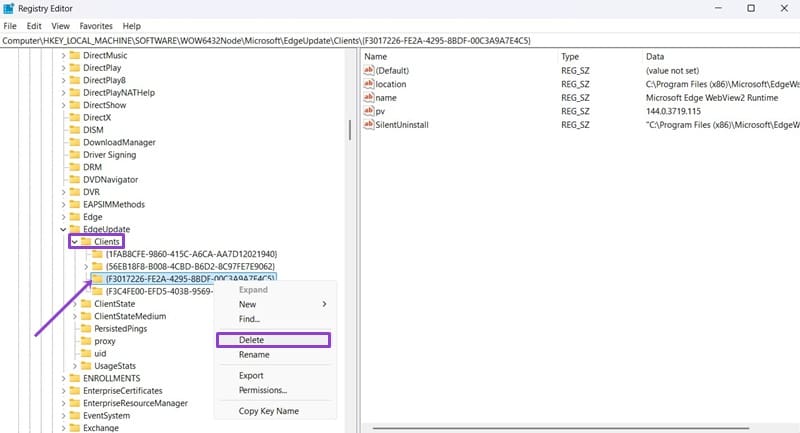
Step 3. In the Registry Editor, navigate to the following address:
Computer\HKEY_LOCAL_MACHINE\SOFTWARE\WOW6432Node\Microsoft\EdgeUpdate\Clients
You can enter it in the search bar on the top, but you have to drag over and remove the entire previous address there.
Step 4. In the clients folder, right-click on “{F3017226-FE2A-4295-8BDF-00C3A9A7E4C5}” and select “Delete.”
Step 5. Close the Registry Editor.
Part 2: Downloading WebView2 Again
With the registry thinking you don’t have WebView2, you can redownload it.
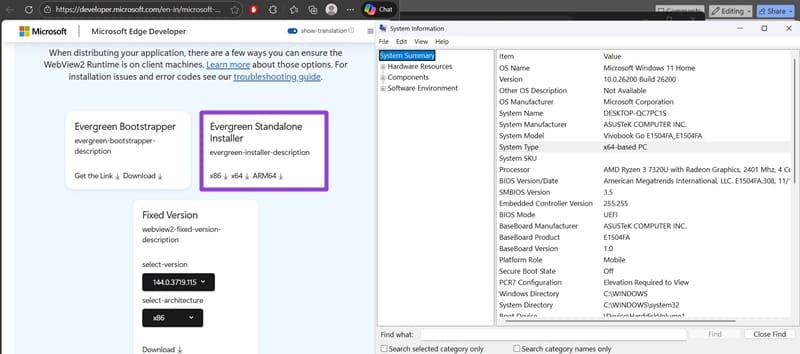
Step 1. Open your browser (Edge is preferred here), and go to the WebView2 download page.
Step 2. Click the download button.

Step 2b. Alternatively, you can scroll down and find the “Evergreen Standalone Installer” for your architecture (most Windows 11s are x64). You can find this by searching “System Information” and looking up the “System Type” entry.
Step 3. Confirm the download if prompted.
Step 4. Double-click on the file you downloaded through the browser and follow the installation instructions.
Step 5. You may need to restart your PC. Then, try to reopen Teams.
Alternative Fixes
If changing the registry doesn’t seem to work, you can try a few other options.
Option 1: Clear Teams Cache
Step 1. Go to the Run utility and paste in “%appdata%\Microsoft\Teams” then hit “Enter.
Step 2. Delete everything inside the folder.
Step 3. Go to “%localappdata%\Packages” inside Run.
Step 4. Delete everything in that folder as well.
Step 5. Restart your PC and turn on Teams.
Option 2: Repair or Reinstall Teams
Step 1. Open Settings with “Win + I.”
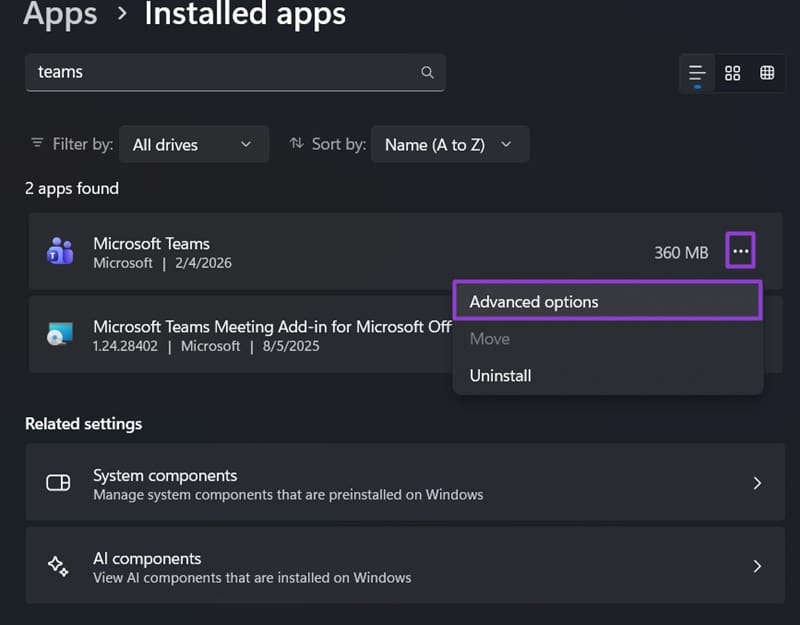
Step 2. Go to “Apps” then to “Installed apps.”
Step 3. Search for Microsoft Teams on the list and click on the three-dots icon on the right, then go to “Advanced options.”
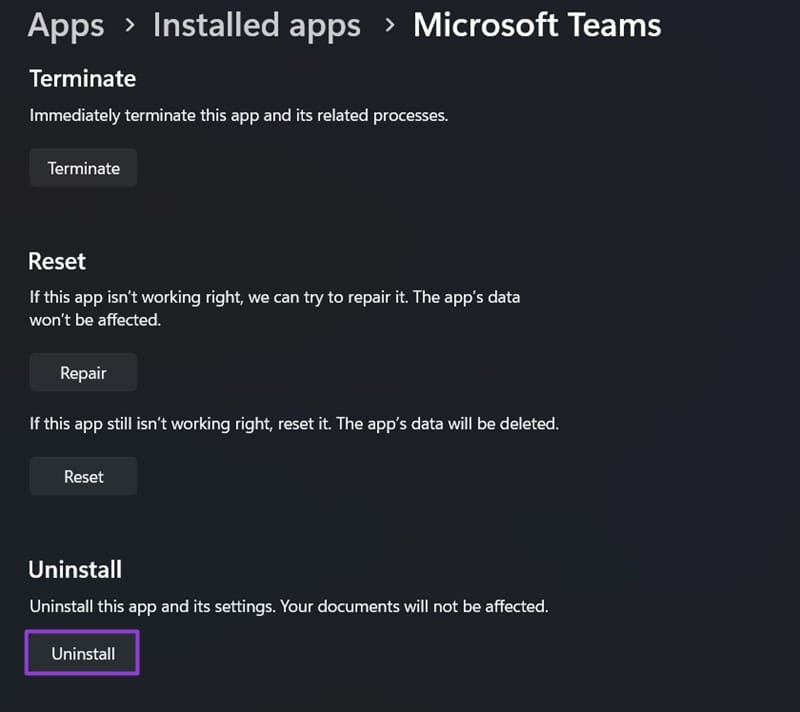
Step 4. Scroll down and click “Repair.”
Step 5. If this doesn’t work, repeat the process and select “Reset.”
Step 6. If Teams still won’t run, hit “Uninstall,” then redownload Teams from your browser.
Was this helpful?
Last updated on 15 February, 2026
Read Next
 Top 5 Ways to Fix a D3D11-Compatible GPU is Required to Run the Engine Error on Windows 11
Preliminary Fixes Update DirectX: Updating DirectX can resolve compatibility issues and errors related to the D3D11 GPU.
Top 5 Ways to Fix a D3D11-Compatible GPU is Required to Run the Engine Error on Windows 11
Preliminary Fixes Update DirectX: Updating DirectX can resolve compatibility issues and errors related to the D3D11 GPU.
 How to Fix Critical Steam Component (steamwebhelper) Not Responding on Windows 11
Preliminary Fixes Restart Steam with administrator privileges: Steamwebhelper.exe manages all the web features inside the Steam client.
How to Fix Critical Steam Component (steamwebhelper) Not Responding on Windows 11
Preliminary Fixes Restart Steam with administrator privileges: Steamwebhelper.exe manages all the web features inside the Steam client.
 3 Ways to Fix Feedback Required Error on Instagram
Basic Fixes Check network connection: Ensure there’s no problem with your Wi-Fi or cellular network.
3 Ways to Fix Feedback Required Error on Instagram
Basic Fixes Check network connection: Ensure there’s no problem with your Wi-Fi or cellular network.
 4 Ways to Fix “Verification Required” on App Store
Basic Fixes Check internet connection: Using the App Store to explore the library and download the apps without any problem requires a stable network connection Sign out and sign into
4 Ways to Fix “Verification Required” on App Store
Basic Fixes Check internet connection: Using the App Store to explore the library and download the apps without any problem requires a stable network connection Sign out and sign into
 5 Fixes for “A Required Privilege Is Not Held by the Client” Error on Windows
Try Basic Fixes Use an administrator account: In most cases, the "A required privilege is not held by the client" error occurs due to a lack of necessary permissions.
5 Fixes for “A Required Privilege Is Not Held by the Client” Error on Windows
Try Basic Fixes Use an administrator account: In most cases, the "A required privilege is not held by the client" error occurs due to a lack of necessary permissions.
 Top 7 Fixes for We’ve Run Into an Issue Error in Microsoft Teams on Windows
Microsoft Teams is a popular business collaboration app among Windows users, and for good reason.
Top 7 Fixes for We’ve Run Into an Issue Error in Microsoft Teams on Windows
Microsoft Teams is a popular business collaboration app among Windows users, and for good reason.
 How to Mute and Unmute Participants in Microsoft Teams
How to Mute All and Individual Participants On Desktop Step 1: When on a call, click on the participants' icon at the bottom.
How to Mute and Unmute Participants in Microsoft Teams
How to Mute All and Individual Participants On Desktop Step 1: When on a call, click on the participants' icon at the bottom.
 How to Test Audio in Microsoft Teams
How to Test Microphone and Speakers in Teams Before Meeting Step 1: Launch Microsoft Teams and click the three-dots icon at the top-right corner.
How to Test Audio in Microsoft Teams
How to Test Microphone and Speakers in Teams Before Meeting Step 1: Launch Microsoft Teams and click the three-dots icon at the top-right corner.
The article above may contain affiliate links which help support Guiding Tech. The content remains unbiased and authentic and will never affect our editorial integrity.