If you’ve just upgraded your PC with a new graphics card (GPU) and it won’t boot, there are several possible reasons for that, each with a varying difficulty of fixing the problem. Here are the most common troubleshooting steps when Windows won’t boot with new GPU.
Fix 1 – Ensure the Motherboard and Power Supply Are Compatible
By far, the most common problem when Windows doesn’t boot after GPU installation is due to the motherboard or the PSU not being able to power it. This can happen if your motherboard is still relatively old compared to the GPU.
There are two main ways you can check for compatibility.
Method 1 – Check Manuals
Step 1. Refer to your GPU’s manual, which should be included in the package. If there isn’t one, go to your graphics provider’s website.
Step 2. Find the make and model of your motherboard, and refer to its own manufacturer’s website. You can find this information in the BIOS or the “System Information” tool under “base board.” (You can plug in your old graphics card to get Windows data if needed.)

Step 3. Try to find compatibility information for your motherboard and GPU in the manuals.
Method 2 – Use a PC Builder Website
Step 1. Go to the PCPartPicker website.
Step 2. Click on “Builder” or “Start Your Build.”
Step 3. Go to “Choose a Motherboard,” then select your motherboard from the list (refer to Step 2 in Method 1 for finding the model).
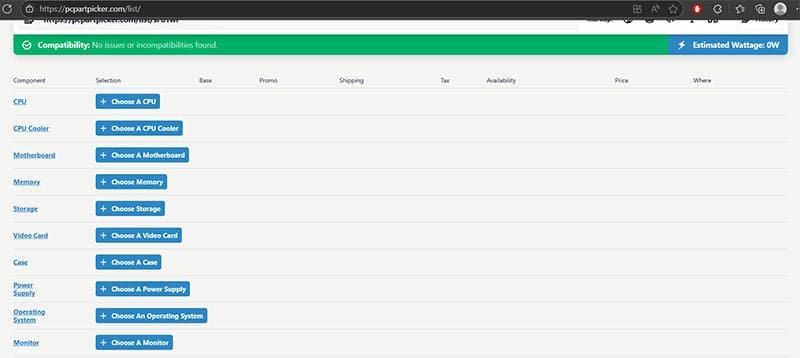
Step 4. For “Choose a Video Card,” enter your exact GPU, along with the name of the manufacturer (as you’ll get a lot of different versions).
Step 5. You should immediately get compatibility information at the top.
Step 6. Add information for your CPU and power supply. This will let you know if the system is pulling more power than the PSU can handle.
If your motherboard is incompatible with the GPU, you’ll need to replace one or both. If the PSU is the problem, you can upgrade it.
Fix 2 – Reseat the GPU
Most motherboards have multiple PCIe slots where you can insert a GPU. In some cases, a loose connection might be the reason why Windows won’t boot with new GPU.
This can be a relatively simple fix. All you have to do is reopen the case and make sure the GPU sits snugly inside its connector. If you do have more PCIe slots, try another one and reboot the PC.
Fix 3 – Check if the GPU Works at All
In extremely rare cases, the factory may send out a non-functioning GPU, or it may break during transport. However, this can be difficult to check if you have only one PC available.
If you can’t plug the GPU into another home PC, you might be able to take it to a nearby PC repair shop. Their technicians can plug it into their test PCs and check for basic hardware issues. If the GPU turns out to be broken, you’ll need to contact the seller to replace it.
Fix 4 – Update BIOS
In some cases, a simple BIOS setting change or a direct update might fix the issue with the GPU. However, to do this, you’ll need a CPU with an integrated graphics component (and a monitor plugged directly into the motherboard) or need to replace the new GPU with an old one so you can boot the PC.
Method 1 – Update PCIe Slot Configuration
Step 1. Boot Windows into BIOS. This can be done by pressing a specific button during the initial boot sequence, usually F2, F11, F12, Escape, or Delete. The exact button will be displayed on screen. Alternatively, you can perform an “Advanced Start” (in System > “Recovery”), then go to UEFI settings.

Step 2. In BIOS, look for the option “PCIe Slot Configuration,” although the exact name and location might differ based on your device.
Step 3. Change the setting to “Generation 3” or its equivalent, which should work for most graphics cards.
If this doesn’t work, change the setting to “Generation 4” and try again.
In some cases, you might also need to change the boot type between UEFI and legacy.
Method 2 – Update BIOS
Older motherboards might need to receive firmware updates to accept newer GPUs.
Step 1. Go to your motherboard manufacturer’s website.
Step 2. Find BIOS updates and download the file you need.
Step 3. Follow the instructions from the manufacturer on how to perform an update, as this can vary from one manufacturer to the next.
Method 3 – Reset BIOS
If you’ve previously changed BIOS settings to accommodate other hardware, you might need to reset the BIOS to its factory settings and start over. There are a few options, depending on what you have available:
- Some motherboards have a reset button on the back that you need to press and hold for a few seconds.
- You can load into BIOS and choose “Reset Settings” (or “Load Setup Defaults” or similar wording).
- You can take out the small CMOS battery from the motherboard for a few seconds and plug it back in.
Was this helpful?
Last updated on 26 July, 2025
Read Next
 5 Ways to Fix Dual Boot Option Not Showing on Windows 11
Fix 1: Enable Dual Boot Option Using Command Prompt Sometimes, the dual boot option goes missing when upgrading the operating system.
5 Ways to Fix Dual Boot Option Not Showing on Windows 11
Fix 1: Enable Dual Boot Option Using Command Prompt Sometimes, the dual boot option goes missing when upgrading the operating system.
 How to Perform a Clean Boot in Windows and Why It Matters
What Is Clean Boot on a Windows PC A clean boot in Windows is a troubleshooting technique that helps you identify software conflicts causing issues with your computer.
How to Perform a Clean Boot in Windows and Why It Matters
What Is Clean Boot on a Windows PC A clean boot in Windows is a troubleshooting technique that helps you identify software conflicts causing issues with your computer.
 How to Use Hardware Accelerated GPU Scheduling on Windows 11
What Is Hardware Accelerated GPU Scheduling?
How to Use Hardware Accelerated GPU Scheduling on Windows 11
What Is Hardware Accelerated GPU Scheduling?
 Top 5 Ways to Fix a D3D11-Compatible GPU is Required to Run the Engine Error on Windows 11
Preliminary Fixes Update DirectX: Updating DirectX can resolve compatibility issues and errors related to the D3D11 GPU.
Top 5 Ways to Fix a D3D11-Compatible GPU is Required to Run the Engine Error on Windows 11
Preliminary Fixes Update DirectX: Updating DirectX can resolve compatibility issues and errors related to the D3D11 GPU.
 5 Ways to Check GPU Health on Windows
https://youtu.be/JGwJ-_hIzfg Method 1: Using Task Manager The Windows Task Manager can help you in checking GPU health.
5 Ways to Check GPU Health on Windows
https://youtu.be/JGwJ-_hIzfg Method 1: Using Task Manager The Windows Task Manager can help you in checking GPU health.
 Best 5 Fixes for Windows 11 Not Detecting GPU
Basic Fixes: Update Windows: While this will not work every time, there is a chance that specific components will be outdated and no longer function correctly.
Best 5 Fixes for Windows 11 Not Detecting GPU
Basic Fixes: Update Windows: While this will not work every time, there is a chance that specific components will be outdated and no longer function correctly.
 Windows 11 High GPU Usage – How to Fix
You’ve probably had times where your PC starts lagging a bit, usually due to high CPU (processing unit or core) usage.
Windows 11 High GPU Usage – How to Fix
You’ve probably had times where your PC starts lagging a bit, usually due to high CPU (processing unit or core) usage.
 How to Completely Uninstall Existing GPU Drivers the Right Way
How to Uninstall GPU Drivers Using DDU Step 1: Download the DDU installer from the Guru3D dedicated webpage.
How to Completely Uninstall Existing GPU Drivers the Right Way
How to Uninstall GPU Drivers Using DDU Step 1: Download the DDU installer from the Guru3D dedicated webpage.
The article above may contain affiliate links which help support Guiding Tech. The content remains unbiased and authentic and will never affect our editorial integrity.