Power throttling sounds sinister, but it’s largely just Windows removing some power from background processes to ensure they’re not draining your battery. Of course, Windows decides which processes get a power cut, and that might not always suit your needs. For example, if you have downloads running in the background while you play a game, you might not want power diverted from them if you’re in a hurry to use the downloaded content.
When it comes to power throttling, Windows 11 users can disable or at least minimize the impact of this feature in a couple of different ways. Read on to learn how to disable power throttling in Windows 11 and why you might want to.
Power Throttling Windows 11 Explained
Power throttling means reducing the resources available to certain background processes and tasks — things that continue running while you work or play. But why would you ever want Windows to cut power from the tasks you’ve asked it to do?
The answer is that many background tasks aren’t things you’re actively using, but they can include essential jobs such as system maintenance, updates, syncing, and managing downloads. However, that’s not always the case. Sometimes, Windows will decide that, in order to keep your battery life efficient, multiple processes need less power, which can leave your computer feeling sluggish and slow. That’s why many Windows 11 users like to figure out how to disable power throttling in Windows 11.
How to Disable Power Throttling in Windows 11: Battery Settings
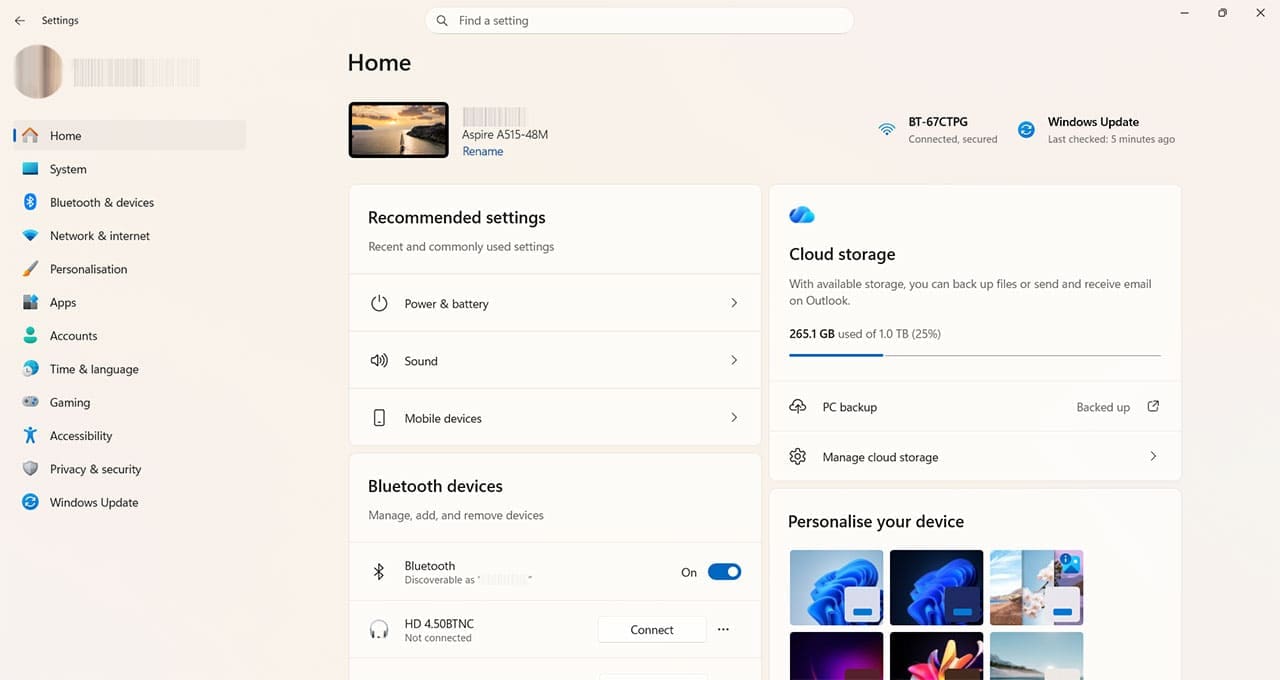
Step 1. Open “Settings” by searching for it using your Windows search bar or clicking Win + I.
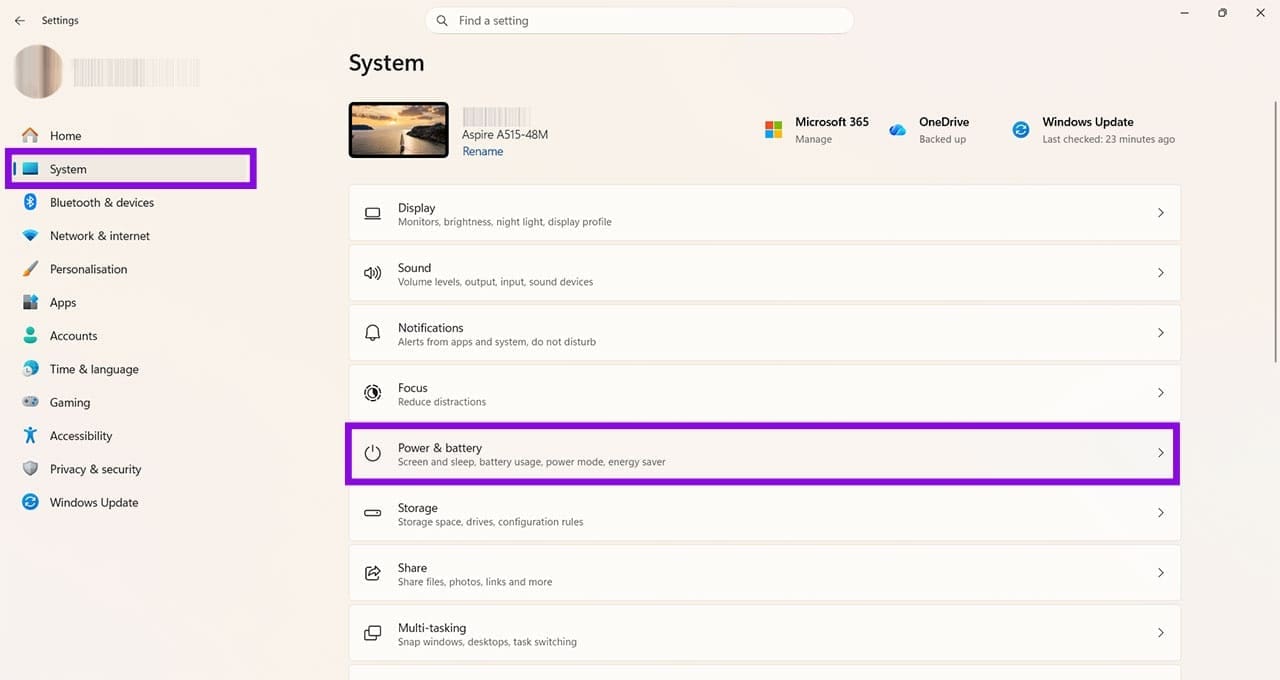
Step 2. Click “System,” then “Power & battery.”
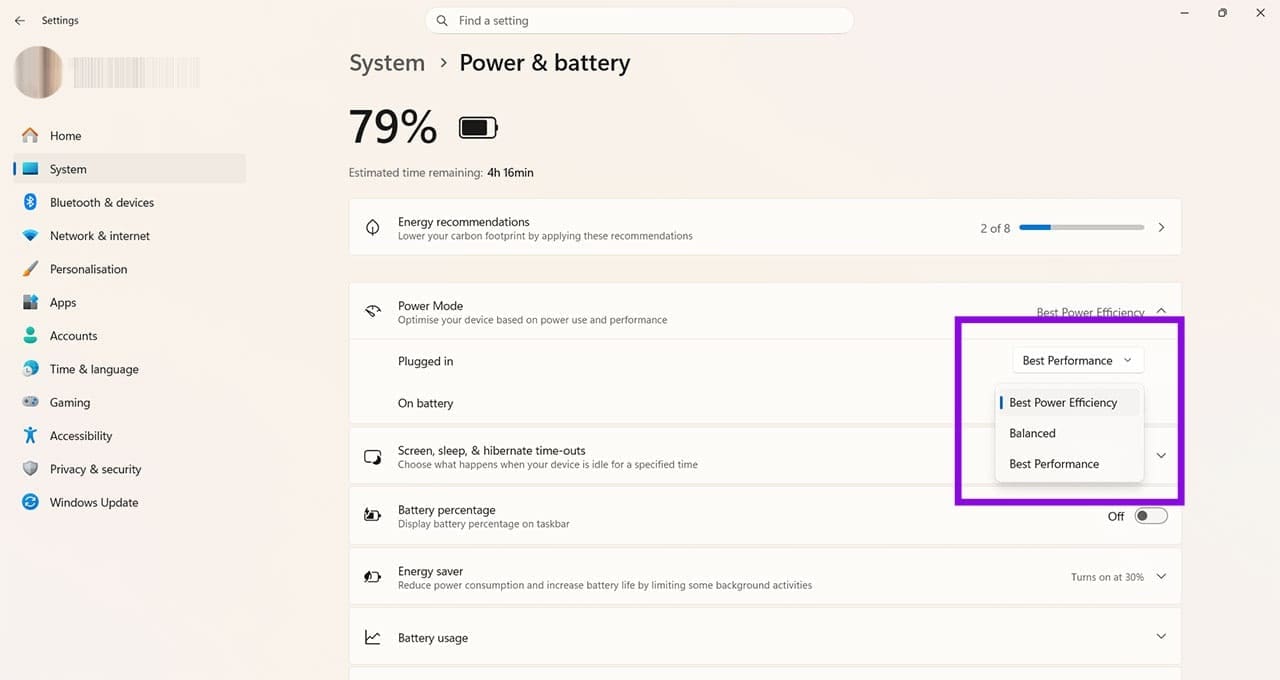
Step 3. Next to Power Mode, there are two drop-down menus so you can choose different modes for when your laptop is plugged in and when it is solely using its battery. Choose from the following:
- Best Power Efficiency: This will throttle many background processes to maximize battery life.
- Balanced: Some power throttling will occur, but performance will be prioritized for what Windows views as essential tasks.
- Best Performance: Windows will reduce power throttling to an absolute minimum, which should improve the responsiveness of your machine.
Be aware that power mode availability and behavior can vary depending on your PC’s hardware and manufacturer.
How to Disable Power Throttling in Windows 11: Registry Edits
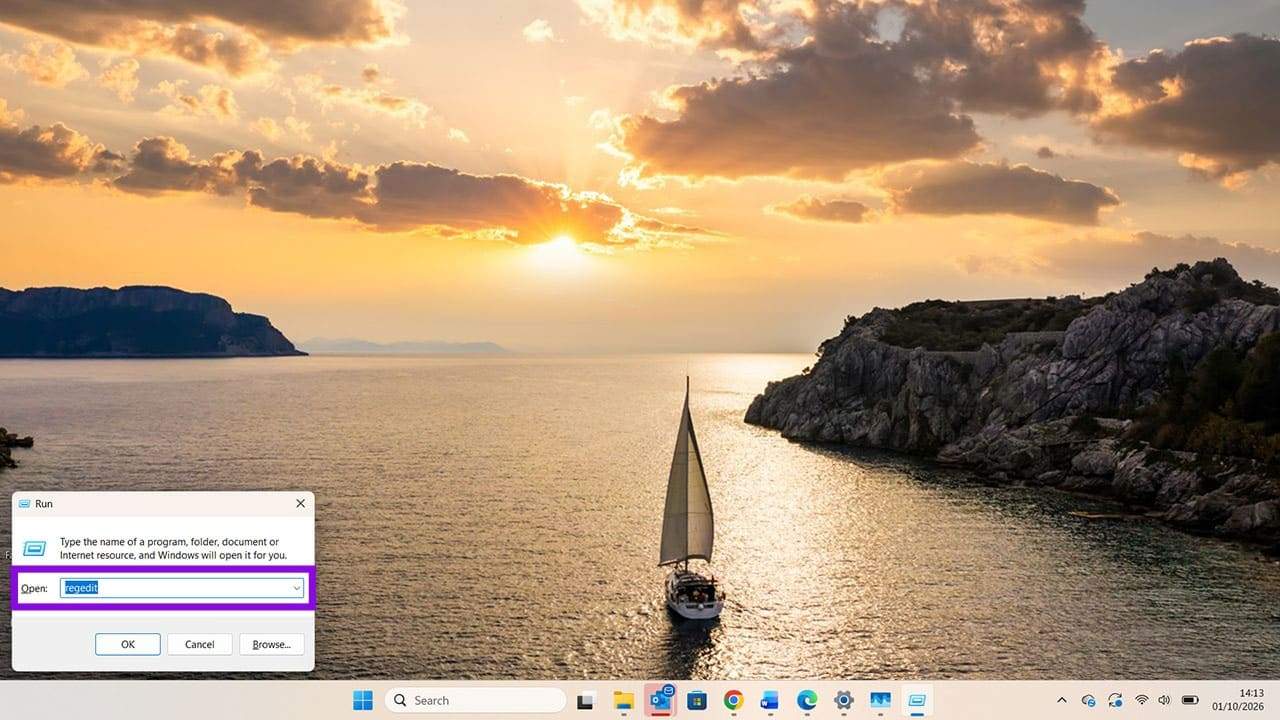
Step 1. You can also disable Power Throttling by adding the PowerThrottlingOff registry value. This is a more advanced system-level change, so back up the registry before proceeding.
Step 2. Enter this address into the location bar at the top of Registry Editor and press “Enter: “
HKEY_LOCAL_MACHINE\SYSTEM\CurrentControlSet\Control\Power
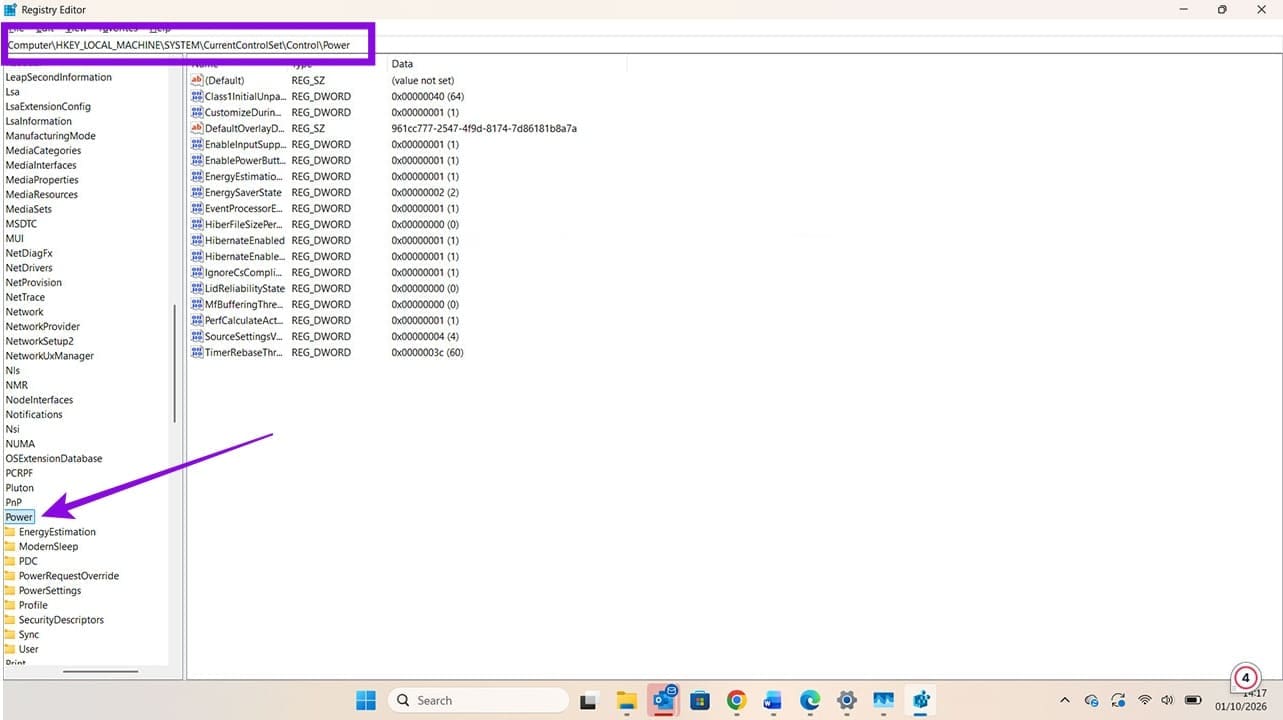
Step 3. Right-click on “Power” in the left-hand menu, then choose New > Key.
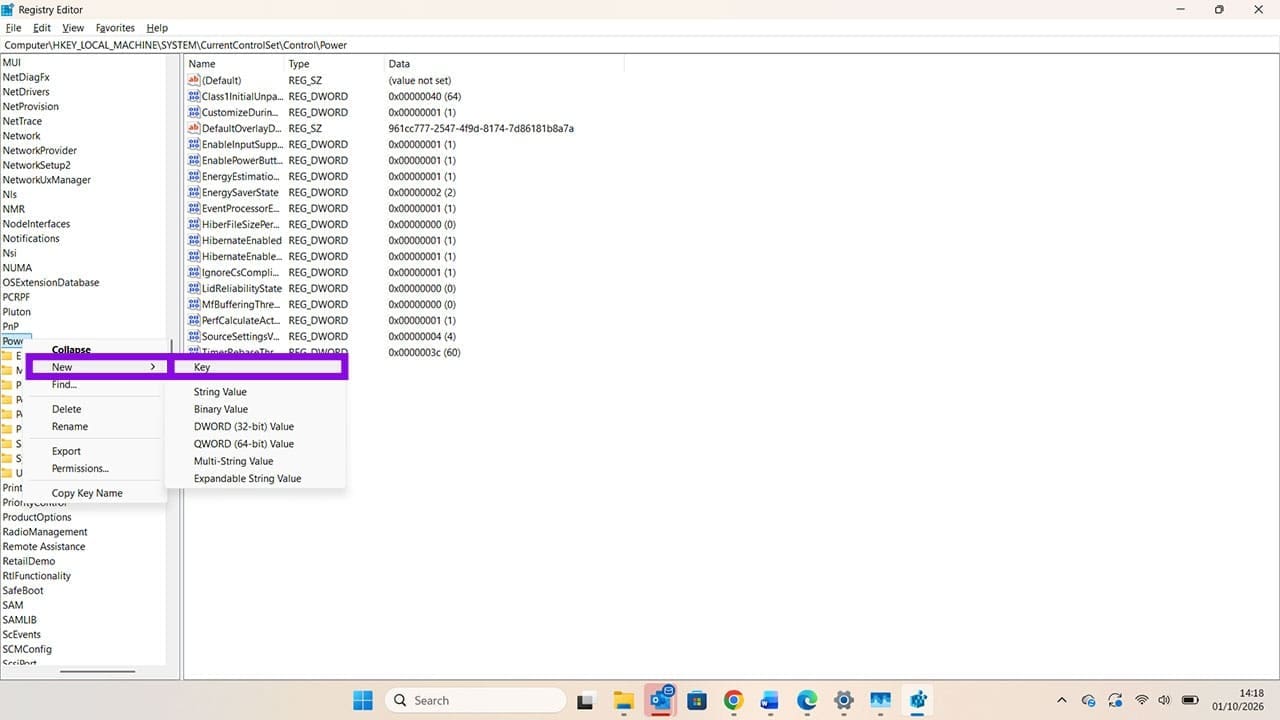
Step 4. Rename this key “PowerThrottling.” Then right-click the new “PowerThrottling” key and select New > DWORD (32-bit) Value.

Step 5. Call this value “PowerThrottlingOff,” and double-click on it. There will be a zero under Value data. Change this to 1 and press “OK.”

Restart your PC for the change to take effect. You can change this value back to 0 at any time to re-enable power throttling if needed.
Was this helpful?
Last updated on 04 October, 2026
Read Next
 6 Best Power Banks With USB Type-C Power Delivery
A power bank is a must-have for many of us who are often on the road.
6 Best Power Banks With USB Type-C Power Delivery
A power bank is a must-have for many of us who are often on the road.
 3 Ways to Change Power Plan in Windows 11
Method 1: Change the Power Plan Using the Settings App By default, your PC is set to Balanced power mode, but you can change it to "Best performance" or "Best
3 Ways to Change Power Plan in Windows 11
Method 1: Change the Power Plan Using the Settings App By default, your PC is set to Balanced power mode, but you can change it to "Best performance" or "Best
 How to Fix ‘There Are Currently No Power Options Available’ Error in Windows
Preliminary Fixes Check for Windows Update: Sometimes, the error can occur due to bugs or issues introduced in a previous Windows update.
How to Fix ‘There Are Currently No Power Options Available’ Error in Windows
Preliminary Fixes Check for Windows Update: Sometimes, the error can occur due to bugs or issues introduced in a previous Windows update.
 5 Quick Ways to Fix Can’t Change Power Plan in Windows 11
Are you unable to change the power plan on your Windows PC?
5 Quick Ways to Fix Can’t Change Power Plan in Windows 11
Are you unable to change the power plan on your Windows PC?
 5 Fixes for Driver Power State Failure in Windows 11
What Causes Driver Power State Failure?
5 Fixes for Driver Power State Failure in Windows 11
What Causes Driver Power State Failure?
 Should You Keep Laptop Plugged in or Use It on Battery Power?
Can You Overcharge Your Laptop Battery?
Should You Keep Laptop Plugged in or Use It on Battery Power?
Can You Overcharge Your Laptop Battery?
 What Is Microsoft Power Automate Desktop and Why Do You Need It
Microsoft recently announced that they have made the Power Automate Desktop completely free for all Windows 10 users.
What Is Microsoft Power Automate Desktop and Why Do You Need It
Microsoft recently announced that they have made the Power Automate Desktop completely free for all Windows 10 users.
 5 Ways to Take Screenshots Without Power Button on Android
Method 1: Use Gestures You can use Gestures to capture a screenshot - on Xiaomi devices, go to Settings > Additional Settings > Gestures > enable the Slide 3 fingers
5 Ways to Take Screenshots Without Power Button on Android
Method 1: Use Gestures You can use Gestures to capture a screenshot - on Xiaomi devices, go to Settings > Additional Settings > Gestures > enable the Slide 3 fingers
The article above may contain affiliate links which help support Guiding Tech. The content remains unbiased and authentic and will never affect our editorial integrity.