In most cases, Windows 11 stores crash dump files in the Windows directory, either in the “%SystemRoot%\Minidump” folder or as “%SystemRoot%\MEMORY.DMP,” depending on the type of dump. If you find .DMP files in the System32 folder, they may have been created by a program or by a custom dump configuration. Here’s how to identify and safely remove them.
What Are System32 Dump Files?
When Windows encounters a system crash, it can create a memory dump file containing information about the system’s state at the time of the crash. Depending on the configured dump type, the file may be a small memory dump, kernel memory dump, automatic memory dump, or complete memory dump. Once the PC restarts, you can analyze the dump file with an appropriate debugging tool to investigate what went wrong.
Windows manages crash dumps according to the configured dump type and overwrite settings, so they may remain on the system until they are overwritten or deleted.
However, the System32 folder has more restrictions put on it since it houses vital drivers and startup files, and the operating system itself rarely automatically removes files from it. If you do get System32 dump files, they might stick around forever, eventually clogging up your hard drive space for no good reason.
Can You Manually Delete System32 Dump Files?
In short, yes. Since the system doesn’t need them to function normally and they are only used for diagnostic purposes that you, as a user, need to start manually, they can be deleted normally.
Note that this doesn’t mean deleting the System32 folder itself. If you do decide to cut down on these files, make sure they are only files marked as “minidump” or having the associated DMP extension.
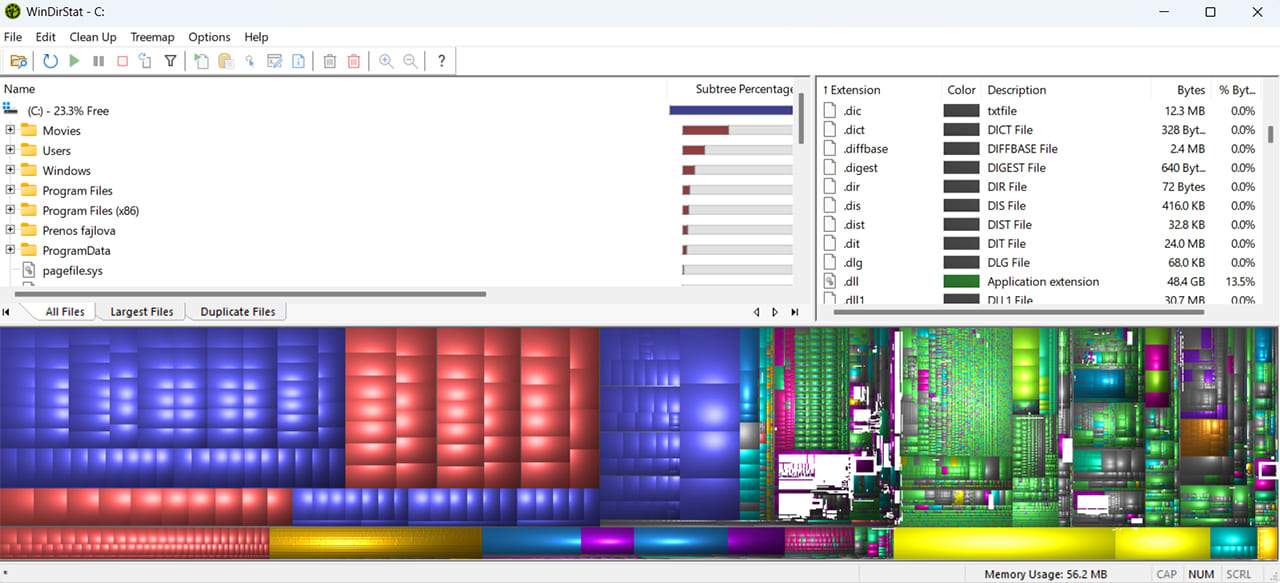
When in doubt, you can use WinDirStat or another visualizer to locate the files. You can use a disk-space analyzer to locate .dmp files and see how much storage they consume. Before deleting them, verify that they are diagnostic dumps and that you don’t need them for troubleshooting.
If you get an error or warning message that a dump file is being actively used by a program, skip it, restart the PC, and try again later.
Use Disk Cleanup to Remove Dump Files
While Windows won’t automatically remove log files, Disk Cleanup will.
Step 1. Search for “Disk Cleanup” and select “Run as administrator.”
Step 2. Select the partition where the system is installed, usually C:.
Step 3. Check the boxes for the following if they exist:
- Windows error reports and feedback diagnostics
- System error memory dump files
- System error minidump files
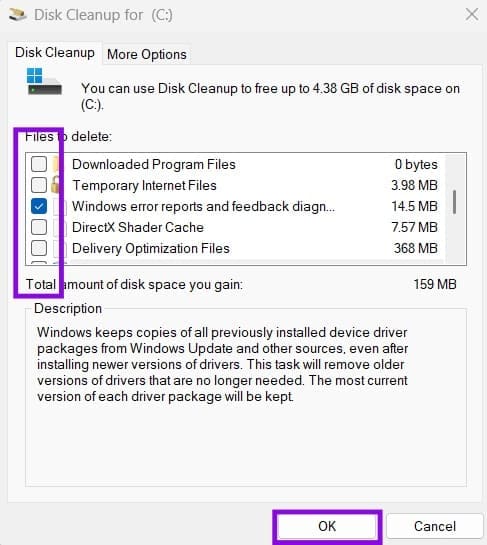
Step 4. Click on “OK” to clean up files.
How to Prevent System32 Dump Files
Windows’ standard crash-dump locations are “%SystemRoot%\Minidump and %SystemRoot%\MEMORY.DMP.” If you want to verify or change the configured dump location, you can do so through Startup and Recovery settings.
Step 1. Hit “Win + R” for the Run utility, type in “sysdm.cpl,” and hit “Enter.” This opens System Properties.
Step 2. Go to the “Advanced” tab and click on “Settings” in the “Startup and Recovery” section.
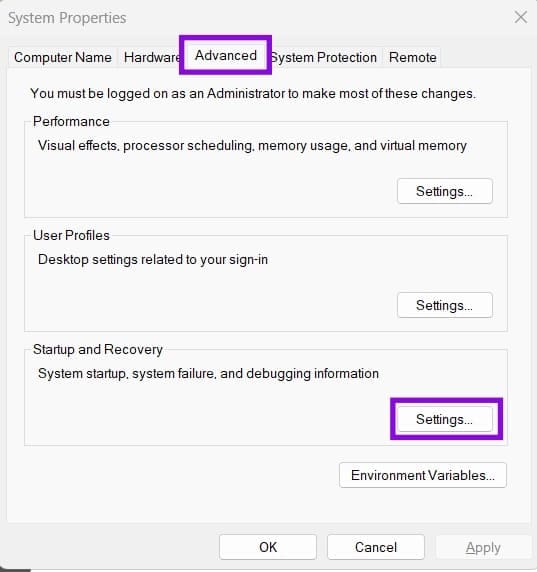
Step 3. For the Write debugging information drop-down, select “Small memory dump,” “Kernel memory dump,” “Automatic memory dump,” or another appropriate option. You can select “None” if you don’t want Windows to create a memory dump, but doing so removes a potentially useful diagnostic resource if the PC experiences another crash.

Step 4. If “Small memory dump” is selected, make sure the “Small dump” directory points to “%SystemRoot%\Minidump.” For kernel, automatic, or complete memory dumps, check the Dump file path and make sure it points to “%SystemRoot%\MEMORY.DMP” unless you have intentionally chosen another location.

Step 5. Click on “OK.”
Was this helpful?
Last updated on 12 October, 2026
Read Next
 Top 5 Ways to Get Rid of Notifications on Samsung Galaxy Phones
Some Android apps display notifications that continue to stay at top for hours as banner with the app name in the notification center.
Top 5 Ways to Get Rid of Notifications on Samsung Galaxy Phones
Some Android apps display notifications that continue to stay at top for hours as banner with the app name in the notification center.
 6 Ways to Get Rid of “Chrome Didn’t Shut Down Correctly” Message
Fix 1: Use the Restore Option One of the most straightforward ways to stop Google Chrome from showing this pop-up is to restore tabs from your previous session.
6 Ways to Get Rid of “Chrome Didn’t Shut Down Correctly” Message
Fix 1: Use the Restore Option One of the most straightforward ways to stop Google Chrome from showing this pop-up is to restore tabs from your previous session.
 How to Get Rid of Facebook Marketplace Limit Reached Problem
Why Is Facebook Limiting My Account on Marketplace Like most e-commerce platforms, Facebook Marketplace has strict guidelines and rules to follow.
How to Get Rid of Facebook Marketplace Limit Reached Problem
Why Is Facebook Limiting My Account on Marketplace Like most e-commerce platforms, Facebook Marketplace has strict guidelines and rules to follow.
 4 Ways to Synchronize Windows 10 Time With Microsoft Server
The benefits of your Windows computer clock transcend way beyond just telling the time.
4 Ways to Synchronize Windows 10 Time With Microsoft Server
The benefits of your Windows computer clock transcend way beyond just telling the time.
 4 Ways to Turn off Windows 11 Telemetry Collection
Method 1: Disable Diagnostic Data Collection on Windows 11 Microsoft collects data regarding system usage and functions.
4 Ways to Turn off Windows 11 Telemetry Collection
Method 1: Disable Diagnostic Data Collection on Windows 11 Microsoft collects data regarding system usage and functions.
 6 Ways to Fix Black Screen on Pressing Alt + Tab on Windows
Fix 1: Change the Display Mode of the Application (Game) The black screen issue usually appears when tabbing out of a full-screen game.
6 Ways to Fix Black Screen on Pressing Alt + Tab on Windows
Fix 1: Change the Display Mode of the Application (Game) The black screen issue usually appears when tabbing out of a full-screen game.
 How to Insert a Table in Outlook Email
More and more information seems to be inserted in emails these days, including tables, which are one of the best ways to present data cleanly.
How to Insert a Table in Outlook Email
More and more information seems to be inserted in emails these days, including tables, which are one of the best ways to present data cleanly.
 Windows 11 Keeps Assigning Drive Letter to Recovery Partition
You might be used to Windows swapping the names of your external hard drives and USBs, but what happens when your recovery partition, which should only be used in emergencies,
Windows 11 Keeps Assigning Drive Letter to Recovery Partition
You might be used to Windows swapping the names of your external hard drives and USBs, but what happens when your recovery partition, which should only be used in emergencies,
The article above may contain affiliate links which help support Guiding Tech. The content remains unbiased and authentic and will never affect our editorial integrity.