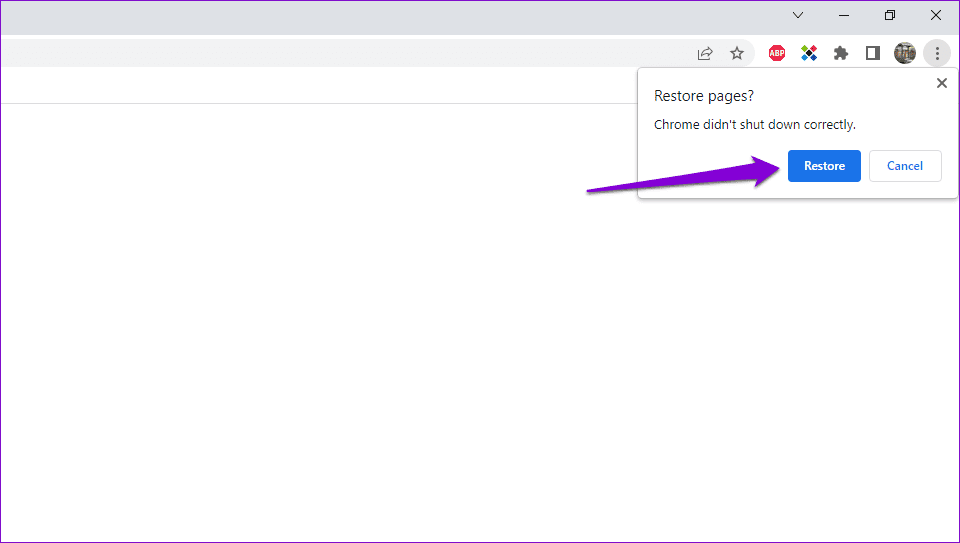
Fix 1: Use the Restore Option
One of the most straightforward ways to stop Google Chrome from showing this pop-up is to restore tabs from your previous session. Click the Restore button to allow Chrome to reopen tabs. Following this, the browser should not display this pop-up unless it closes abruptly again.
Fix 2: Allow Chrome to Run in the Background
Another reason Google Chrome might keep asking you to restore tabs is if you have prevented the browser from running in the background. Here’s how to change that.
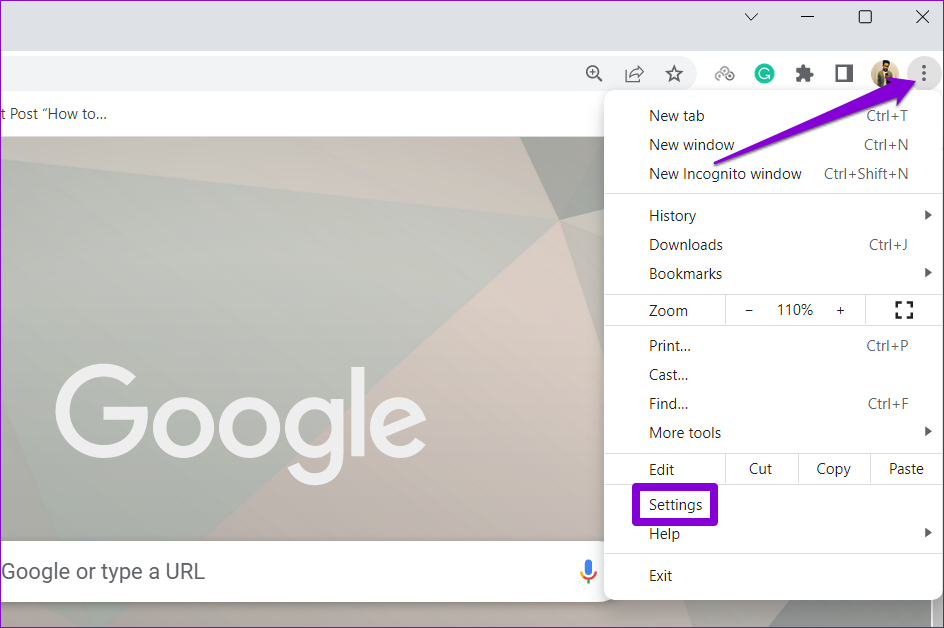
Step 1: Open Google Chrome, click the three-dot menu icon at the top-right corner and select Settings.
Step 2: Select System from the left pane. Then, enable the toggle for Continue running background apps when Google Chrome is closed.

Fix 3: Clear Browsing Data
Clearing old Chrome cache and cookies is an effective way to fix most browser-related issues, including this one.
Step 1: Press Ctrl + Shift + Delete together on your keyboard to access the Clear browsing data panel.
Step 2: Select All time in the Time range menu. Then, check the boxes for Cookies and other site data and Cached images and files.
Step 3: Click on Clear data.

Fix 4: Rename the Default Folder
Chrome’s Default folder in Windows stores your profile’s data, including browsing history, bookmarks, saved passwords, and other settings. If there is a problem with this data, Google Chrome may display these annoying pop-ups.
To avoid this, try renaming Chrome’s default folder to something else. This will force the browser to recreate the folder from scratch, fixing any problems.
Step 1: Close Google Chrome on your PC. Press the Windows key + E to open File Explorer and head to the following folder:
C:\Users\[YourUsername]\AppData\Local\Google\Chrome\User Data
Note: Replace [YourUsername] in the above command with your username.
Step 2: Locate and select the Default folder. Press F2 on your keyboard and rename the folder to Default.old or something else.

Fix 5: Modify Chrome’s Preferences File
If renaming the Default folder proves ineffective, you can modify the browser’s Preferences file to disable the “Chrome didn’t shut down correctly” pop-up. Here are the steps to follow.
Step 1: Press the Windows key + E to open File Explorer and navigate to the following folder.
C:\Users\[YourUsername]\AppData\Local\Google\Chrome\User Data\Default
Note: Replace [YourUsername] in the above command with your actual username.
Step 2: Right-click on the Preferences file and select Open with.

Step 3: Select Notepad and click on Just once.

Step 4: In the Notepad window, press the Ctrl + F keyboard shortcut to access the Find tool. Then, type exit_type in the text box and press Enter.

Step 5: Change exit_type value from Crashed to Normal.

Step 6: Click the File menu at the top and select Save.

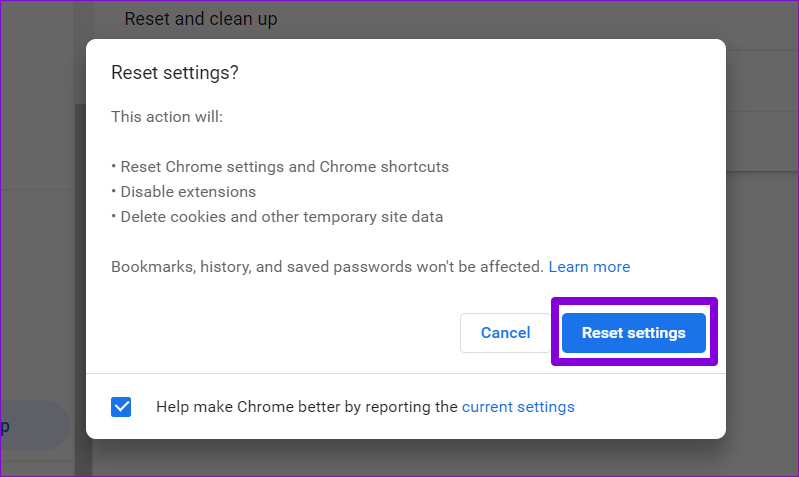
Fix 6: Reset Google Chrome
If you still see the “Chrome didn’t shut down correctly” pop-up, consider resetting the browser on your PC. This will remove your custom settings, bookmarks, and browser extensions, resolving any issues.
Step 1: Open Google Chrome on your computer. Click the three-dot menu icon at the top right corner and select Settings.
Step 2: Use the left pane to navigate to the Reset settings tab. Then, click on Restore settings to their original defaults.

Step 3: Click on Reset settings to confirm.
Was this helpful?
Last updated on 08 May, 2024
Read Next
 4 Ways to Fix Google Docs Not Printing Correctly
Fix 1: Check the Printer Connection and Select the Right Printer You must perform some basic hardware checks to ensure everything is hooked up.
4 Ways to Fix Google Docs Not Printing Correctly
Fix 1: Check the Printer Connection and Select the Right Printer You must perform some basic hardware checks to ensure everything is hooked up.
 How to Get Rid of Facebook Marketplace Limit Reached Problem
Why Is Facebook Limiting My Account on Marketplace Like most e-commerce platforms, Facebook Marketplace has strict guidelines and rules to follow.
How to Get Rid of Facebook Marketplace Limit Reached Problem
Why Is Facebook Limiting My Account on Marketplace Like most e-commerce platforms, Facebook Marketplace has strict guidelines and rules to follow.
 Top 5 Ways to Get Rid of Notifications on Samsung Galaxy Phones
Some Android apps display notifications that continue to stay at top for hours as banner with the app name in the notification center.
Top 5 Ways to Get Rid of Notifications on Samsung Galaxy Phones
Some Android apps display notifications that continue to stay at top for hours as banner with the app name in the notification center.
 12 Tips to Charge Your iPhone Correctly
Tip 1.
12 Tips to Charge Your iPhone Correctly
Tip 1.
 How to Uninstall Microsoft Teams on Windows 10 Correctly
Uninstalling apps from Windows PC is pretty easy and you can use more than one way to remove apps.
How to Uninstall Microsoft Teams on Windows 10 Correctly
Uninstalling apps from Windows PC is pretty easy and you can use more than one way to remove apps.
 5 Fixes for “Application Was Unable to Start Correctly (0xc0000142)” Error for Office Apps
Fix 1: Run the Office App as Administrator Lack of relevant permissions can prevent Office apps from accessing essential files, triggering the "The application was unable to start correctly (0xc0000142)"
5 Fixes for “Application Was Unable to Start Correctly (0xc0000142)” Error for Office Apps
Fix 1: Run the Office App as Administrator Lack of relevant permissions can prevent Office apps from accessing essential files, triggering the "The application was unable to start correctly (0xc0000142)"
 How to Force Restart or Shut Down Mac When Frozen
Has your Mac ever frozen to the point where you couldn't even shut it down?
How to Force Restart or Shut Down Mac When Frozen
Has your Mac ever frozen to the point where you couldn't even shut it down?
The article above may contain affiliate links which help support Guiding Tech. The content remains unbiased and authentic and will never affect our editorial integrity.