Note: All the methods mentioned below help pause or restrict automatic updates on Windows 11. However, some major or critical updates may reset the preferences and re-enable the service. So, it is recommended to check the settings periodically.
Method 1: Using Windows Settings
Step 1: Press the Windows key on your keyboard, type Settings, and click Open.
Step 2: Go to Windows Update from the left pane.
Step 3: Click on the down arrow next to Pause updates and choose the longest time frame, i.e., Pause for 5 weeks.

There you go. You have turned off Windows 11 auto updates. However, this isn’t a permanent fix. This setting can stop the Windows 11 update for 5 weeks. After that, your system will revert to downloading Windows updates whenever they are available.
Method 2: Using Network Settings
This method lets you disable Windows 11 auto-updates forever.
Step 1: Press the Windows key on your keyboard, type Settings, and click Open.
Step 2: From the left pane, select Windows Update.

Step 3: Select Advanced options from the right pane.

Step 4: Toggle off the Download updates over metered connections option.

Step 5: Now, select Network & internet in the left pane and click Wi-Fi in the right pane.

Step 6: Click on the Wi-Fi properties.

Step 7: Finally, toggle on Metered connection.

This reduces data utilization while also disabling automatic updates on Windows 11. However, it is important to note that critical updates may still be downloaded.
Method 3: Using Windows Services
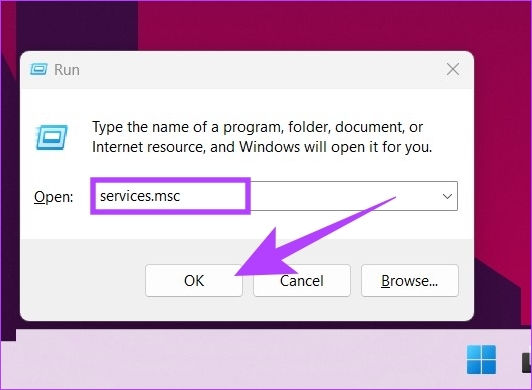
Step 1: Press the Windows key on your keyboard, type Run, and click Open.
Step 2: In the Run dialog box’s text field, type services.msc and click OK.
Step 3: Scroll down to find and double-click the Windows Update service to open its properties.

Step 4: In the General tab, next to the Startup type, select Disabled from the drop-down menu.
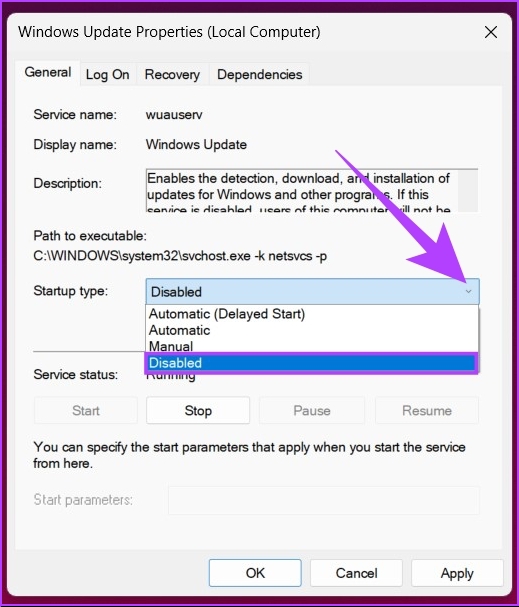
Step 5: Click Apply and OK.
These steps let you disable automatic updates on Windows 11. However, certain updates might re-enable the service.
Method 4: Using Registry Editor
Because this method uses the Registry Editor, we suggest backing up the Windows Registry before you follow the steps.
Step 1: Press the Windows key on your keyboard, type Registry Editor, and click Run as administrator. In the prompt, select Yes.
Step 2: In the top bar, enter the below-mentioned address.
HKEY_LOCAL_MACHINE\SOFTWARE\Policies\Microsoft\Windows
Now, create the WindowsUpdate and AU (Automatic Update) folders.
Step 3: Right-click in the empty space, choose New > select Key > create a folder > name it WindowsUpdate.

Step 4: Now, select the WindowsUpdate folder in the sidebar, and in the right pane, right-click, choose New, select Key, and create a folder and name it AU.
The address should look like this: HKEY_LOCAL_MACHINE\SOFTWARE\Policies\Microsoft\Windows\WindowsUpdate\AU

Step 5: Now, select the AU folder in the sidebar. In the right pane, right-click the blank space > click New > select DWORD (32-bit) Value > name it NoAutoUpdate.

Step 6: Now, double-click on NoAutoUpdate.

Step 7: Set its value to 1 and click OK.

Restart your Windows machine to implement and execute the changes. It is important to note that registry changes are generally respected, but significant updates (like feature updates) may revert the settings. It is important to keep a periodical check.
Method 5: Using Group Policy Editor
Group Policy Editor is only available for Windows 11 Pro and Enterprise versions. If you are on Windows 11 Home Edition, you can skip this method.
Step 1: Press the Windows keys on your keyboard, type gpedit.msc, and click Open.
Step 2: In the left pane, under Local Computer Policy, select Computer Configuration.
Step 3: In the right pane, double-click on Administrative Templates.

Step 4: Select the Windows Components option.
Step 5: Under the Windows Components option, locate Windows Update and open it.

Step 6: Go to Manage end user experience.
Step 7: Now, double-click the Configure Automatic Updates option.

Step 8: In the Configure Automatic Updates window, select the Disabled option and click Apply, followed by OK.

FAQs
Nothing will change. Microsoft will support Windows 10 until October 14, 2025, so you can continue using it until then. If you change your mind, go to Settings > Window Update > accept Windows 11 install.
When you stop Windows updates in between, it can corrupt the operating system. If stuck, you may have to reinstall the Windows version again from the start.
Windows updates consist of security updates and patches essential for your system’s safety and security. However, if you don’t want to update, you may continue using your system, but it will be prone to bugs and security attacks.
Was this helpful?
Last updated on 01 August, 2024
3 Comments
Leave a Reply
Read Next
 How to Disable Automatic App Updates on Android and iOS
Automatic app updates ensure that your favorite apps are always updated and bug-free.
How to Disable Automatic App Updates on Android and iOS
Automatic app updates ensure that your favorite apps are always updated and bug-free.
 6 Best Fixes for Windows 10 Stuck in Automatic Repair Loop
Windows 10 PC runs fun until a bad system update, a corrupted file, and even a driver update can cause your it to stop working abruptly.
6 Best Fixes for Windows 10 Stuck in Automatic Repair Loop
Windows 10 PC runs fun until a bad system update, a corrupted file, and even a driver update can cause your it to stop working abruptly.
 4 Ways to Fix Windows Stuck on Checking for Updates
Basic Fixes Check internet connection: Ensure your PC is connected to a stable Wi-Fi or Ethernet connection.
4 Ways to Fix Windows Stuck on Checking for Updates
Basic Fixes Check internet connection: Ensure your PC is connected to a stable Wi-Fi or Ethernet connection.
 7 Ways to Fix Windows 11 Updates Not Downloading or Installing
Fix 1: Run the Windows Update Troubleshooter Windows 11 includes a dedicated troubleshooter that can automatically scan, detect, and fix any issues with Windows Updates.
7 Ways to Fix Windows 11 Updates Not Downloading or Installing
Fix 1: Run the Windows Update Troubleshooter Windows 11 includes a dedicated troubleshooter that can automatically scan, detect, and fix any issues with Windows Updates.
 4 Ways to Disable Office Updates on Windows 11
Method 1: Using an Office App You can use any Microsoft Office app to turn off automatic updates for all Office applications.
4 Ways to Disable Office Updates on Windows 11
Method 1: Using an Office App You can use any Microsoft Office app to turn off automatic updates for all Office applications.
 5 Fixes for “Not All of the Updates Were Successfully Uninstalled” Error on Windows
Fix 1: Use the DISM Tool to Remove the Update Deployment Image Servicing and Management (or DISM) is a useful tool for fixing corrupt system files on your PC.
5 Fixes for “Not All of the Updates Were Successfully Uninstalled” Error on Windows
Fix 1: Use the DISM Tool to Remove the Update Deployment Image Servicing and Management (or DISM) is a useful tool for fixing corrupt system files on your PC.
 How to Unpause Windows Updates and What to Do if You Can’t
How to Resume Windows Updates The process of resuming Windows updates is quite similar to pausing them.
How to Unpause Windows Updates and What to Do if You Can’t
How to Resume Windows Updates The process of resuming Windows updates is quite similar to pausing them.
 6 Best Automatic Dog Water Dispensers and Fountains
If you often miss out on filling your dog’s water bowls, then an automatic water dispenser for dogs might be just what you are looking for.
6 Best Automatic Dog Water Dispensers and Fountains
If you often miss out on filling your dog’s water bowls, then an automatic water dispenser for dogs might be just what you are looking for.
The article above may contain affiliate links which help support Guiding Tech. The content remains unbiased and authentic and will never affect our editorial integrity.

None of this works any longer. You can disable the Windows Update service; Windows doesn’t honor that and turns it back to enabled. You can set the group policy to disabled as you’ve described; Windows doesn’t honor that and installs updates anyway. You can set the registry as you’ve described; again, Windows throws a big FU at the user. Good info here and I appreciate it, but apparently MS has decided that the user isn’t to be trusted with decisions of auto update.
I understand your frustration. Unfortunately, you’re right—Windows can override these settings, especially for critical updates. Even though the methods mentioned can help reduce the frequency of updates, they aren’t foolproof against all updates.
Or you can do what I do. I run Windows 11 in an advanced virtualization container that has near full access to my bare metal hardware resources. (I run 8 different operating systems on my machine, due to the nature of my work). My primary bare metal OS is not Windows 11, but it is very secure, and it acts as a hypervisor to all of my auxiliary systems. I simply removed all internet connectivity software interfaces from Network Connections in Windows 11. If I need new software, drivers, etc. for use with Windows, I download it using my bare metal OS, then move it into Windows using a secure drop box that I built between the two filesystems. The software I need to install in Windows is there immediately (because it is essentially changing directory on the same disk). In this respect, I have no threat whatsoever from unwanted updates being forced that break software or brick startup (which has happened many times with multiple Windows versions in the past), however I do have immediate access to any software or data that I need to work with in Windows. 😀