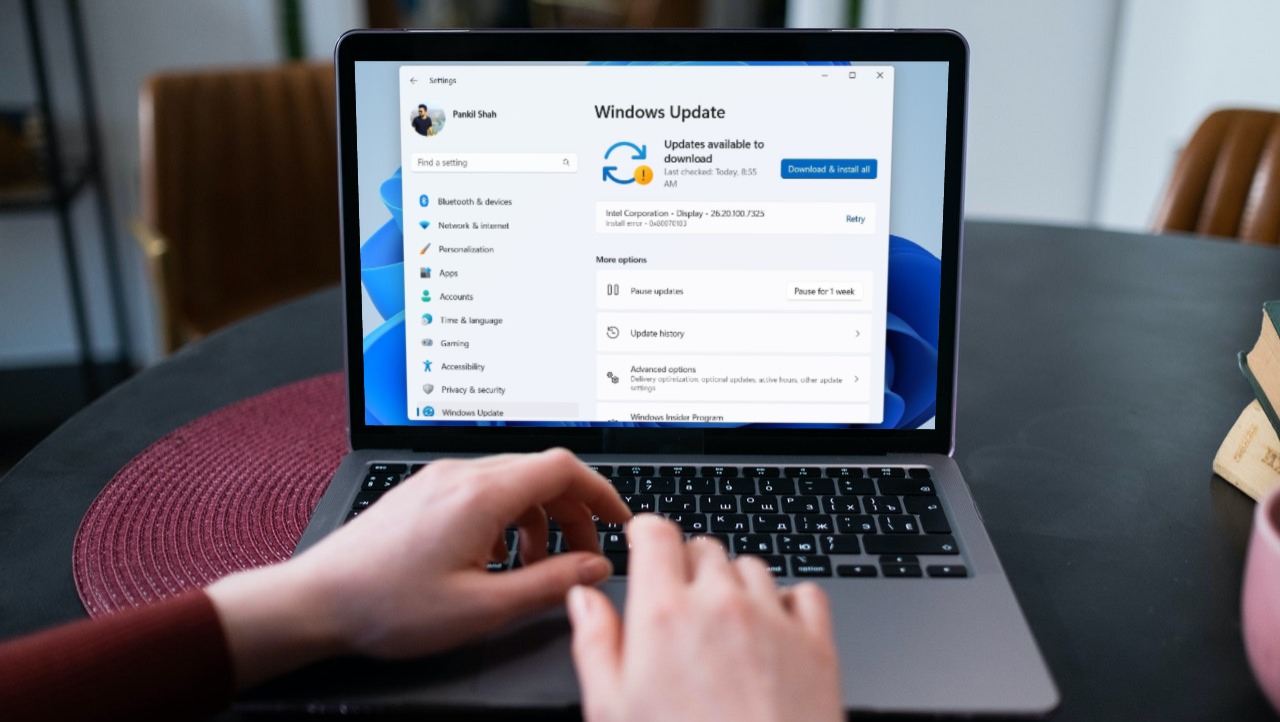
Fix 1: Use the DISM Tool to Remove the Update
Deployment Image Servicing and Management (or DISM) is a useful tool for fixing corrupt system files on your PC. Additionally, you can also use this tool to uninstall stubborn Windows updates that won’t go away. Here’s how.
Step 1: Right-click the Start icon and select Terminal (Admin) from the Power User menu.

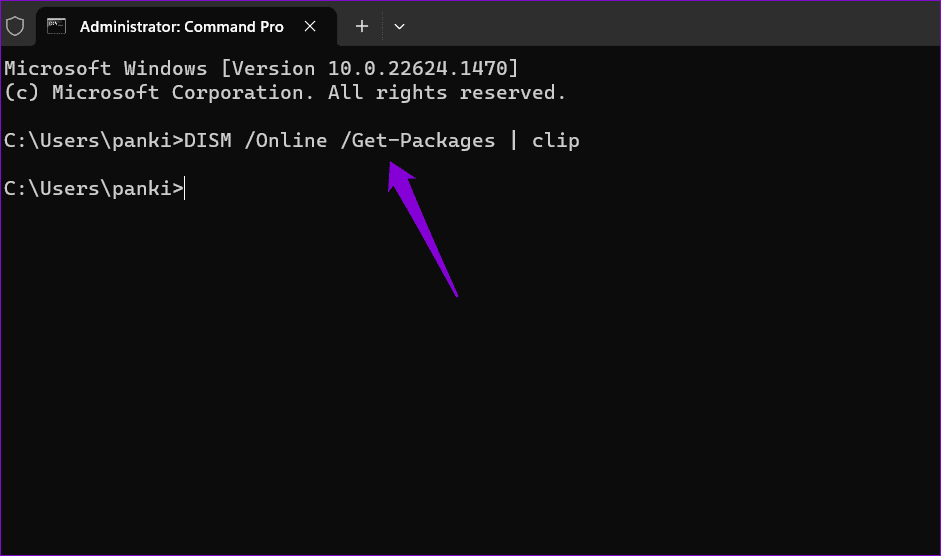
Step 2: Type the following command and press Enter:
DISM /Online /Get-Packages | clip
Step 3: The output of the command will be copied to your clipboard. Press the Windows + S keyboard shortcut to open the search menu, type in Notepad, and press Enter.

Step 4: Press the Ctrl + V keyboard shortcut to paste the output of the DISM command. Then, locate the update you want to remove and copy the value next to Package Identity.

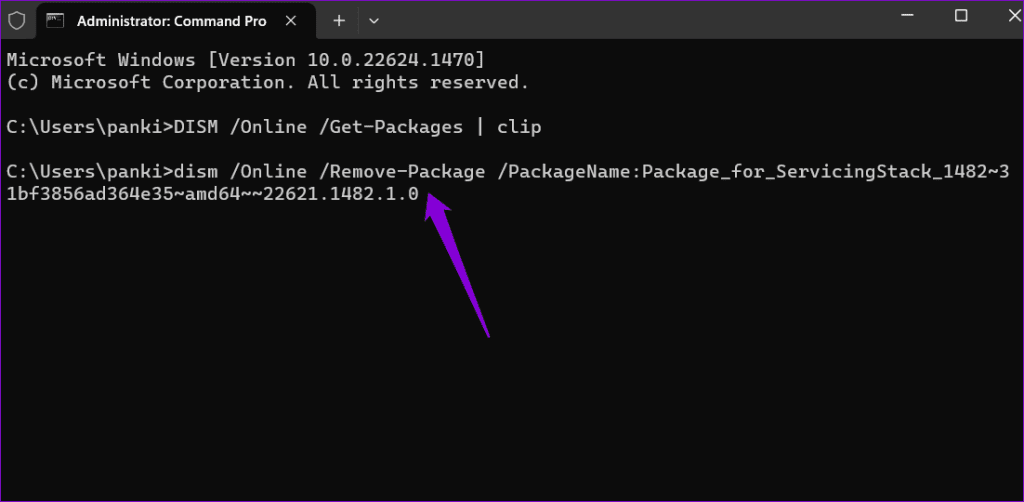
Step 5: Return to the Command Prompt window, paste the following command, and press Enter.
dism /Online /Remove-Package /PackageName:Package_ID
Replace Package_ID in the above command with the value copied in the last step.
Fix 2: Use Command Prompt or PowerShell to Uninstall the Update
Another thing you can do is use Command Prompt or PowerShell to remove the problematic update that won’t get uninstalled.
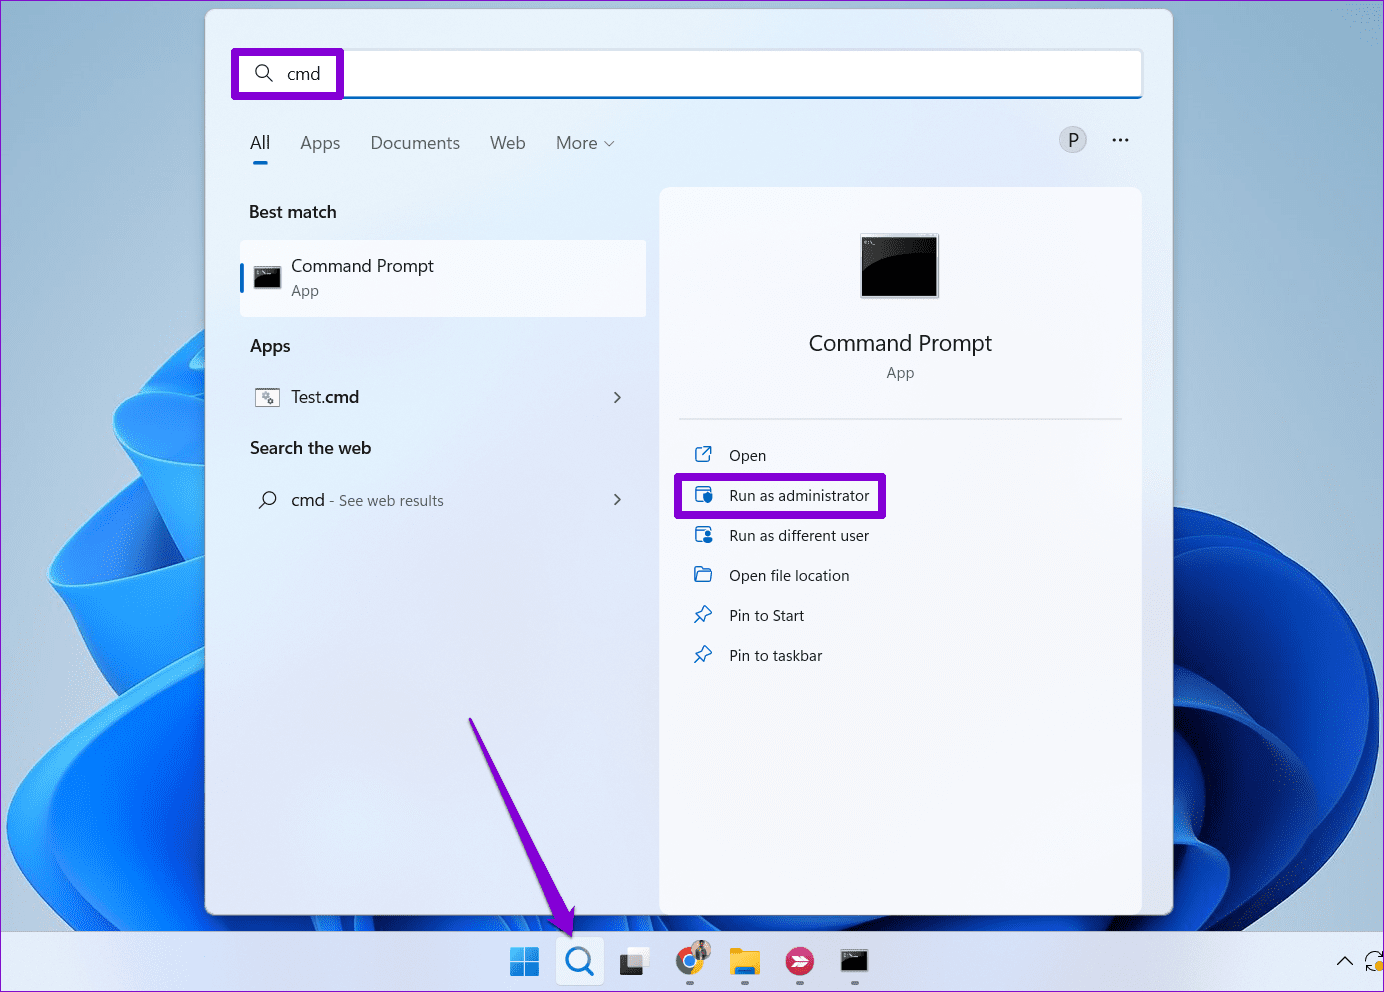
Step 1: Click the search icon on the taskbar, type in cmd or PowerShell, and select Run as administrator.
Step 2: In the console, paste the following command and press Enter to view the Windows update history:
wmic qfe list brief /format:table

Step 3: Note down the KB number under HotfixID of the Windows update you’d like to uninstall.

Step 4: Run the following command to remove the Windows update:
wusa /uninstall /kb:number
Replace number in the above command with the KB number noted in the previous step.

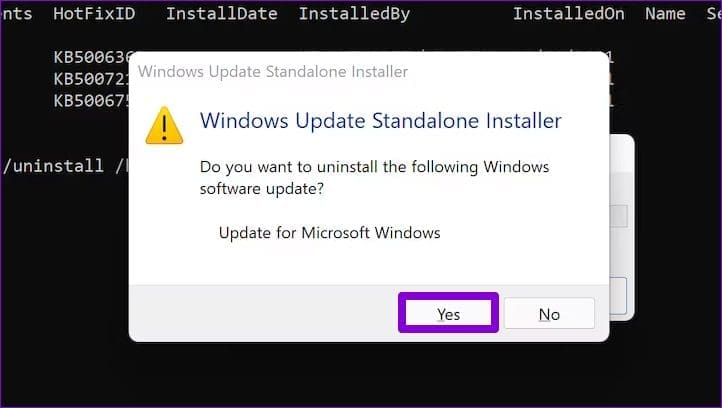
Step 5: Hit Yes to proceed when the confirmation prompt appears.
Fix 3: Modify Registry Files
Incorrectly configured registry entries can also prevent you from uninstalling updates on your Windows 10 or Windows 11 PC, triggering such errors. Therefore, it’s advisable to review the relevant registry entries and make necessary changes if needed.
Step 1: Press the Windows + R keyboard shortcut to open the Run dialog box. Type regedit in the box and press Enter.
Step 2: Paste the following path in the address bar at the top and press Enter.
HKEY_LOCAL_MACHINE\System\CurrentControlSet\Control\Print
Step 3: Locate the RPCAuthnLevelPrivacyEnabled entry in the right pane. If you can’t find it, right-click on the Print key, go to New, and select DWORD (32-bit) Value from the submenu. Name it RPCAuthnLevelPrivacyEnabled.
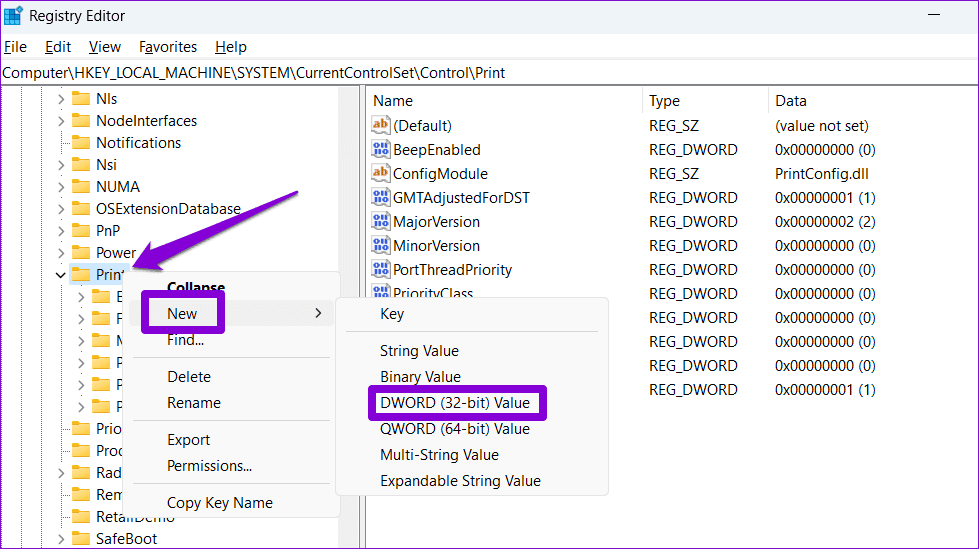
Step 4: Double-click the newly created DWORD, enter 0 in the Value data field, and hit OK.

Restart your PC after this and try uninstalling Windows updates one more time.
Fix 4: Reset Windows Update Components
Problems with the Windows update components can result in errors while installing or removing updates. If that’s the case, resetting the Windows update components should help fix the problem.
Step 1: Click the search icon on the taskbar, type in windows powershell, and select Run as Administrator.

Step 2: Run the following commands one by one and press Enter after each command:
net stop wuauserv
net stop cryptSvc
net stop bits
net stop msiserver
ren C:\Windows\SoftwareDistribution SoftwareDistribution.old
ren C:\Windows\System32\catroot2 catroot2.old
net start wuauserv
net start cryptSvc
net start bits
net start msiserver

After resetting the Windows update components, you should be able to uninstall updates without any issues.
Fix 5: Try Clean Boot
If the above tips don’t work, a third-party app or program on your PC may be disrupting Windows processes and causing problems. To avoid any interference, you can try uninstalling Windows updates in a clean boot state.
Step 1: Press the Windows + R keyboard shortcut to open the Run dialog. Type msconfig in the box and press Enter.
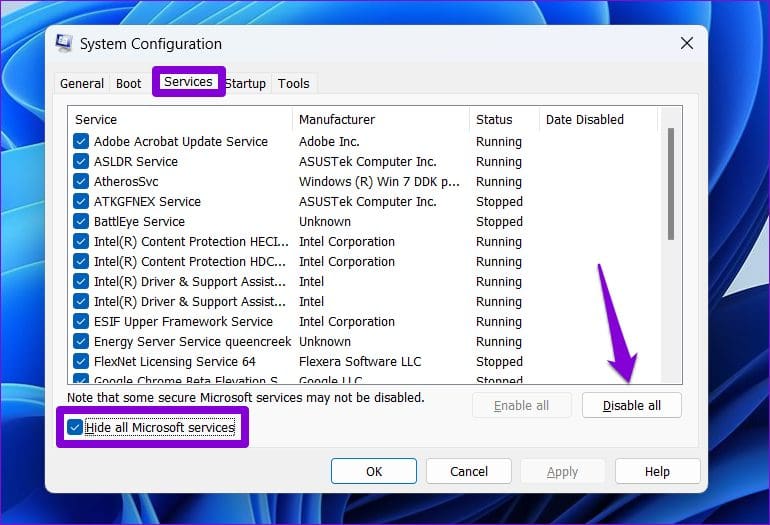
Step 2: Under the Services tab, tick the Hide all Microsoft services checkbox and click the Disable all button.
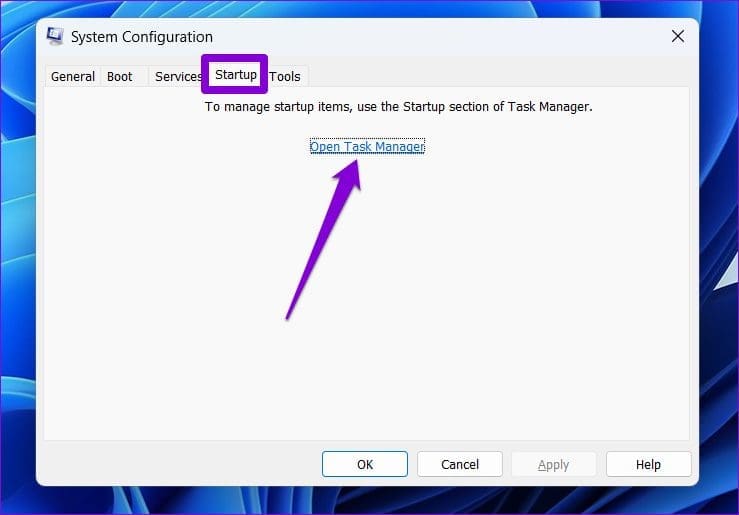
Step 3: Switch to the Startup tab and click on Open Task Manager.
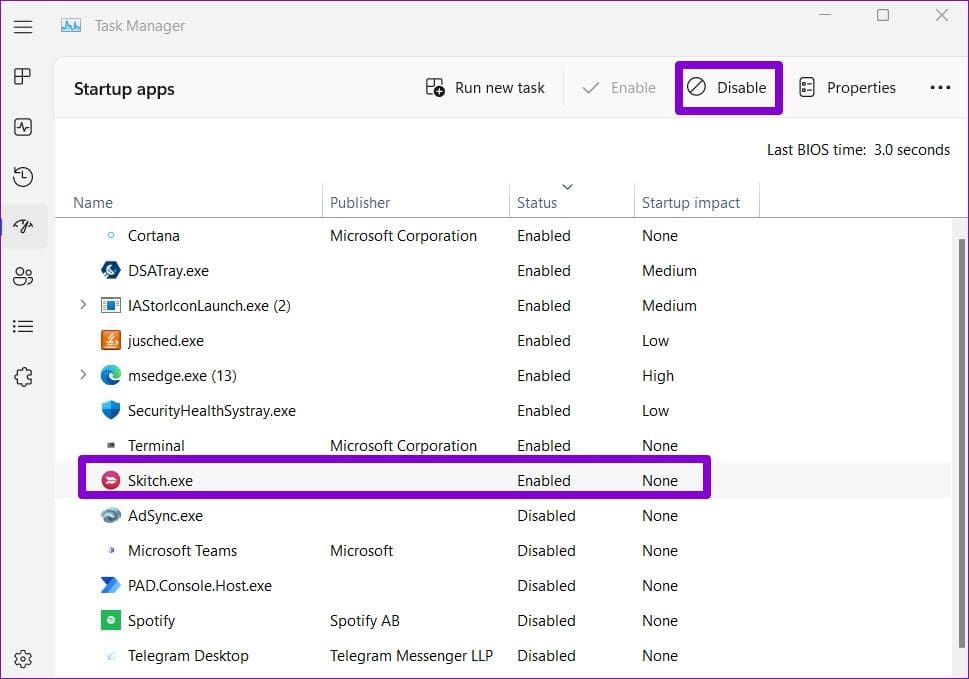
Step 4: In the Startup tab, select a third-party app or program and click the Disable option at the top. Repeat this step to disable all third-party apps and programs.
Restart your PC to enter a clean boot state and try to uninstall Windows updates again.
Was this helpful?
Last updated on 26 June, 2024
Read Next
 5 Ways to Fix Error Checking for Updates in the Google Play Store
Basic Fixes Check the app update preference: If you can't update apps manually, check the app update preference to automate it.
5 Ways to Fix Error Checking for Updates in the Google Play Store
Basic Fixes Check the app update preference: If you can't update apps manually, check the app update preference to automate it.
 4 Ways to Fix Windows Stuck on Checking for Updates
Basic Fixes Check internet connection: Ensure your PC is connected to a stable Wi-Fi or Ethernet connection.
4 Ways to Fix Windows Stuck on Checking for Updates
Basic Fixes Check internet connection: Ensure your PC is connected to a stable Wi-Fi or Ethernet connection.
 7 Ways to Fix Windows 11 Updates Not Downloading or Installing
Fix 1: Run the Windows Update Troubleshooter Windows 11 includes a dedicated troubleshooter that can automatically scan, detect, and fix any issues with Windows Updates.
7 Ways to Fix Windows 11 Updates Not Downloading or Installing
Fix 1: Run the Windows Update Troubleshooter Windows 11 includes a dedicated troubleshooter that can automatically scan, detect, and fix any issues with Windows Updates.
 5 Ways to Turn off Automatic Updates on Windows 11
Note: All the methods mentioned below help pause or restrict automatic updates on Windows 11.
5 Ways to Turn off Automatic Updates on Windows 11
Note: All the methods mentioned below help pause or restrict automatic updates on Windows 11.
 4 Ways to Disable Office Updates on Windows 11
Method 1: Using an Office App You can use any Microsoft Office app to turn off automatic updates for all Office applications.
4 Ways to Disable Office Updates on Windows 11
Method 1: Using an Office App You can use any Microsoft Office app to turn off automatic updates for all Office applications.
 How to Unpause Windows Updates and What to Do if You Can’t
How to Resume Windows Updates The process of resuming Windows updates is quite similar to pausing them.
How to Unpause Windows Updates and What to Do if You Can’t
How to Resume Windows Updates The process of resuming Windows updates is quite similar to pausing them.
 5 Fixes for “Word Experienced an Error Trying to Open the File” Error in Windows
Fix 1: Unblock Your Word File Microsoft Word may fail to open a document if it has been altered by third-party software.
5 Fixes for “Word Experienced an Error Trying to Open the File” Error in Windows
Fix 1: Unblock Your Word File Microsoft Word may fail to open a document if it has been altered by third-party software.
 3 Ways to Fix Discord Stuck on Checking for Updates
Preliminary Fixes Restart your PC: This will stop all the running background processes in Discord from working properly and allow you to check again.
3 Ways to Fix Discord Stuck on Checking for Updates
Preliminary Fixes Restart your PC: This will stop all the running background processes in Discord from working properly and allow you to check again.
The article above may contain affiliate links which help support Guiding Tech. The content remains unbiased and authentic and will never affect our editorial integrity.