Fix 1: Try Alternative Methods
If you can’t shut down your PC using the Start menu, press Alt + F4 to bring up the “Shut Down Windows” dialog box and try again. Alternatively, you can also press Ctrl + Alt + Del, click the power icon, and select Shut down from the menu.

Another thing you can do is forcefully shut down your Windows 11 PC. For that, press and hold the physical power button until it completely shuts off.
Fix 2: Turn off Fast Startup
If you’ve been using fast startup to reduce boot times on Windows 11, you might face such issues. Try turning it off to see if that fixes the issue.
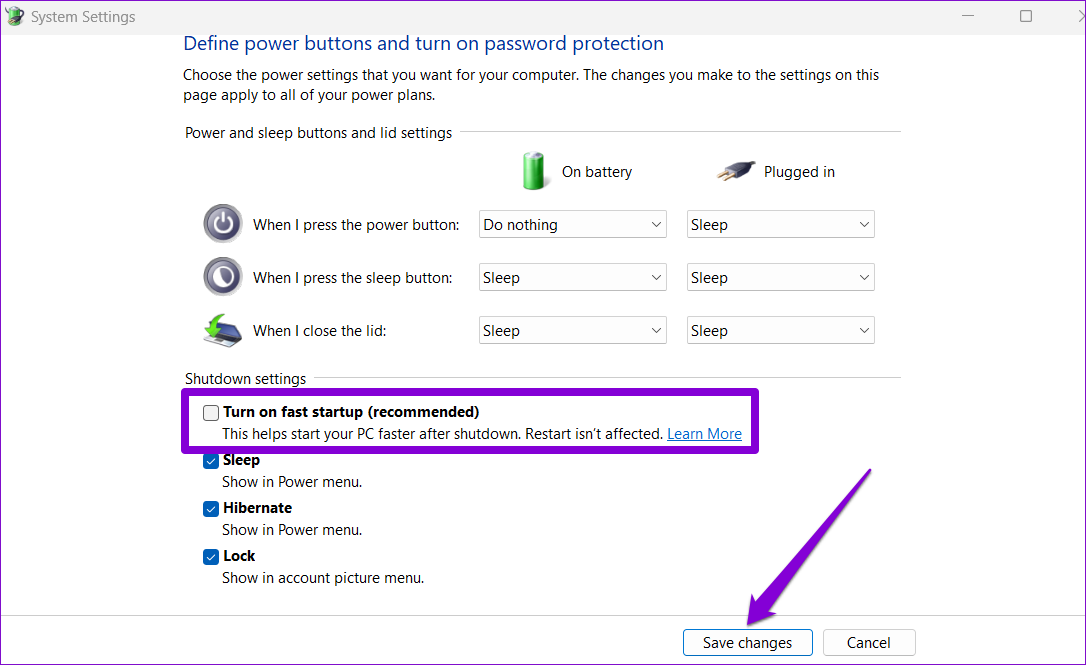
Step 1: Press the Windows key + R to open the Run dialog, type control, and press Enter.
Step 2: Switch the view type to large icons and select Power Options.

Step 3: Click Choose what the power buttons do on your left.

Step 4: Click the Change settings that are currently unavailable option.

Step 5: Uncheck Turn on fast startup (recommended) and hit Save Changes.
Fix 3: Run SFC Scan
Corrupted system files are another reason you might have trouble shutting down your PC. To fix this, run a SFC (or System File Checker) scan on your PC.
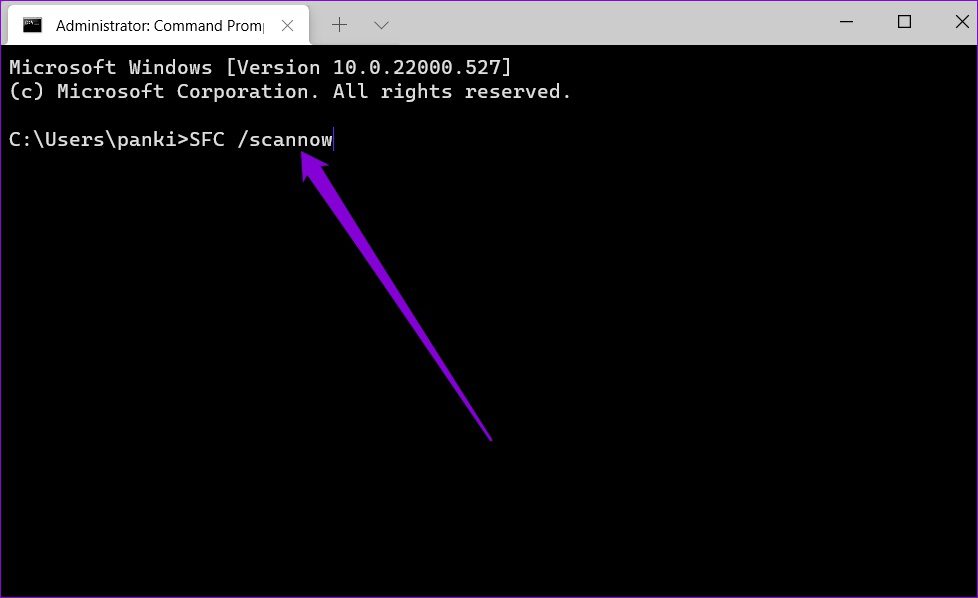
Step 1: Right-click the Start icon and select Terminal (Admin) from the list.
Step 2: In the console, type the following command and press Enter.
SFC /scannow
Fix 4: Perform a System Restore
System Restore is a handy utility on Windows 11 that periodically backs up the entire system. You can use it to restore your system to a point when everything was working fine.
Step 1: Click the search icon on the taskbar, type create a restore point, and press Enter.

Step 2: Under the System Protection tab, click System Restore.

Step 3: Select Recommended restore and click Next.

Step 4: Review all the details one more time and hit Finish.

Fix 5: Reset Windows 11
Lastly, if all else fails, you might need to resort to the nuclear option of resetting Windows. When resetting your PC, you can keep or remove your personal files. Here’s how to do it.
Step 1: Press the Windows key + I to launch the Settings app and head to System > Recovery.
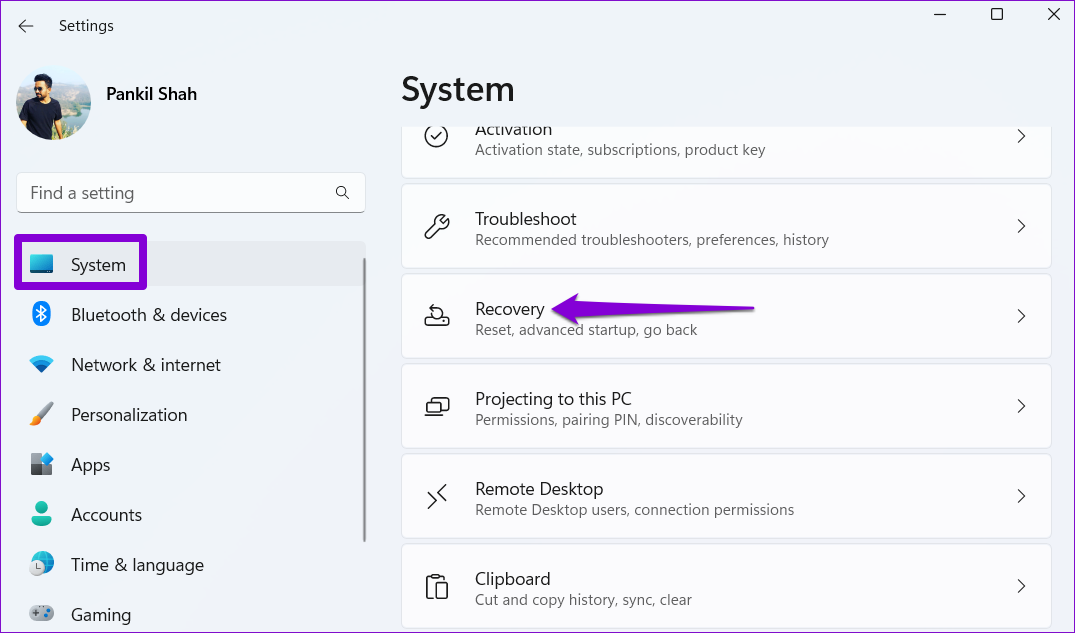
Step 2: Under Recovery options, click the Reset PC button and follow the on-screen prompts to finish the process.

Was this helpful?
Last updated on 29 July, 2024
3 Comments
Leave a Reply
Read Next
 4 Ways to Fix Windows 11 Stuck on Shutting Down Screen
Try These Things First Try to force shutdown: Sometimes the problem can occur due to a temporary bug or glitch.
4 Ways to Fix Windows 11 Stuck on Shutting Down Screen
Try These Things First Try to force shutdown: Sometimes the problem can occur due to a temporary bug or glitch.
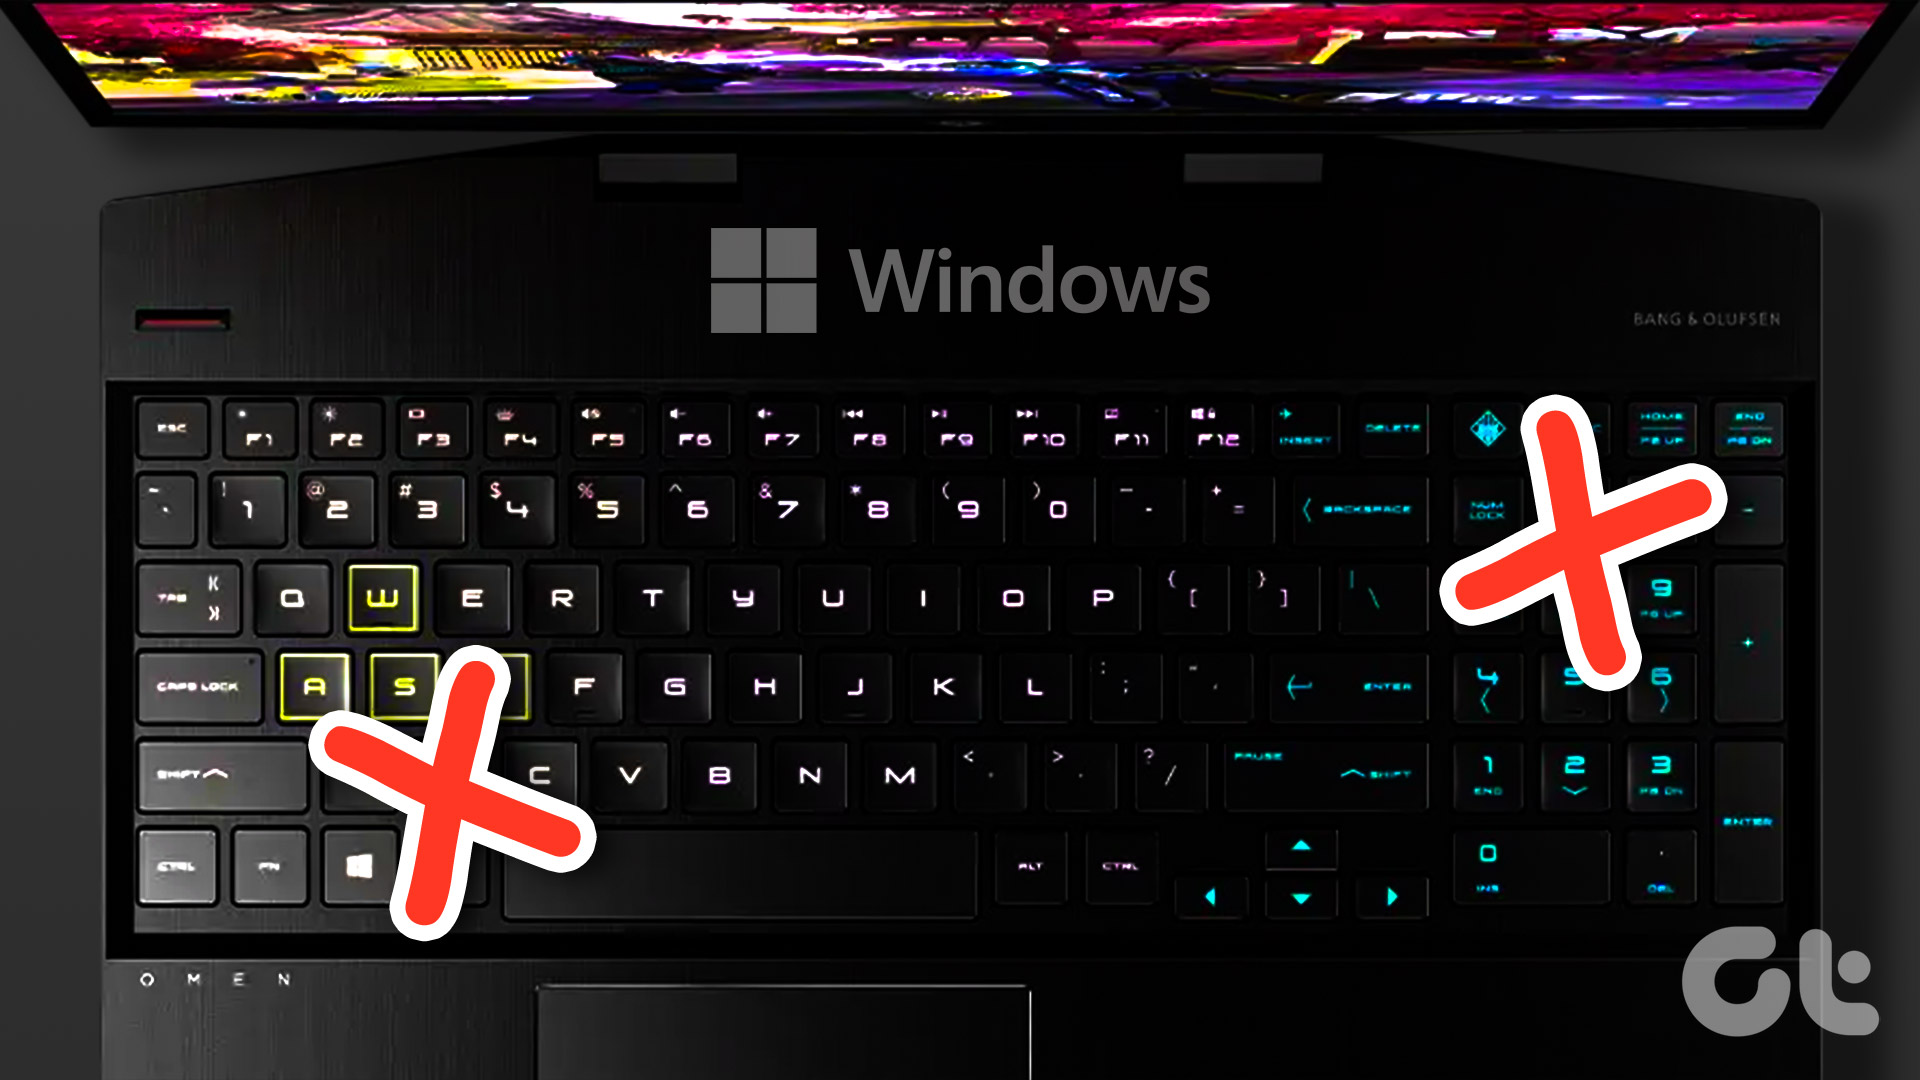
 Top 7 Ways to Fix Windows Key Not Working on Windows 10
Windows 10 operating system is full of keyboard shortcuts.
Top 7 Ways to Fix Windows Key Not Working on Windows 10
Windows 10 operating system is full of keyboard shortcuts.
 2 Ways to Fix Discord Not Opening on Windows 10 and Windows 11
Try Basic Fixes End Discord processes: Press Ctrl + Shift + Esc to launch the Task Manager.
2 Ways to Fix Discord Not Opening on Windows 10 and Windows 11
Try Basic Fixes End Discord processes: Press Ctrl + Shift + Esc to launch the Task Manager.
 4 Ways to Fix Firefox Not Opening on Windows 10 and Windows 11
Fix 1: Force Close Firefox Processes Sometimes, Firefox processes may become unresponsive on your PC, resulting in such issues.
4 Ways to Fix Firefox Not Opening on Windows 10 and Windows 11
Fix 1: Force Close Firefox Processes Sometimes, Firefox processes may become unresponsive on your PC, resulting in such issues.
 6 Ways to Fix Print Spooler Keeps Stopping on Windows 10 and Windows 11
Fix 1: Run Printer Troubleshooter Windows comes with a dedicated printer troubleshooter that can automatically diagnose and fix any printing issues on your PC.
6 Ways to Fix Print Spooler Keeps Stopping on Windows 10 and Windows 11
Fix 1: Run Printer Troubleshooter Windows comes with a dedicated printer troubleshooter that can automatically diagnose and fix any printing issues on your PC.
 5 Ways to Fix Windows Explorer High CPU Usage on Windows 11
Try Basic Fixes Restart the Windows Explorer process: There's a chance that Windows Explorer's high CPU usage is a one-time glitch.
5 Ways to Fix Windows Explorer High CPU Usage on Windows 11
Try Basic Fixes Restart the Windows Explorer process: There's a chance that Windows Explorer's high CPU usage is a one-time glitch.
 3 Best Ways to Fix Keyboard Backlight Not Working on Windows 10 and Windows 11
Try Basic Fixes Toggle the keyboard backlight using the hotkey: You can use a key combination to quickly enable or disable the keyboard backlight on your Windows 11 PC.
3 Best Ways to Fix Keyboard Backlight Not Working on Windows 10 and Windows 11
Try Basic Fixes Toggle the keyboard backlight using the hotkey: You can use a key combination to quickly enable or disable the keyboard backlight on your Windows 11 PC.
 3 Ways to Fix Mouse Keeps Scrolling Automatically Windows 10 and Windows 11
https://youtu.be/1UZ3PWNr-lE Try Basic Fixes Disconnect and reconnect the mouse: Unplug your mouse cable or wireless adapter from your computer and reconnect it to a different port.
3 Ways to Fix Mouse Keeps Scrolling Automatically Windows 10 and Windows 11
https://youtu.be/1UZ3PWNr-lE Try Basic Fixes Disconnect and reconnect the mouse: Unplug your mouse cable or wireless adapter from your computer and reconnect it to a different port.
The article above may contain affiliate links which help support Guiding Tech. The content remains unbiased and authentic and will never affect our editorial integrity.


I tried all those and regedit tweaks. No wakers listed in powercfg,… And actually none of the articles point to a case where the user has a HDMI switch/hub to allow two computers share the same monitor. Finally I figured if you unplug the HDMI switch from computer, SSD led and CDROM finally turn off. When the HDMI switch is plugged, it seems that electricity keeps flowing and causing my disk and CDROM to be on all the time, that can give you the impression Windows didn’t shutdown.
You made a slight error here. On the ‘create restore point’ section, you gave instructions to restore one… not create one. You have to click the ‘create’ option at the bottom of the window. Good apart from that! 🙂
Hi! We are suggesting users perform a system restore, so the instructions provided are correct.
Glad you found the rest of the article helpful! 🙂