

Try Basic Fixes
- Check connections: If you are using a Windows 11 desktop, check the wired connections between your CPU and the monitor. Unplug the HDMI cable and wait for a few minutes before reconnecting. While at it, check out the monitor’s connection to the power outlet.
- Unplug peripheral devices: Interference from external devices connected to your system can cause such problems. To check for this possibility, disconnect all peripherals from your computer.
- Restart your PC: If your Windows 11 PC encounters any issues at startup, it may display a black screen immediately after login. If it’s just a one-off glitch, restarting your computer should solve your problem. Press and hold the power button until your PC turns off. Wait for some time, and press the power button again to turn on your computer.
- Install Windows updates: Such black screen issues can also occur due to a buggy Windows build. If that’s the case, installing pending updates should help.
Fix 1: Change Projection Settings
Selecting the incorrect projection settings on Windows can also cause the black screen problem. To fix it, press the Windows key + P to launch the projection settings and use the arrow keys to scroll through the available options. Since your screen is black, it may take a few attempts to get this right.
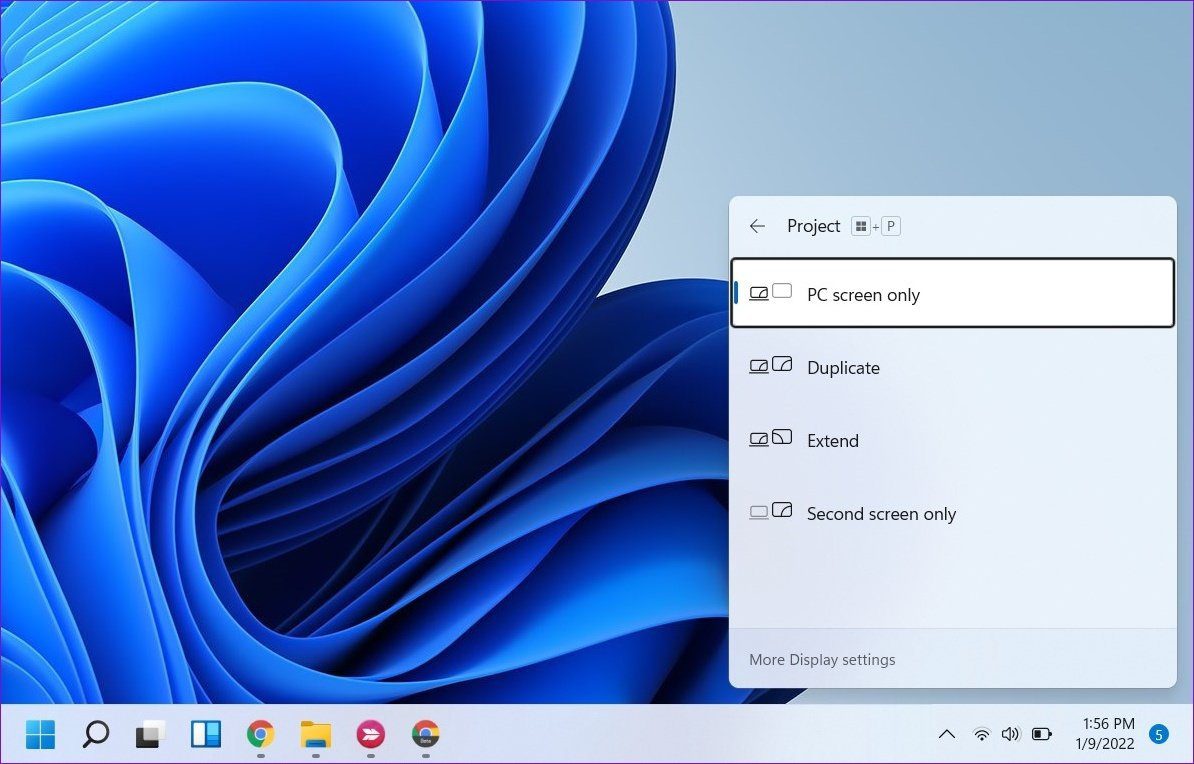
Fix 2: Update the Graphics Driver
If you only face this issue intermittently, consider updating the graphics driver to avoid such issues in the future. To do so, use these steps:
Step 1: Press the Windows key + S to open the search menu, type device manager, and press Enter.
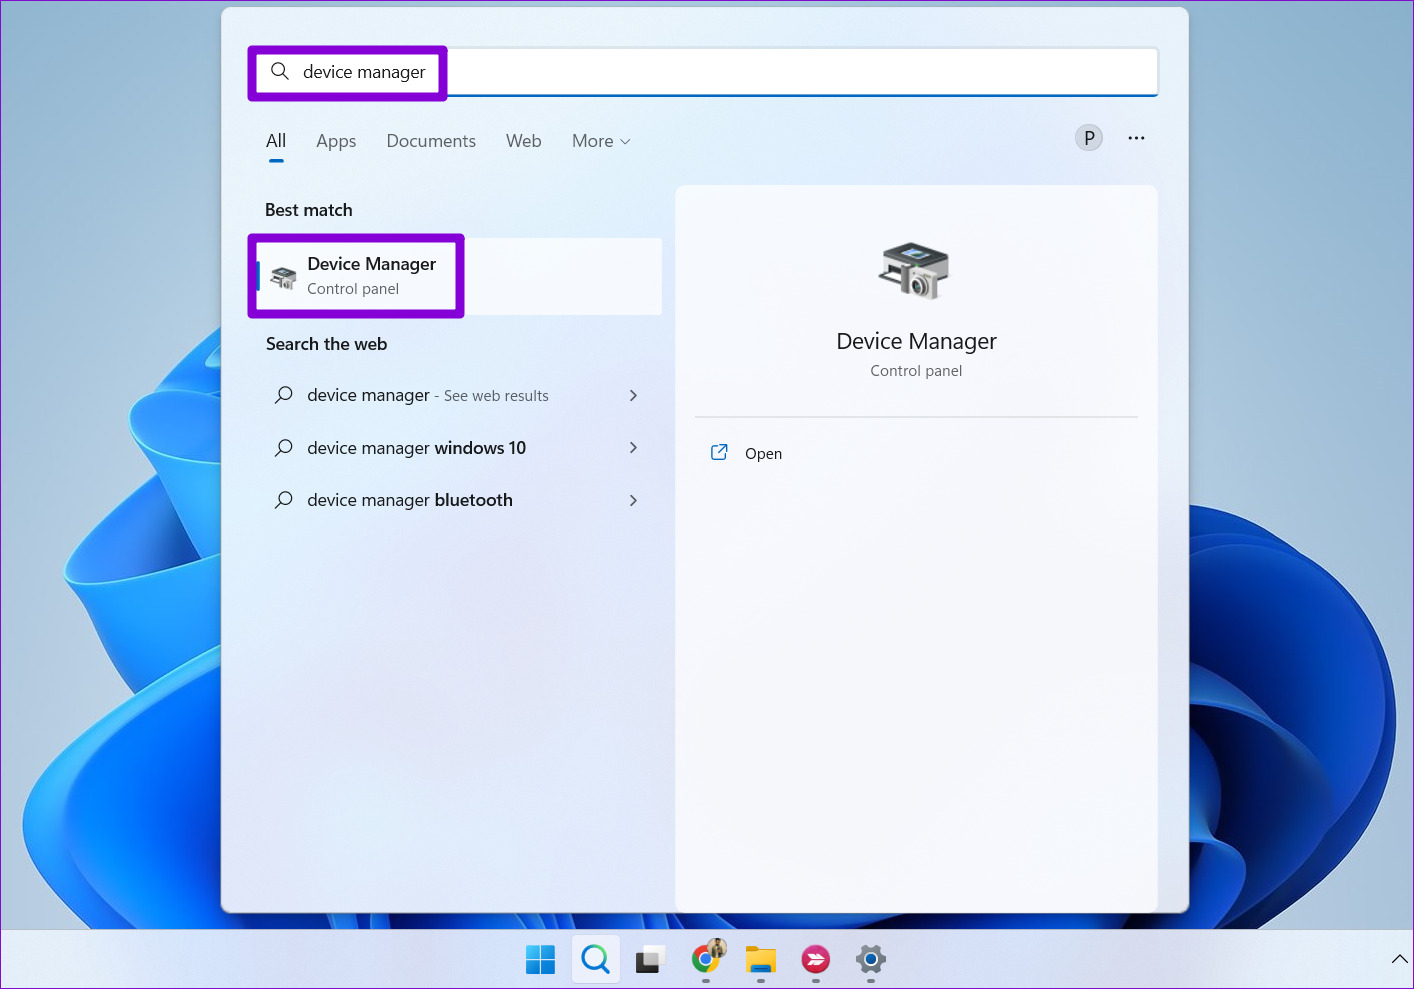
Step 2: In the Device Manager window, expand Display adapters. Right-click on your driver and select Update driver.

From there, follow the on-screen instructions to update the driver. Alternatively, you can also update the display driver manually by downloading the latest version from the manufacturer’s website. For that, you must know what graphics hardware your PC is using. Here’s how to check.
Step 1: Press the Windows key + R to open the Run dialog. Type dxdiag and press Enter.
Step 2: Go to the Display tab and note down the name of the driver.
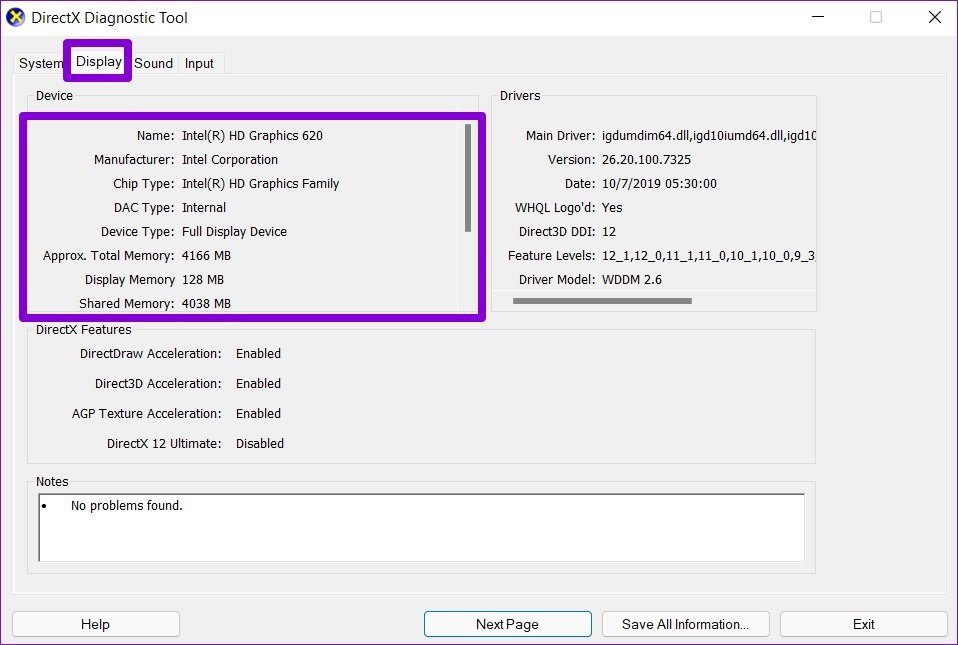
Now, go to the manufacturer’s website—Intel, NVIDIA, or AMD—and download the latest compatible display driver. Once downloaded, open the installer file and follow the on-screen instructions to install the drivers. After that, restart your PC to apply the changes.
Fix 3: Try Safe Mode
A third-party app or process running in the background may be causing the black screen problem. To check for this possibility, try booting your PC in safe mode.
Step 1: Press and hold the power button to forcefully shut down your PC. Then, press the power button again to boot it up.
Step 2: When the Windows logo appears, press and hold the power button until your PC restarts. Repeat the above step to interrupt the boot process three times. On the fourth occasion, Windows will greet you with the Automatic Repair screen. When it does, click the Advanced options button.
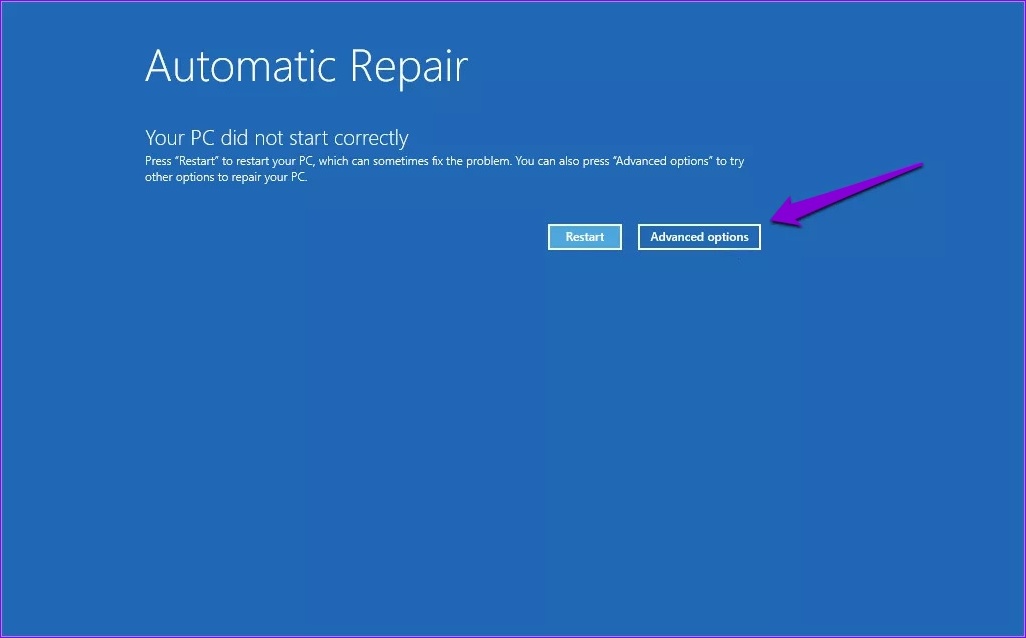
Step 3: Go to Troubleshoot > Advanced options > Startup Settings.
Step 4: Click the Restart button to visit the Startup Settings menu.

Step 5: Press 4 or F4 on your keyboard to restart your PC in Safe Mode.
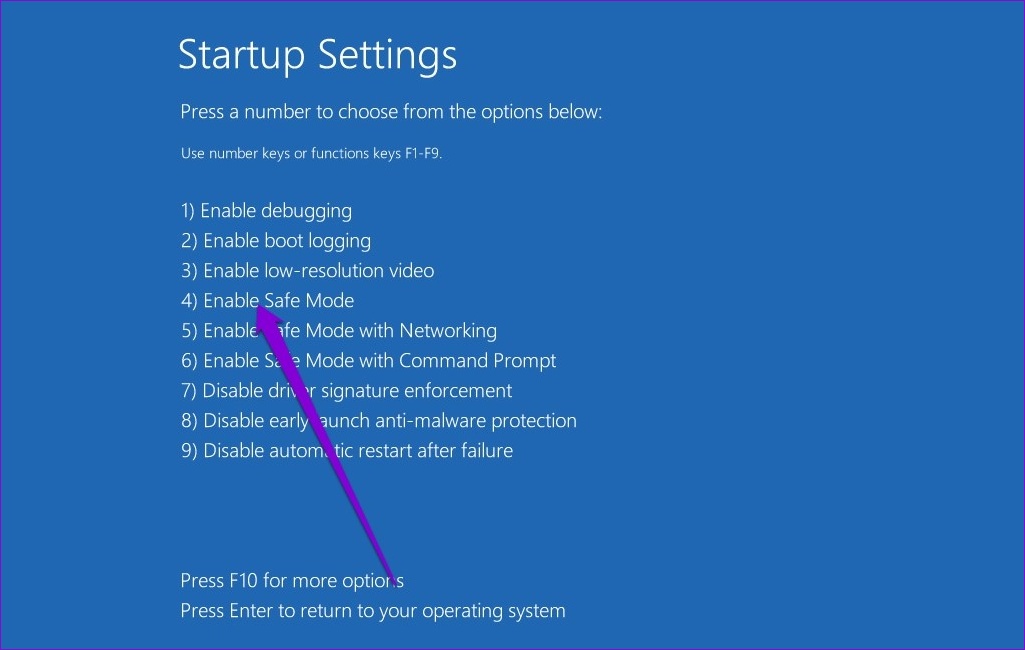
Wait for your PC to boot into Safe Mode. If you don’t see the black screen while in Safe Mode, one of your startup apps or programs is causing the problem during a regular boot. You can try uninstalling recently installed apps or software and see if that fixes the issue.
Fix 4: Perform System Restore
If uninstalling suspicious apps or programs does not solve your problem, the black screen issue could be caused by some other recent system change. Performing a system restore will allow you to undo that change and resolve the issue for good.
Step 1: Click the search icon on the taskbar, type create a restore point, and press Enter.

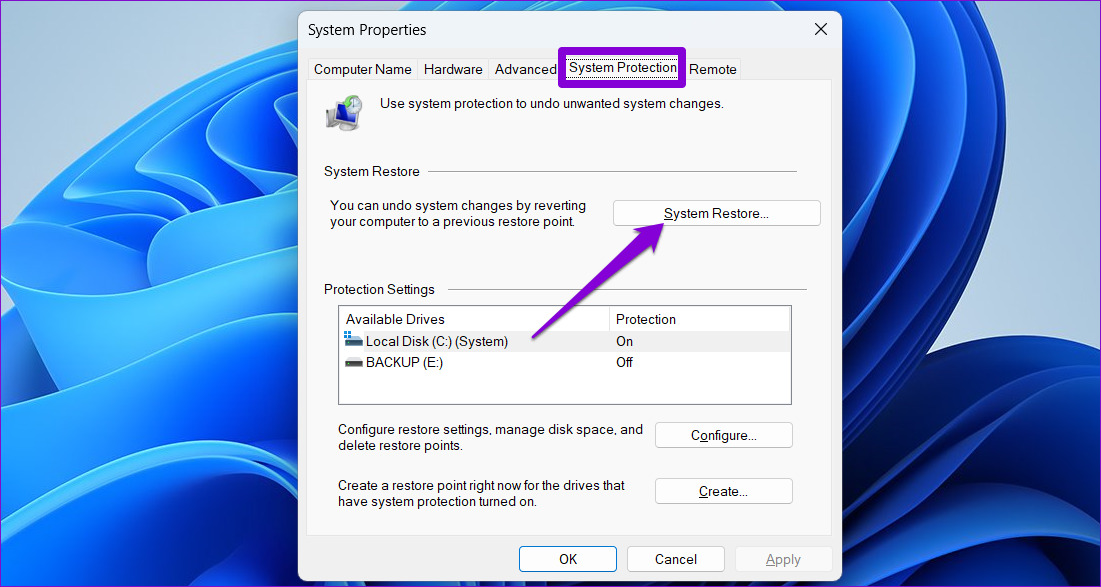
Step 2: Under the System Protection tab, click the System Restore button.
Step 3: Click Next to continue.
Step 4: Select a restore point before the issue first appeared and hit Next.

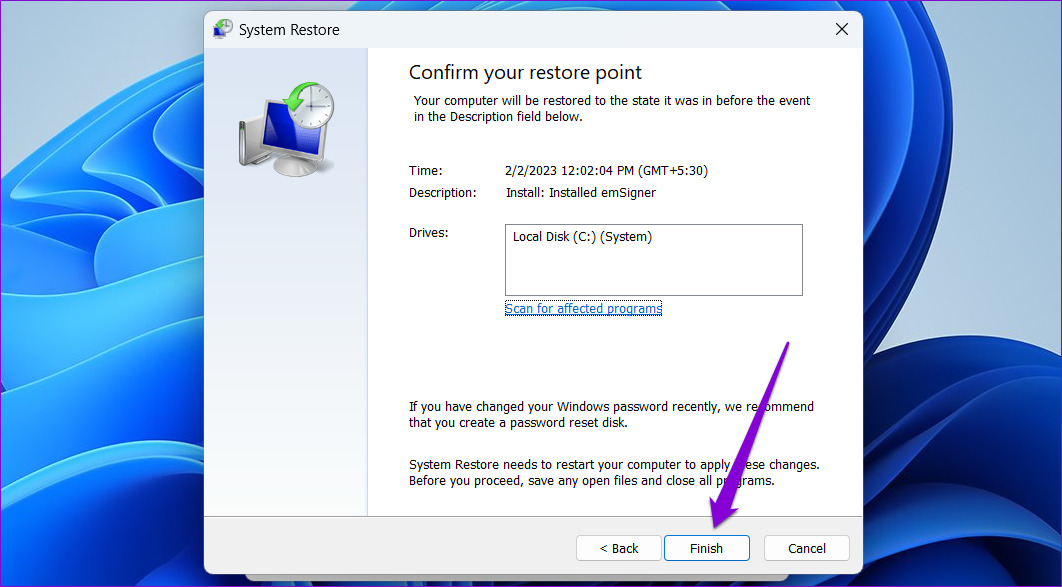
Step 5: Click Finish and allow Windows to restore to the specified restore point.
Was this helpful?
Last updated on 02 September, 2024
1 Comment
Leave a Reply
Read Next
 5 Ways to Fix the Black Screen Issue in Amazon Prime Video on Windows
Try Basic Fixes Temporarily disable your VPN connection: Although VPNs are great for maintaining privacy, they can often cause problems with streaming services such as Prime Video, especially if you
5 Ways to Fix the Black Screen Issue in Amazon Prime Video on Windows
Try Basic Fixes Temporarily disable your VPN connection: Although VPNs are great for maintaining privacy, they can often cause problems with streaming services such as Prime Video, especially if you
 2 Ways to Fix Android Auto Black Screen Issue
Basic Fixes Let your phone cool down if it's overheating: If your phone has been sitting in your car for a long time and it's sunny outside, it's possible your
2 Ways to Fix Android Auto Black Screen Issue
Basic Fixes Let your phone cool down if it's overheating: If your phone has been sitting in your car for a long time and it's sunny outside, it's possible your
 3 Ways to Fix iPhone Screen Black and White Issue
Basic Fixes: Connect to a charger: If your device has low battery levels, it might automatically switch to the Grayscale setting to extend battery life.
3 Ways to Fix iPhone Screen Black and White Issue
Basic Fixes: Connect to a charger: If your device has low battery levels, it might automatically switch to the Grayscale setting to extend battery life.
 8 Ways to Fix Crunchyroll Showing Black Screen Issue
Streaming on Crunchyroll is extremely convenient, thanks to the desktop and mobile app support.
8 Ways to Fix Crunchyroll Showing Black Screen Issue
Streaming on Crunchyroll is extremely convenient, thanks to the desktop and mobile app support.
 How to Fix the Black Folder Background Issue in Windows 10
Do you have black squares show up all of a sudden behind certain folders in Windows 10?
How to Fix the Black Folder Background Issue in Windows 10
Do you have black squares show up all of a sudden behind certain folders in Windows 10?
 5 Fixes for Roblox Black Screen Issue
Fix 1: Turn On Reduced Motion Is Roblox showing a black screen when you try to join an experience?
5 Fixes for Roblox Black Screen Issue
Fix 1: Turn On Reduced Motion Is Roblox showing a black screen when you try to join an experience?
 Top 7 Useful Ways to Fix Windows 10 Photos Black Screen Error
Windows 10 got a lot of things right, but the Photos app was not one of them.
Top 7 Useful Ways to Fix Windows 10 Photos Black Screen Error
Windows 10 got a lot of things right, but the Photos app was not one of them.
 4 Ways to Fix Camera Showing a Black Screen on Windows 11
Basic Fixes: Ensure the camera lens is unobstructed: Certain laptops come with built-in privacy shutters for the device camera.
4 Ways to Fix Camera Showing a Black Screen on Windows 11
Basic Fixes: Ensure the camera lens is unobstructed: Certain laptops come with built-in privacy shutters for the device camera.
The article above may contain affiliate links which help support Guiding Tech. The content remains unbiased and authentic and will never affect our editorial integrity.

Thanks with this article inputs I resolved my windows black out screen problem.keep going