Basic Fixes
- Manually change your wallpaper: You can manually change your wallpaper instead of choosing it to change automatically.
- Set wallpaper using the context menu: In the folder that contains your image, right-click on the image and choose Set as desktop background.
- Restart Windows Explorer: Restarting Windows Explorer on your PC effectively troubleshoots glitches, performance issues, and bugs in the user interface.
- Update Windows 11 version: Installing an updated version of Windows 11 will help remove bugs and glitches.
Fix 1: Change Ease of Access Settings
Ease of Access includes different accessibility settings for your Windows computer, such as enabling the On-Screen Keyboard, Magnifier, and rich contrast.
Step 1: Open the Control Panel and click on Ease of Access on the right side.
Step 2: Click on Ease of Access Center > Make the Computer Easier to See.

Step 3: Scroll down and look for Make Things on the Screen Easier to See.
Step 4: Ensure that Remove Background Images (When Available) is unchecked.

Fix 2: Rename Corrupt Transcoded Wallpaper File
Whenever you select an image for the desktop background, Windows will convert that image file’s format to JPG regardless of its original file format. This is called a Transcoded Wallpaper File. If your Windows 11 wallpaper keeps going black automatically, the Transcoded Wallpaper file might be corrupted.
Step 1: Click on the Windows Search icon on the Taskbar, type the following file location in the Search Bar, and press Enter.
%USERPROFILE%\AppData\Roaming\Microsoft\Windows\Themes\
Step 2: Select the TranscodedWallpaper file and press F2 to rename it.
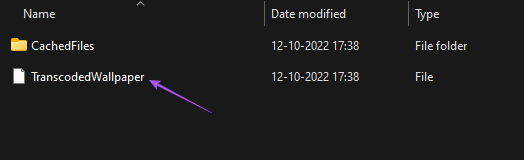
Step 3: Rename the file to TranscodedWallpaper.old.
Close the window and try changing the wallpaper.
Fix 3: Update the Display Drivers
An outdated version of the Display Drivers on your Windows 11 PC may be causing the wallpaper on the desktop to go black automatically. Here’s how to check and update the Display Drivers.
Step 1: Open Device Manager and click on Display Adapters.
Step 2: Right-click on your video card name and select Update Driver from the list of options.

Step 3: When a dialog box opens, click on Search Automatically for Drivers to let Windows automatically search and install the best version of Display driver for your computer.
After the driver installation is complete, try changing your wallpaper.
Fix 4: Disable Remember My Preferences in Account Settings
Step 1: Open Settings and click on Accounts,. Then, click on Accounts again.
Step 2: Click on Windows Backup and disable the option of Remember my preferences.

Now, try changing your desktop background again.
Was this helpful?
Last updated on 01 July, 2024
Read Next
 Mac Wallpaper Keeps Changing? 2 Easy Fixes
Basic Fixes Restart Device: Your Mac's wallpaper changing constantly might be just a simple software glitch.
Mac Wallpaper Keeps Changing? 2 Easy Fixes
Basic Fixes Restart Device: Your Mac's wallpaper changing constantly might be just a simple software glitch.
 5 Fixes if Outlook Keeps Asking For Password on Windows
Fix 1: Open Outlook in Safe Mode Opening Outlook in Safe Mode allows you to run the application without add-ins.
5 Fixes if Outlook Keeps Asking For Password on Windows
Fix 1: Open Outlook in Safe Mode Opening Outlook in Safe Mode allows you to run the application without add-ins.
 5 Fixes for Windows 11 Desktop That Keeps Refreshing
Try Basic Fixes Close background apps: Open the Task Manager and go through the list of apps running in the background.
5 Fixes for Windows 11 Desktop That Keeps Refreshing
Try Basic Fixes Close background apps: Open the Task Manager and go through the list of apps running in the background.
 7 Fixes When Printer on Windows 11 Keeps Printing Landscape Instead of Portrait
1.
7 Fixes When Printer on Windows 11 Keeps Printing Landscape Instead of Portrait
1.
 4 Fixes When Mouse Keeps Clicking on Its Own on Windows 11
Basic Fixes: Restart the computer: Restarting the computer will force all running processes and services to shut down, effectively resolving random clicking.
4 Fixes When Mouse Keeps Clicking on Its Own on Windows 11
Basic Fixes: Restart the computer: Restarting the computer will force all running processes and services to shut down, effectively resolving random clicking.
 4 Fixes for Dynamic Wallpaper Not Working on Mac
Basic Fixes Enable Dynamic Appearance: Open Settings > Appearance > Select Auto to make your Mac wallpapers dynamic.
4 Fixes for Dynamic Wallpaper Not Working on Mac
Basic Fixes Enable Dynamic Appearance: Open Settings > Appearance > Select Auto to make your Mac wallpapers dynamic.
 5 Fixes for Roblox Black Screen Issue
Fix 1: Turn On Reduced Motion Is Roblox showing a black screen when you try to join an experience?
5 Fixes for Roblox Black Screen Issue
Fix 1: Turn On Reduced Motion Is Roblox showing a black screen when you try to join an experience?
 3 Fixes for Black Screen of Death on Samsung Galaxy Phone
Try Basic Fixes Force restart your phone: Press and hold the power button (or side button) and volume down button simultaneously until the device turns off and the Samsung logo
3 Fixes for Black Screen of Death on Samsung Galaxy Phone
Try Basic Fixes Force restart your phone: Press and hold the power button (or side button) and volume down button simultaneously until the device turns off and the Samsung logo
The article above may contain affiliate links which help support Guiding Tech. The content remains unbiased and authentic and will never affect our editorial integrity.