You can hide your location (IP address) and browsing history from an ISP (Internet Service Provider) and local government using a VPN. It is also useful for accessing websites often unavailable in your region. But what if VPN fails to establish a connection on your computer? Here are the ways to fix VPN not working in Windows 11.

If you are halfway through the research, it’d be frustrating if the VPN stops working out of the blue. Instead of returning to the regular connection for normal browsing, you can use the tricks below and fix the VPN not working on your Windows 11. We understand that most VPN apps have different software interface and settings. However, we’ve compiled solutions that can work on Windows.
1. Check Internet Connection
Your preferred VPN app isn’t an internet service provider. A VPN service relies on your computer’s internet connection and reroutes the browsing traffic to another server. If you are facing issues with Ethernet or Wi-Fi connection on your computer, the VPN connection won’t work either.

You can read our dedicated post on troubleshooting Wi-Fi connection on Windows 11. Once you get back to an active internet connection, you can visit fast.com and confirm a double-digit speed (in MBPS) for a smooth web browsing experience on a VPN connection.
2. Disable VPN Connection and Enable It
We aren’t talking about disconnecting a VPN connection from an app. You can disable the VPN connection from the Windows 11 Settings and enable it again.
Step 1: Open Windows 11 Settings app (use Windows + I keys).
Step 2: Go to Network & internet menu.
Step 3: Scroll to Advanced network settings.

Step 4: From the Network adapters menu, disable a VPN connection and enable it again after a minute or two.

3. Reinstall Network Adapters
When you update a VPN app on a computer, it will automatically install the required network adapter drivers to run smoothly. Corrupt network adapters might mess up the VPN connection on your computer. Here’s how you can reinstall them.
Step 1: Right-click on the Windows key and open the Device Manager menu.

Step 2: Expand the Network adapters menu.
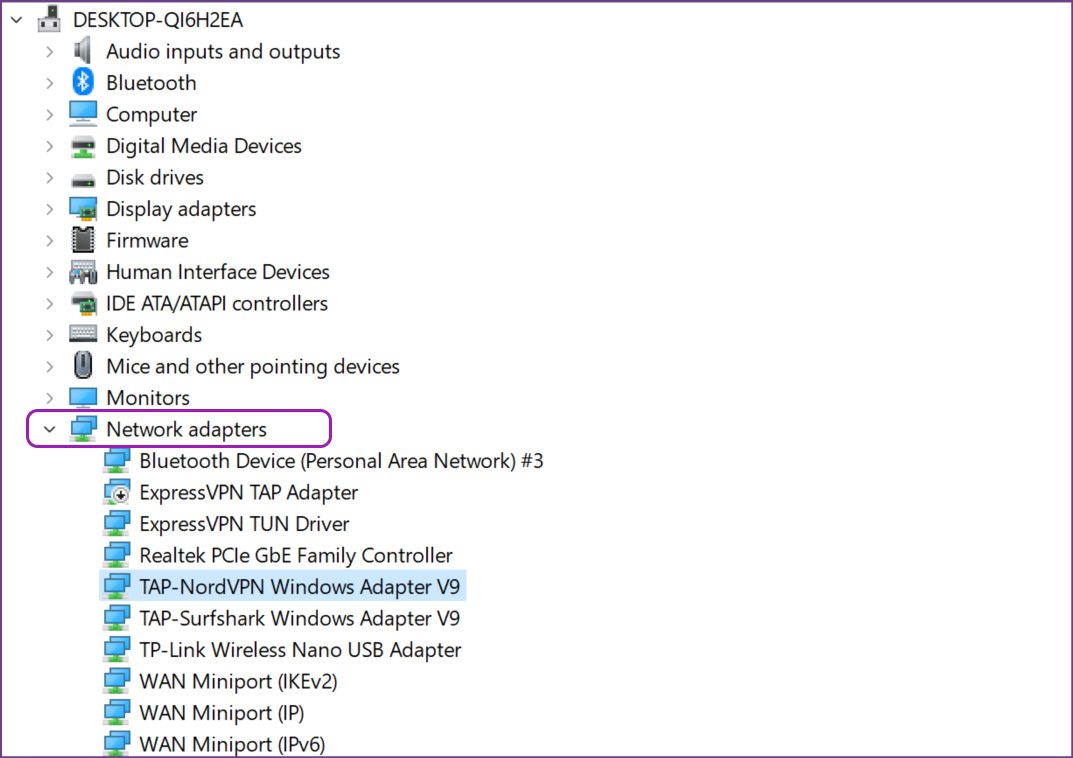
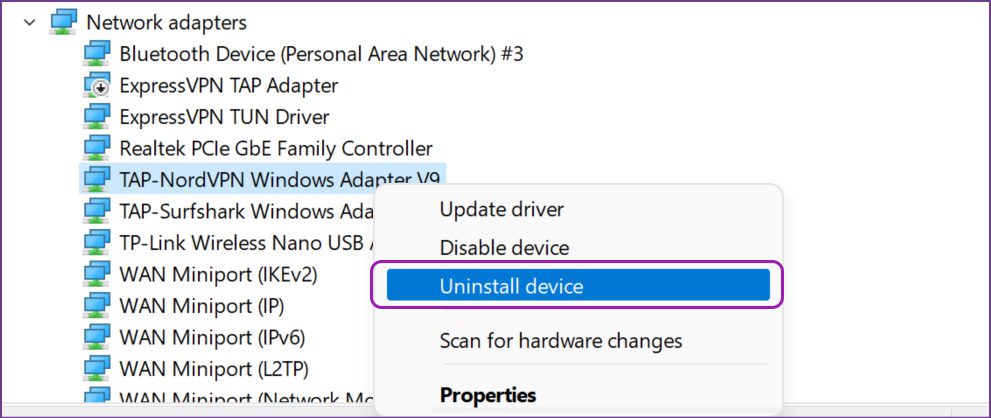
Step 3: Find your VPN’s Windows adapter and right-click on it.
Step 4: Select Uninstall device from the context menu and confirm the decision.
Restart your Windows PC, and the system will install pending updates during the reboot process.
4. Some Websites Might Detect VPN and Block Access
With hundreds of VPN services available in the market, the website admins have become smarter in identifying a VPN connection on your computer.
Websites like Fite TV that use the Stripe payment service on the checkout page. Stripe uses an algorithm to detect a VPN connection to block the payment from specific location. Similarly, DAZN (often known as Netflix of sports streaming) won’t allow users to surf the library on a VPN connection. These are just a few examples.
What’s the reason behind blocking the VPN access? These apps and services are available in hundreds of countries around the world. One of the key reason is that the pricing of services differs from one region to another. When a user tries to connect to a developing country’s server to avoid paying high-price in the home country, the service will detect the VPN connection and block the payment for that account. For example, a DAZN subscription costs $9.99 per month in the US and less than $1 in India).
5. Disable IPv6
IPv6 (Internet Protocol Version 6) is the latest Internet Protocol version and offers a unique IP address for your computer to communicate and route traffic across the internet. Sometimes, it may affect the VPN connection on your computer. Here’s how you can disable it.
Step 1: Press the Windows key and search for ‘network connections.’
Step 2: Find your VPN adapter from the list and right-click on it.

Step 3: Select Properties.
Step 4: Disable Internet Protocol version 6 and hit the Ok button.

6. Disable Windows Firewall
The default Windows Defender Firewall might detect the VPN as an unsafe connection and block it entirely. Here’s how you can disable Windows Firewall on your PC.
Step 1: Press the Windows key and search for Windows Defender Firewall.
Step 2: Hit Enter and open it.
Step 3: Select ‘Turn Windows Defender Firewall on or off’.

Step 4: Enable the ‘Turn off Windows Defender Firewall’ option and hit OK.

7. Update VPN App
VPN apps regularly release new updates to improve app performance and include added servers. Most users skip the update as it will temporarily disable the VPN connection on the PC. You shouldn’t follow that routine and keep the VPN app updated to the latest version.
8. Connect to Another Location Server
If you face issues connecting to a specific location server, the VPN app will try to use another location server or perform several attempts to establish the connection. You can manually select another server and resolve the issue. Most VPN apps offer multiple location services in major regions like the US, UK, Australia, and Canada.

Make VPN Up and Running on Windows 11
We actively avoid and recommend you to skip free-tier and sketchy too-good-to-be-true VPN apps. Some free VPN apps might use your browsing info by making that part of a clause in Privacy Policy, which many don’t read, and sell that to anyone interested. Stick to the well-known VPN providers who follow industry-standard practices of not logging any user data. Which method helped you fix the VPN not working on Windows 11 issue? Share your finding in the comments below.
Was this helpful?
Last updated on 19 April, 2022
Read Next
 3 Ways to Fix Google Chrome Not Working With VPN
Basic Fixes Use another VPN server: Most VPN apps have hundreds of servers.
3 Ways to Fix Google Chrome Not Working With VPN
Basic Fixes Use another VPN server: Most VPN apps have hundreds of servers.
 4 Ways to Fix VPN Not Working on iPhone or iPad
Basic Fixes: Check app server status: When your preferred VPN provider faces an outage, you may face issues when using their services.
4 Ways to Fix VPN Not Working on iPhone or iPad
Basic Fixes: Check app server status: When your preferred VPN provider faces an outage, you may face issues when using their services.
 4 Fixes for No Internet Connection After Connecting to VPN
Fix 1: Change Routing Settings The routing settings are set to use the default gateway as it is.
4 Fixes for No Internet Connection After Connecting to VPN
Fix 1: Change Routing Settings The routing settings are set to use the default gateway as it is.
 Five VPN Android Apps to Bypass Country Restrictions
While few VPNs offer free service, they are not safe, and it is best to use a service with free or completely paid plans.
Five VPN Android Apps to Bypass Country Restrictions
While few VPNs offer free service, they are not safe, and it is best to use a service with free or completely paid plans.
 6 Best Browsers With Built-in VPN for Android
Why Should You Need a Browser With VPN VPN (Virtual Private Network) serves multiple purposes apart from the fact that it unlocks content locked away in your geolocation.
6 Best Browsers With Built-in VPN for Android
Why Should You Need a Browser With VPN VPN (Virtual Private Network) serves multiple purposes apart from the fact that it unlocks content locked away in your geolocation.
 Top 7 Ways to Fix Windows Key Not Working on Windows 10
Windows 10 operating system is full of keyboard shortcuts.
Top 7 Ways to Fix Windows Key Not Working on Windows 10
Windows 10 operating system is full of keyboard shortcuts.
 Top 14 Ways to Fix Windows 11 Taskbar Not Working
Microsoft completely revamped the taskbar in Windows 11.
Top 14 Ways to Fix Windows 11 Taskbar Not Working
Microsoft completely revamped the taskbar in Windows 11.
 5 Ways to Fix Ethernet Connection Not Working on Windows 11
Basic Fixes Check the Ethernet port and cable: Inspect the Ethernet plug and cable for wear and tear.
5 Ways to Fix Ethernet Connection Not Working on Windows 11
Basic Fixes Check the Ethernet port and cable: Inspect the Ethernet plug and cable for wear and tear.
The article above may contain affiliate links which help support Guiding Tech. The content remains unbiased and authentic and will never affect our editorial integrity.