Fix 1: Disconnect Work or School Account
One of the most common reasons Windows may prevent you from changing your sign-in PIN is if you’ve linked your work or school account to your PC.
Step 1: Open the Settings app from the start menu. Navigate to the Accounts tab and click on Access work or school on your right.

Step 2: Click on your email id > Disconnect.
Check if you can change your Windows Hello PIN.

Fix 2: Use the Forgot PIN Option
If disconnecting your work or school account doesn’t help, use the forgot PIN option to reset your Windows Hello PIN.
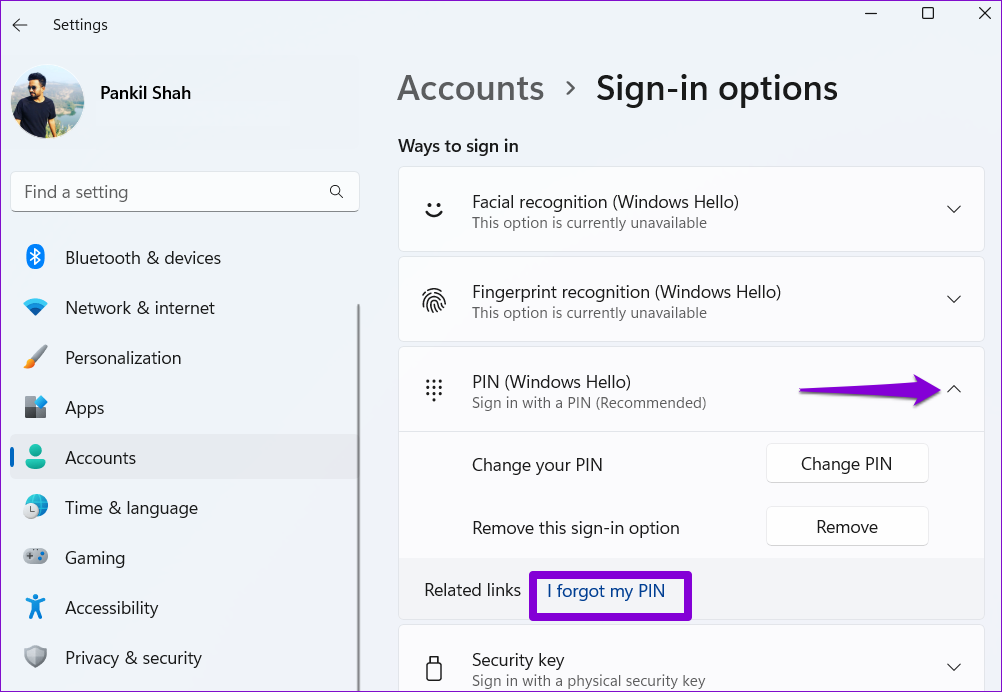
Step 1: Press the Windows key + I to launch the Settings app. In the Accounts tab, click on the Sign-in options.

Step 2: Click on the arrow next to PIN (Windows Hello) and click on I forgot my PIN.
Step 3: Click on Continue. Enter your Microsoft account password to verify your identity.
Step 4: Set up your new PIN by entering it twice and then clicking on OK.

Also Read: How to fix Windows Hello something went wrong error.
Fix 3: Delete the NGC Folder
Windows saves all your sign-in information, including your PIN, in the NGC folder. If Windows cannot access that folder, you may face issues; hence, delete the NGC folder and set up your Windows Hello PIN again to fix it.
To delete the NGC folder, you must take its ownership by following the steps below.
Step 1: Right-click on the Start icon and select Terminal (Admin) from the list.

Step 2: In the console, run the following command to take ownership of the NGC folder.
takeown /f C:\Windows\ServiceProfiles\LocalService\AppData\Local\Microsoft\NGC /r /d y

Step 3: Next, run the following command to grant administrative permission.
icacls C:\Windows\ServiceProfiles\LocalService\AppData\Local\Microsoft\NGC /grant administrators:F /t

After running the above commands, use the following steps to delete the NGC folder.
Step 4: Open File Explorer from the Start menu. Use the following path to navigate to the Microsoft folder.
C:\Windows\ServiceProfiles\LocalService\AppData\Local\Microsoft
Step 5: Select the NGC folder and click on the trash icon at the top to delete it.

After completing the above steps, your old Windows Hello PIN will be removed so you can set it up again.
Fix 4: Switch to a Local Account
If Windows still does not let you change your PIN, temporarily switch to a local account and try again.
Step 1: Press the Windows key + S to access the search menu. Type your account info and press Enter.

Step 2: Under Account settings, click on Sign in with a local account instead.

Step 3: Follow the on-screen instructions to set up your local account.
Step 4: After the setup, click on Sign out and finish.

Step 5: Sign in to your local account and change your Windows Hello PIN.

Step 6: Next, head to the Accounts tab and click on Sign-in options.

Step 7: Click on Sign in with a Microsoft account instead and follow the prompts to switch to your Microsoft account.

Fix 5: Tweak Registry Files
Modifying registry files on your PC lets you make various system-level changes. So, if the problem persists and you can’t change the sign-in PIN, edit the registry to fix issues.
Before proceeding with the changes, you must back up all the registry files on your PC.
Step 1: Press the Windows key + R to launch the Run utility. Type regedit in the Open field and press Enter.

Step 2: In the Registry Editor window, paste the following path in the address bar at the top and press Enter.
HKEY_LOCAL_MACHINE\SOFTWARE\Policies\Microsoft\Windows\System

Step 3: Right-click on the System key, go to New, and select DWORD (32-bit) Value. Name it AllowDomainPINLogon.

Step 4: Double-click the newly created DWORD and change its value data to 1. Then, click on OK.
Restart your PC after this and see if you can change your PIN.

Fix 6: Perform System Restore
System Restore is a handy feature on Windows that periodically backs up the entire system. If none of the above solutions work, you can use this tool to undo any recent changes made to your PC that may have caused this issue.
Step 1: Open the search menu, type create a restore point, and press Enter.

Step 2: Under the System Protection tab, click on System Restore.

Step 3: Click on Next.

Step 4: Select your preferred restore point and hit Next.

Step 5: Lastly, click on Finish.

Windows will restart and revert to the specified restore point. After that, you should be able to change your PIN without a problem.
Was this helpful?
Last updated on 30 April, 2024
4 Comments
Leave a Reply
Read Next
 3 Ways to Fix Unable to Sign in to Microsoft OneNote on Windows
Fix 1: Remove OneNote Credentials From Credential Manager The Credential Manager in Windows stores login details for all your apps.
3 Ways to Fix Unable to Sign in to Microsoft OneNote on Windows
Fix 1: Remove OneNote Credentials From Credential Manager The Credential Manager in Windows stores login details for all your apps.
 Top 9 Ways to Fix Unable to Change Default Programs in Windows 10
The apps offered by Microsoft are great.
Top 9 Ways to Fix Unable to Change Default Programs in Windows 10
The apps offered by Microsoft are great.
 6 Ways to Fix NVIDIA’s ‘Unable to Change Display Mode’ Error on Windows 11
Method 1: Terminate and Restart the NVIDIA Control Panel It is common for apps and their associated processes to encounter glitches and stop working properly.
6 Ways to Fix NVIDIA’s ‘Unable to Change Display Mode’ Error on Windows 11
Method 1: Terminate and Restart the NVIDIA Control Panel It is common for apps and their associated processes to encounter glitches and stop working properly.
 5 Fixes for Unable to Change Desktop Background on Windows
Fix 1: Ensure Windows Is Activated Although you can use an unactivated version of Windows 10 or 11, there are a few limitations.
5 Fixes for Unable to Change Desktop Background on Windows
Fix 1: Ensure Windows Is Activated Although you can use an unactivated version of Windows 10 or 11, there are a few limitations.
 5 Ways to Fix Unable to Remove Bluetooth Device on Windows 11
Fix 1: Try Removing Device in Airplane Mode To start, enable Airplane mode and remove the Bluetooth device again.
5 Ways to Fix Unable to Remove Bluetooth Device on Windows 11
Fix 1: Try Removing Device in Airplane Mode To start, enable Airplane mode and remove the Bluetooth device again.
 4 Ways to Fix Unable to Install Programs or Software on Windows 11
Try Basic Fixes Check program compatibility: Programs and games that worked perfectly on Windows 10 may not necessarily be compatible with Windows 11.
4 Ways to Fix Unable to Install Programs or Software on Windows 11
Try Basic Fixes Check program compatibility: Programs and games that worked perfectly on Windows 10 may not necessarily be compatible with Windows 11.
 4 Ways to Fix Unable to Rename Folders on Windows 11
Try Basic Fixes Make sure the folder is not in use: You may have difficulty renaming a folder on your PC if it is already open in another program.
4 Ways to Fix Unable to Rename Folders on Windows 11
Try Basic Fixes Make sure the folder is not in use: You may have difficulty renaming a folder on your PC if it is already open in another program.
 4 Ways to Fix Unable to Install Drivers on Windows 11
Try Basic Fixes Install Windows updates: The driver installation issue may be limited to your Windows build.
4 Ways to Fix Unable to Install Drivers on Windows 11
Try Basic Fixes Install Windows updates: The driver installation issue may be limited to your Windows build.
The article above may contain affiliate links which help support Guiding Tech. The content remains unbiased and authentic and will never affect our editorial integrity.
It was helpful! Thank you!
This was a life saver! Thank you!
The first solution solved my problem, thank you very much Pankil
Thanks,my problem got solved in first method.