When gaming, having a high-performance monitor can make a significant difference in your overall experience. One way to push your monitor’s limits and unlock its full potential is through the process of monitor overclocking. This can result in a smoother and more responsive image, which can be especially beneficial for gaming.
In this article, we will show you how to overclock a monitor using NVIDIA, AMD, and Intel GPUs. We’ll explain what monitor overclocking is, its benefits, and the precautions you should take to ensure a successful and safe overclocking experience. So let’s get to it.
What Is Monitor Overclocking
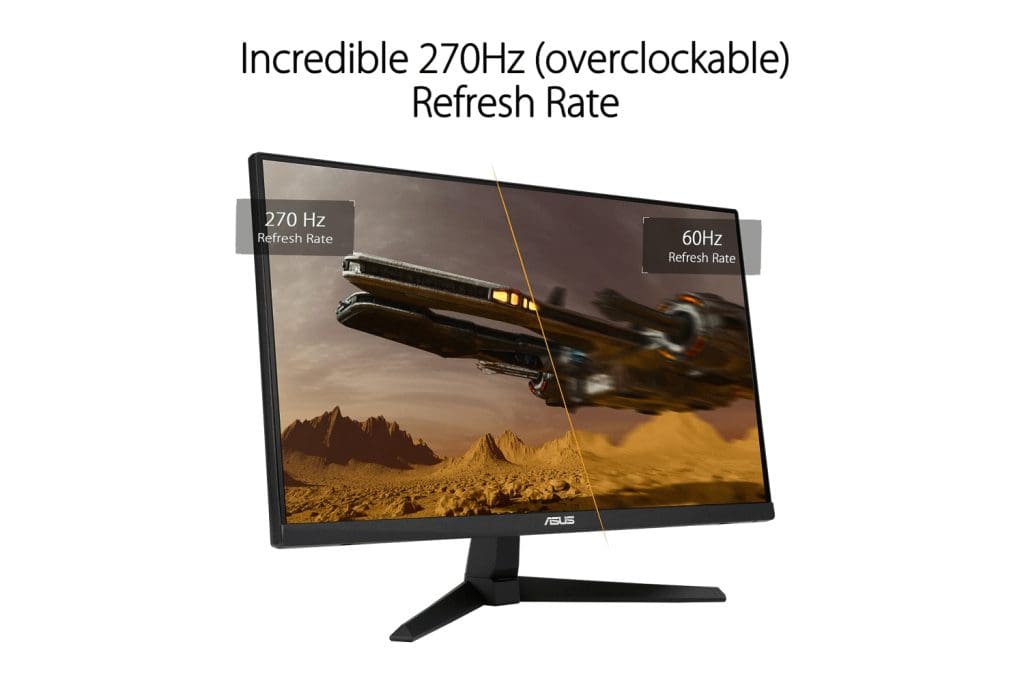
The refresh rate of a monitor is the number of times per second that the image on the screen is updated. A higher refresh rate results in a smoother and more responsive image. Overclocking a monitor involves increasing its refresh rate beyond its factory default.

Most monitors come with a standard refresh rate of 60Hz, which means they refresh the image on the screen 60 times per second. However, many modern monitors can handle higher refresh rates, such as 75Hz, 100Hz, or even 144Hz, resulting in smoother motion and reduced motion blur.
Know if Your Monitor Can Be Overclocked
No, not all monitors support overclocking. The ability to overclock a monitor depends on several factors, including the monitor’s hardware, firmware, and manufacturer specifications.
Overclocking a monitor involves pushing it beyond these factory-defined refresh rates to achieve a higher refresh rate. In some cases, OEMs will advertise whether their monitor supports overclocking or not.
Some monitors may have a small amount of overclocking headroom, allowing you to achieve a slightly higher refresh rate than the default. Others may be unable to overclock due to hardware limitations or manufacturer restrictions.
At the end of the day, it’s a hit-and-trial method to find the sweet spot for the perfect overclock setting.
Is Overclocking a Monitor Safe
Attempting to overclock a monitor that doesn’t support it or pushing it too far beyond its capabilities can lead to instability, visual artifacts, or even permanent damage to the monitor. Therefore, it’s crucial to exercise caution and understand the risks involved before attempting to overclock your monitor.
An excellent way to overclock is to increase the refresh rate in steps of 5Hz. That way, if you encounter any artifacts or instability, you can easily roll back to the stable settings without causing any permanent damage to your monitor.
With that out of the way, let’s look at how you can overclock your monitor.
How to Overclock Monitor With NVIDIA GPU
To overclock a monitor with an NVIDIA GPU, you can use the NVIDIA Control Panel. Here are the steps involved.
Step 1: Ensure you have the latest drivers for your NVIDIA GPU, along with the NVIDIA Control Panel installed. You can also automate the process with the help of NVIDIA GeForce Experience.
Alternatively, you can also update your NVIDIA drivers without GeForce Experience, if you don’t want to install the GeForce Experience tool.
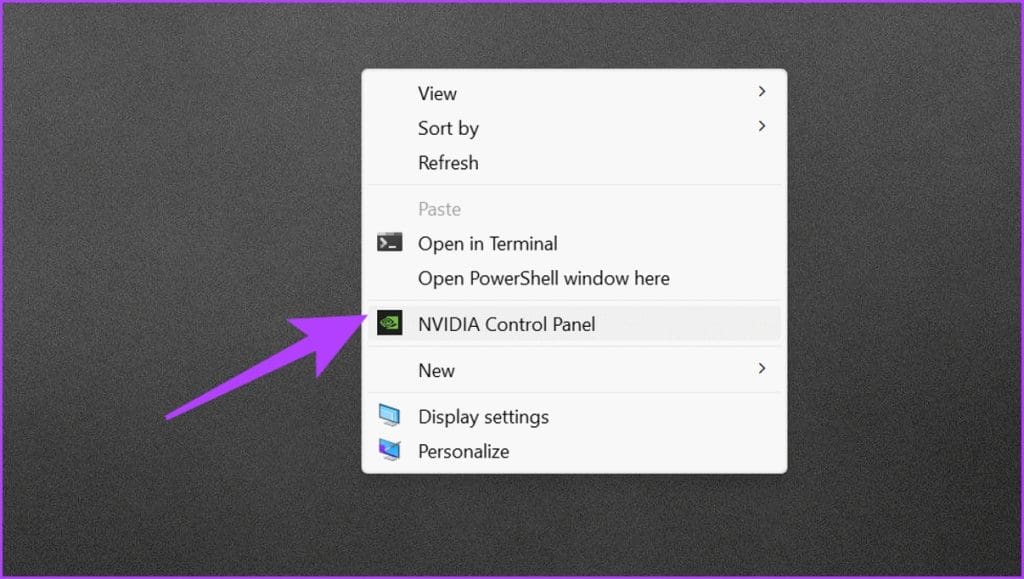
Step 2: While holding down the Shift key, right-click on an empty area on your Windows desktop. Click on NVIDIA Control Panel’ to open it.
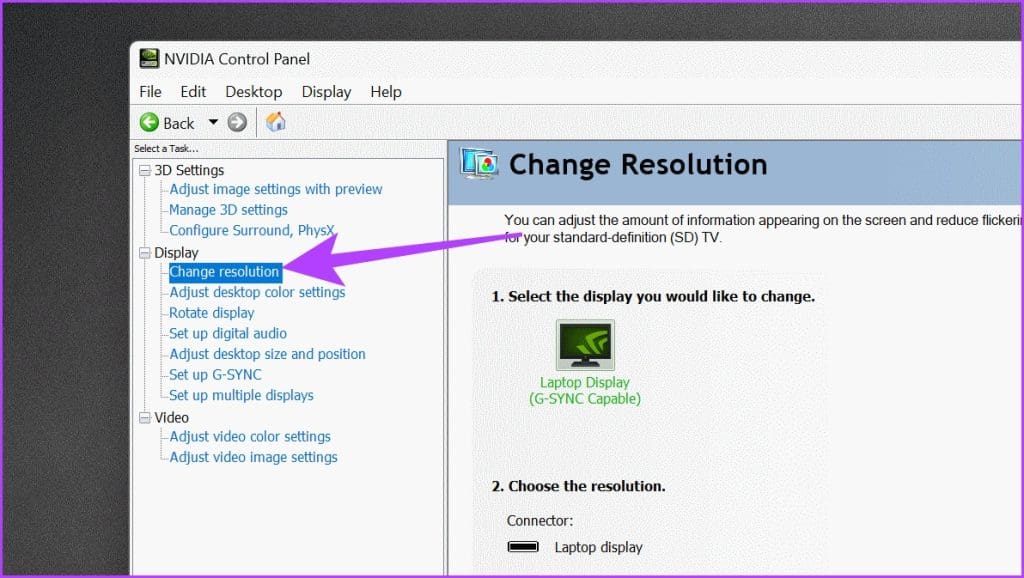
Step 3: Click on Display to expand its options. Here, select Change resolution.
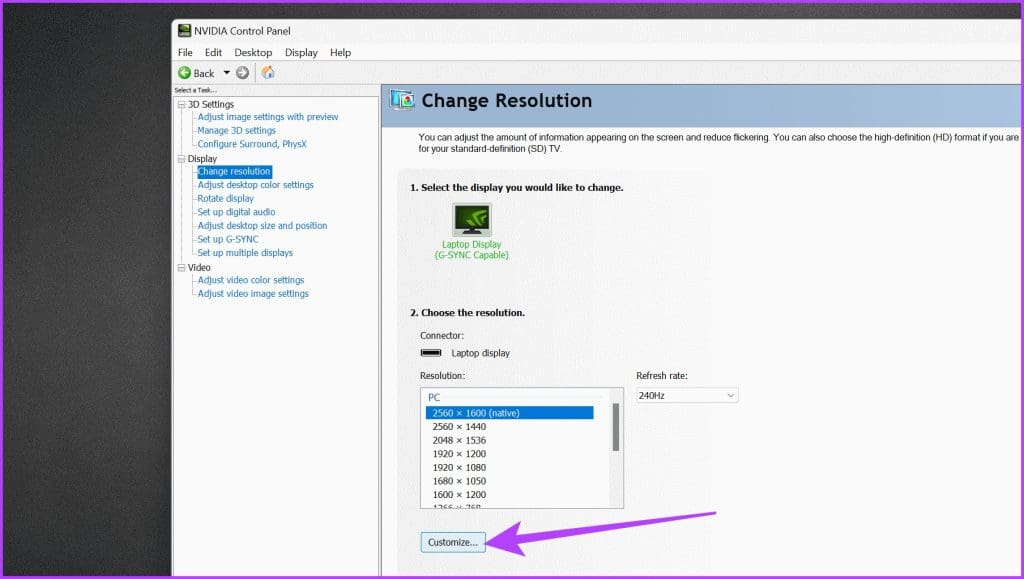
Step 4: Under the ‘Choose the resolution’ option, click on Customize.
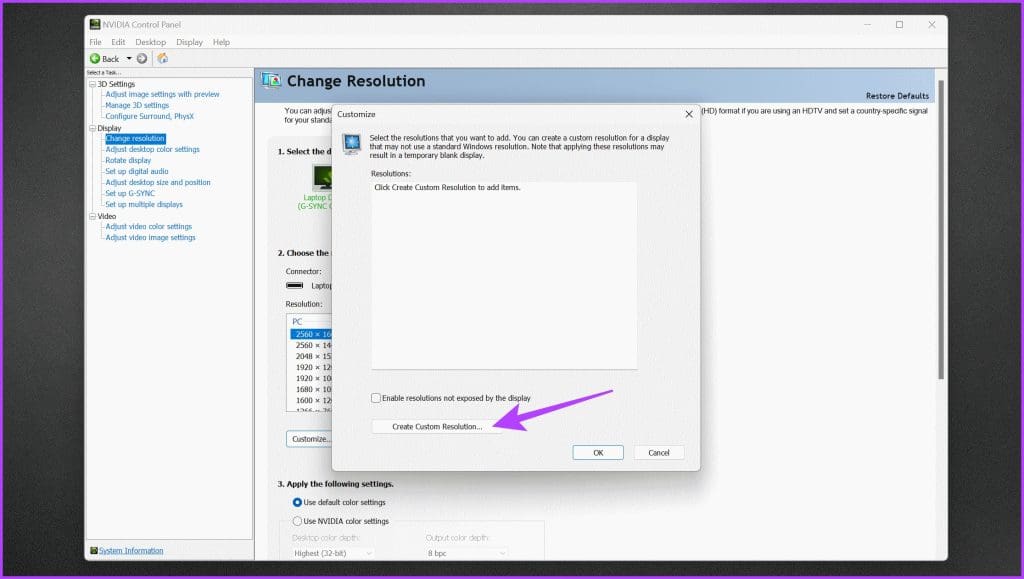
Step 5: A new customization window will pop up. Click on ‘Create Custom Resolution’.
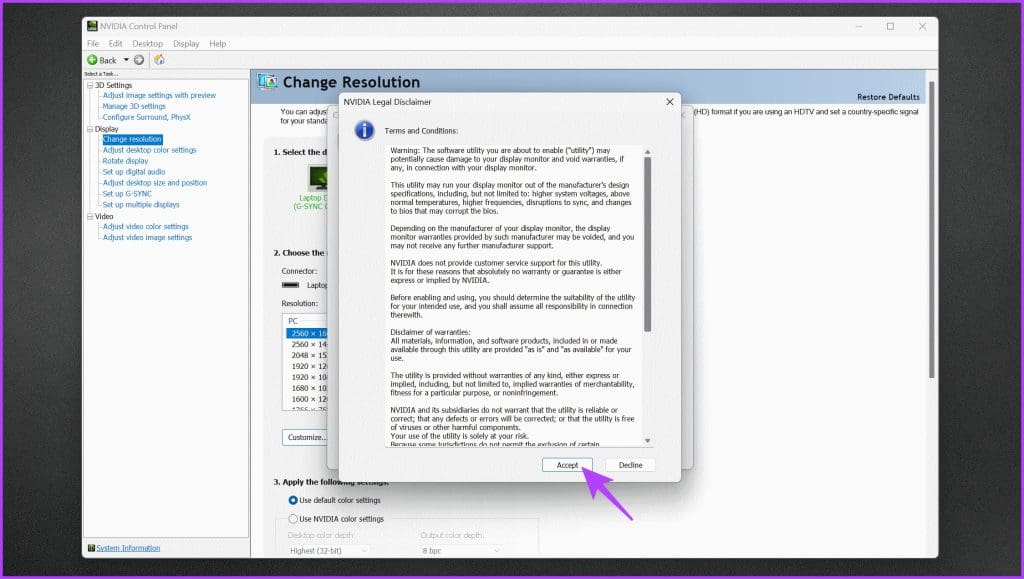
Step 6: You will be greeted with NVIDIA’s Terms and Conditions. Go through it and click on Accept to proceed.
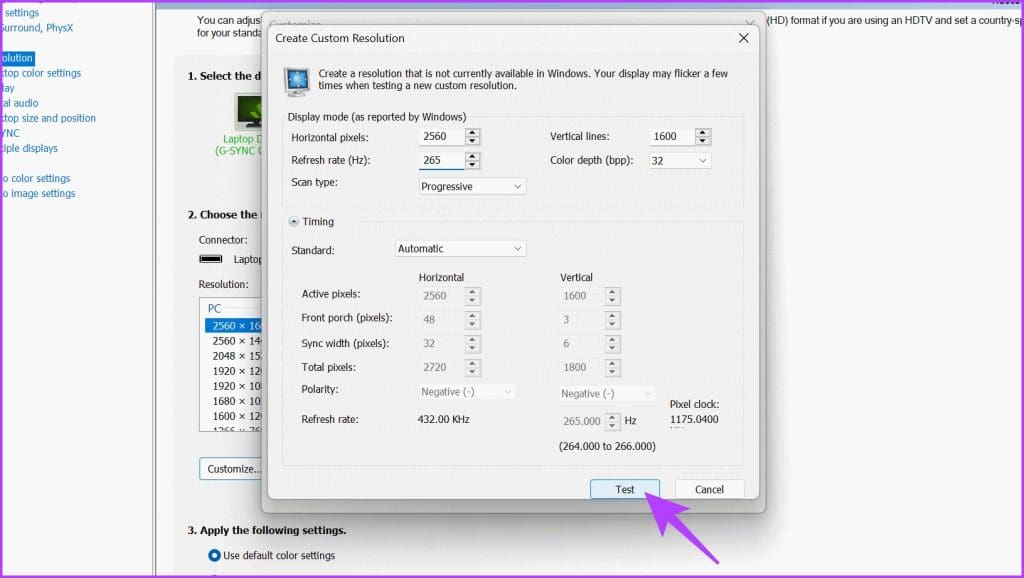
Step 7: Now, enter the Refresh Rate of your choice in Hz under the Display Mode section.
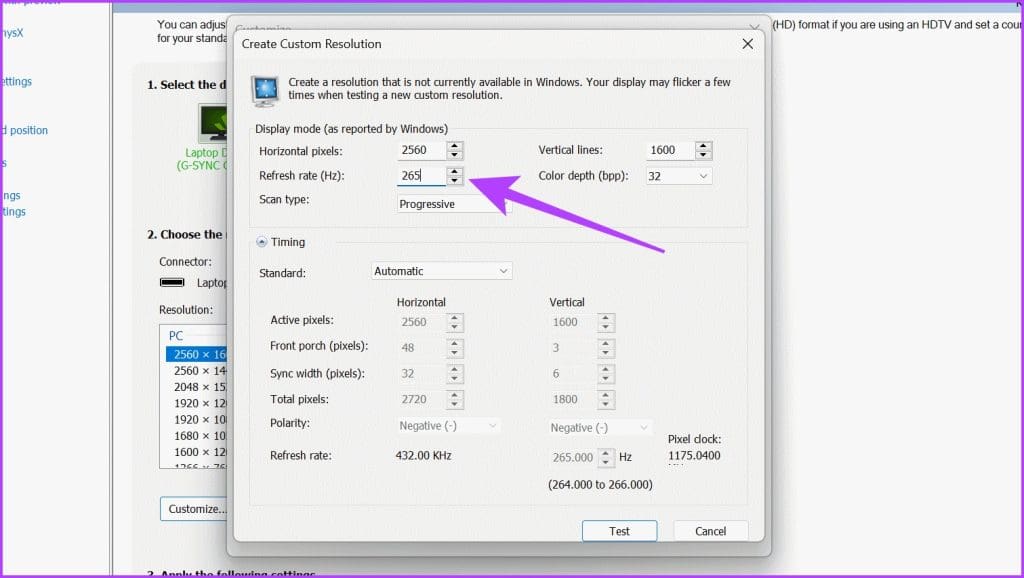
Step 8: Once done, click on Test to check if it works. If everything looks good, click Apply to save the settings.
How to Overclock Monitor Refresh Rate with AMD GPU
If you own an AMD GPU, the process of overclocking your monitor is slightly different. Thankfully, similar to NVIDIA, AMD offers AMD Software: Adrenalin Edition to overclock your display easily. Here’s how to do that.
Step 1: Download and install the AMD Software: Adrenalin Edition on your PC. Also, ensure that you have the latest AMD graphics drivers installed.
Step 2: Right-click on an empty space on your desktop and select ‘AMD Software: Adrenalin Edition’.

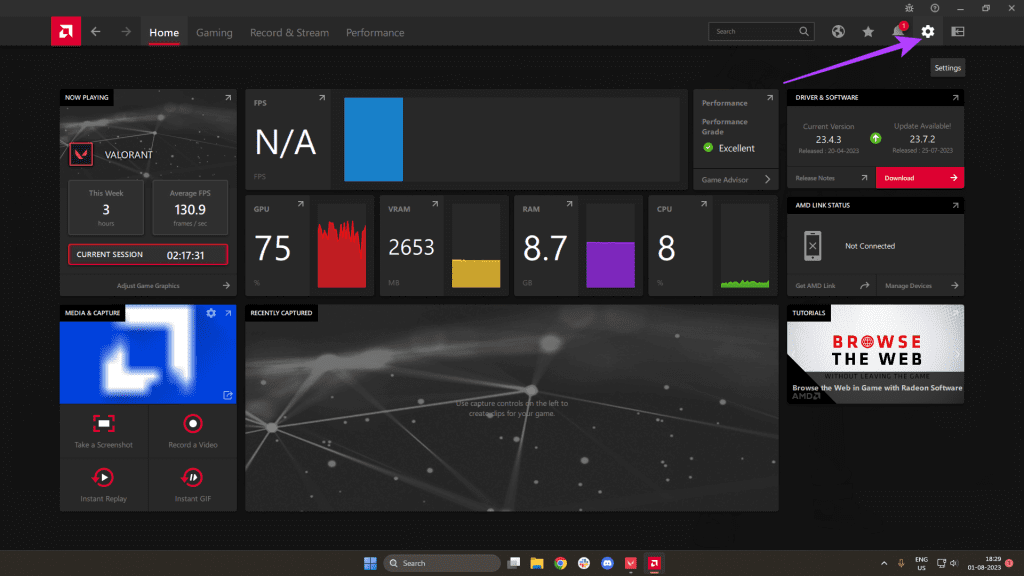
Step 3: Once the tool launches, click on the gear cog in the top-right corner to access the Settings menu.
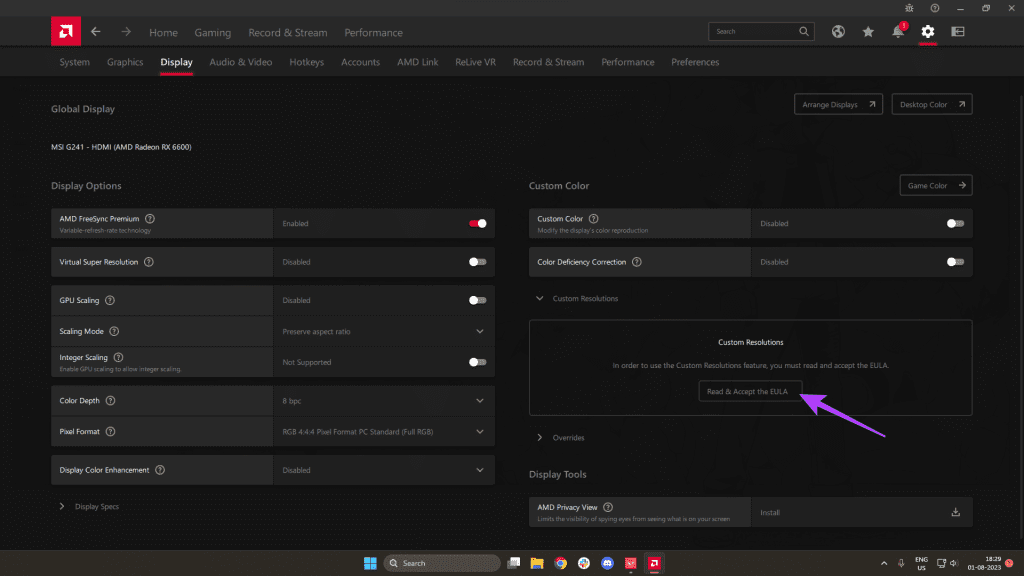
Step 4: Switch to the Display tab.
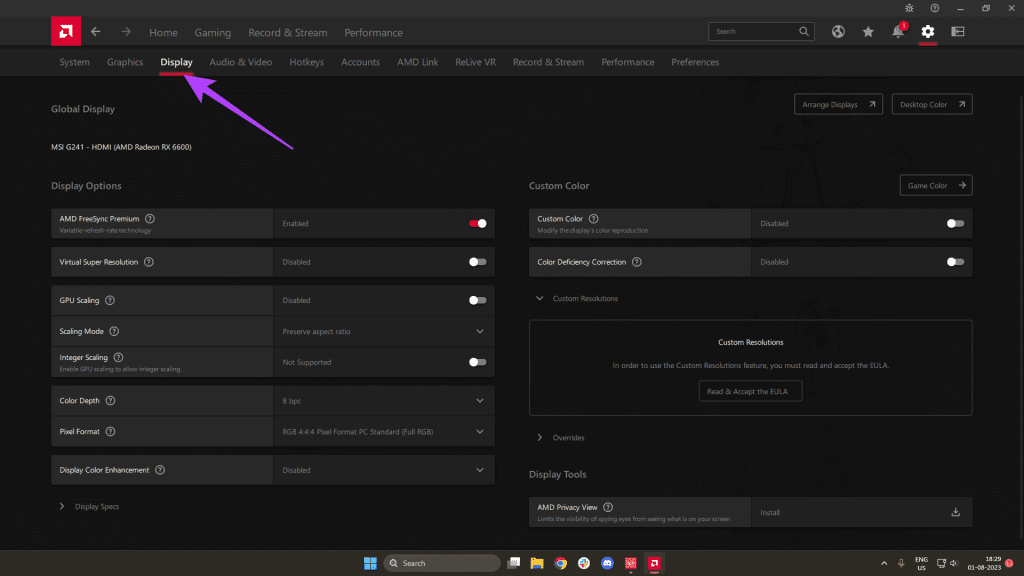
Step 5: You should now see a Custom Resolutions section. However, to define your custom resolutions, you must first accept the EULA. Click on the option for the same.
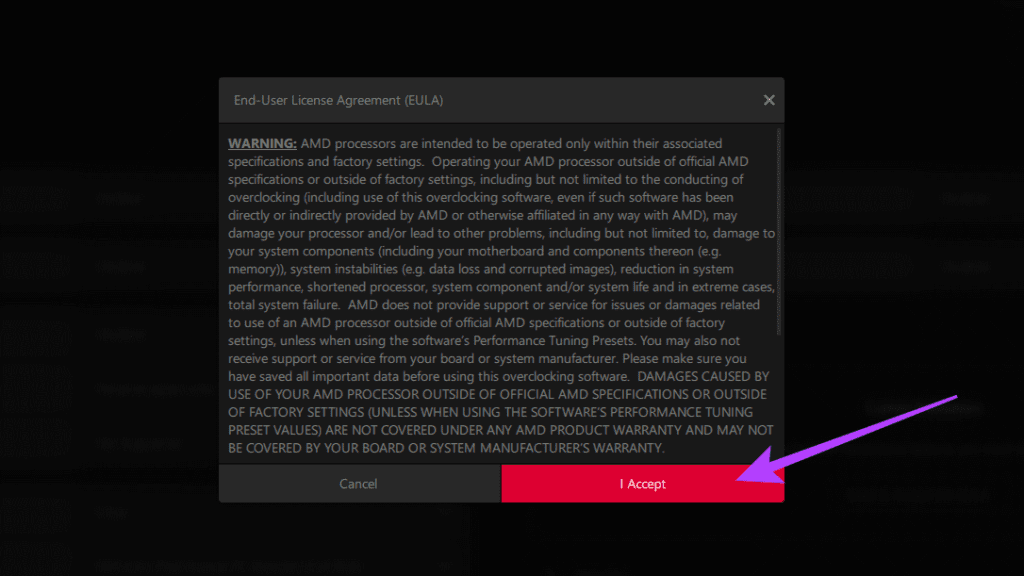
Step 6: Click on I Accept to proceed.
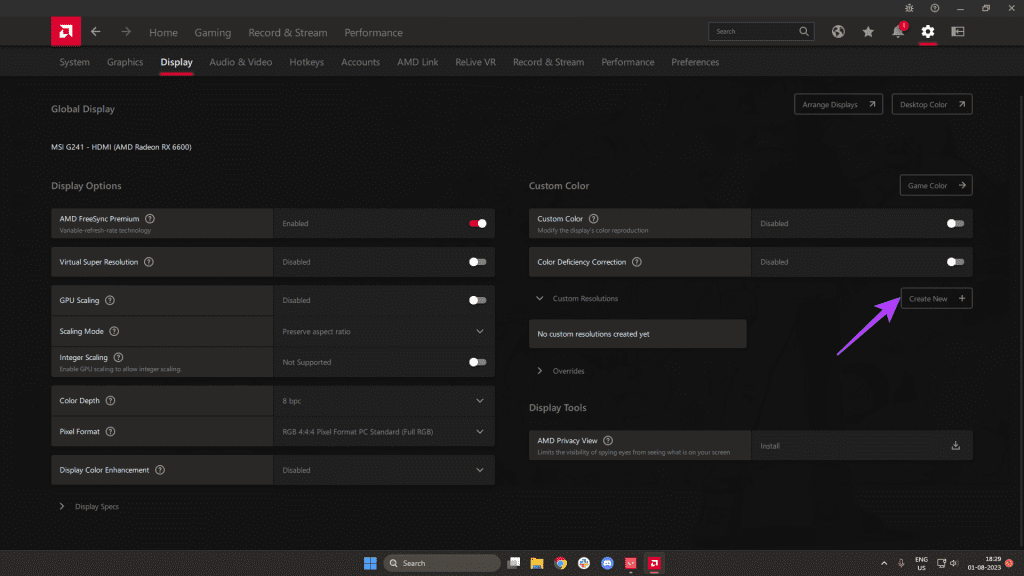
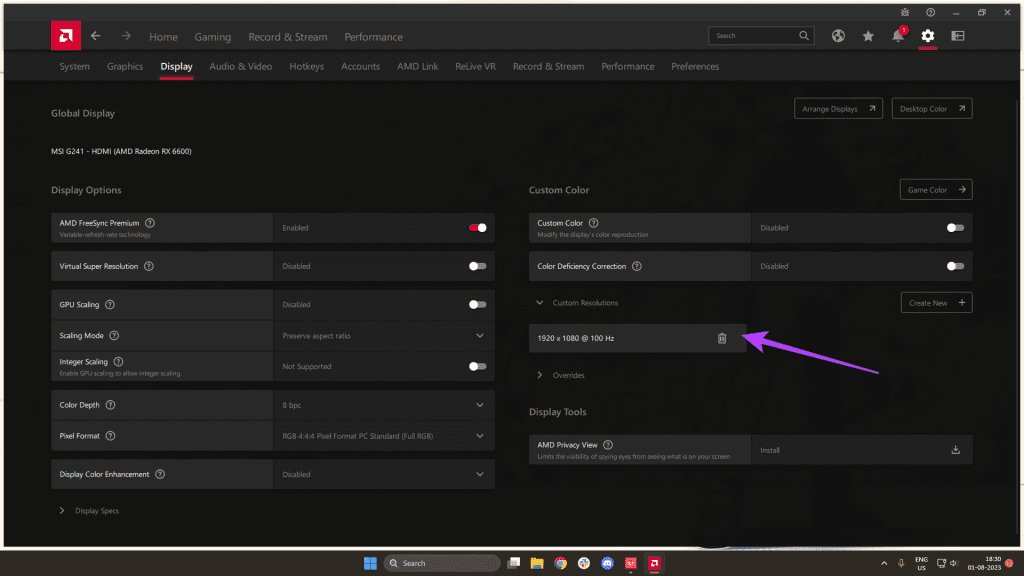
Step 7: You can now create custom resolutions with a higher refresh rate. To do that, click on Create New under the Custom Resolutions section.
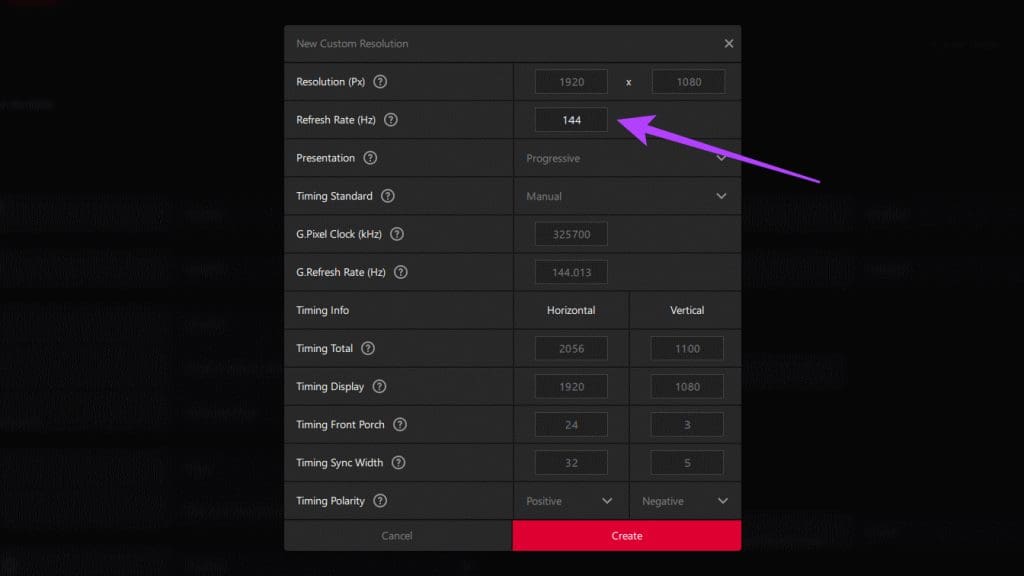
Step 8: Enter a refresh rate of your choice. Once done, click on Create.
Step 9: You will now find the custom resolution with your overclocked refresh rate as an option. Click on it to test it and verify its stability.
How to Overclock Monitor with Intel GPU Using CRU
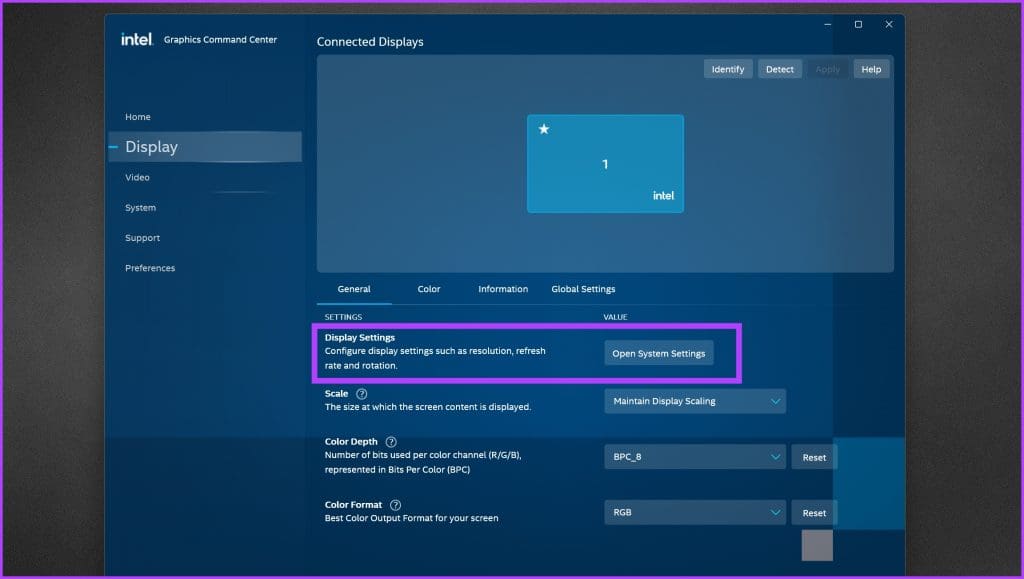
Intel offers the Intel Graphics Command Center to adjust the Display Settings. However, the newer versions don’t have their settings. It simply redirects you to the Display Settings inside Windows.
Thankfully, you can create your custom resolutions with a higher refresh rate using CRU. Custom Resolution Utility, or CRU, is a third-party software tool that allows you to create custom display resolutions and refresh rates for your monitor. It is widely used for monitor overclocking and fine-tuning display settings.
The best part is that you can use CRU not only with Intel GPUs but also with Nvidia and AMD GPUs. Here’s how to use CRU to overclock your monitor.
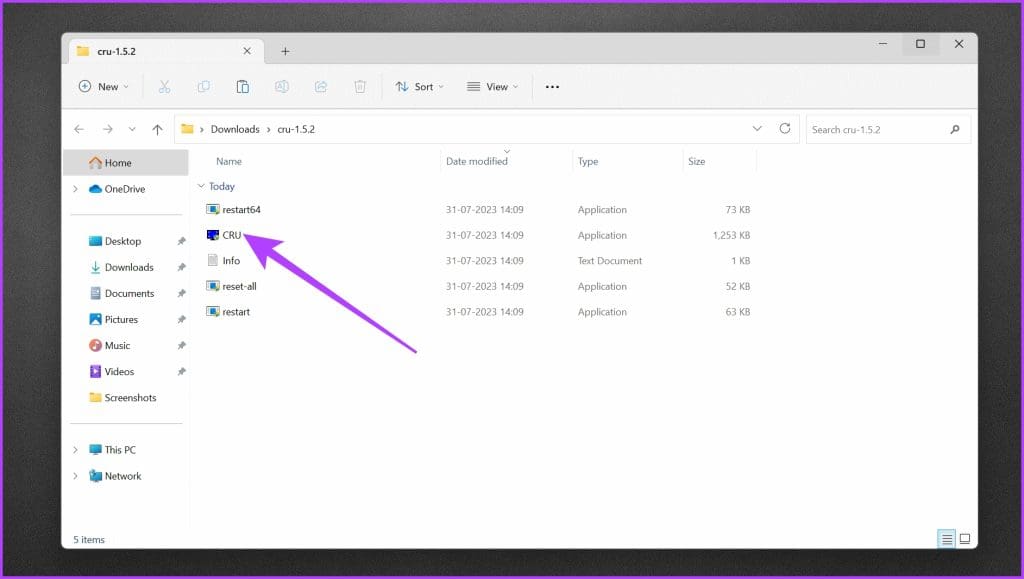
Step 1: Download the latest version of Custom Resolution Utility (CRU) from the official website or a reputable source. Once done, extract the downloaded files to a folder of your choice.
Step 2: Inside the extracted folder, double-click on CRU.exe to launch it.
Step 3: You should see various sections, including Detailed resolutions and Standard resolutions. Click on the Add button under the Detailed Resolutions section.
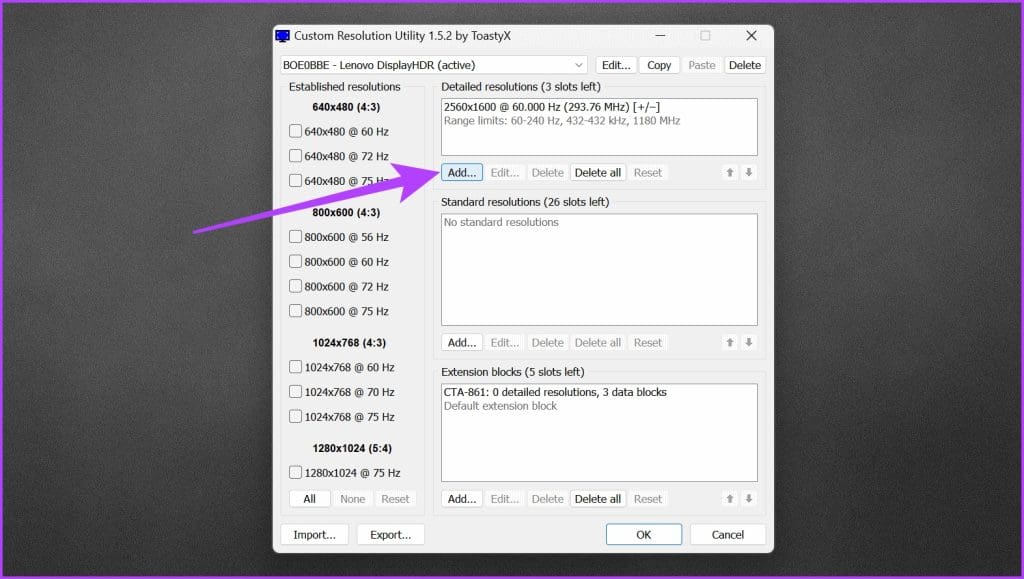
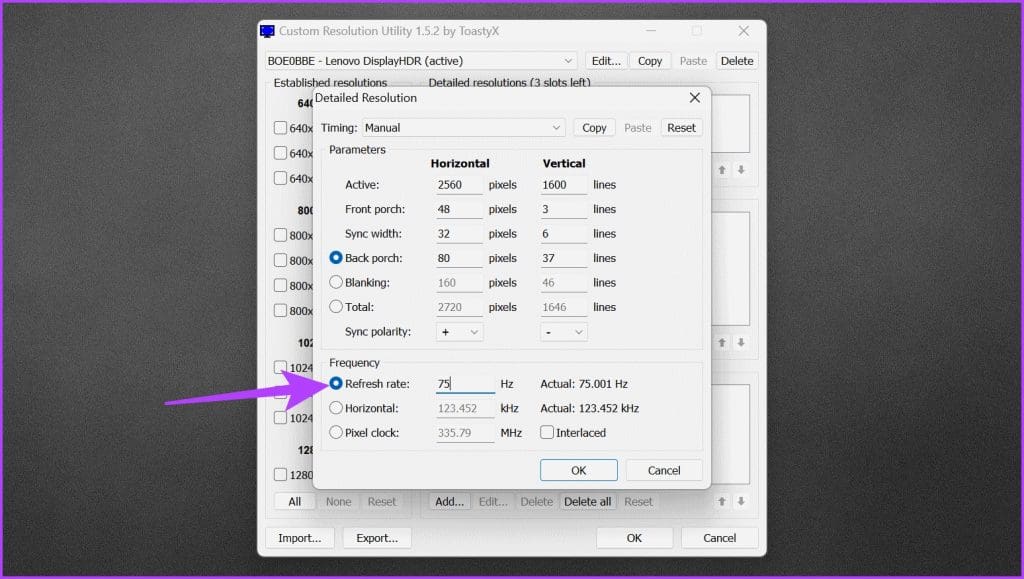
Step 4: Change the Refresh rate to a number of your choice. Once done, click on OK to add the custom resolution.
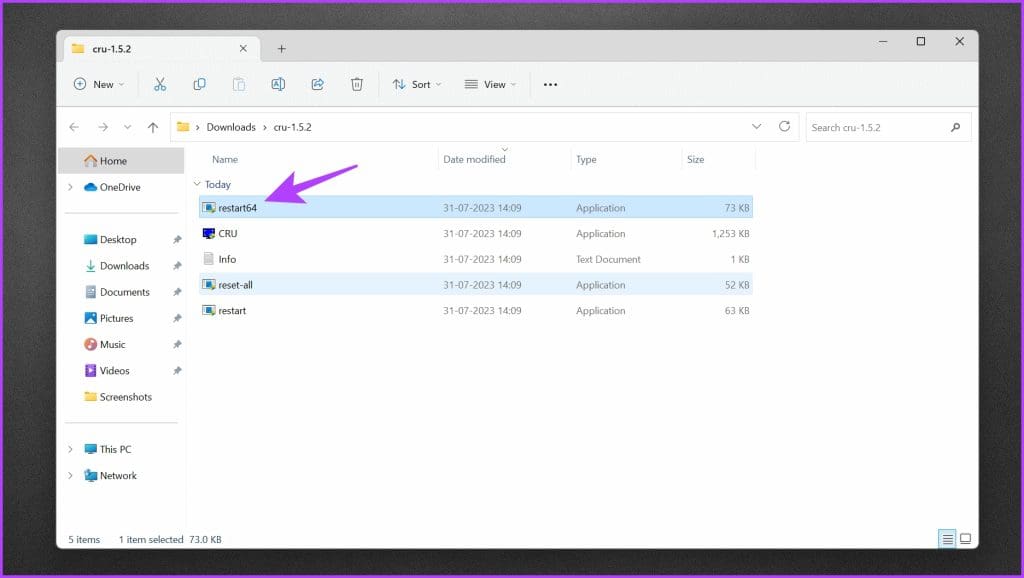
Step 5: Now, open the folder where you extracted the CRU files. Double-click on restart64 to restart your graphics driver.
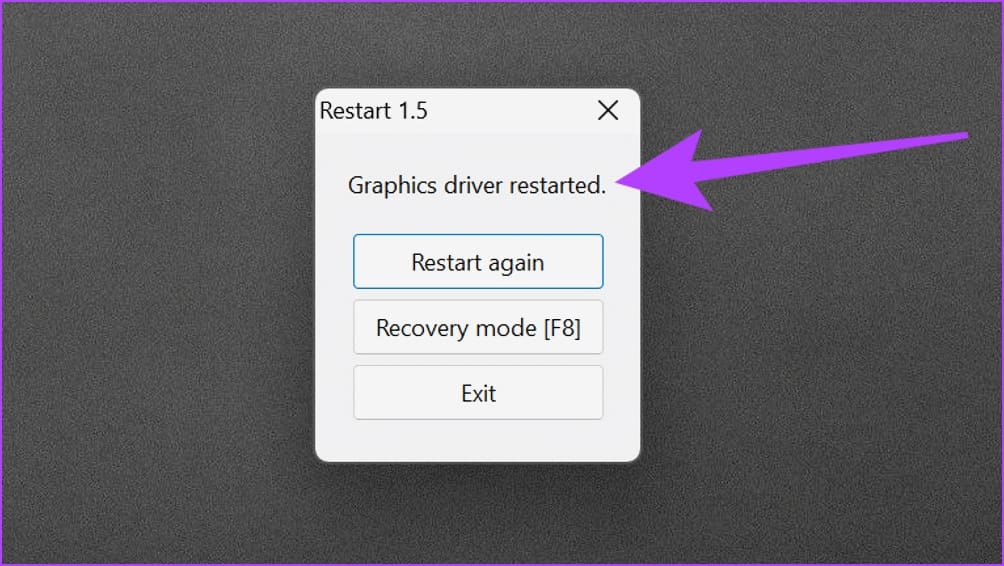
Step 6: Your screen should go black for a couple of seconds. Post that, you’ll get a pop-up on your screen stating ‘Graphics driver restarted’.
And that’s it. You can now enjoy the higher refresh rate on your monitor. In some cases, the newer refresh rate might not have been applied, which you can fix by manually selecting the correct refresh rate and resolution from Windows Settings.
How to Verify Your Overclock
Applying a custom refresh rate is only half the process. It’s crucial to verify your monitor overclock settings to ensure stability and visual quality after overclocking. To do that, there are a couple of things you can try.
- First up, use your monitor normally for various tasks like web browsing, watching videos, and working with different applications. Pay close attention to the visual quality to see if any artifacts or distortions are present.
- Additionally, keep a tab of your monitor’s temperature during extended use. If all goes well, try playing your games at the higher refresh rate that you set. If the refresh rate is unstable, you may notice screen tearing, flickering, or overshooting.
- Another way to verify your monitor overclock settings is to use benchmarking tools. One popular tool is the Blur Busters UFO Test, displaying a moving UFO image to help detect any frame skipping or refresh rate irregularities.
FAQs on Overclocking a Monitor
Leaving a monitor overclocked can potentially reduce its lifespan and void the warranty. It is generally not recommended for long-term use.
No, overclocking your monitor does not increase FPS. Overclocking your monitor can increase the refresh rate of your monitor, making the image appear smoother. However, it won’t increase the FPS in your games that your GPU can render. For that, you will have to either overclock your GPU or upgrade the hardware.
Whether overclocking a monitor is worth it depends on personal preferences and the monitor’s capabilities. If the monitor supports stable overclocking and the user values smoother motion in gaming or content creation, it can be worth it. However, the risks and limitations of overclocking a monitor should be considered.
Enjoy a Smoother Refresh Rate
By pushing your monitor’s refresh rate beyond its default settings, you can enjoy smoother gameplay, reduced motion blur, and improved responsiveness. However, it’s crucial to proceed cautiously and understand the risks involved. Remember to check your monitor’s compatibility and backup settings, and use reliable cables before attempting to overclock.
Was this helpful?
Last updated on 07 August, 2023
Read Next
 How to Use AMD FSR3 on NVIDIA RTX GPUs
If you already own an NVIDIA GPU, one of the best features available is DLSS technology.
How to Use AMD FSR3 on NVIDIA RTX GPUs
If you already own an NVIDIA GPU, one of the best features available is DLSS technology.
 How to Take Screenshots of One Monitor on Windows 11 With a Multi-Monitor Setup
Method 1: PikPick Some screenshot tools allow you to configure their settings so that they will only capture screenshots of one monitor.
How to Take Screenshots of One Monitor on Windows 11 With a Multi-Monitor Setup
Method 1: PikPick Some screenshot tools allow you to configure their settings so that they will only capture screenshots of one monitor.
 7 Fixes for AMD Adrenalin Software Not Working or Opening
Fix 1: Run AMD Radeon Software With Admin Privileges If your AMD Adrenalin software is not working or opening, one of the initial fixes to perform is to run it
7 Fixes for AMD Adrenalin Software Not Working or Opening
Fix 1: Run AMD Radeon Software With Admin Privileges If your AMD Adrenalin software is not working or opening, one of the initial fixes to perform is to run it
 5 Ways to Fix Intel Graphics Control Panel Not Showing After Windows 11 Update
Common Fixes Check the Windows 11 context menu: Right-click the blank space on your desktop and select Show more options.
5 Ways to Fix Intel Graphics Control Panel Not Showing After Windows 11 Update
Common Fixes Check the Windows 11 context menu: Right-click the blank space on your desktop and select Show more options.
 5 Ways to Fix Intel Wi-Fi 6 AX201 Adapter Driver or Hardware Issues
Fix 1: Update or Reinstall Driver The software drivers for the Intel Wi-Fi 6 AX201 on your Windows PC may be outdated and are due for an update.
5 Ways to Fix Intel Wi-Fi 6 AX201 Adapter Driver or Hardware Issues
Fix 1: Update or Reinstall Driver The software drivers for the Intel Wi-Fi 6 AX201 on your Windows PC may be outdated and are due for an update.
 How to Download and Install NVIDIA Drivers Without GeForce Experience
Prerequisite 1: Check Which NVIDIA GPU You Have First, you need to check which NVIDIA graphics card you have installed on your system.
How to Download and Install NVIDIA Drivers Without GeForce Experience
Prerequisite 1: Check Which NVIDIA GPU You Have First, you need to check which NVIDIA graphics card you have installed on your system.
 6 Ways to Fix NVIDIA’s ‘Unable to Change Display Mode’ Error on Windows 11
Method 1: Terminate and Restart the NVIDIA Control Panel It is common for apps and their associated processes to encounter glitches and stop working properly.
6 Ways to Fix NVIDIA’s ‘Unable to Change Display Mode’ Error on Windows 11
Method 1: Terminate and Restart the NVIDIA Control Panel It is common for apps and their associated processes to encounter glitches and stop working properly.
 Top 9 Ways to Fix NVIDIA GeForce Overlay Not Working on Windows
NVIDIA GeForce Experience is a utility that helps you keep the GPU drivers up to date.
Top 9 Ways to Fix NVIDIA GeForce Overlay Not Working on Windows
NVIDIA GeForce Experience is a utility that helps you keep the GPU drivers up to date.
The article above may contain affiliate links which help support Guiding Tech. The content remains unbiased and authentic and will never affect our editorial integrity.