Fix 1: Verify Site Settings
To start, verify the content settings in Chrome and ensure websites are allowed to load images on your computer. Here’s how to do it.
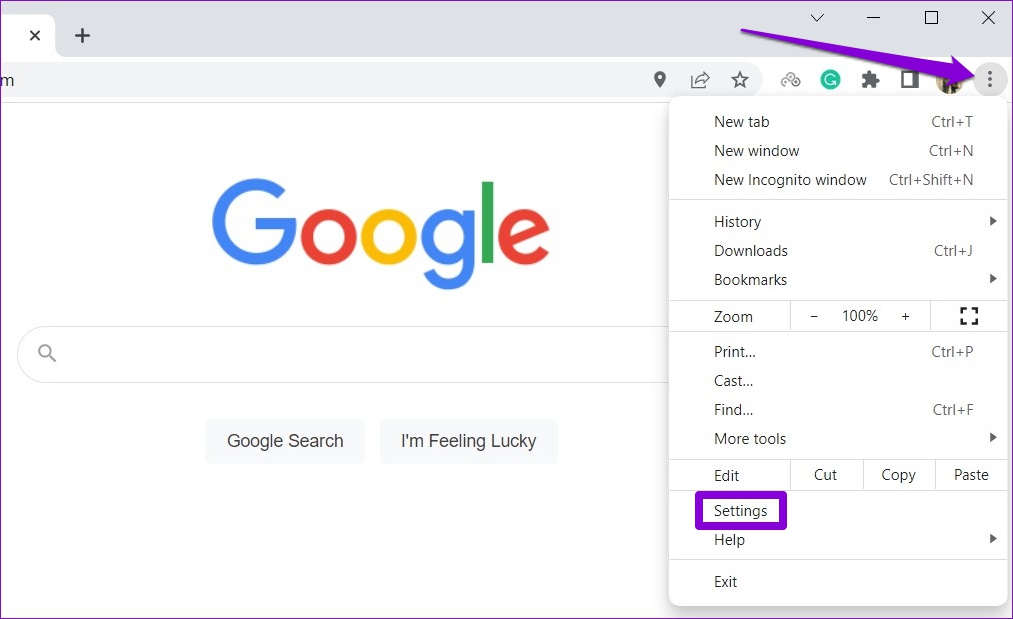
Step 1: In Chrome, click the three-dot menu icon at the top right corner and select Settings.
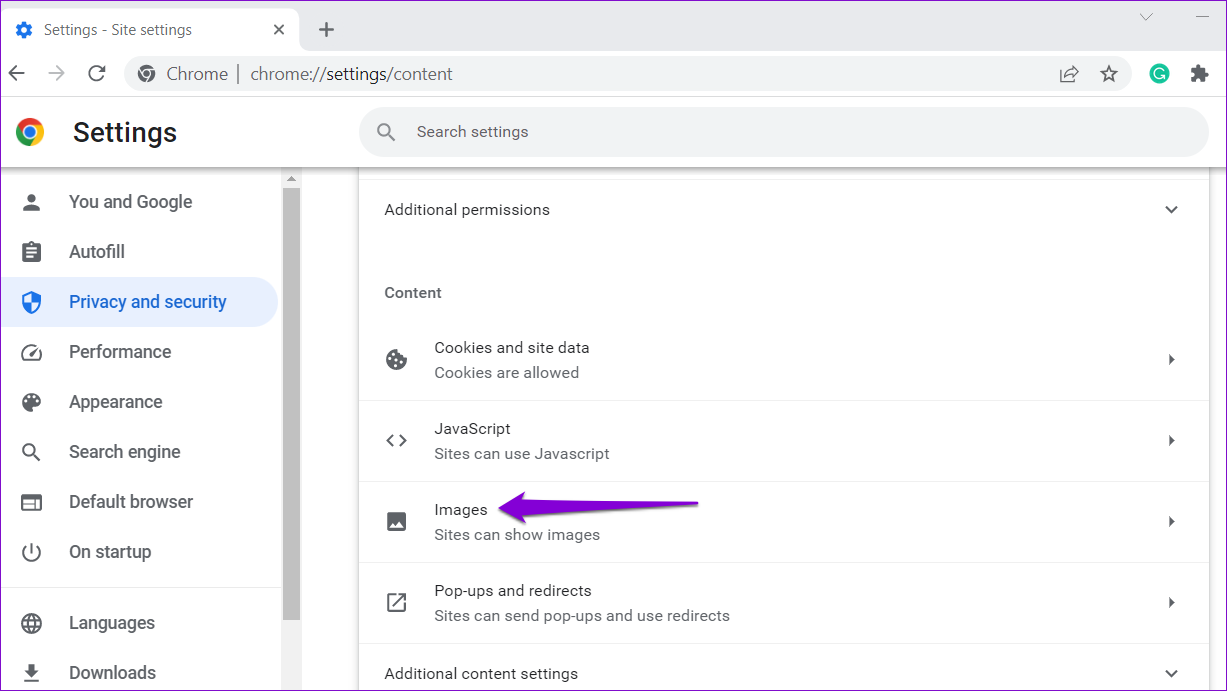
Step 2: Use the left pane to switch to the Privacy and security tab and go to Site Settings.

Step 3: Scroll down to the Content section and click on Images.
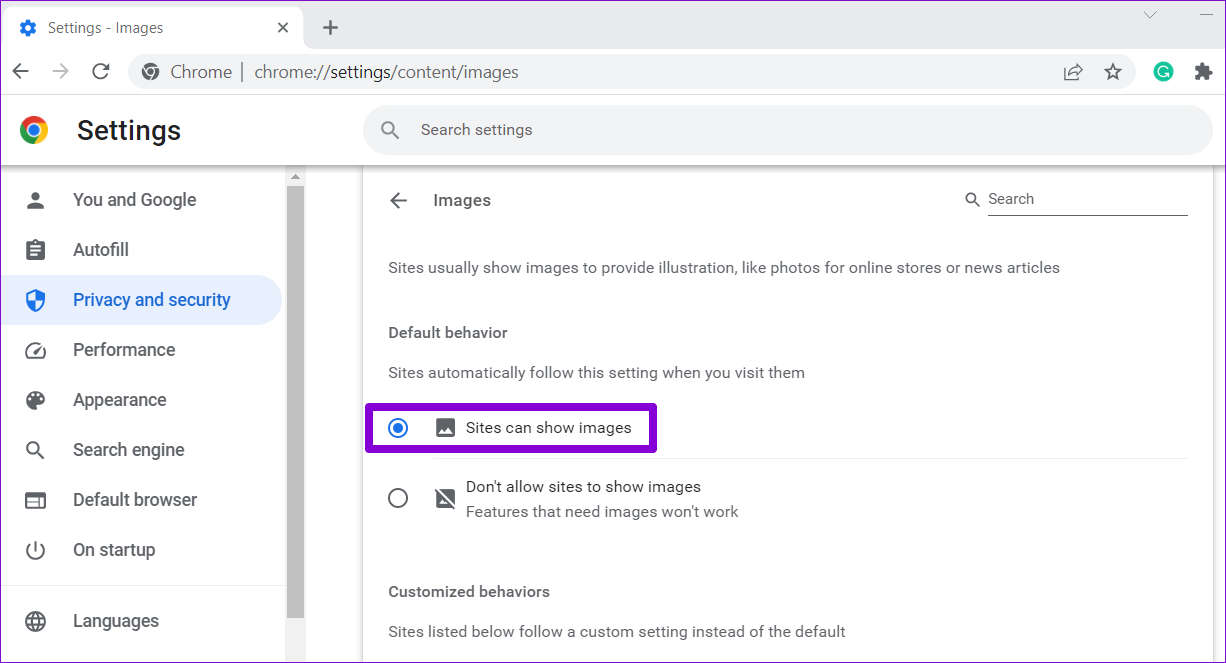
Step 4: Under Default behavior, select the Sites can show images option.
Fix 2: Turn on JavaScript
JavaScript is a programming language that web developers use to add various features and visual elements to their websites. If you’ve previously blocked websites from using JavaScript in Chrome, they might fail to load images. Here’s how to fix that.
Step 1: In Google Chrome, type chrome://settings/content/javascript in the URL bar at the top and press Enter.
Step 2: Under Default behavior, select the Sites can use Javascript option.

Fix 3: Disable Hardware Acceleration
While enabling hardware acceleration in Chrome enhances your browsing experience visually, there are times when this feature fails to function properly. In such cases, Chrome might have trouble loading images or playing videos. To avoid this, try disabling hardware acceleration in Chrome.
Step 1: In Chrome, click the three-dot menu icon at the top right corner and select Settings from the list.
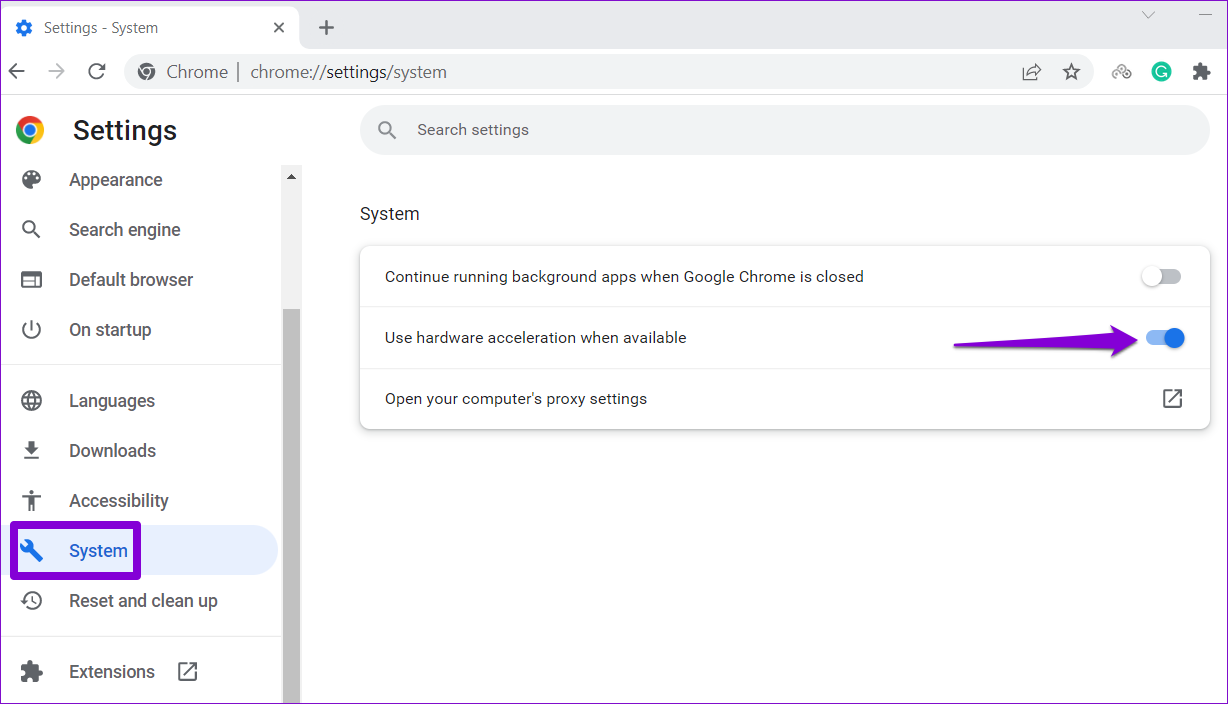
Step 2: In the System tab, turn off the toggle for Use hardware acceleration when available.
Fix 4: Rename Chrome’s Data Folder
Corrupt or outdated app files in Chrome’s data folder can also lead to such anomalies. To fix this, rename Chrome’s data folder on your PC, forcing the browser to recreate it.
Step 1: Press the Windows key + R to launch the Run command. Type %localappdata% in the Open field and press Enter.
Step 2: In the File Explorer window, navigate to Google > Chrome > User Data folder. Then, rename that Default folder to something else.

Relaunch Chrome after this and check if the issue is still there.
Fix 5: Clear Browsing Data
Just like any other browser, Chrome stores cache data to reduce loading times and improve your experience. However, if this data gets corrupted, Chrome might fail to load web pages as usual. You can try clearing Chrome’s existing browsing data to see if that helps.
Press Ctrl + Shift + Del to open the Clear browsing data panel in Chrome. Use the Time range drop-down menu to select All time. Check the boxes for Cookies and other site data and Cached images and files. Then, click on Clear data.

Fix 6: Change DNS Servers
Issues with your current DNS server can also prevent Chrome from loading images on your PC. You can try switching to a more reliable DNS server, such as Google Public DNS, to see if that helps.
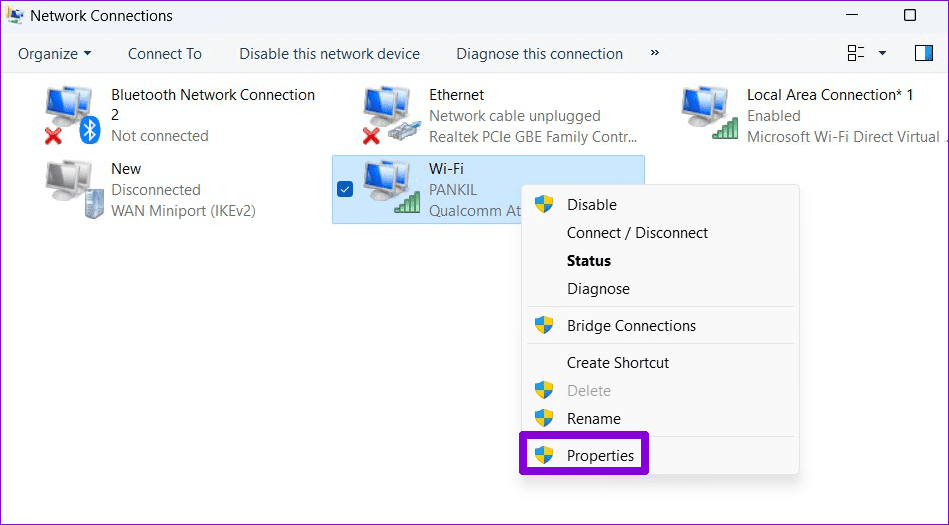
Step 1: Press the Windows key + R to launch the Run dialog box. Type ncpa.cpl in the Open field and press Enter.
Step 2: In the Network Connections window, right-click on your internet connection and select Properties.
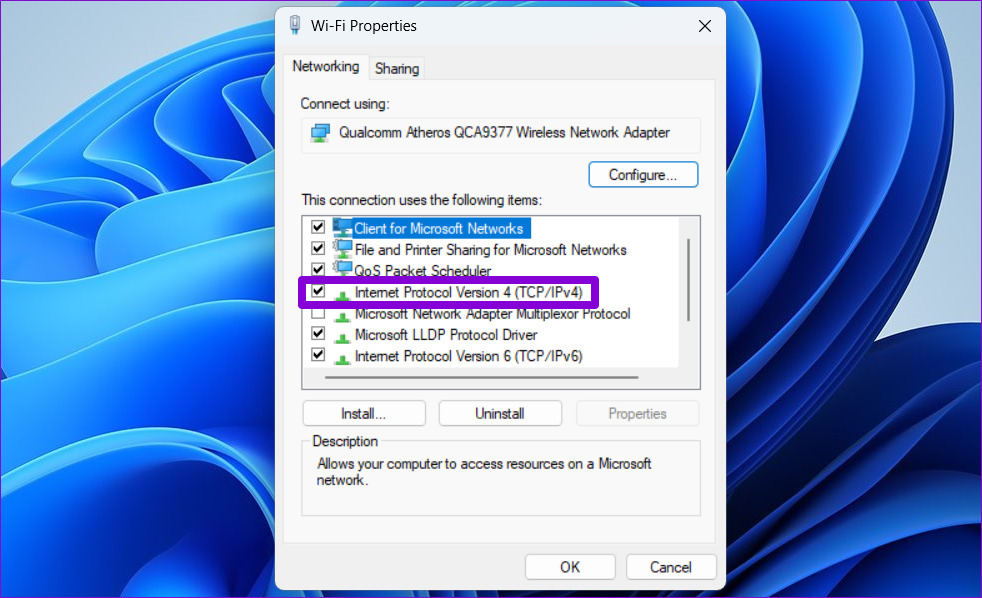
Step 3: Double-click the Internet Protocol Version 4 (TCP/IPv4) option.
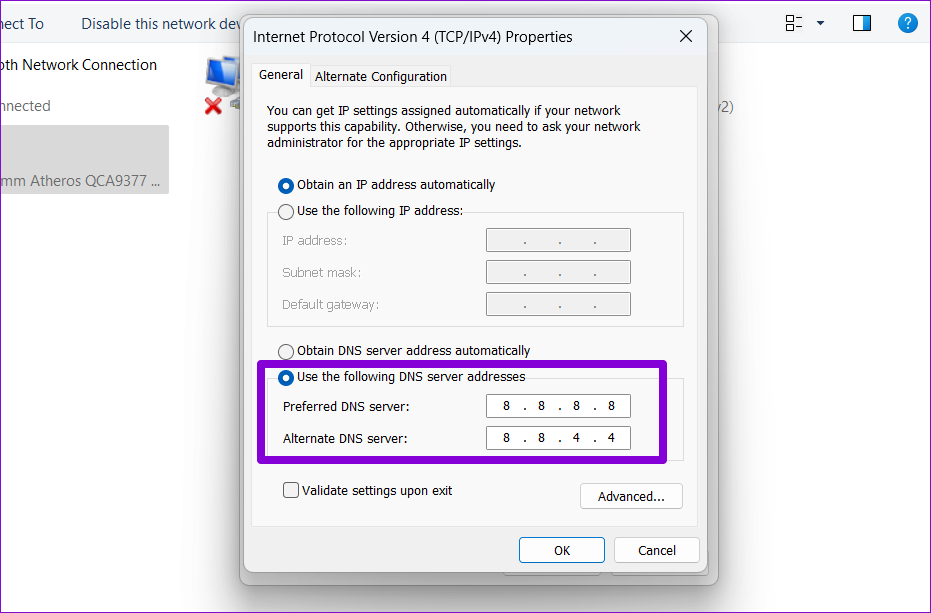
Step 4: Select Use the following DNS server addresses. In the text fields next to the Preferred DNS Server and the Alternate DNS Server, enter 8.8.8.8 and 8.8.4.4, respectively. Then, click OK.
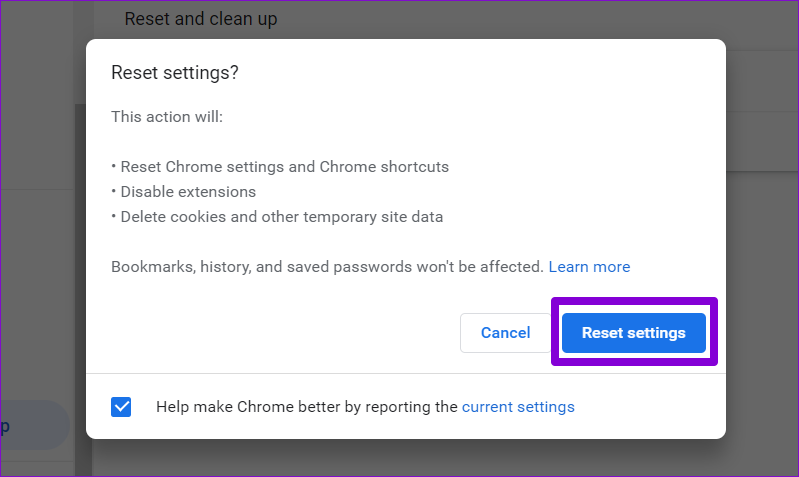
Fix 7: Reset Google Chrome
Lastly, if all else fails, you have no option but to reset Google Chrome. To do so, use these steps:
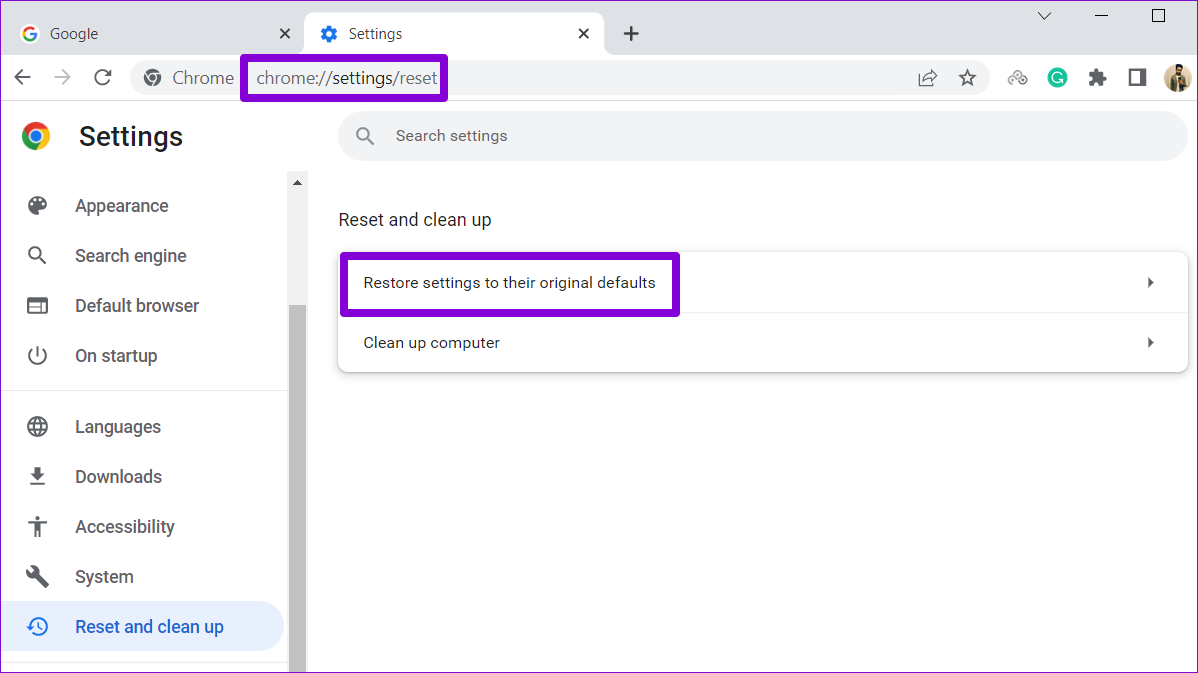
Step 1: In Chrome, type chrome://settings/reset in the address bar and press Enter. Then, click on Restore settings to their original defaults.
Step 2: Click on Reset settings when prompted.
Was this helpful?
Last updated on 01 May, 2024
1 Comment
Leave a Reply
Read Next
 4 Ways to Fix Images Not Loading in Microsoft Edge
Fix 1: Check Site Permissions The first thing you should do is review site permissions in Microsoft Edge to ensure websites are allowed to load images.
4 Ways to Fix Images Not Loading in Microsoft Edge
Fix 1: Check Site Permissions The first thing you should do is review site permissions in Microsoft Edge to ensure websites are allowed to load images.
 4 Ways to Fix Safari Not Loading Images on iPhone
https://youtu.be/Fj1KYUokzkI Fix 1: Disable Content Blocker Extensions If you use any content blocker extensions to avoid ads or pop-ups while browsing, they may interfere with Safari and prevent them from
4 Ways to Fix Safari Not Loading Images on iPhone
https://youtu.be/Fj1KYUokzkI Fix 1: Disable Content Blocker Extensions If you use any content blocker extensions to avoid ads or pop-ups while browsing, they may interfere with Safari and prevent them from
 9 Best Ways to Fix Google Chrome Not Loading Pages in Windows 10
Google Chrome is one of the most used browsers in the world, no doubt.
9 Best Ways to Fix Google Chrome Not Loading Pages in Windows 10
Google Chrome is one of the most used browsers in the world, no doubt.
 6 Ways to Fix Google Slides Not Loading in Chrome
Fix 1: Free Up Google Drive Storage Space Google Slides may fail to open a file and display errors like "Something went wrong" or "Sorry, the file you have requested
6 Ways to Fix Google Slides Not Loading in Chrome
Fix 1: Free Up Google Drive Storage Space Google Slides may fail to open a file and display errors like "Something went wrong" or "Sorry, the file you have requested
 3 Ways to Fix Facebook Games Not Loading in Google Chrome
Try Basic Fixes Close and reopen the game: Sometimes, temporary glitches can cause your Facebook games to become unresponsive and stop working.
3 Ways to Fix Facebook Games Not Loading in Google Chrome
Try Basic Fixes Close and reopen the game: Sometimes, temporary glitches can cause your Facebook games to become unresponsive and stop working.
 How to Fix Apple Mail Not Loading Images on Mac
Basic Fixes Check internet connection: Ensure that you have good connection speeds on your Wi-Fi network in order to load images.
How to Fix Apple Mail Not Loading Images on Mac
Basic Fixes Check internet connection: Ensure that you have good connection speeds on your Wi-Fi network in order to load images.
 3 Fixes for Images Not Loading in Mail App for iPhone
Try Basic Fixes Turn off VPN: Since VPNs route your internet traffic through different servers, they can sometimes lead to delays or issues loading content, such as images in emails.
3 Fixes for Images Not Loading in Mail App for iPhone
Try Basic Fixes Turn off VPN: Since VPNs route your internet traffic through different servers, they can sometimes lead to delays or issues loading content, such as images in emails.
 How to Fix Facebook Not Loading in Google Chrome
Basic Fixes Try using Incognito Mode: This is a quick hack that enables faster loading of websites that don't launch in the standard browsing window.
How to Fix Facebook Not Loading in Google Chrome
Basic Fixes Try using Incognito Mode: This is a quick hack that enables faster loading of websites that don't launch in the standard browsing window.
The article above may contain affiliate links which help support Guiding Tech. The content remains unbiased and authentic and will never affect our editorial integrity.

I was getting blocks missing within images, and/or corrupted parts of images within Brave
My fix was to navigate to “Settings->System”, disable “Use graphics acceleration when available”, and click on the “Relaunch” button