Fix 1: Free Up Google Drive Storage Space
Google Slides may fail to open a file and display errors like “Something went wrong” or “Sorry, the file you have requested does not exist” if you don’t have enough free storage space on your Google Drive.
Open the Google Drive website in Chrome, sign into your account, and check the storage status in the left pane.
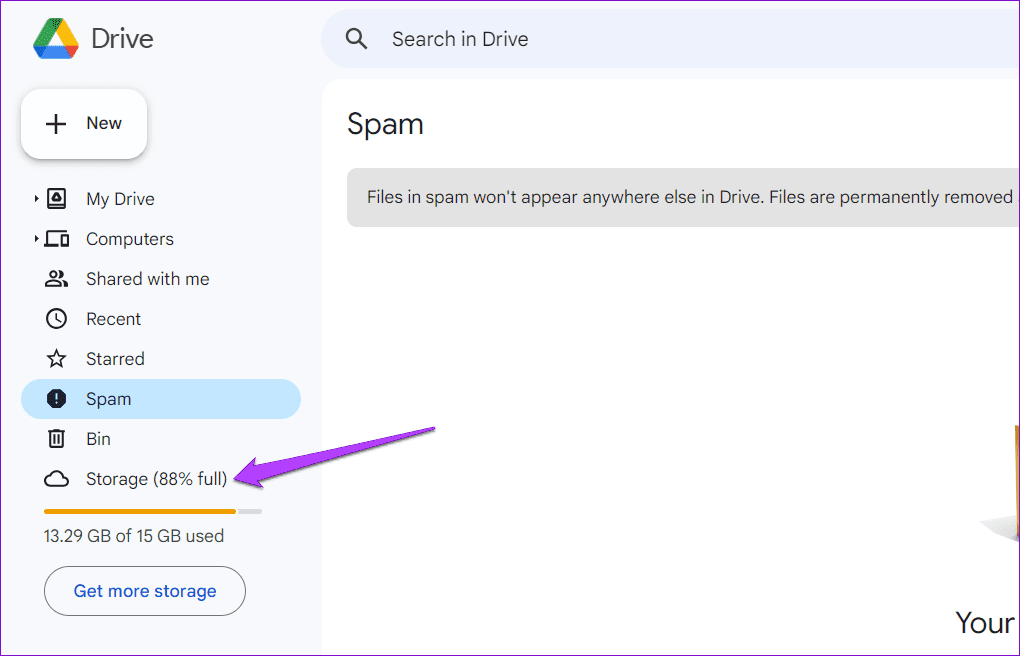
If your Google Drive storage is approaching its limit, consider deleting large files to free up space quickly. Following this, Google Slides should open your files in Chrome.
Fix 2: Disable and Re-Enable the Offline Mode
The offline mode in Google Slides allows you to work on your presentations even when you don’t have an active internet connection. However, this feature sometimes fails to work as expected, preventing Google Slides from loading your files in Chrome.
You can try turning the offline mode off and back on to see if that gets things moving again.
Step 1: Open Google Slides in Chrome and click the menu icon (three horizontal lines) at the top-left corner.
Note: If Google Slides does not load, you can also toggle the offline mode via Google Docs or Sheets.
Step 2: Select Settings from the left pane.
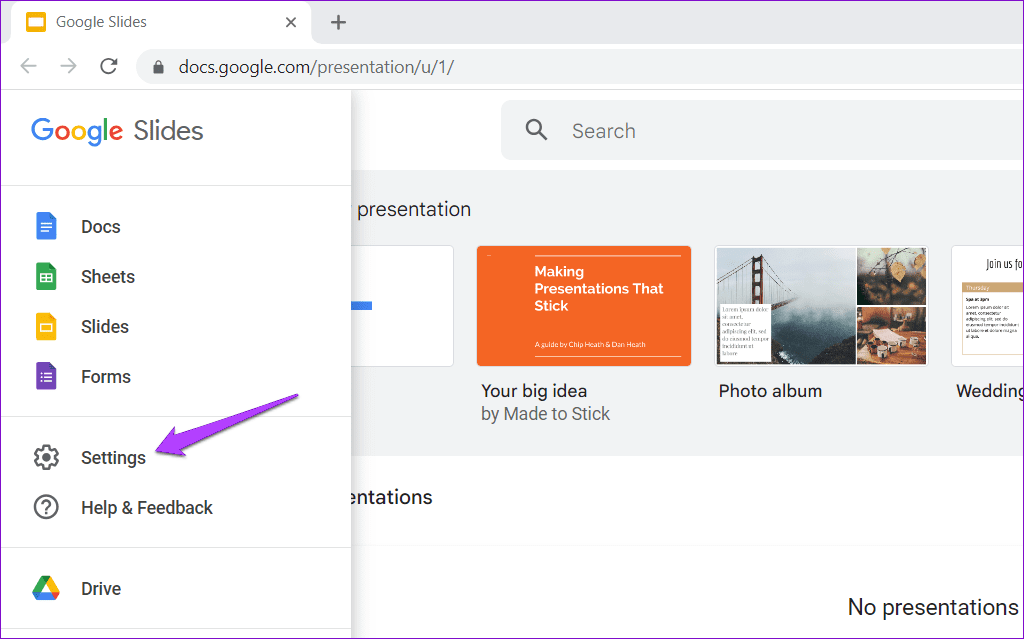
Step 3: Disable the toggle for Offline and wait for the Offline disabled message to appear. Then, turn the toggle back on.

Fix 3: Disable Browser Extensions
While Chrome extensions can greatly enhance your browsing experience, they can occasionally disrupt browser processes and cause issues. To check for this possibility, try disabling all the browser extensions temporarily.
Open Google Chrome, type chrome://extensions in the address bar at the top, and press Enter. Then, use the toggles to turn off all the extensions.
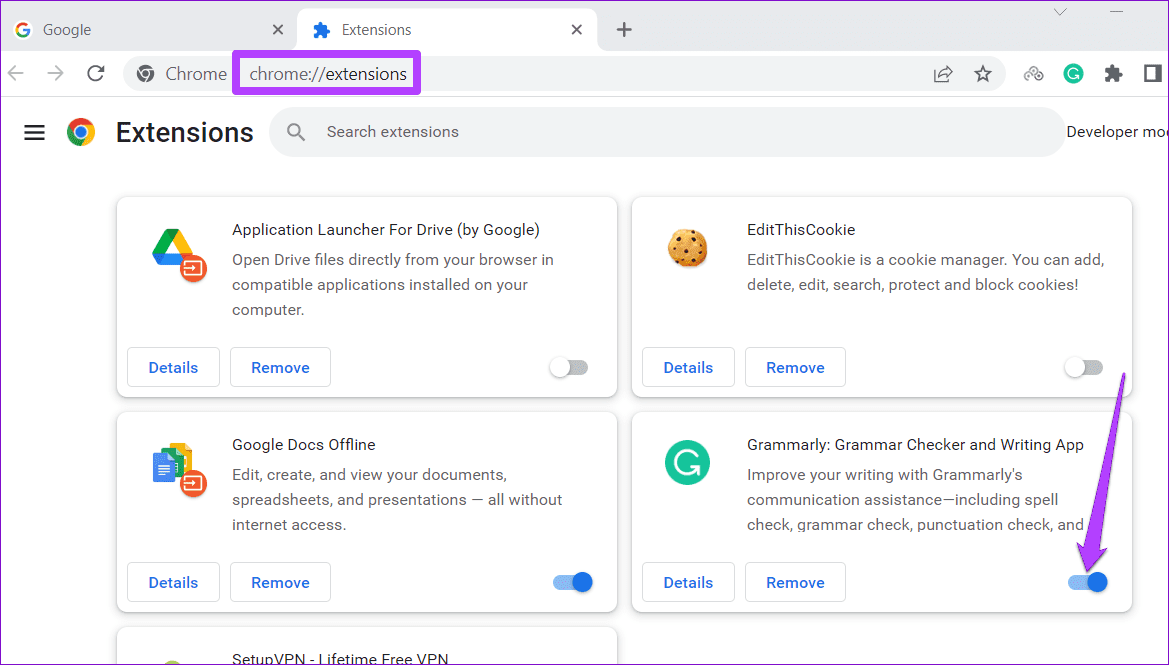
Restart Google Chrome after this and check if Google Slides loads fine. If this solves your problem, re-enable your extensions individually to identify the one causing the issue.
Fix 4: Turn off Hardware Acceleration
Hardware acceleration is a nifty feature in Chrome that allows the browser to use your computer’s GPU instead of the CPU to perform graphics-intensive tasks better. However, if Google Slides can load photos and videos in your presentations, try disabling the hardware acceleration feature in Chrome and see if that works.
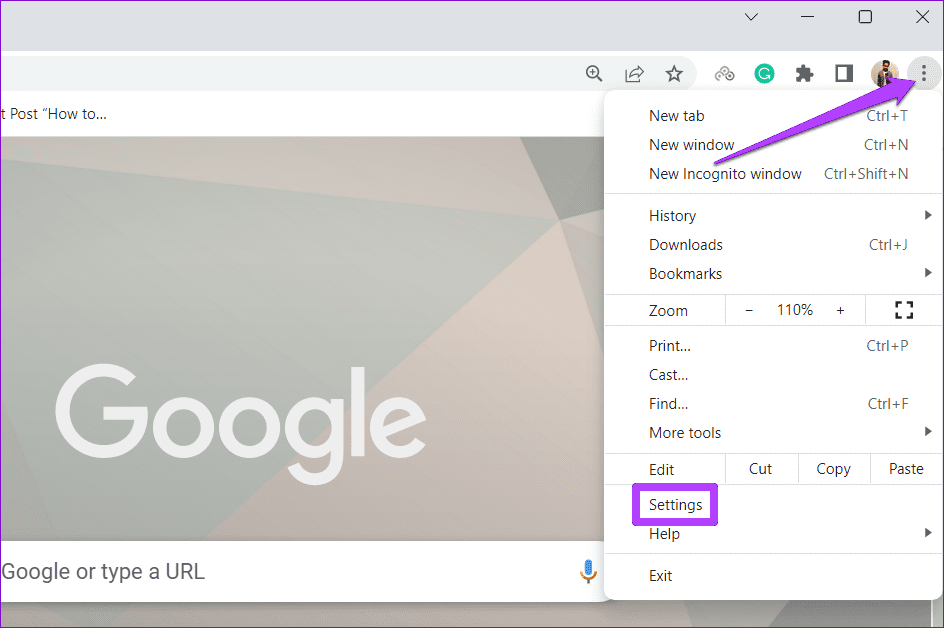
Step 1: Launch Google Chrome, click the menu icon (three vertical dots) at the top-right corner, and select Settings.
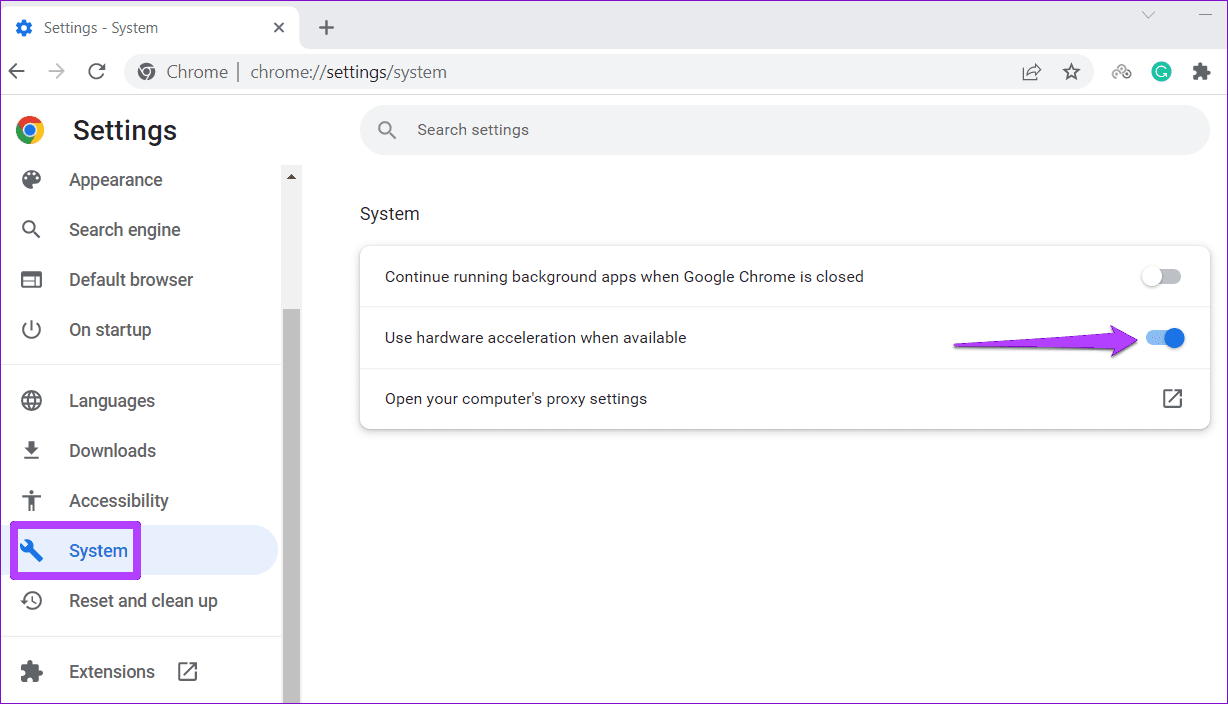
Step 2: Select System from the left sidebar and disable the toggle for Use hardware acceleration when available.
Fix 5: Clear Hosted App Data
Hosted app data refers to the files web apps like Google Slides, Sheets, Docs, and others store locally on your computer. If this data has become inaccessible, it could prevent Google Slides from loading in Chrome. Here’s how to fix it.
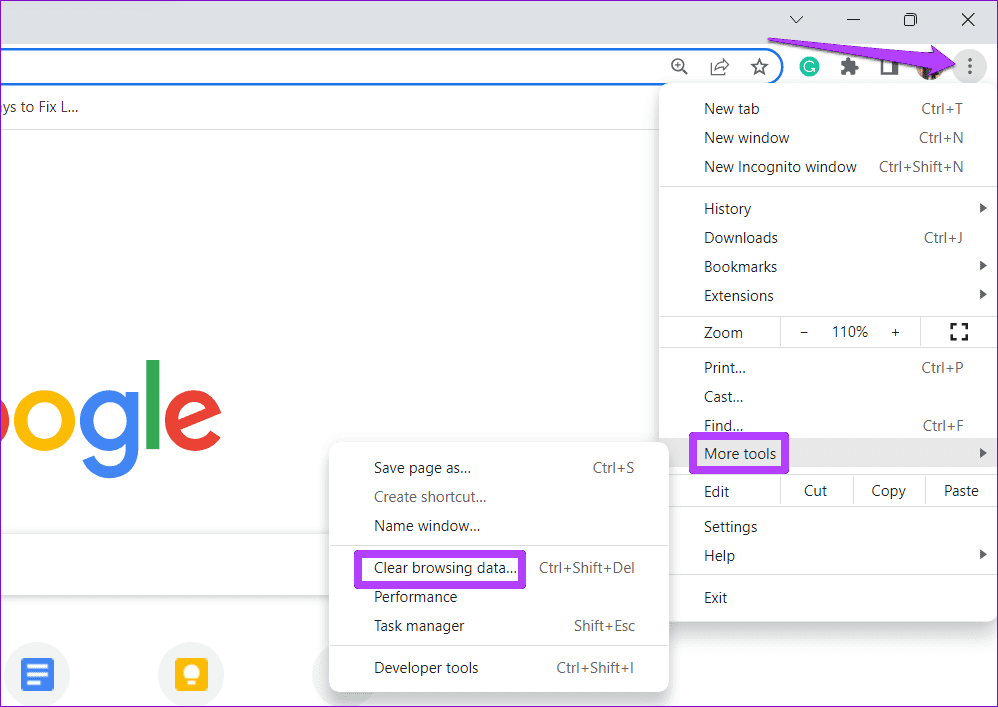
Step 1: Open Google Chrome on your computer. Click the three-dot menu icon at the top-right corner, go to More tools, and select Clear browsing data.
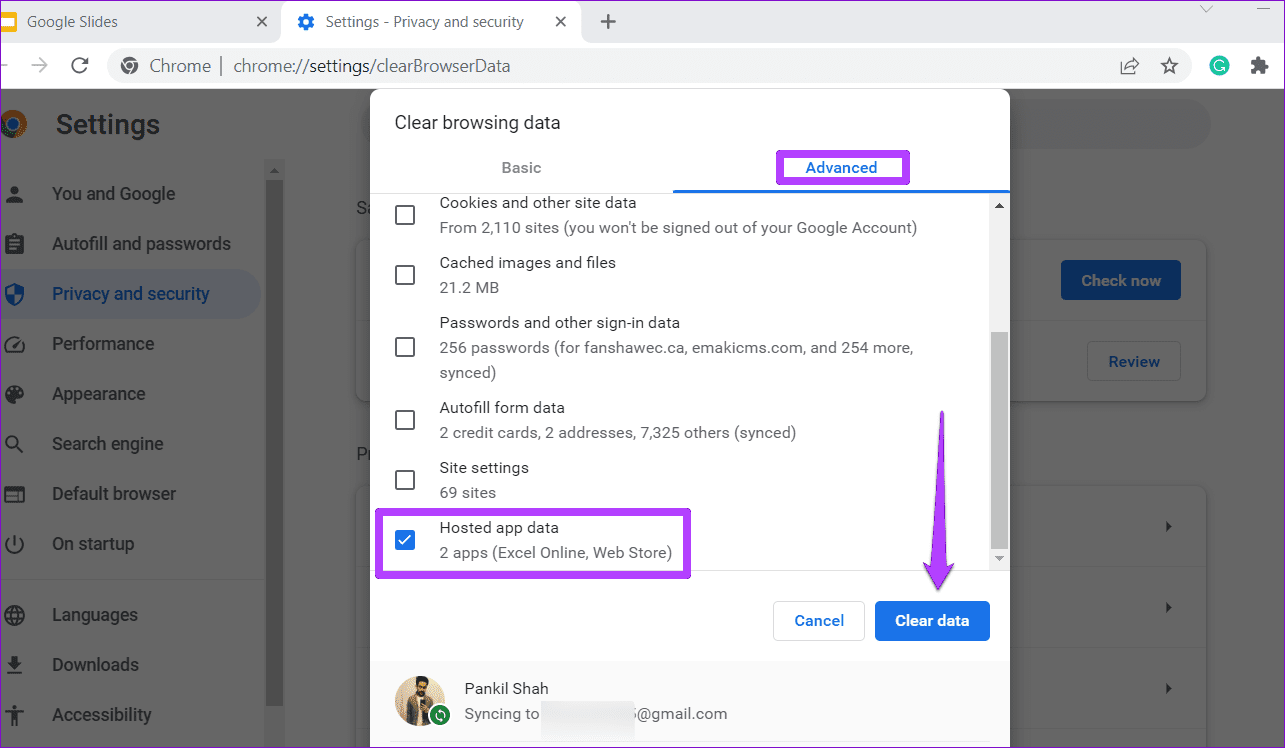
Step 2: Under the Advanced tab, check the Hosted app data box and clear all the other checkboxes. Then, click Clear data.
Fix 6: Clear Browsing Data
If Google Slides is not working properly in Chrome after purging the hosted app data, the existing browsing data may be corrupt. Here’s how to get rid of the problematic browsing data.
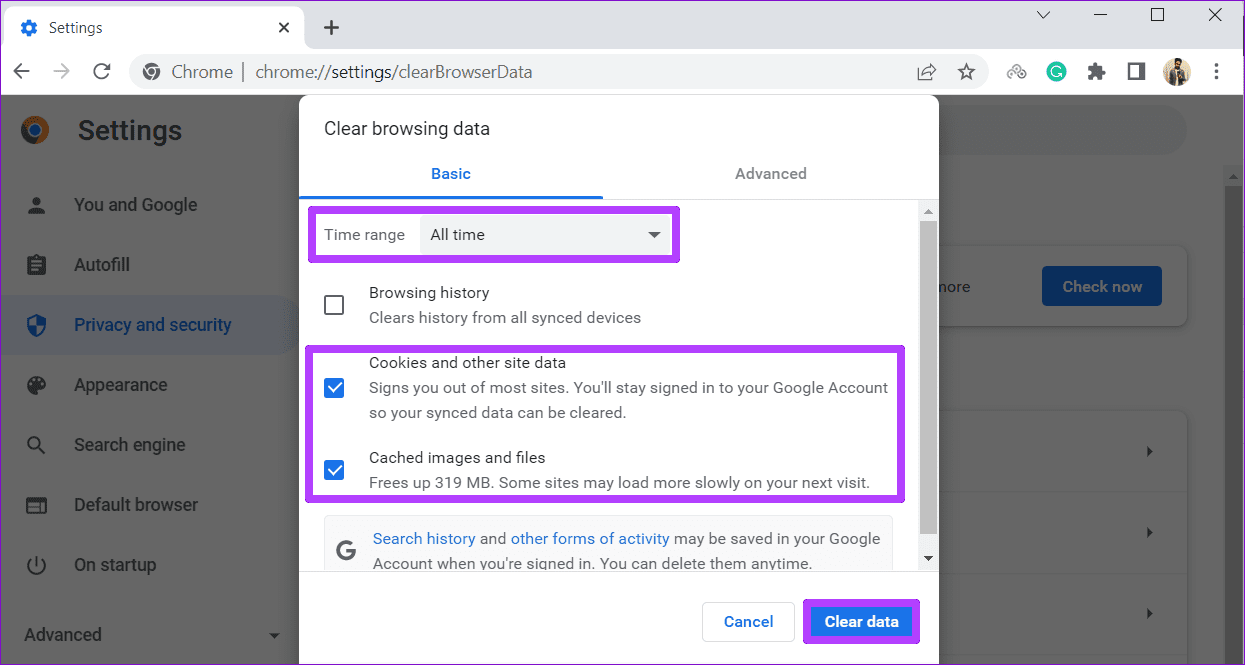
In Google Chrome, press Ctrl + Shift + Delete to open the Clear browsing data panel. Use the drop-down menu to select All time and check the boxes for Cookies and other site data and Cached images and files. Then, hit the Clear data button.
Was this helpful?
Last updated on 07 May, 2024
Read Next
 9 Best Ways to Fix Google Chrome Not Loading Pages in Windows 10
Google Chrome is one of the most used browsers in the world, no doubt.
9 Best Ways to Fix Google Chrome Not Loading Pages in Windows 10
Google Chrome is one of the most used browsers in the world, no doubt.
 7 Ways to Fix Images Not Loading in Google Chrome
Fix 1: Verify Site Settings To start, verify the content settings in Chrome and ensure websites are allowed to load images on your computer.
7 Ways to Fix Images Not Loading in Google Chrome
Fix 1: Verify Site Settings To start, verify the content settings in Chrome and ensure websites are allowed to load images on your computer.
 3 Ways to Fix Facebook Games Not Loading in Google Chrome
Try Basic Fixes Close and reopen the game: Sometimes, temporary glitches can cause your Facebook games to become unresponsive and stop working.
3 Ways to Fix Facebook Games Not Loading in Google Chrome
Try Basic Fixes Close and reopen the game: Sometimes, temporary glitches can cause your Facebook games to become unresponsive and stop working.
 How to Fix Facebook Not Loading in Google Chrome
Basic Fixes Try using Incognito Mode: This is a quick hack that enables faster loading of websites that don't launch in the standard browsing window.
How to Fix Facebook Not Loading in Google Chrome
Basic Fixes Try using Incognito Mode: This is a quick hack that enables faster loading of websites that don't launch in the standard browsing window.
 4 Best Ways to Put a Border Around a Picture in Google Slides
A presentation with just text is boring, and adding images can make it attractive.
4 Best Ways to Put a Border Around a Picture in Google Slides
A presentation with just text is boring, and adding images can make it attractive.
 2 Ways to Insert Equations in Google Slides
Method 1: Using Menu Options Google Slides comes with a set of useful menu options.
2 Ways to Insert Equations in Google Slides
Method 1: Using Menu Options Google Slides comes with a set of useful menu options.
 5 Ways to Fix Google Chrome Not Loading Pages on Android and iPhone
Try Basic Fixes Enable or disable the VPN: If webpages are not loading in Chrome, consider disabling your VPN connection temporarily and see if that resolves the problem.
5 Ways to Fix Google Chrome Not Loading Pages on Android and iPhone
Try Basic Fixes Enable or disable the VPN: If webpages are not loading in Chrome, consider disabling your VPN connection temporarily and see if that resolves the problem.
 3 Fixes for Google Sheets Not Loading in Chrome
Basic Fixes: Restart Chrome: In some cases, a simple restart should fix the issue.
3 Fixes for Google Sheets Not Loading in Chrome
Basic Fixes: Restart Chrome: In some cases, a simple restart should fix the issue.
The article above may contain affiliate links which help support Guiding Tech. The content remains unbiased and authentic and will never affect our editorial integrity.