Valve’s Steam Deck is easily one of the best handheld gaming consoles. However, despite all the power it packs in, there are times when the system could use extra optimization. Whether you’re a seasoned framerate warrior seeking buttery-smooth gameplay or a casual adventurer battling lag spikes, optimizing the Steam Deck’s performance is crucial. And that’s what this post is all about.
In this guide, we’ll explore various methods to optimize your Steam Deck’s performance. These methods will ensure smooth gameplay and a delightful gaming experience. Be it single-player story games, multiplayer action titles, or emulated games, this guide will help make the most of your Steam Deck. So, let’s get to it.
1. Enable the Steam Deck’s Performance Overlay
Before diving into the optimization journey, let’s equip ourselves with a handy tool – the Steam Deck’s Performance Overlay. This built-in feature provides insights into your system’s performance, allowing you to monitor key metrics. This includes real-time data on CPU, GPU, RAM, and frame rate. Here’s how to enable it.
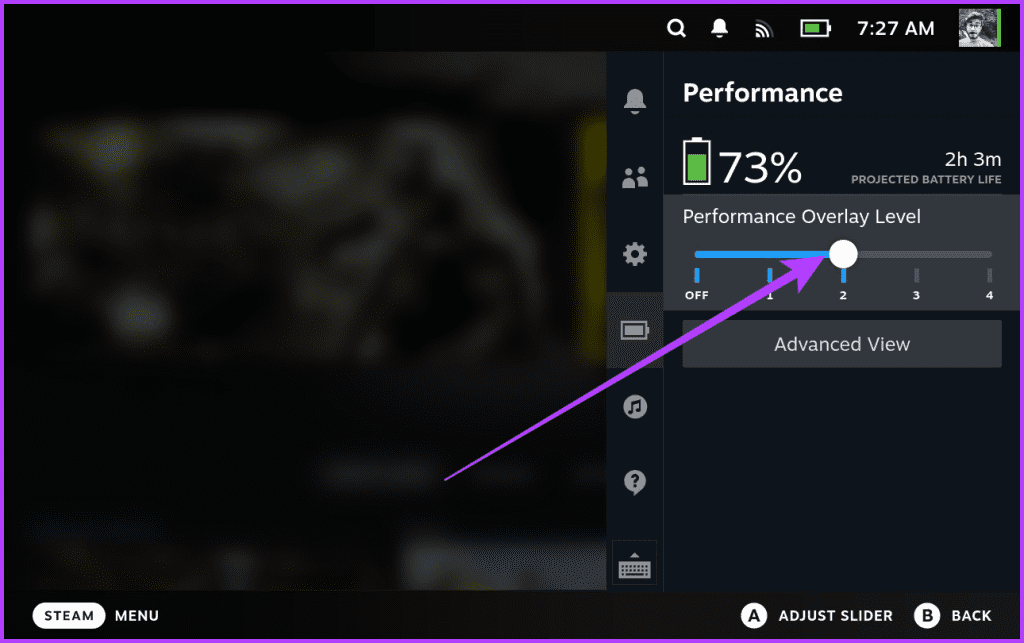
Step 1: First up, launch the game you want to boost your performance. Then, press the Quick Access Menu (QAM) button on your Steam Deck. From here, navigate to the Performance section.
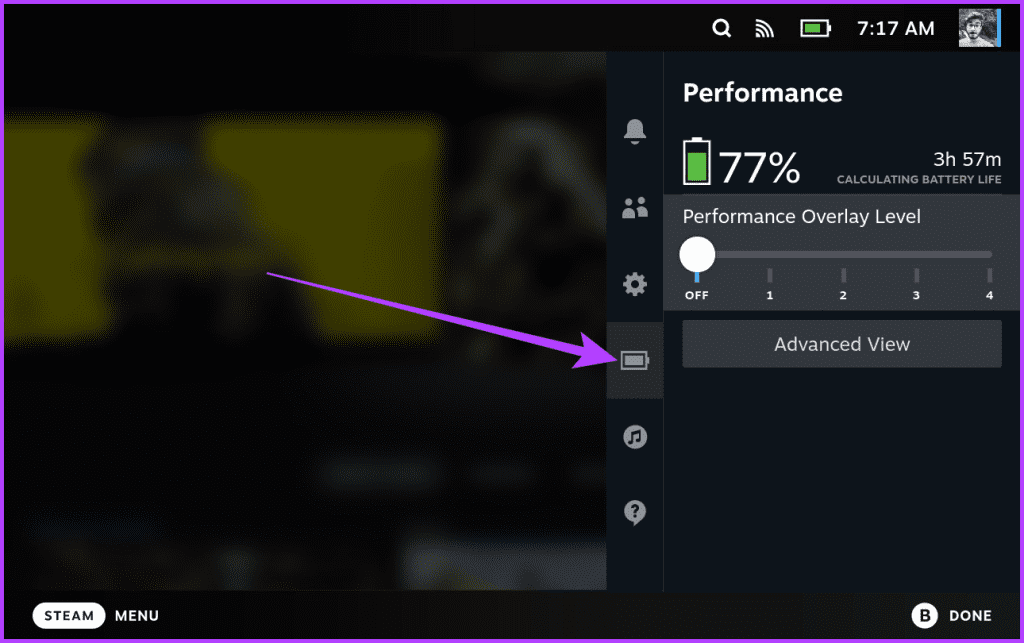
Step 2: Here, you should see four performance overlay levels along a slider. Move the slider right or left to select different performance levels. Each level will display more information, such as in-game FPS, GPU and CPU performance percentages, fan speed, and more.
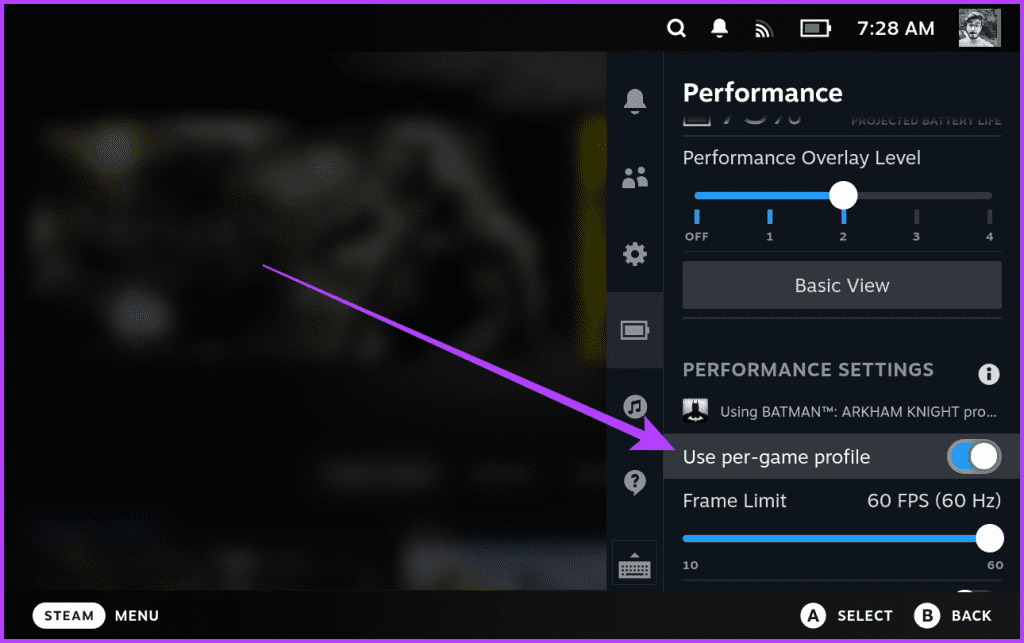
2. Enable Per-Game Profile
Every game has unique demands. Fortunately, the Steam Deck lets you create per-game profiles, allowing you to customize settings on a game-by-game basis. This way, you can create a high-performance profile for a demanding title while creating an efficient profile for a lightweight game to get better battery life. Here’s how to do that.
Step 1: Once again, navigate to the Performance section of the Quick Access Menu. Now, tap on ‘Advanced View’.
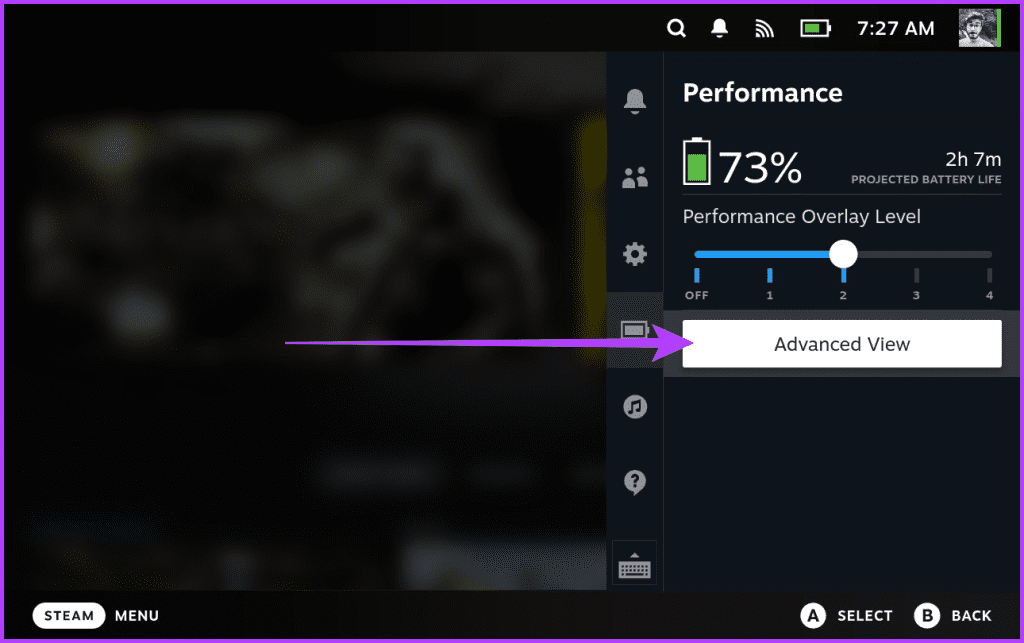
Step 2: Next, scroll down to the ‘Performance Settings’ section. Here, enable the toggle for ‘Use per-game profile’.
By tailoring settings for individual games, you can ensure that each one runs optimally on your Steam Deck.
3. Customize Steam Deck’s Performance Settings
Speaking of tailored settings, the Performance Settings section offers multiple options to customize and optimize Steam Deck’s performance. It provides various options such as controlling the frame limit, allowing screen tearing, choosing Half Rate Sharing, adding a TDP limit, overclocking the GPU, and customizing the scaling mode and filter.
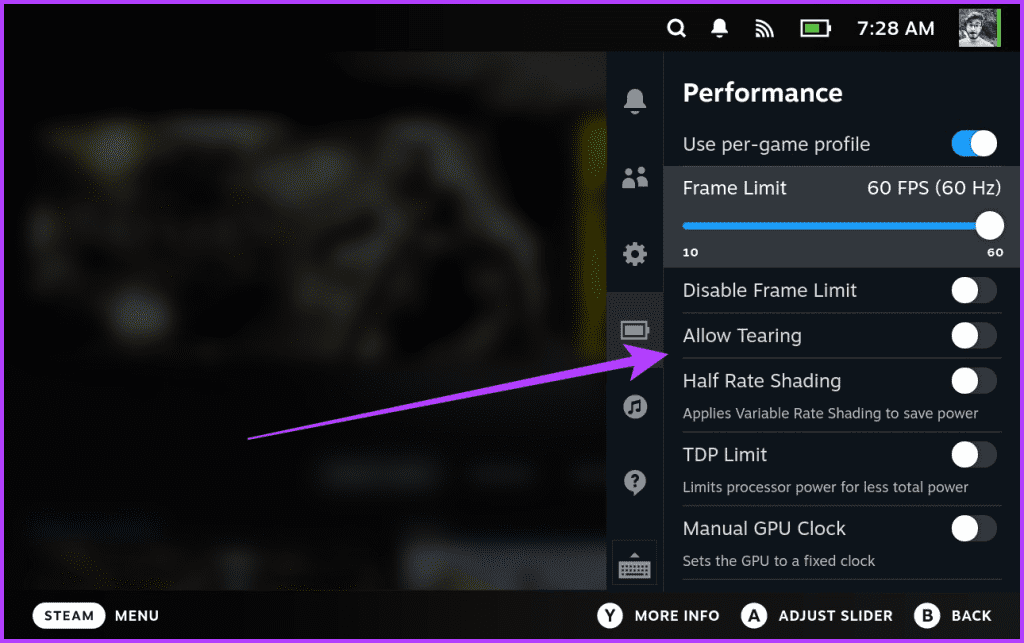
Here’s what each of these settings do.
- Frame Limit: This is crucial for balancing performance and battery life. 60 FPS offers silky smoothness, while 30 FPS prioritizes battery endurance. You can experiment and find your sweet spot, depending on your game. Alternatively, you can enable the toggle next to ‘Disable Frame Limit’ to get an unlocked FPS.
- Allow Tearing: Some titles have a forced VSync setting inside them. If you prefer to disable that, but your game doesn’t allow it, enable the ‘Allow Tearing’ option here to disable VSync forcefully. However, note that you might notice screen tearing in this case.
- Half Rate Shading: If image quality isn’t important, try enabling this setting. Essentially, Steam Deck will only render half the pixels. In theory, it should boost the performance a lot. However, most gamers have reported that the feature doesn’t work well, so you might want to keep it disabled.
- TDP Limit: TDP is the Thermal Power drawn by the Steam Deck. With this option, you can control the Deck’s maximum power draw, impacting performance and heat generation. Higher limits will boost performance but at the cost of battery life and higher temperatures.
- Manual GPU Clock: This feature allows you to adjust the GPU’s clock speed for advanced users manually. However, use it cautiously, as exceeding recommended limits can damage the Deck.
- Scaling Mode and Filter: Steam Deck has an aspect ratio of 16:10. If you’re using a title that doesn’t natively support this, try out different options for scaling to make the game fit better inside your screen.
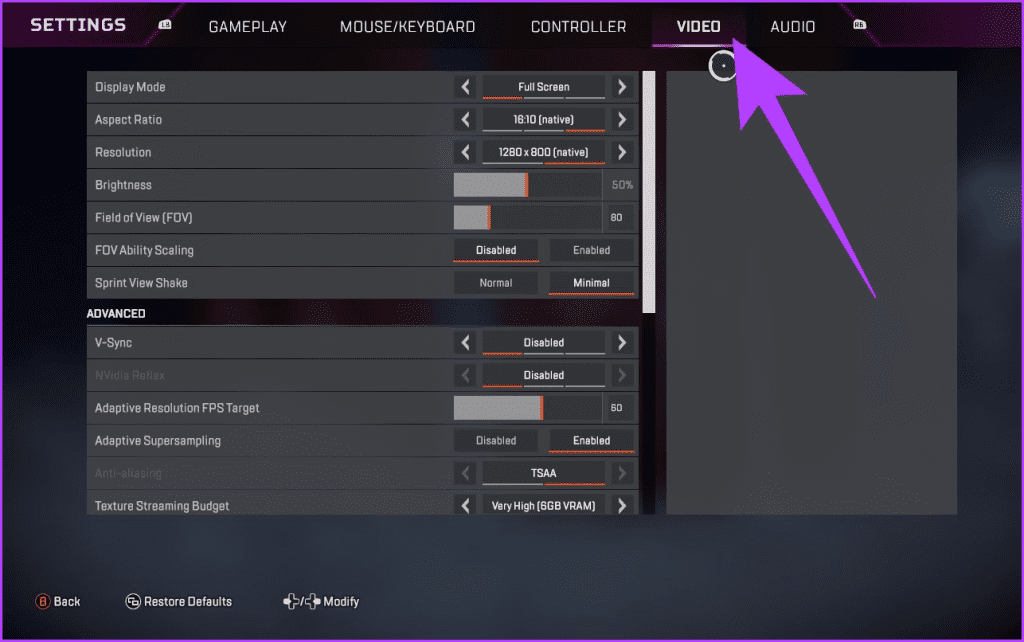
4. Customize In-Game Settings
The journey doesn’t end with the Deck itself. For an added boost, you can dive into each game’s settings menu and adjust the graphical options. To do that, launch the game and find the in-game video or display settings to tune. Feel free to adjust graphics settings such as resolution, texture quality, and shadows.
Additionally, look for performance-related options, including anti-aliasing, V-Sync, and other features impacting frame rates. For instance, Apex Legends on Steam Deck offers a plethora of settings to play around with.
Considering the Steam Deck isn’t powerful, we recommend keeping most settings on Low. However, some titles are well-optimized for the Steam Deck. For instance, Cyberpunk 2077 has a dedicated Steam Deck Settings mode in it. The mixture of low and medium settings means you can enjoy good gameplay without compromising the video quality.

5. Use Proton GE
For games not natively supported on Steam Deck, Proton GE comes to the rescue. Proton GE is a custom version of Proton, Steam’s compatibility layer for running Windows games on Linux. The GE variant is a community-driven effort that enhances Proton, fine-tuning it for better compatibility and performance.
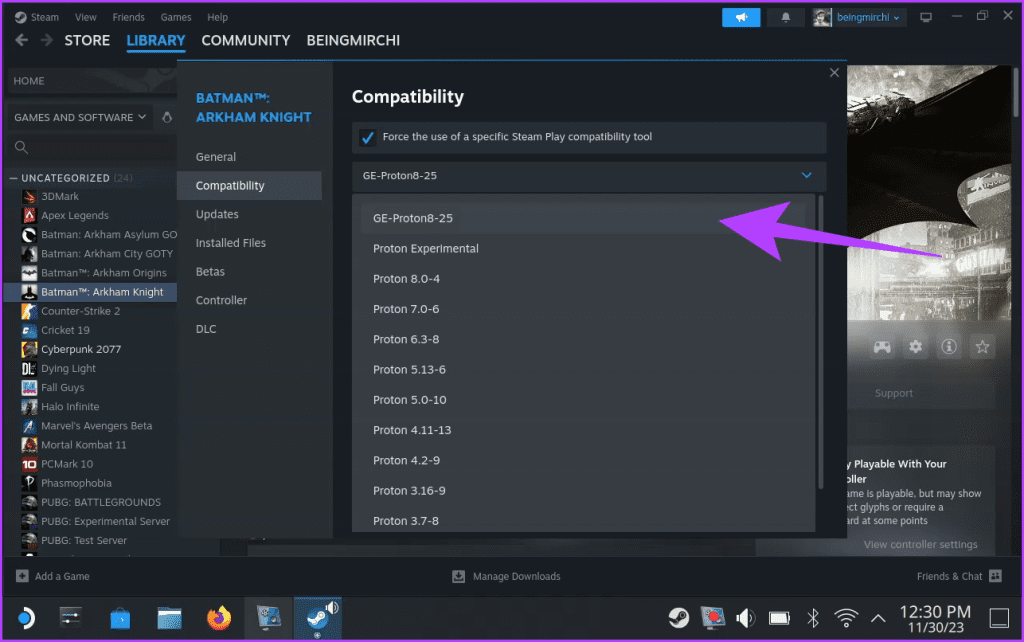
Once you’ve installed Proton GE on your Steam Deck, force the compatibility tool from the Steam app. Proton GE can significantly improve compatibility and performance for a broader range of games on your Steam Deck.
6. Use CryoUtilities
If you don’t mind installing added tools to tweak various Steam Deck settings, CryoUtilities is an excellent choice. Essentially, the tool creates a special Linux SWAP file through the TRIM command. As a result, Steam Deck can use all of its 4GB of VRAM for an added performance boost. Here’s how to install and use CryoUtilies on the Steam Deck.
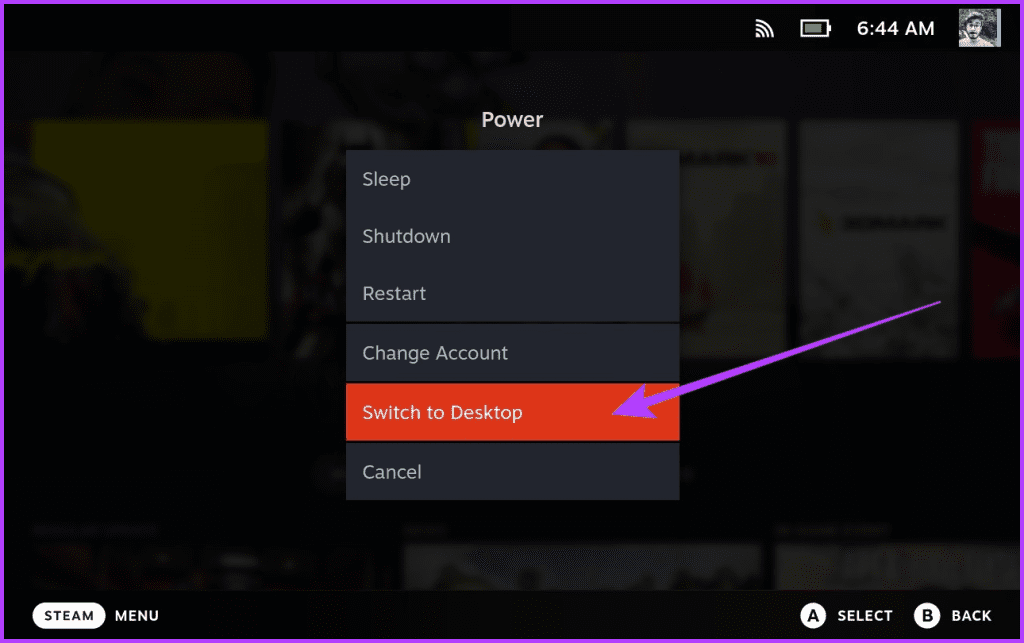
Step 1: Press the Power key on your Steam Deck to open the power menu. Then, select ‘Switch to Desktop’.
Step 2: Inside the Desktop mode, open the Firefox app. Then, head over to CryoUtilities GitHub page. Alternatively, you can open this guide on your Steam Deck and directly click on the button below.
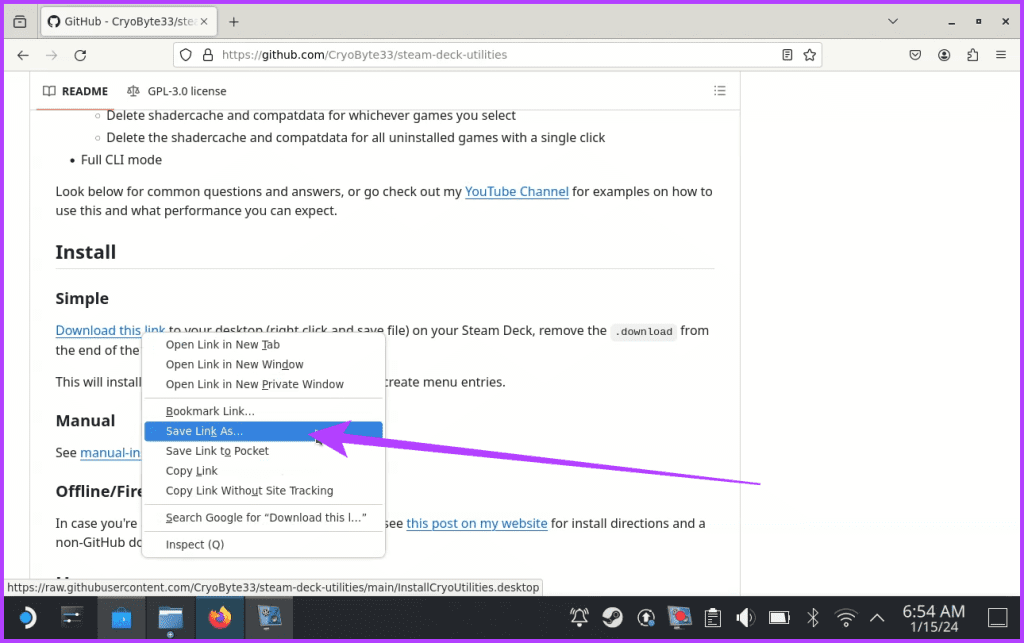
Step 3: Now, scroll down till you reach the Install section. There should be a link stating, ‘Download this link’. Use the left trigger to click on it and select ‘Save Link As’. Also, while saving, remove the ‘.download’ from the filename.
Step 4: Once done, open the Dolphin File Explorer and navigate to where you downloaded the file. Now, double-click on the CryoUtilities file. In the pop-up window, select Execute.

Step 5: CryoUtilities will install the necessary files on your Steam Deck. Once done, you should get a notification. Click on OK.

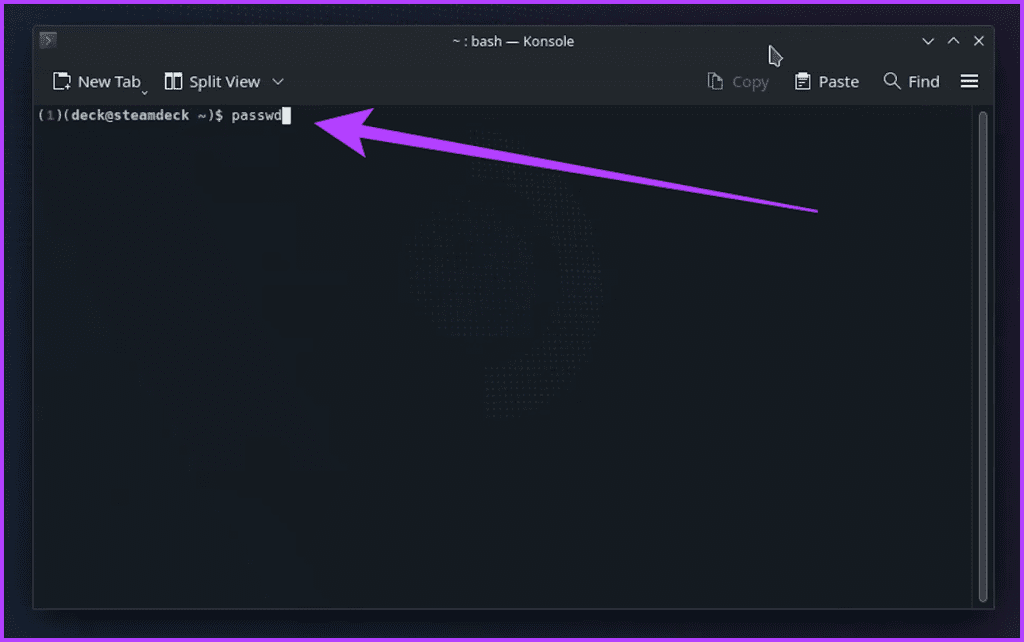
Step 6: Before we use CryoUtilities on the Steam Deck, it’s essential to set up a password. If you already have one, skip to Step 8. Otherwise, launch the Konsole app from the launcher and enter the following command.
passwd
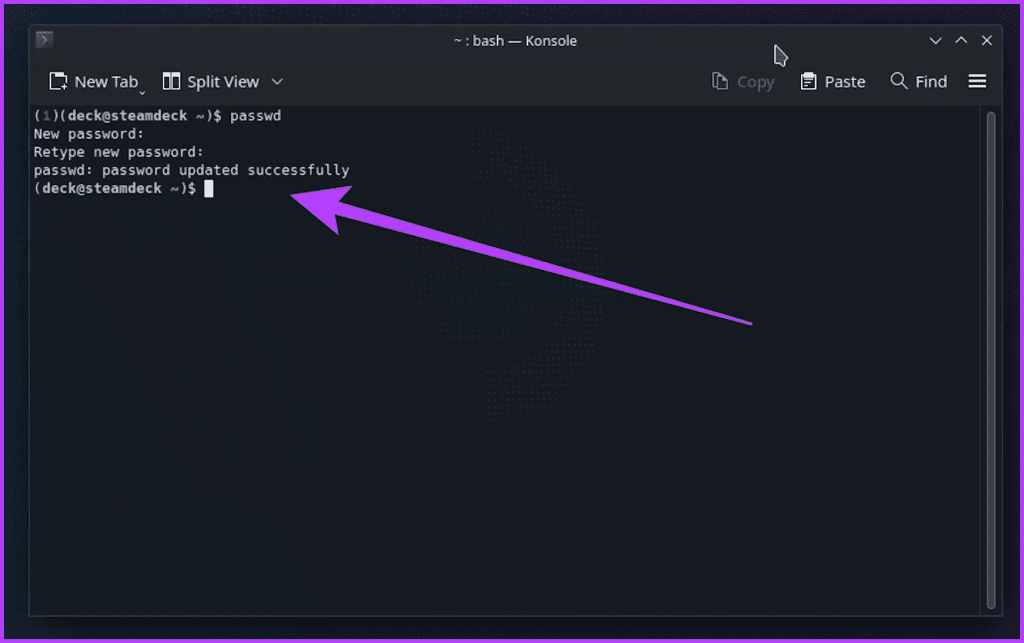
Step 7: Now, type the password of your choice and press Enter. You will have to enter the password again to confirm. Once done, your new password should be set.
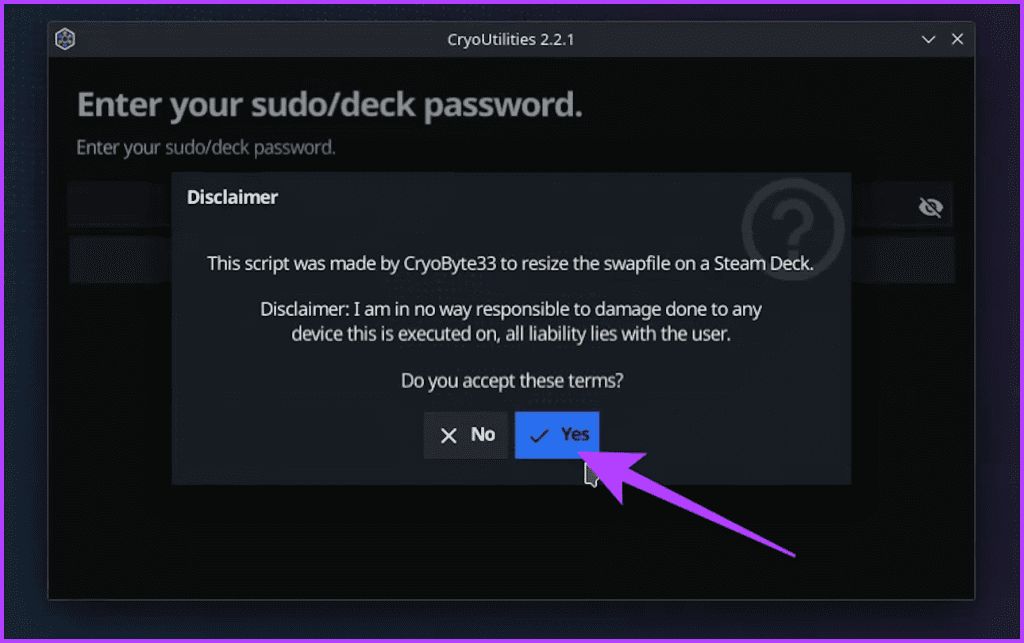
Step 8: Now, you can start using CryoUtilities. To do that, launch CryoUtilities from the launcher or the shortcut on the desktop. At first, you will be greeted with a warning. Tap on Yes to proceed.
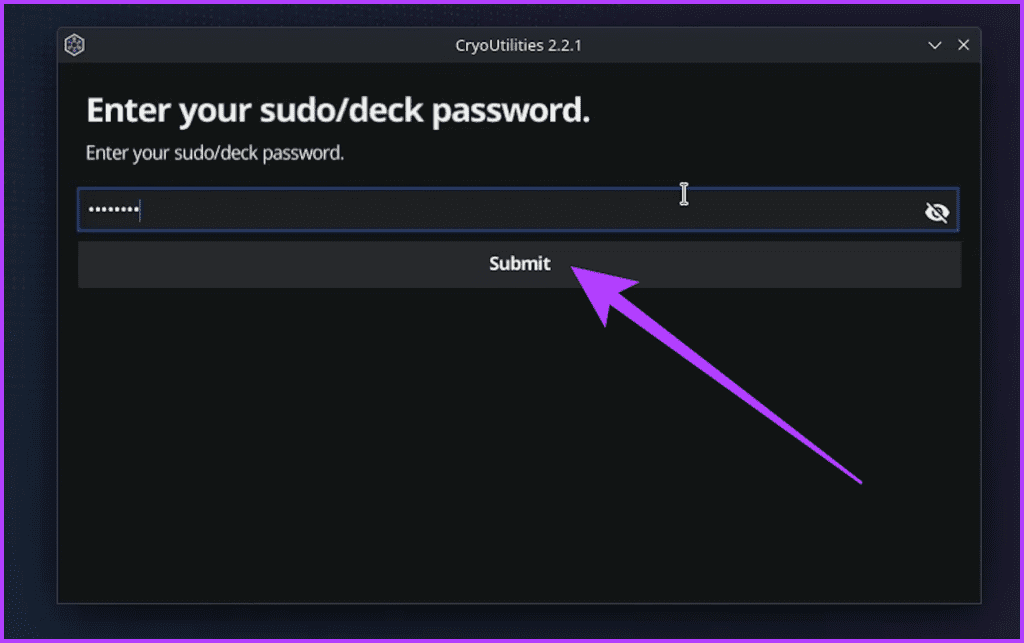
Step 9: Next, enter your password in the pop-up window and click on Submit. This is to grant CryoUtilities the required access.
Step 10: Once done, you’ll be taken inside the CryoUtilities main page. Here, tap on Recommended to apply the recommended settings to your Steam Deck.
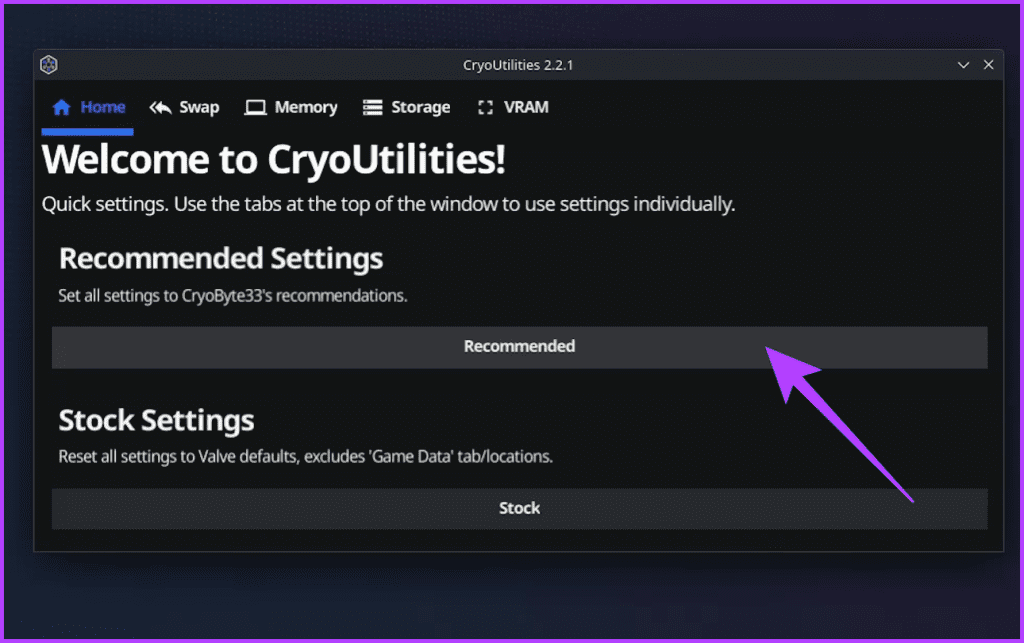
And that’s it. Once done, switch back to the game mode and enjoy the optimized performance. If you ever wish to roll back the changes, repeat Step 10 and tap on ‘Stock’.
Optimize Your Steam Deck
And there you have it, fellow gamers! Steam Deck isn’t just a handheld console; it’s a blank canvas for crafting the perfect gaming experience. With the right tools and a spirit of exploration, you can transform it into a performance powerhouse capable of conquering the most demanding digital landscapes.
By unleashing the power of the Steam Deck’s Performance Overlay, customizing the system and in-game settings, and embracing tools like Proton GE and CryoUtilities, you’re on the path to gaming nirvana. Also, finding the right settings takes a hit and trial. So, don’t be afraid to experiment to find the best Steam Deck performance settings for your games library.
Was this helpful?
Last updated on 19 January, 2024
Read Next
 Optimize Windows 11 Startup Using System Configuration Tool (MSConfig)
How to Use System Configuration Tool on Windows 11 The System Configuration Tool is divided into five tabs for easy navigation, each with different functions.
Optimize Windows 11 Startup Using System Configuration Tool (MSConfig)
How to Use System Configuration Tool on Windows 11 The System Configuration Tool is divided into five tabs for easy navigation, each with different functions.
 How to Optimize FaceTime Audio and Video Settings on iPhone
The FaceTime app is commonly available across all Apple devices, including the iPhone.
How to Optimize FaceTime Audio and Video Settings on iPhone
The FaceTime app is commonly available across all Apple devices, including the iPhone.
 MSI Cyborg 15 Review: High Performance, Low Bucks
With the launch of Nvidia's latest 40-series of graphics cards, the gaming laptop market has seen a massive performance boost.
MSI Cyborg 15 Review: High Performance, Low Bucks
With the launch of Nvidia's latest 40-series of graphics cards, the gaming laptop market has seen a massive performance boost.
 5 Eco-Friendly Ways to Increase Performance of Your Aging PC
1.
5 Eco-Friendly Ways to Increase Performance of Your Aging PC
1.
 How to Fix Epic Games Library Not Showing Games
Basic Fixes: Refresh Epic Games launcher library: A quick refresh can help fix any glitches keeping you from accessing your Epic Games Library.
How to Fix Epic Games Library Not Showing Games
Basic Fixes: Refresh Epic Games launcher library: A quick refresh can help fix any glitches keeping you from accessing your Epic Games Library.
 How to Update Epic Games Launcher and Its Games on Windows
How to Check and Update Epic Games Launcher Epic Games Launcher auto-updates along with its games.
How to Update Epic Games Launcher and Its Games on Windows
How to Check and Update Epic Games Launcher Epic Games Launcher auto-updates along with its games.
 How to Uninstall Epic Games Launcher and Its Games
Things to Consider Before Uninstalling Games or Epic Games Launcher Before uninstalling Epic Games Launcher or the games in it, consider the following things: Backup game files: If you have
How to Uninstall Epic Games Launcher and Its Games
Things to Consider Before Uninstalling Games or Epic Games Launcher Before uninstalling Epic Games Launcher or the games in it, consider the following things: Backup game files: If you have
 How to Play Steam Games on Android and iOS
How to Enable Remote Play Inside Steam The Steam Link app's Remote Play toggle lets your computer communicate wirelessly with your phone over the internet, thereby letting you to play
How to Play Steam Games on Android and iOS
How to Enable Remote Play Inside Steam The Steam Link app's Remote Play toggle lets your computer communicate wirelessly with your phone over the internet, thereby letting you to play
The article above may contain affiliate links which help support Guiding Tech. The content remains unbiased and authentic and will never affect our editorial integrity.