If you’re trying to chat with your friends, you’ve probably experienced the setup process where a new microphone needs to be set up to sound pleasant. The most common issue here is mic echoing Windows 11 apps that doesn’t seem to go away. Another possibility is a mic muffled Windows 11 issue that makes your voice sound distant or sometimes even underwater. Here’s what to do about these problems.
Fix 1 – Turn Off Voice Clarity for a Mic Muffled Windows 11
Voice Clarity is available on some Windows 11 devices and automatically processes microphone input to reduce background noise. However, it may overcorrect and make the voice itself sound more distant.
Step 1. Press “Win + I” to open “Settings.”
Step 2. Go to “System,” then “Sound.”
Step 3. Under “Input,” click on your microphone by name to enter its Properties screen.
Step 4. Go to “Audio Enhancements” and change “Voice Clarity” to another option.
Step 5. Test your mic on a call or with a quick recording afterward.
Fix 2 – Disable “Listen to This Device” to Stop Mic Echoing Windows 11
This is one of the most common causes of echo specifically, since it deliberately routes your microphone input directly back through your speakers or headphones.
Step 1. Open the Control Panel and go to “Sound.”
Step 2. Open the “Recording” tab and select your microphone.
Step 3. Click on “Properties,” then go to the “Listen” tab.
Step 4. Uncheck “Listen to this device.”
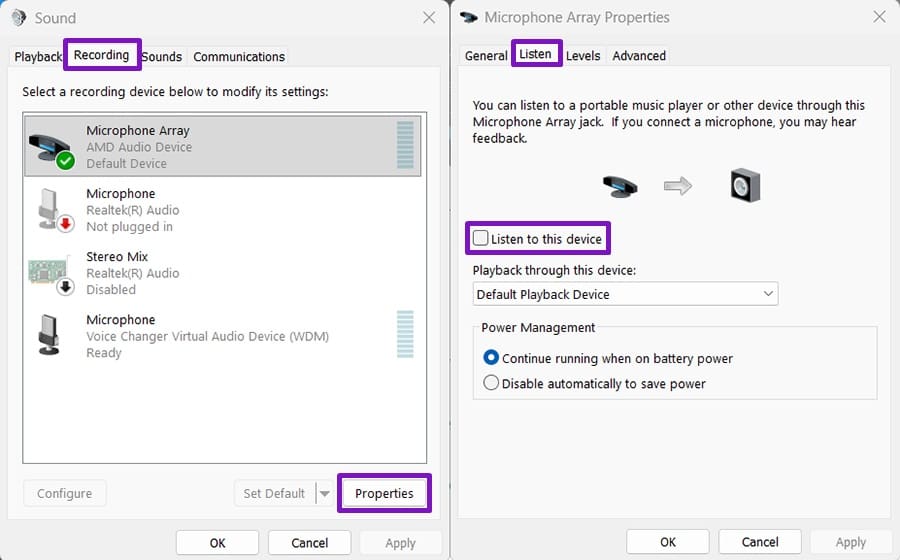
Step 5. Click “Apply,” then “OK,” and close the dialog windows.
Fix 3 – Disable Microphone Boost and Stereo Mix
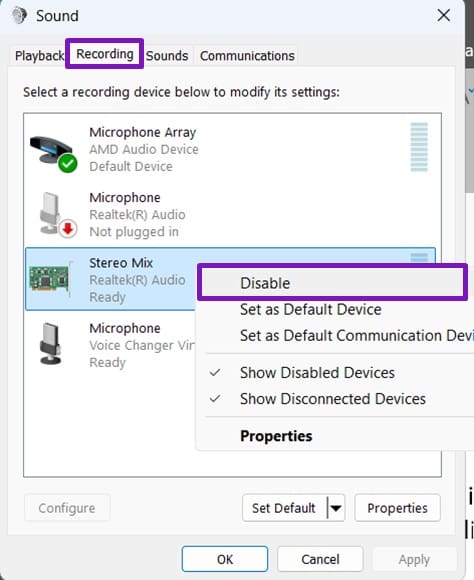
Microphone Boost amplifies your mic’s input, which can raise it enough to pick up sound from your speakers and create an echo loop. Stereo Mix, if enabled, can cause a similar problem since it feeds your system’s own audio output back into what’s treated as an input source.
Step 1. In the same Sound window as in Fix 2, click the “Recording” tab, then double-click on the microphone.
Step 2. Go to the “Levels” tab and uncheck “Microphone Boost” if it’s available. If there’s a slider instead, move it down to 0 dB.
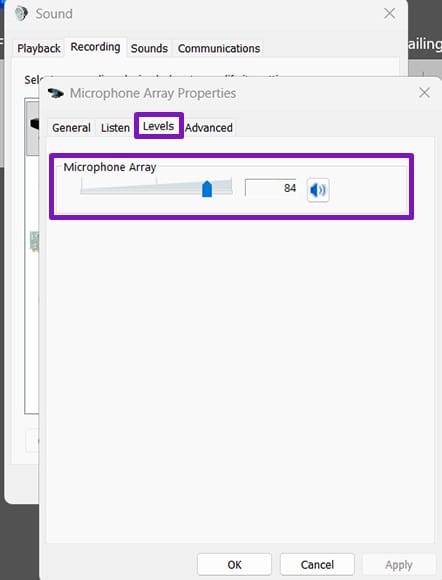
Step 3. Back in the “Recording” tab, check whether “Stereo Mix” appears as an enabled device. If it does, right-click it and select “Disable.”
Fix 4 – Stop Apps from Taking Control of the Mic
An obscure Windows setting allows individual apps to take full control of your microphone and change how it behaves, which can overwrite any setting you program for it.
Step 1. Open the Sound panel from Control Panel.
Step 2. Go to the microphone’s properties.
Step 3. Open the “Advanced” tab and uncheck “Allow applications to take exclusive control of this device.”
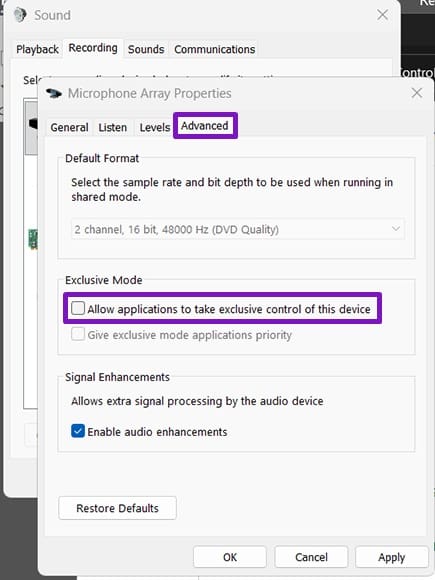
Step 4. Repeat the process for your playback device (headphones or speakers) under the “Playback” tab.
Step 5. Click “OK” to save your changes.
Fix 7 – Turn Off NPU Audio Processing (Copilot+ PCs Only)
If you’re on a Copilot+ PC with a built-in AI chip (an NPU), that chip can apply its own audio compression on top of everything else, adding to the muffling. Skip this fix entirely if you’re not on a Copilot+ machine, since the option won’t exist.
Step 1. Restart your PC and enter the BIOS/UEFI, usually by tapping “Delete,” “F2,” or “F10” as it powers on (the exact key is shown on the startup screen).
Step 2. Look under “Advanced” settings for an option like “NPU” or “AI Audio Processing.”
Step 3. Set it to “Disabled,” then save and exit.
Was this helpful?
Last updated on 06 August, 2026
Read Next
 How to Fix Valorant Voice Chat or Mic Not Working on Windows
Voice communication is important in multiplayer games like Valorant, enable you to effectively communicate and strategize your next move.
How to Fix Valorant Voice Chat or Mic Not Working on Windows
Voice communication is important in multiplayer games like Valorant, enable you to effectively communicate and strategize your next move.
 5 Ways to Make Your Mic Sound Better on Windows
Basic Fixes Place the Microphone Properly: One of the first things to ensure is that your microphone is placed properly.
5 Ways to Make Your Mic Sound Better on Windows
Basic Fixes Place the Microphone Properly: One of the first things to ensure is that your microphone is placed properly.
 How to Fix Bluetooth Headset Mic Not Working in Windows PC
Basic Fixes: Check if it's working with another device: You cannot rule out the possibility that your headset’s mic is the problem.
How to Fix Bluetooth Headset Mic Not Working in Windows PC
Basic Fixes: Check if it's working with another device: You cannot rule out the possibility that your headset’s mic is the problem.
 5 Ways to Fix Discord Mic Not Working on Android and iPhone
https://youtu.be/24cdhNs1yIU Try Basic Fixes Disconnect any Bluetooth devices: Make sure your phone isn't connected to any Bluetooth devices.
5 Ways to Fix Discord Mic Not Working on Android and iPhone
https://youtu.be/24cdhNs1yIU Try Basic Fixes Disconnect any Bluetooth devices: Make sure your phone isn't connected to any Bluetooth devices.
 How to Perform Live Mic Monitoring on Mac
Method 1: Use QuickTime Player QuickTime Player gives you the option to record your screen and audio on your Mac.
How to Perform Live Mic Monitoring on Mac
Method 1: Use QuickTime Player QuickTime Player gives you the option to record your screen and audio on your Mac.
 How to Use an Android Device as Mic for Bluetooth Speakers
1.
How to Use an Android Device as Mic for Bluetooth Speakers
1.
 Top 15 Ways to Fix Amazon Echo and Alexa Setup Problems
If you've landed on this page, it means that the Amazon Echo setup process is giving you a hard time too.
Top 15 Ways to Fix Amazon Echo and Alexa Setup Problems
If you've landed on this page, it means that the Amazon Echo setup process is giving you a hard time too.
 Top 6 Ways to Fix Amazon Echo Stuck on Blue Light
An Amazon Echo speaker or display can be of great help if you wish to add a touch of smartness to your home.
Top 6 Ways to Fix Amazon Echo Stuck on Blue Light
An Amazon Echo speaker or display can be of great help if you wish to add a touch of smartness to your home.
The article above may contain affiliate links which help support Guiding Tech. The content remains unbiased and authentic and will never affect our editorial integrity.