Basic Fixes
- Place the Microphone Properly: One of the first things to ensure is that your microphone is placed properly. The position of your microphone can affect the sound quality of your recordings. The best position for your microphone is about 6 inches away from your mouth. Additionally, ensure the microphone is not pointing directly at your mouth, as this can cause distortion.
- Use Pop Filters: A pop filter is a mesh screen between the microphone and the user. As such, using a pop filter can help minimize the impact of breath sounds and sibilance.
- Adjust the Gain: Most microphones have a dial or knob on them indicating the gain level. Gain refers to the microphone’s sensitivity, controlling how loud or soft the input sounds should be. Adjust it and simultaneously test it using the Sound Recorder app on Windows 11 to find the sweet spot.
- Increase the Mic Level in Windows: In case your microphone doesn’t have a knob for gain, you can use Windows to adjust it on a software level. Thankfully, Windows offers a native way to easily increase the mic volume.
- Close Apps Using Your Microphone: It’s also advisable to close any background apps that could be accessing your microphone. You can do that easily by opening the Task Manager and closing any unwanted applications.
Fix 1: Adjust the Microphone Format
If you’re using a high-end microphone, it’s possible to record in a higher format for better quality as well. You can essentially increase the bitrate of your recording, thus, resulting in an improved audio result. Here’s how you can do that.
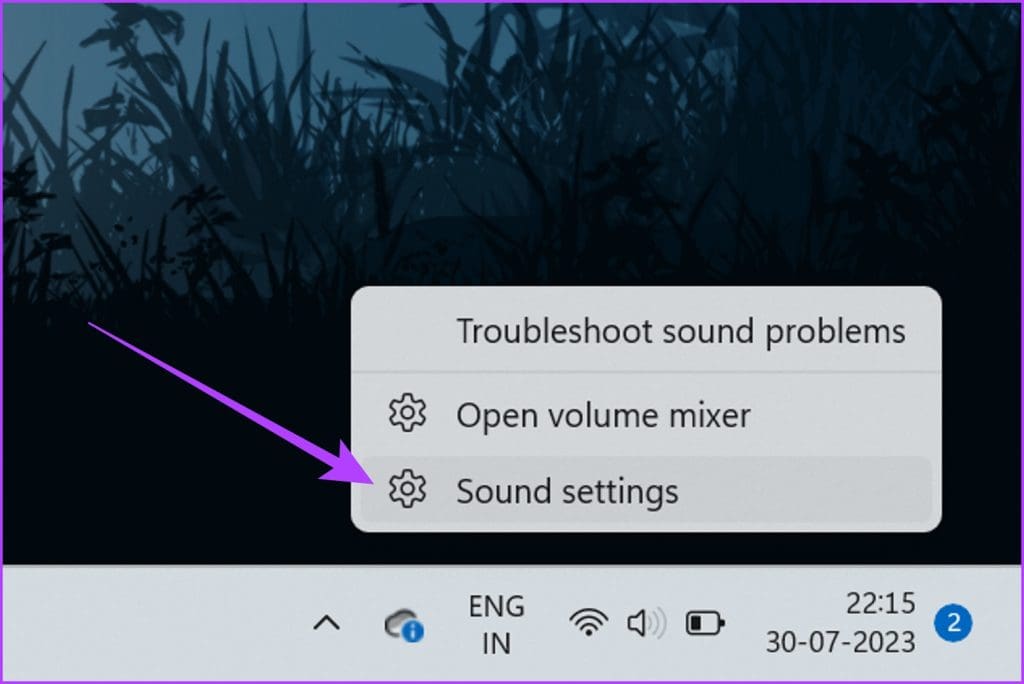
Step 1: Right-click on the speaker icon in the system tray and click on Sound settings.
Step 2: Under the Input section, click on the arrow next to your microphone.

Step 3: Click on the drop-down menu for Format to select a different recording format.

Step 4: Windows typically offers options like ’16-bit, 44100 Hz (CD Quality)’, or ’16-bit, 48000 Hz (DVD Quality)’. You may have other options depending on your audio hardware. Just select the highest format available.

Step 5: After selecting the desired recording format, click Apply and OK to save the changes.
Fix 2: Enable Exclusive Mode
Additionally, it’s important to enable exclusive mode for your microphone on Windows as well. Exclusive mode grants the microphone exclusive access to the audio device, preventing other applications from accessing it simultaneously. This, in turn, reduces potential conflicts and resource sharing, resulting in a smoother and more stable audio experience.
Step 1: Right-click on the speaker icon in the system tray and click on Sound settings.
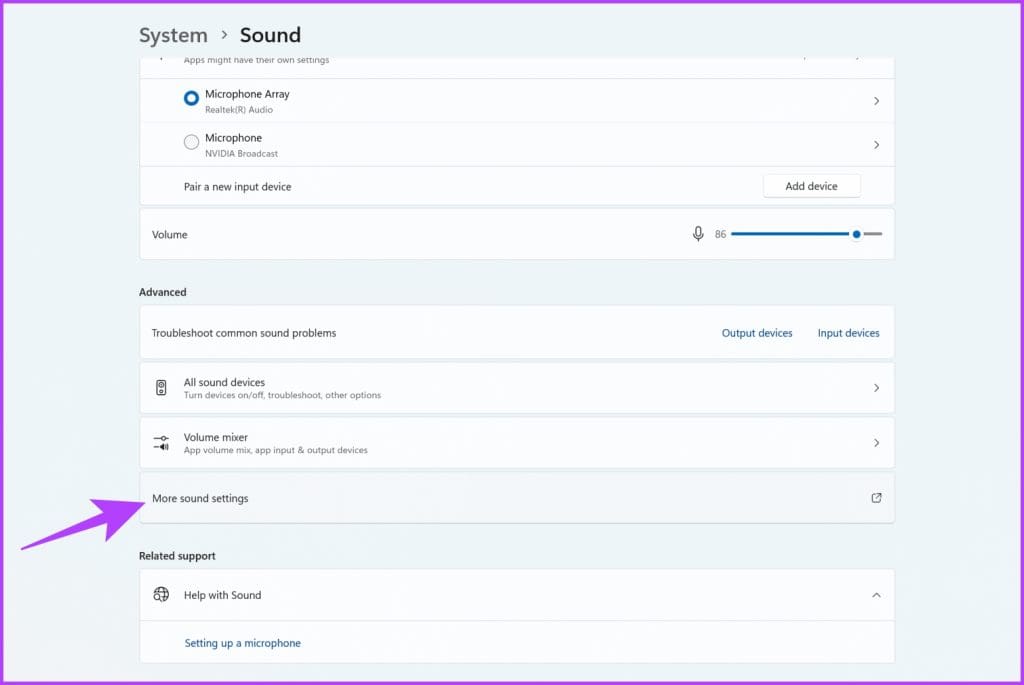
Step 2: Scroll down to the bottom and click on ‘More sound settings‘.
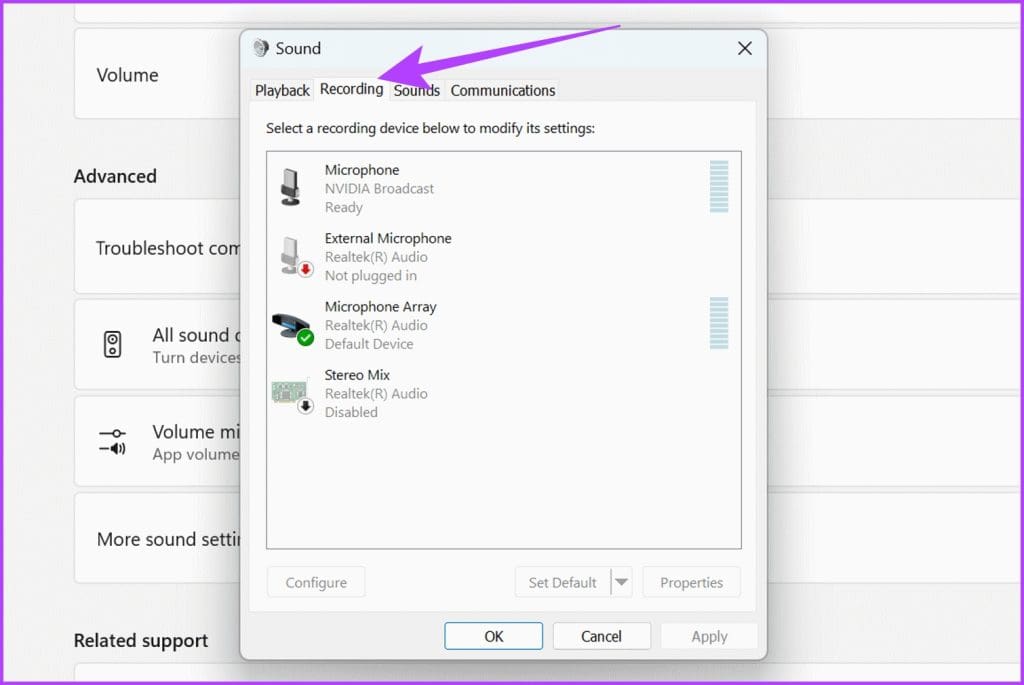
Step 3: Switch to the Recording tab in the popup window.
Step 4: Right-click on microphone and select the Properties option.

Step 5: Now, switch to the Advanced tab.

Step 6: Check the box next to ‘Allow applications to take exclusive control of this device‘. Also, check the box next to ‘Give exclusive mode applications priority‘.

Step 7: Once done, click on Apply and then OK.
Fix 3: Update Microphone Driver
It’s also possible that your microphone is in perfect condition. However, a faulty driver is why you can’t use it to its best ability. Outdated or incorrect audio drivers can cause microphone issues. To update your audio drivers, follow these steps:
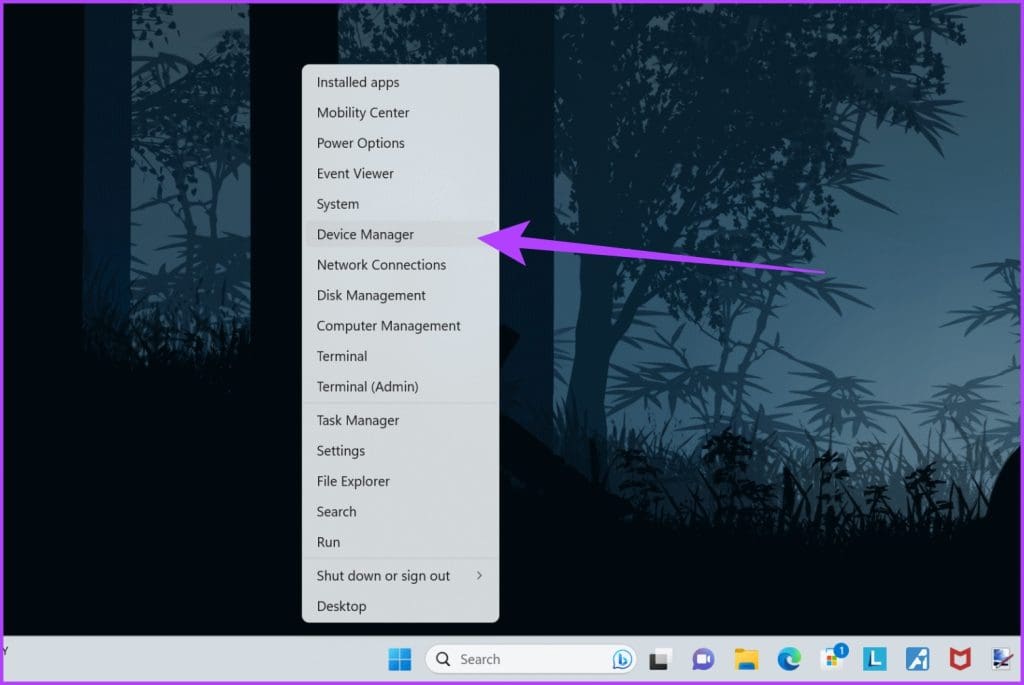
Step 1: Right-click on the Start button and select Device Manager.
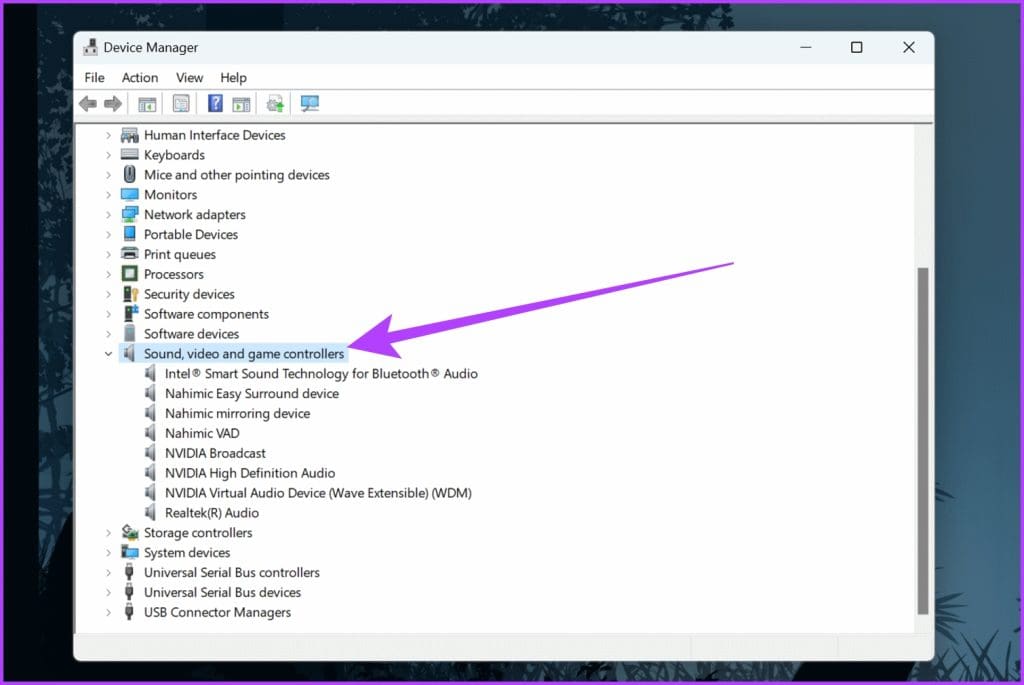
Step 2: Click on ‘Sound, video and game controllers‘ to expand it.
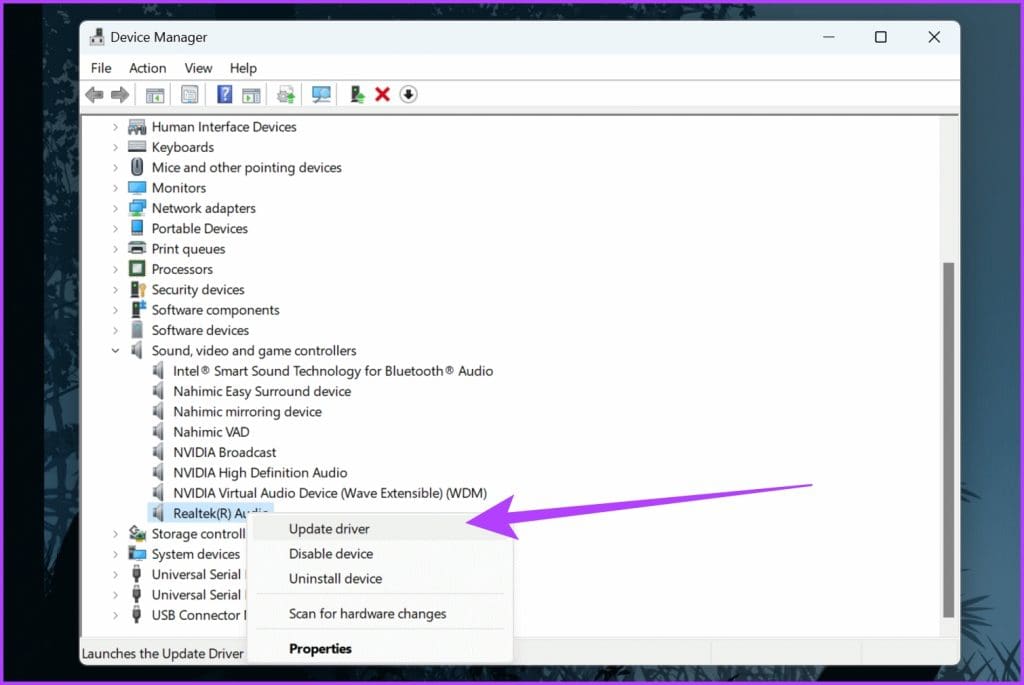
Step 3: Right-click on your microphone device and select Update driver.
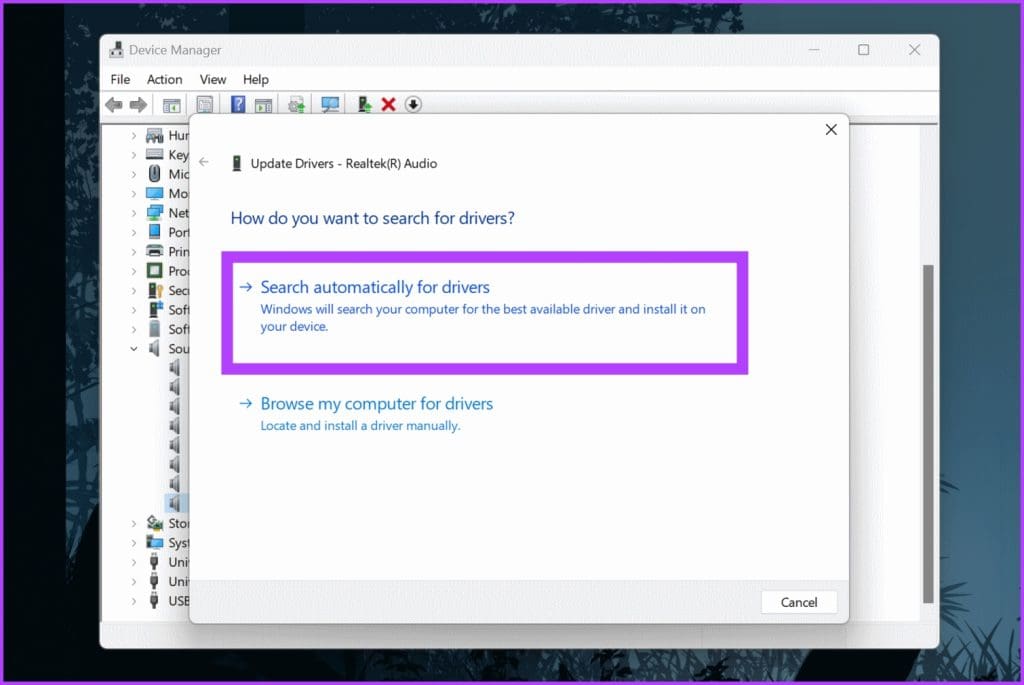
Step 4: Choose ‘Search automatically for drivers‘. Windows will now automatically search and update to the latest drivers.
Once the process is complete, reboot your PC and try and use your microphone post that.
Fix 4: Turn on Microphone Enhancements
Using Windows, you can further tweak the quality of your microphone using some enhancements. These enhancements can be used to suppress the noise in the background as well as subdue the echo.
Step 1: Right-click on the speaker icon in the system tray and click on Sound settings.
Step 2: Under the Input section, click on the arrow next to the microphone.

Step 3: Click on the drop-down menu for Audio Enhancements, and select the enhancement of your choice.
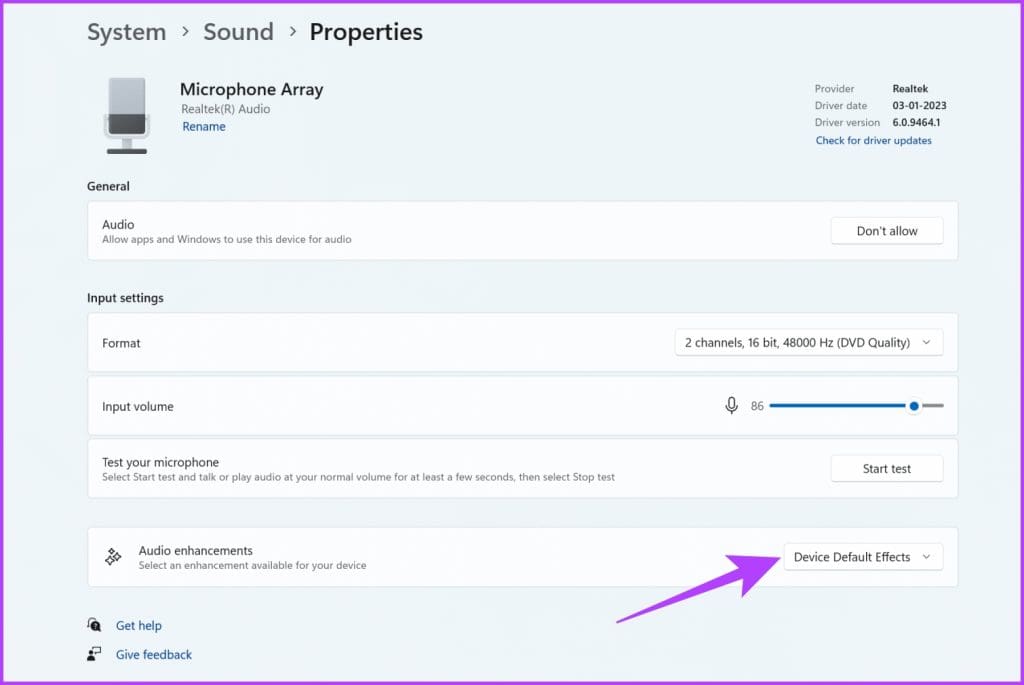
For most users, it will be Device Default Effects. However, if you’re using an expensive microphone, you’ll also get options for Noise suppression and Acoustic echo cancellation.
Fix 5: Use Third-Party Apps
If you don’t have any Microphone enhancements available, fret not, you can also use third-party tools. If you have an NVIDIA RTX GPU, download the NVIDIA Broadcast tool for Windows. It offers various features such as Noise removal and Room echo removal. It further allows you to fine-tune the strength of these effects to ensure the final output doesn’t sound too robotic.

Alternatively, you can also try using Krisp AI. It uses artificial intelligence to remove background noise from your microphone. It works similarly to NVIDIA Broadcast, except it works across all platforms. While it has a paid version, try out the free version for up to 60 minutes of sound recording daily.
FAQs
There could be several reasons your microphone barely picks up your voice in Windows 11. It could be due to a faulty connection, improper placement, or a lot of noise in the background. It could also be that your microphone’s gain is too low or that other background apps on your PC are accessing it simultaneously as you record.
You can test your microphone by heading over to the Sound settings and opening the mic’s properties. Speak into the microphone, and observe the volume bar to check if it registers your voice properly. You can also click on Device properties > Additional device properties > Test Microphone to run a test and listen to the playback.
Yes, microphone privacy is essential. Always be cautious of granting microphone access to unauthorized applications, and regularly review privacy settings to ensure your microphone is not misused.
Was this helpful?
Last updated on 26 June, 2024
Read Next
 How to Fix Valorant Voice Chat or Mic Not Working on Windows
Voice communication is important in multiplayer games like Valorant, enable you to effectively communicate and strategize your next move.
How to Fix Valorant Voice Chat or Mic Not Working on Windows
Voice communication is important in multiplayer games like Valorant, enable you to effectively communicate and strategize your next move.
 5 Ways to Fix Discord Mic Not Working on Android and iPhone
https://youtu.be/24cdhNs1yIU Try Basic Fixes Disconnect any Bluetooth devices: Make sure your phone isn't connected to any Bluetooth devices.
5 Ways to Fix Discord Mic Not Working on Android and iPhone
https://youtu.be/24cdhNs1yIU Try Basic Fixes Disconnect any Bluetooth devices: Make sure your phone isn't connected to any Bluetooth devices.
 How to Fix Bluetooth Headset Mic Not Working in Windows PC
Basic Fixes: Check if it's working with another device: You cannot rule out the possibility that your headset’s mic is the problem.
How to Fix Bluetooth Headset Mic Not Working in Windows PC
Basic Fixes: Check if it's working with another device: You cannot rule out the possibility that your headset’s mic is the problem.
 How to Perform Live Mic Monitoring on Mac
Method 1: Use QuickTime Player QuickTime Player gives you the option to record your screen and audio on your Mac.
How to Perform Live Mic Monitoring on Mac
Method 1: Use QuickTime Player QuickTime Player gives you the option to record your screen and audio on your Mac.
 How to Use an Android Device as Mic for Bluetooth Speakers
1.
How to Use an Android Device as Mic for Bluetooth Speakers
1.
 11 Ways to Fix Sound Not Working on Windows 11
While Windows 11 is Microsoft's most stable release to date, it's not without its flaws.
11 Ways to Fix Sound Not Working on Windows 11
While Windows 11 is Microsoft's most stable release to date, it's not without its flaws.
 6 Ways to Fix No Sound in Microsoft Edge on Windows 11
Common Fixes Unmute the Edge tab: If you've unknowingly muted a tab, unmute it by right-clicking the tab > Unmute tab.
6 Ways to Fix No Sound in Microsoft Edge on Windows 11
Common Fixes Unmute the Edge tab: If you've unknowingly muted a tab, unmute it by right-clicking the tab > Unmute tab.
 4 Ways to Fix Video Sound Not Working on Windows 11
Basic Fixes: Ensure the video is not muted and has sound: Click the speaker icon in the player window or the taskbar and increase the volume using the slider.
4 Ways to Fix Video Sound Not Working on Windows 11
Basic Fixes: Ensure the video is not muted and has sound: Click the speaker icon in the player window or the taskbar and increase the volume using the slider.
The article above may contain affiliate links which help support Guiding Tech. The content remains unbiased and authentic and will never affect our editorial integrity.