How to Turn Text Into Columns in Google Docs
By default, Google Docs’s page setup is Pages. In this setup, you can turn text blocks into columns. Adding columns is an easy trick to enhance your document’s readability. Here’s how.
Step 1: Open Google Docs in your preferred browser and sign in with your details.
Step 2: Open the document where you want to introduce text columns on the Google Docs home page.
Step 3: Highlight the text on the Google Docs canvas to convert it into columns.

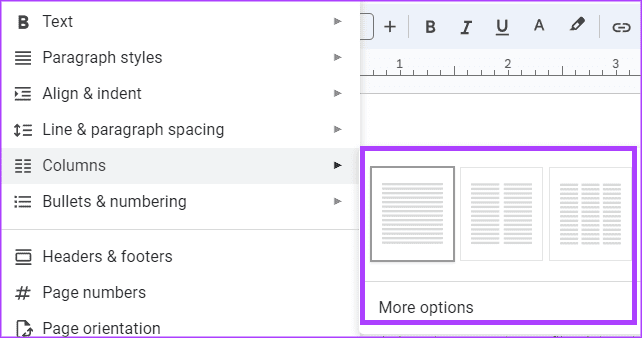
Step 4: On the Google Docs Ribbon, click the Format tab.

Step 5: Click Columns from the option shown.

Step 6: Select the number of columns you want the text split into. The default options available are 1, 2, or 3 columns. The maximum number of columns you can introduce is 3.
How to Edit the Column Format in Google Docs
You can edit the column format in Google Docs to remove, reduce, or increase the number of columns within the document. Here’s how to do so:
Step 1: Select the columns in the Google Docs you want to change.

Step 2: On the Google Docs Ribbon, click the Format tab.
Step 3: Click Columns.
Step 4: If you want to reduce or increase the number of columns, choose from the options 1, 2, or 3 columns.
How to Customize the Text Columns in Google Docs
After converting your text into the preferred number of columns, you can also change the spacing between the columns. In addition, you can decide to include a line to show the boundary between columns. Here’s how to do so:
Step 1: Select the columns in the Google Docs you want to change.
Step 2: On the Google Docs Ribbon, click the Format tab.
Step 3: Click Columns from the option shown.
Step 4: Click More Options from the Columns list.
Step 5: Enter your preferred Spacing option in the Column options dialog box.

Step 6: Check the box for Line between columns.
Step 7: Click Apply to save your changes.

How to Insert a Column Break in Google Docs
Column breaks are useful in documents with text columns to indicate where text should stop. If your document is divided into two columns, inserting a column break ends the active column, moving the text cursor and any text after it to the top of the next column. This helps to control the flow of text within the document. Here’s how to insert a column break in Google Docs:
Step 1: Select the part of the column in Google Docs that you want to add a break.

Step 2: On the Google Docs Ribbon, click the Insert tab.
Step 3: Click the Break option shown.

Step 4: Click Column break.

Was this helpful?
Last updated on 29 August, 2024
Read Next
 How to Use Split Text to Columns in Google Sheets
Steps to Use Split Text to Columns in Google Sheets We use spreadsheet tools, such as Google Sheets, to analyze, edit, and organize different types of data.
How to Use Split Text to Columns in Google Sheets
Steps to Use Split Text to Columns in Google Sheets We use spreadsheet tools, such as Google Sheets, to analyze, edit, and organize different types of data.
 How to Add and Customize a Pie Chart in Google Docs
How to Insert Pie Charts in Google Docs There are two methods to add a pie chart in Google Docs.
How to Add and Customize a Pie Chart in Google Docs
How to Insert Pie Charts in Google Docs There are two methods to add a pie chart in Google Docs.
 How to Add, Customize and Delete a Text Box in Microsoft Word
Like in Microsoft PowerPoint, you can add a text box to a Microsoft Word document.
How to Add, Customize and Delete a Text Box in Microsoft Word
Like in Microsoft PowerPoint, you can add a text box to a Microsoft Word document.
 How to Add or Remove Strikethrough Text in Google Docs
Method 1: Add or Remove Strikethrough on Desktop Step 1: Launch Google Docs and highlight the text that needs the strikethrough.
How to Add or Remove Strikethrough Text in Google Docs
Method 1: Add or Remove Strikethrough on Desktop Step 1: Launch Google Docs and highlight the text that needs the strikethrough.
 How to Overlap Images or Text in Google Docs
Method 1: Overlap Images in Google Docs With Google Drawings In this method, you must first add your image as a drawing.
How to Overlap Images or Text in Google Docs
Method 1: Overlap Images in Google Docs With Google Drawings In this method, you must first add your image as a drawing.
 3 Easy Ways to Insert a Text Box In Google Docs
Because of its simple yet powerful interface, Google Docs has become the preferred option for many.
3 Easy Ways to Insert a Text Box In Google Docs
Because of its simple yet powerful interface, Google Docs has become the preferred option for many.
 How to Change the Text Direction in Google Docs
Change the Text Direction in Google Docs Using a PC By default, when you type on the Google Docs canvas, the text direction goes from left to right.
How to Change the Text Direction in Google Docs
Change the Text Direction in Google Docs Using a PC By default, when you type on the Google Docs canvas, the text direction goes from left to right.
 3 Best Ways to Double Underline Text in Google Docs
Method 1: Using Paragraph Borders This option is best used to underline text in a paragraph.
3 Best Ways to Double Underline Text in Google Docs
Method 1: Using Paragraph Borders This option is best used to underline text in a paragraph.
The article above may contain affiliate links which help support Guiding Tech. The content remains unbiased and authentic and will never affect our editorial integrity.