Google Sheets and Google Docs provide a free, online alternative to Microsoft Office, along with unique features. If you work on any of these tools, you must enter dates now and then. However, wrestling with date formats and remembering specific days can be a tedious, error-prone chore. Thankfully, you can insert a date picker in Google Sheets and Google Docs to make the job easier.

Gone are the days of manually typing dates. In this guide, we’ll show you how to insert a pop-up Calendar Date Picker into your Google Sheets and Google Docs. This nifty feature not only enhances your efficiency but also adds a touch of organization to your documents. And the best part is that it is easy to use. So, let’s dive in.
Why Should You Use a Pop-Up Calendar Date Picker
Picture this: You’re managing a project timeline, planning events, or tracking deadlines. Manually typing dates can be prone to errors and consume time. Thankfully, with a pop-up date picker, you don’t have to worry about these issues. The calendar ensures you pick the right date every time, eliminating the headache of formula errors and data inconsistencies.

Additionally, using the calendar GUI is much faster than meticulously typing the date. Pop-up calendars also add a touch of sophistication and professionalism to your work, making it look polished and well-organized. Essentially, a calendar date picker ensures precision, eliminates mistakes, and streamlines your workflow.
Now, let’s delve into the methods for Google Sheets and Google Docs.
How to Add a Pop-Up Calendar Date Picker on Google Sheets
Method 1: Change Cell Format
The first method is relatively straightforward, wherein you can define the kind of value a cell holds. Once you set the value to be categorized as a date, Google Sheets will automatically allow you to interact with a pop-up calendar to feed data into it. Here’s how to set it up.
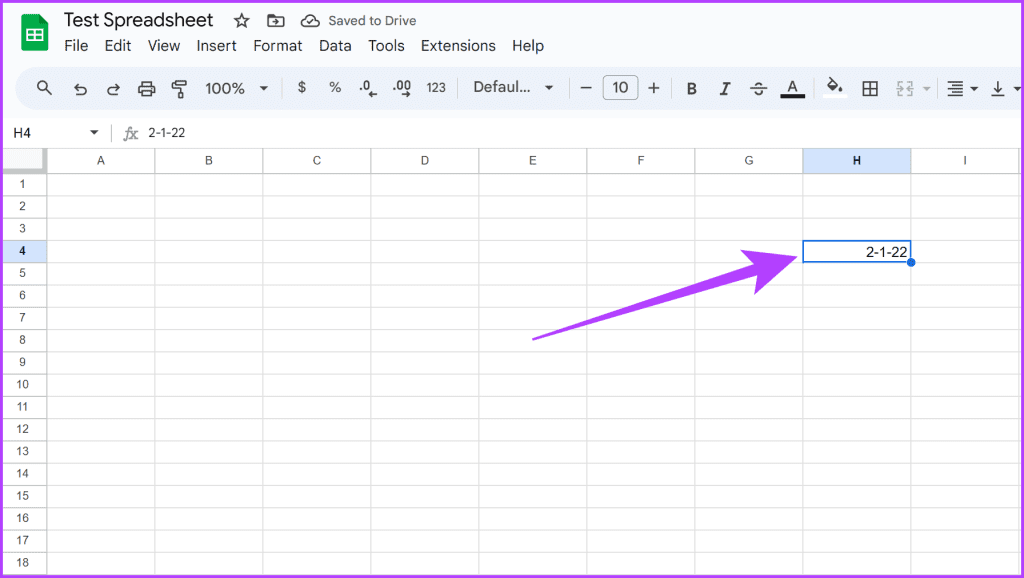
Step 1: Open your Google Sheet. Now, select the cell where you want the date picker. Here, enter a valid date in any format.
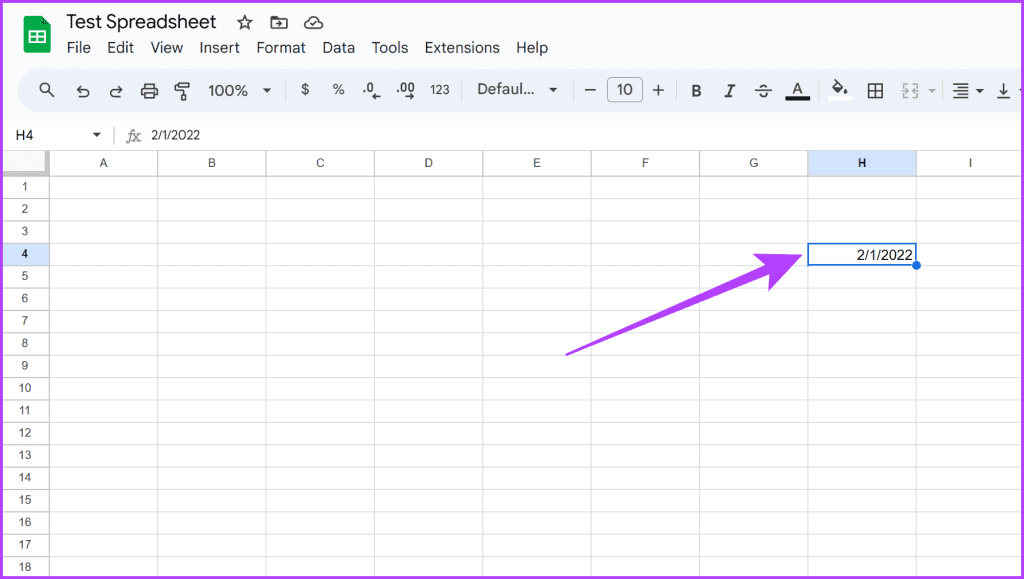
Step 2: Now, with the cell selected, navigate to the Format menu. Choose Number and select Date.

Step 3: The highlighted cell should now reflect as a date in the selected format.
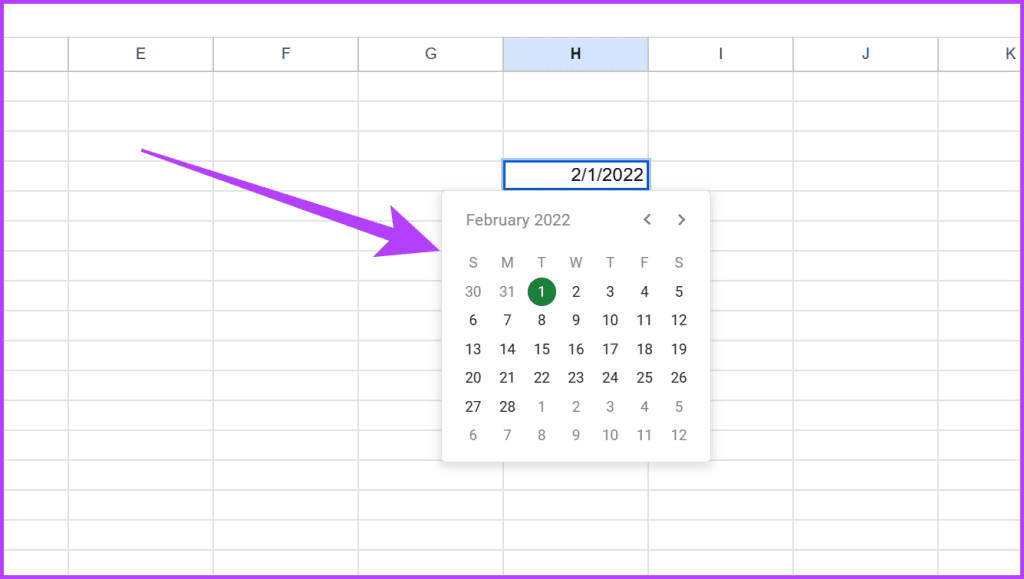
Step 4: And that’s it. Now, double-click on the cell, and the pop-up calendar should appear. You can now easily use the calendar to modify the date.
Method 2: Use Data Validation
While the previous method is straightforward, the cell must have some data before it can be converted to the Date format. A better way is to use data validation to create a custom check for selected cells. Here’s how to do that.
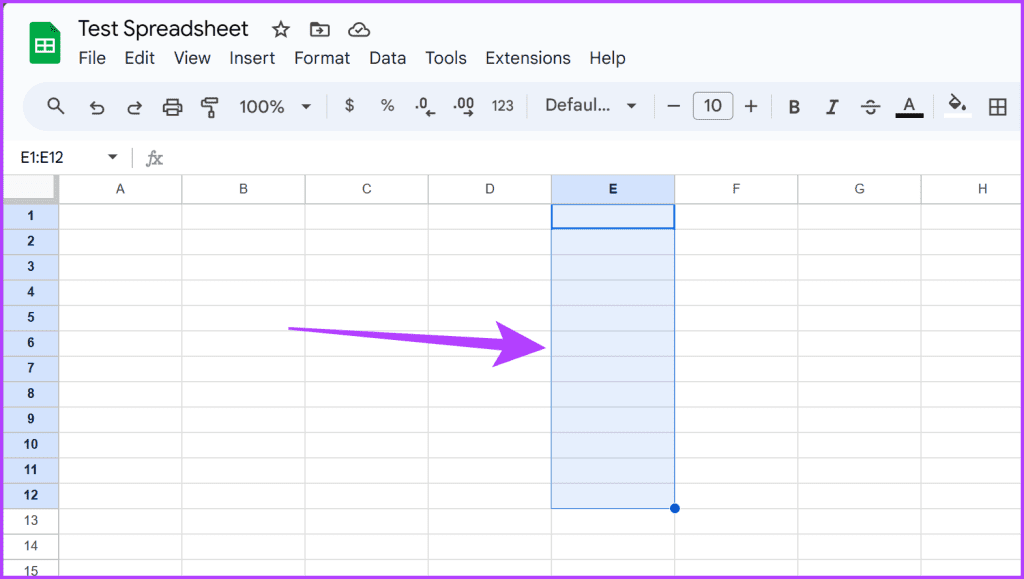
Step 1: Open your Google Sheet. Select the cell(s) where you want the date picker.
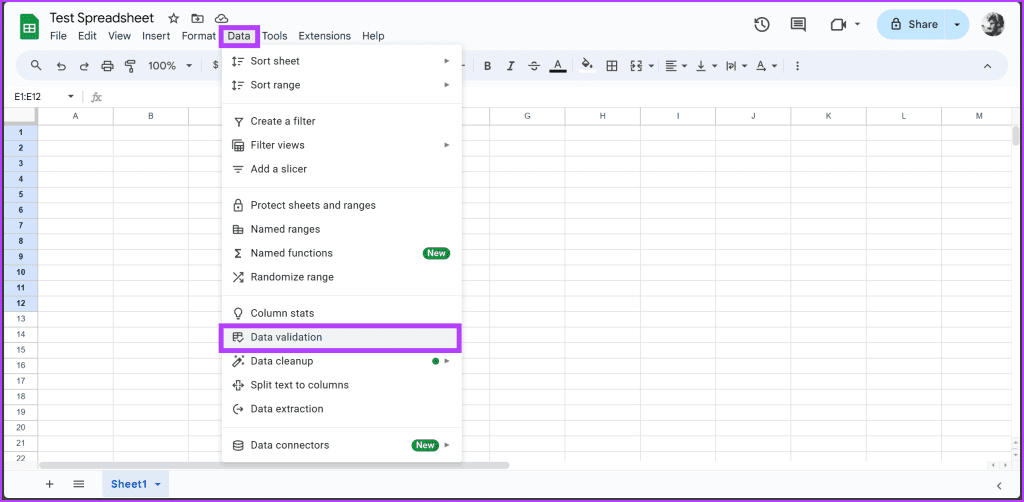
Step 2: Now, go to the Data menu and choose Data validation.
Step 3: You should see a ‘Data Validation rules’ panel on the right. Click on Add rule.

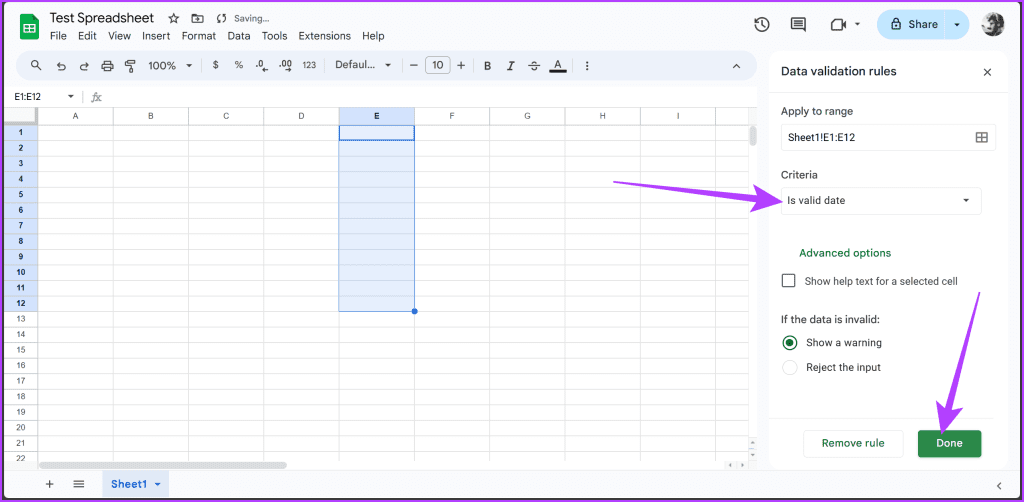
Step 4: In the new settings, set Criteria to ‘is valid date’. Once done, click on Done.
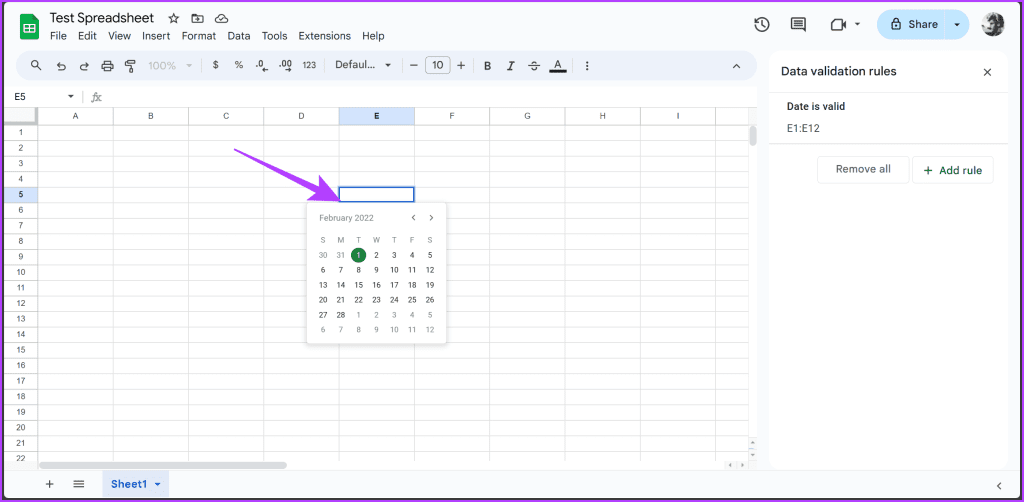
Step 5: That’s it. Now, double-click on the formatted texts for the pop-up calendar to appear.
How to Add a Pop-Up Calendar Date Picker on Google Docs
Method 1: Using Smart Chips Shortcut
Compared to a spreadsheet, the usage of dates in Google Docs is lower. However, it is still essential to ensure that you’re following the correct format of the date. The entire process is easy, thanks to the use of Smart Chips.
Step 1: Open your Google Docs file. Now, place your cursor where you want to insert the date, type @date, and press Enter.

Step 2: That’s it. A pop-up calendar should appear, letting you choose your desired date.

Method 2: Using Insert Menu
Alternatively, you can use the Insert menu to do the same. Navigate to Insert > Smart Chips > Date.
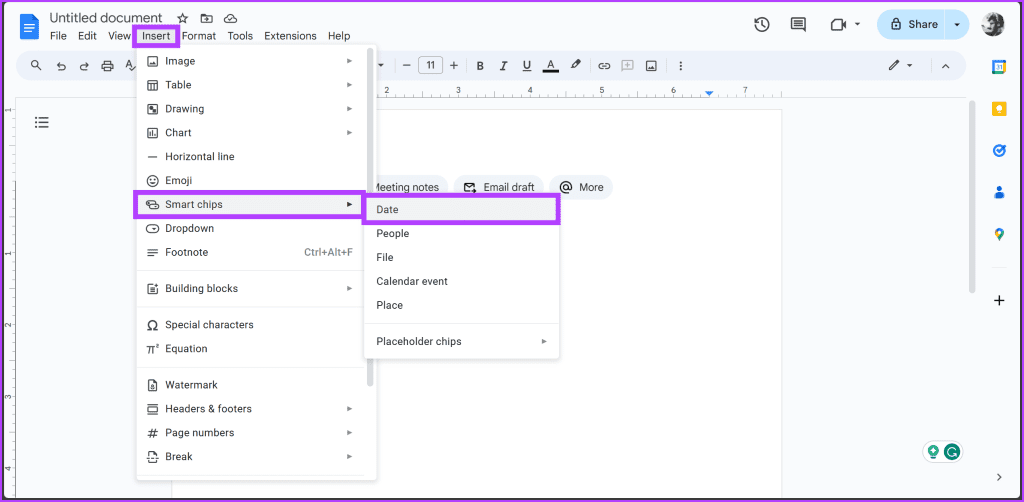
A pop-up calendar should appear, allowing you to select the date of your choice. Once done, the chosen date is inserted where your cursor was, complete with its pop-up calendar for future edits.

Add Dates Quickly
And there you have it. You can now embrace efficiency and accuracy by inserting pop-up calendar date pickers in Google Sheets and Google Docs. Say goodbye to date-related hiccups and hello to a smoother, more organized document and spreadsheet.
Was this helpful?
Last updated on 23 January, 2024
Read Next
 3 Ways to Change Date Created, Date Modified, and Other Attributes on Windows
Potential Risks and Considerations of Modifying File Attributes Manually changing the creation and modification date of any file on Windows can be useful for better organizing your files, making them
3 Ways to Change Date Created, Date Modified, and Other Attributes on Windows
Potential Risks and Considerations of Modifying File Attributes Manually changing the creation and modification date of any file on Windows can be useful for better organizing your files, making them
 How to Insert and Edit Pictures in Google Docs on Mobile and PC
How to Insert a Picture in Google Docs on PC Drag and drop: Open the Google Docs document and place your cursor where you want to insert the image.
How to Insert and Edit Pictures in Google Docs on Mobile and PC
How to Insert a Picture in Google Docs on PC Drag and drop: Open the Google Docs document and place your cursor where you want to insert the image.
 5 Tips to Insert Special Characters in Google Docs
Tip 1: Open Special Characters Library Faster To access the Insert Special Characters box in Google Docs, you usually need to follow two steps: selecting the Insert menu and clicking
5 Tips to Insert Special Characters in Google Docs
Tip 1: Open Special Characters Library Faster To access the Insert Special Characters box in Google Docs, you usually need to follow two steps: selecting the Insert menu and clicking
 How to Insert a Scanned Document in Google Docs
Types of Attachments Supported by Google Docs Besides charts, tables, and drawings, you can add images in all formats, such as JPG, PNG, GIFs, etc., to Docs.
How to Insert a Scanned Document in Google Docs
Types of Attachments Supported by Google Docs Besides charts, tables, and drawings, you can add images in all formats, such as JPG, PNG, GIFs, etc., to Docs.
 How to Insert Endnotes and Footnotes in Google Docs
How to Insert a Footnote in Google Docs On Web Step 1: Go to Google Docs and open the file where you want to add the endnotes or footnotes.
How to Insert Endnotes and Footnotes in Google Docs
How to Insert a Footnote in Google Docs On Web Step 1: Go to Google Docs and open the file where you want to add the endnotes or footnotes.
 3 Easy Ways to Insert a Text Box In Google Docs
Because of its simple yet powerful interface, Google Docs has become the preferred option for many.
3 Easy Ways to Insert a Text Box In Google Docs
Because of its simple yet powerful interface, Google Docs has become the preferred option for many.
 8 Ways to Insert Emojis in Google Docs
Method 1: Using the Menus Search Feature You can add an emoji to your Google Docs file with a simple keyboard shortcut.
8 Ways to Insert Emojis in Google Docs
Method 1: Using the Menus Search Feature You can add an emoji to your Google Docs file with a simple keyboard shortcut.
 4 Ways to Insert Images in Google Docs
Method 1: Add Photos From Camera Roll to Google Docs You can add photos in Google Docs from the Camera Roll of your iPhone or Android phone.
4 Ways to Insert Images in Google Docs
Method 1: Add Photos From Camera Roll to Google Docs You can add photos in Google Docs from the Camera Roll of your iPhone or Android phone.
The article above may contain affiliate links which help support Guiding Tech. The content remains unbiased and authentic and will never affect our editorial integrity.