Potential Risks and Considerations of Modifying File Attributes
Manually changing the creation and modification date of any file on Windows can be useful for better organizing your files, making them more secure, and managing them easily. However, it’s essential to know that some risks are involved in making these changes.
- Data Integrity: File properties often include extra information (metadata) important for understanding the file. Wrongly changing or removing metadata from the file could make it unusable or make programs think it’s something else.
- System Stability: Some properties are important for programs and things to work properly. Changing system files or properties could make your computer act weird, crash, or stop working altogether.
- Application Compatibility: Programs often rely on specific file properties to work properly. If you change these properties, the programs might not work anymore.
- Security: File properties are sometimes used for security, like to control who can access or change files or to say if a file can be run. Changing these properties without permission could make your computer less secure.
- Timestamps and File Sorting: Changing timestamps (when files were created, changed, or last opened) can affect how files are sorted, how different versions of the same file are kept track of, and how backups are made.
- User Awareness: Users might not be aware that file properties have been changed, leading to confusion or problems.
Method 1: Change File Attributes Using the PowerShell
While File Explorer doesn’t provide a direct way to modify file details like creation, access, or modification dates, you can leverage the PowerShell to accomplish this task.
Note: Ensure to create a Windows restoration point before using PowerShell to avoid any data loss.
Step 1: Navigate to the file’s location. Copy the file location from the address bar.

Step 2: Click the Windows icon. Search for Windows PowerShell and run it as administrator. If prompted, click Yes.
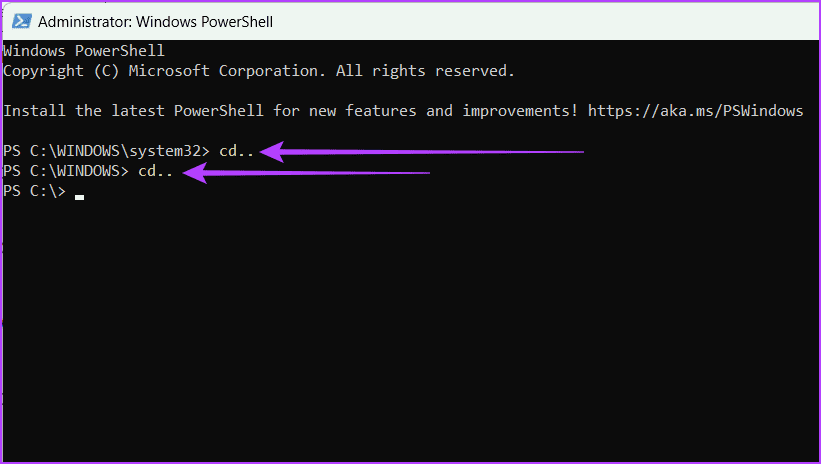
Step 3: Type the following command twice and press the Enter key on your keyboard.
cd..
Explanation: When you first opened PowerShell, you were in the system32 folder, and using the cd.. command, you moved back one step each time to reach the main directory.
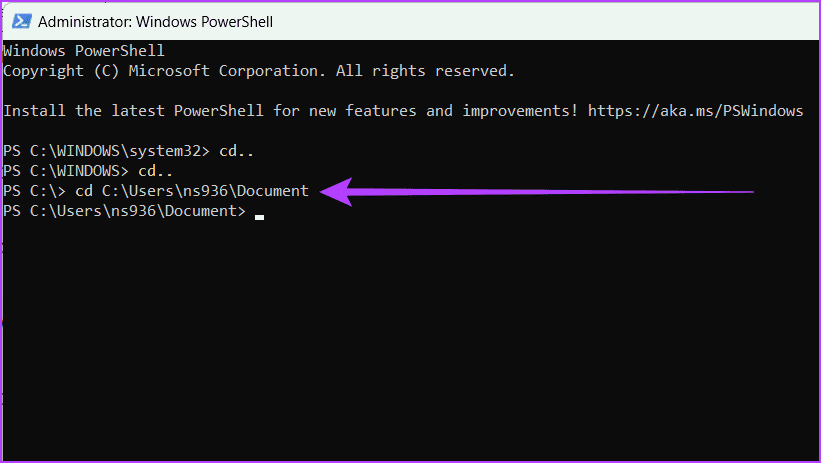
Step 4: In the PowerShell window, type cd followed by a space and paste the file location you copied in Step 1. Hit Enter on your keyboard.
cd C:\Users\ns936\Document
Note: The location of your file may not be the same as mine.
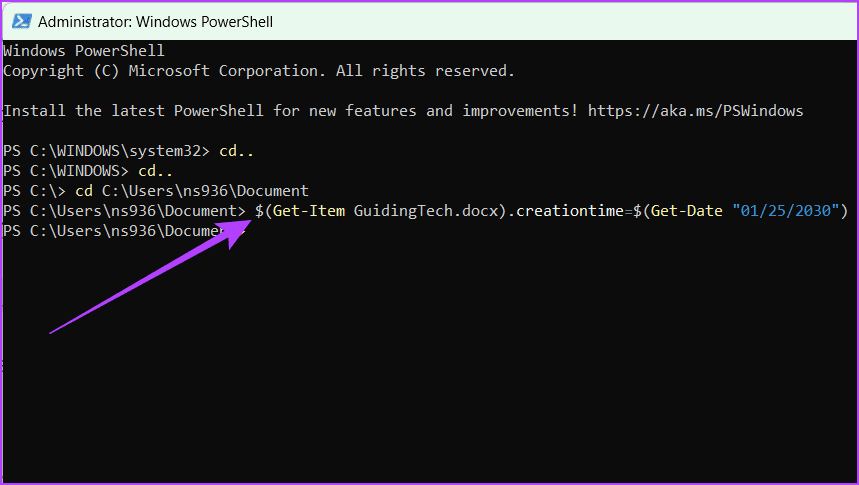
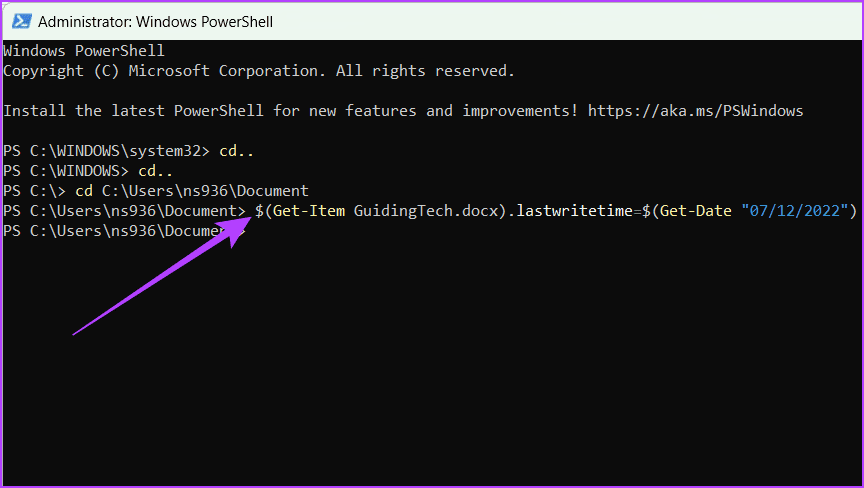
Step 5: Use the following commands and press Enter.
Note: Replace the file-name and file-extension with your actual file name and file type. Also, change the mm/dd/yyyy with the dates you want.
- Change creation time: $(Get-Item file-name.file-extension).creationtime=$(Get-Date “mm/dd/yyyy”)
$(Get-Item GuidingTech.docx).creationtime=$(Get-Date "mm/dd/yyyy")
- Change last access time: $(Get-Item file-name.file-extension).lastaccesstime=$(Get-Date “mm/dd/yyyy”)
$(Get-Item GuidingTech.docx).lastaccesstime=$(Get-Date "mm/dd/yyyy")

- Change last write time: $(Get-Item file-name.file-extension).lastwritetime=$(Get-Date “mm/dd/yyyy”)
$(Get-Item GuidingTech.docx).lastwritetime=$(Get-Date "mm/dd/yyyy")
Code Symbols Explanation
Below mentioned is the explanation of the symbols used in the steps above:
- cd: Change directory.
- [..]: Refers to the parent directory.
- cd..: Moves up one level in the directory hierarchy.
- [$]: Denotes a variable.
- [.]: Connect two points.
Also Read: How to fix PowerShell not opening on Windows 11
Method 2: Removing File Attributes Using Third-Party Tools
Step 1: Download and install the Bulk File Changer software. Unzip the file and open the application.
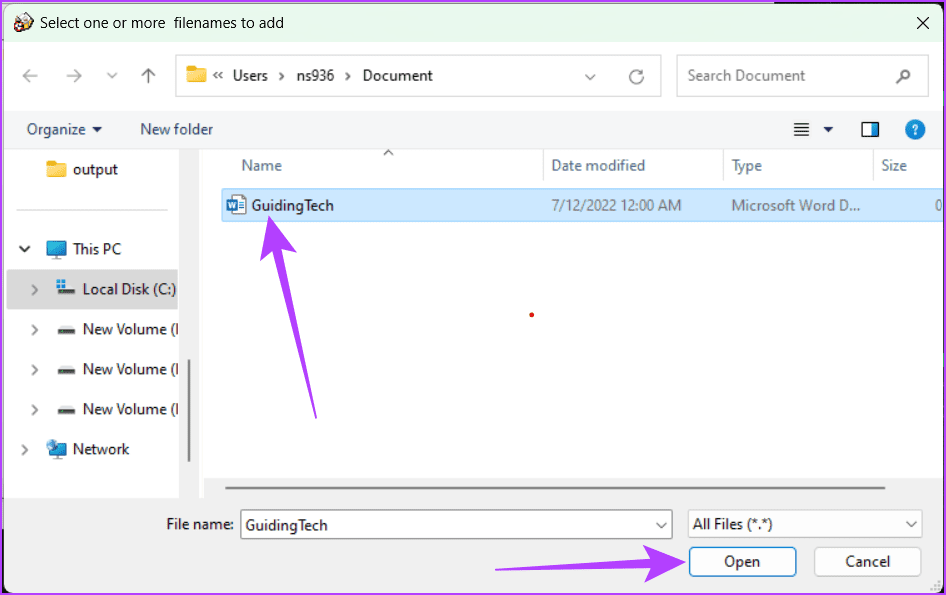
Step 2: Go to Files and click Add Files.
Tip: You can also directly press F2 on your keyboard.

Step 3: Choose the files you want to edit and click Open.
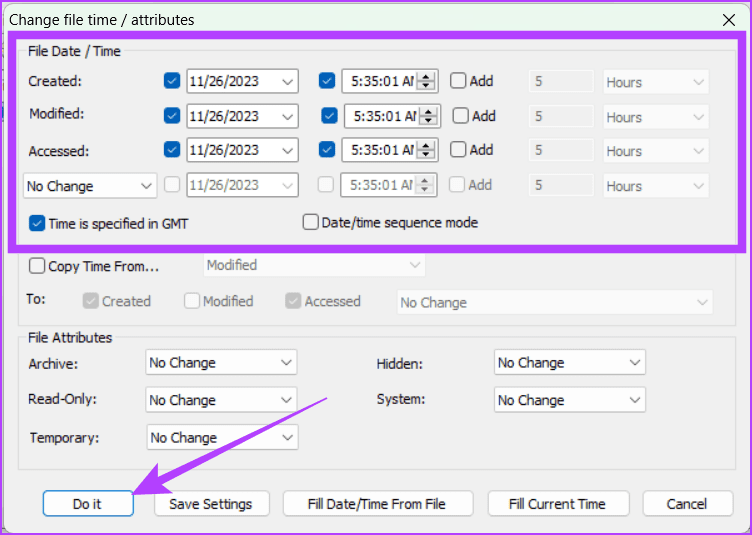
Step 4: Select the file and click the Change Time/Attributes button (it looks like a blue clock).

Step 5: Check the box next to Created, Modified, and Accessed. Enter your preferred date in the box. You can further check the box before time and Add to modify the time of the files.
Step 6: Finally, click Do it to save the changes.
Note: Attribute Changer’s steps may differ since it’s a separate app.
Method 3: Remove File Attributes Using Windows File Explorer
The File Explorer doesn’t allow you to change important details like when a file was created, modified, or accessed. However, you can still remove details like the author’s name, copyright information, and version number. To do so, follow the steps below:
Step 1: Head to the file you want to modify. Right-click on the file and choose Properties.

Step 2: Navigate to the Details tab and click Remove Properties and Personal Information.

Step 3: Choose any one of the below-mentioned.
- Create a copy with all possible properties removed (This makes a duplicate without the extra details)
- Remove the following properties from this file
Step 4: Check the boxes next to the attributes you want to remove and click OK.

Also Read: How to hide files and folders in Windows 11
Was this helpful?
Last updated on 27 June, 2024
1 Comment
Leave a Reply
Read Next
 How to Change Date and Time on Windows 10 and 11
How to Change Date and Time in Windows Step 1: On the desktop, right-click on the Date and time widget at the bottom right corner.
How to Change Date and Time on Windows 10 and 11
How to Change Date and Time in Windows Step 1: On the desktop, right-click on the Date and time widget at the bottom right corner.
 2 Ways to Change Your Age (and Birth Date) on Discord
Things to Know Before Changing Your Age on Discord 1. Discord's 'Terms of Service' clearly state that users must be at least 13 years old to use the platform.
2 Ways to Change Your Age (and Birth Date) on Discord
Things to Know Before Changing Your Age on Discord 1. Discord's 'Terms of Service' clearly state that users must be at least 13 years old to use the platform.
 How to Show Missing Date and Time in Taskbar on Windows
A few days back, I was playing with the Taskbar settings on my Windows laptop.
How to Show Missing Date and Time in Taskbar on Windows
A few days back, I was playing with the Taskbar settings on my Windows laptop.
 Top 5 Ways to Add Date and Timestamp to Photos on Android
Over the last couple of iterations, the humble phone camera has evolved significantly.
Top 5 Ways to Add Date and Timestamp to Photos on Android
Over the last couple of iterations, the humble phone camera has evolved significantly.
 6 Ways to Fix the Wrong Date and Time on Mac
Have you ever glanced at your Mac's clock only to find it displaying the wrong time?
6 Ways to Fix the Wrong Date and Time on Mac
Have you ever glanced at your Mac's clock only to find it displaying the wrong time?
 4 Ways to Get Google Search Results by Date
Method 1: Search by Date Using the Google Any Time Tool The Google Any Time tool is handy when researching or looking for information from a specific time.
4 Ways to Get Google Search Results by Date
Method 1: Search by Date Using the Google Any Time Tool The Google Any Time tool is handy when researching or looking for information from a specific time.
 How To Fix Your Phone Date Is Inaccurate Error In WhatsApp
When WhatsApp is your go-to platform for communicating with friends and family, you'd want it to function properly.
How To Fix Your Phone Date Is Inaccurate Error In WhatsApp
When WhatsApp is your go-to platform for communicating with friends and family, you'd want it to function properly.
 How to Add Date, Time and Weather to Your Phone’s Home Screen
How to Show Date, Time, and Weather on iPhone Home Screen You can do so, in the following two ways.
How to Add Date, Time and Weather to Your Phone’s Home Screen
How to Show Date, Time, and Weather on iPhone Home Screen You can do so, in the following two ways.
The article above may contain affiliate links which help support Guiding Tech. The content remains unbiased and authentic and will never affect our editorial integrity.
What in the hell kind of computer user uses MM/DD/YYYY instead of YYYY/MM/DD like the system itself uses by default?
Deranged behavior.