Common Fixes
- Disable Do Not Disturb from the Notification Shade: Select the Notification bell at the rightmost end of the Windows Taskbar and click the blue Do Not Disturb button at the top right to disable it.
- Update Windows 11: Press the Windows + I keys to open Settings, select Windows Update in the left sidebar, and install available system updates.
Fix 1: Turn off the Do Not Disturb Schedule
A pre-configured schedule is a common culprit behind Do Not Disturb turning on itself on Windows 11. Tweak the Windows Settings to disable it.
Step 1: Open Windows Settings (press the Windows + I keys), click System in the left sidebar, and select Notifications.

Step 2: Expand Turn on do not disturb automatically and disable all check marks besides enabled conditions.

Fix 2: Disable All Automatic Rules in Focus Settings
An active focus session can automatically turn on Do Not Disturb on Windows 11 to suppress notifications. Turn it off from Windows settings and disable all its automatic rules.
Step 1: Press the Windows + I keys to open the Settings app, click System in the sidebar, and select Focus.

Step 2: Stop the current focus session (if active) and uncheck all its automatic rules, including the Turn on do not disturb.

Fix 3: Disable the Windows Game Mode
The Game Mode on Windows 11 automatically blocks incoming notifications (like Do Not Disturb) to prevent disruptions during gameplay. Disable it to continue receiving new system alerts while playing a game.
Step 1: Open Windows Settings > click Gaming in the left sidebar > select Game Mode.
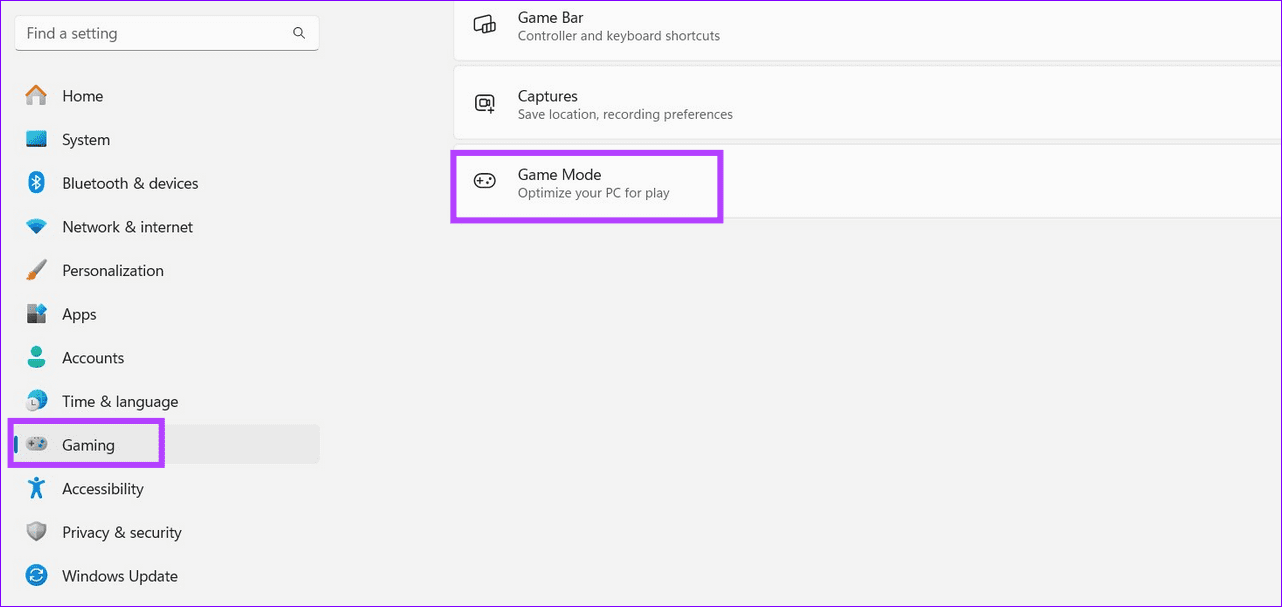
Step 2: Turn off the Game Mode toggle to disable it.

Fix 4: Turn off Quiet Hours in the Group Policy Editor
If adjusting the Do Not Disturb and Focus settings didn’t work, you can tweak Windows policy rules using the Group Policy Editor to stop Do Not Disturb from turning on by itself.
Step 1: Press the Windows + R keys simultaneously to open the Run dialog, type gpedit.msc, and hit Enter.

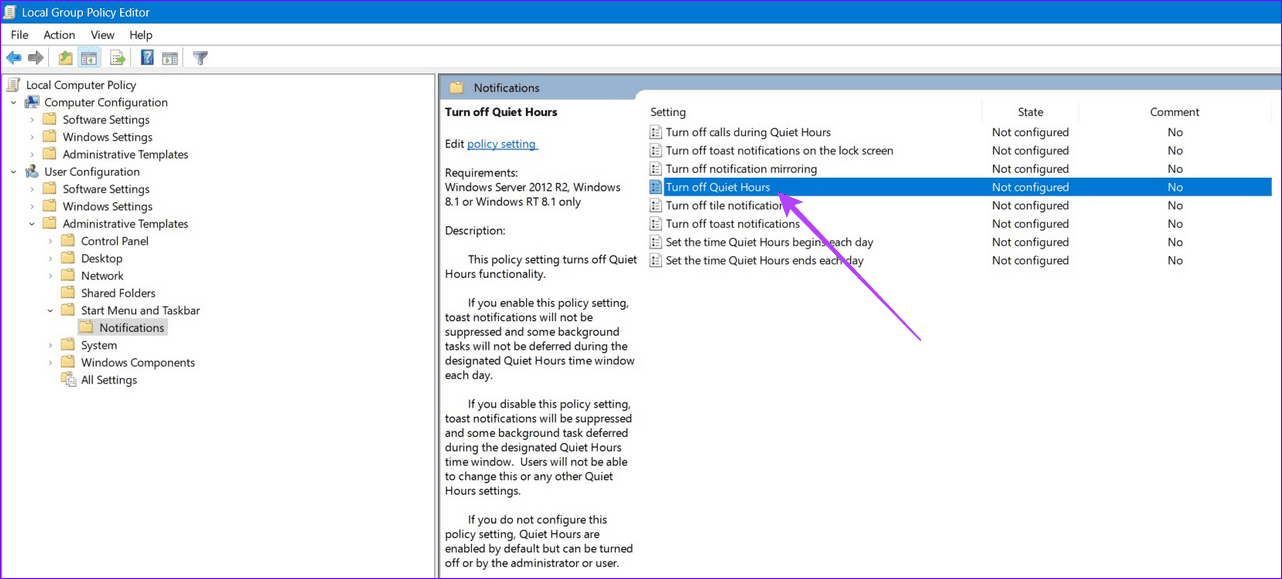
Step 2: Navigate to User Configuration > Administrative Templates > Start Menu and Taskbar > Notifications, and open the Turn off Quiet Hours policy.
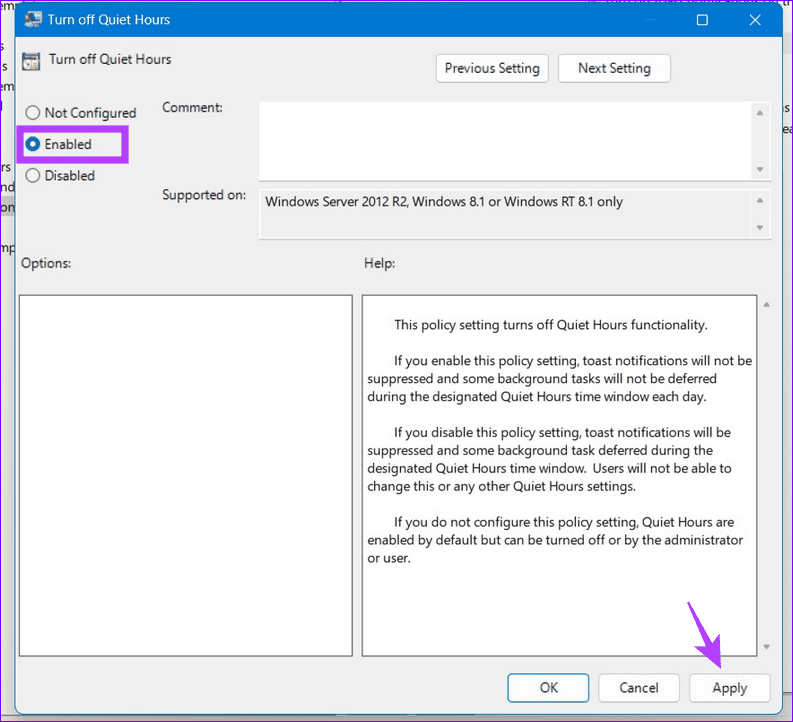
Step 3: Set policy to Enabled and click Apply to save changes.
Fix 5: Disable Auto-DND With Command Prompt
Lastly, you can edit Windows registry values using Command Prompt to stop Do Not Disturb from turning on by itself on Windows 11.
Note: Ensure to back up Windows Registry before making changes. Open Registry Editor, click File > Export > select All under Export range.
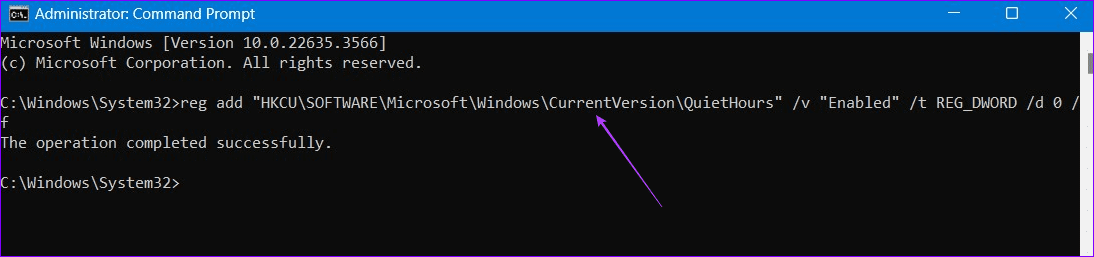
Step 1: Press the Windows key, search Command Prompt, and click Run as administrator.

Step 2: Copy-paste the below command, hit Enter, and reboot your PC.
reg add “HKCU\SOFTWARE\Microsoft\Windows\CurrentVersion\QuietHours” /v “Enabled” /t REG_DWORD /d 0 /f
Alternative: Enable Priority Notifications
If nothing works and you continue to miss important app notifications, enable priority notifications for the desired apps to get alerts even when DND is active.
Step 1: Select System under the Windows Settings app (check the above steps) and click Notifications.

Step 2: Select Set priority notifications.

Step 3: Click Add Apps and pick your desired apps in the popup menu.

Was this helpful?
Last updated on 21 May, 2024
Read Next
 5 Best Ways to Fix Do Not Disturb Turning on Itself on Android
https://youtu.be/KPSTdO-aMpo Fix 1: Check the Do Not Disturb Schedule Step 1: Swipe up from the home screen to open the app drawer menu.
5 Best Ways to Fix Do Not Disturb Turning on Itself on Android
https://youtu.be/KPSTdO-aMpo Fix 1: Check the Do Not Disturb Schedule Step 1: Swipe up from the home screen to open the app drawer menu.
 4 Ways to Fix Do Not Disturb Turning on Automatically on iPhone
Fix 1.
4 Ways to Fix Do Not Disturb Turning on Automatically on iPhone
Fix 1.
 5 Fixes if Spotify Starts Playing by Itself on Android and iPhone
Basic Fixes Update the Spotify app: Using an outdated version may lead to such unusual behavior.
5 Fixes if Spotify Starts Playing by Itself on Android and iPhone
Basic Fixes Update the Spotify app: Using an outdated version may lead to such unusual behavior.
 Top 7 Fixes for Apple Music Starts Playing by Itself on iPhone
Picture this: you're in an important meeting or a quiet library, and your iPhone is lying nearby.
Top 7 Fixes for Apple Music Starts Playing by Itself on iPhone
Picture this: you're in an important meeting or a quiet library, and your iPhone is lying nearby.
 4 Ways to Fix Windows Mobile Hotspot Keeps Turning off
Fix 1: Disable Mobile Hotspot Power Saving Disable the power saving feature to prevent Windows from automatically turning off the hotspot when not in use.
4 Ways to Fix Windows Mobile Hotspot Keeps Turning off
Fix 1: Disable Mobile Hotspot Power Saving Disable the power saving feature to prevent Windows from automatically turning off the hotspot when not in use.
 6 Ways to Fix Bluetooth Keeps Turning Off on Windows 11
Fix 1: Toggle the Airplane Mode Toggling the airplane mode in Windows is a neat way to refresh your PC’s wireless connections, including Bluetooth.
6 Ways to Fix Bluetooth Keeps Turning Off on Windows 11
Fix 1: Toggle the Airplane Mode Toggling the airplane mode in Windows is a neat way to refresh your PC’s wireless connections, including Bluetooth.
 4 Best Ways to Fix Windows PC Not Turning Off After Shutdown
Fix 1: Disable Fast Startup Fast Startup is a useful feature that puts your computer into a hibernation state rather than a full shutdown.
4 Best Ways to Fix Windows PC Not Turning Off After Shutdown
Fix 1: Disable Fast Startup Fast Startup is a useful feature that puts your computer into a hibernation state rather than a full shutdown.
 5 Ways to Fix Android Phone Automatically Turning Down Volume
https://youtu.be/c3evW3GIp5w Basic Fixes Restart device: Restart your Android device to get rid of temporary bugs and glitches.
5 Ways to Fix Android Phone Automatically Turning Down Volume
https://youtu.be/c3evW3GIp5w Basic Fixes Restart device: Restart your Android device to get rid of temporary bugs and glitches.
The article above may contain affiliate links which help support Guiding Tech. The content remains unbiased and authentic and will never affect our editorial integrity.