A Mac is a great tool for learning and discovery for your kids. But as they access the world of the internet, they can come across content that is inappropriate for their age. So, it is wise to set up Parental Controls on your Mac or your kid’s Mac.
Setting up Parental Controls will help you control your child’s internet and Mac activity. This post will walk you through the steps required to set up Parental Controls on Mac and the features available for parents. So, let’s get to it.
Enable Family Sharing on Mac
Family Sharing is not just limited to sharing in-app purchases, payment methods, iCloud Storage, and group calendars. It also lets you set up Parental Controls on your Mac to monitor your child’s Mac usage. You need to create a child account under Family Sharing to set up Parental Controls. Here’s how.
Step 1: Press Command + Spacebar to open Spotlight Search, type System Settings, and press Return.

Step 2: Click on your profile name from the left menu.

Step 3: Select Family Sharing.

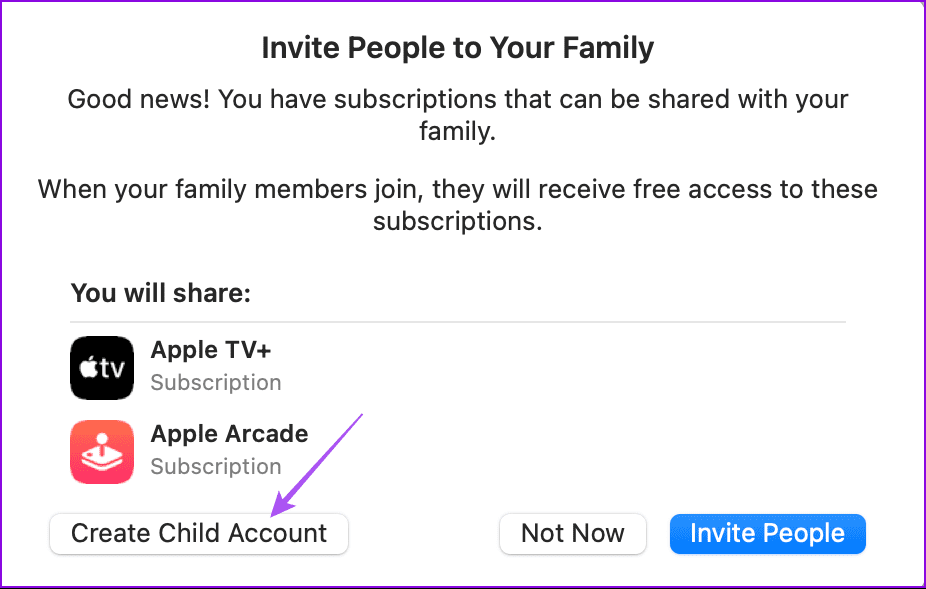
Step 4: Click on Set Up Family to get started.

Step 5: Select Create Child Account from the prompt that follows.
Step 6: Click on Add Member to add your child’s account.

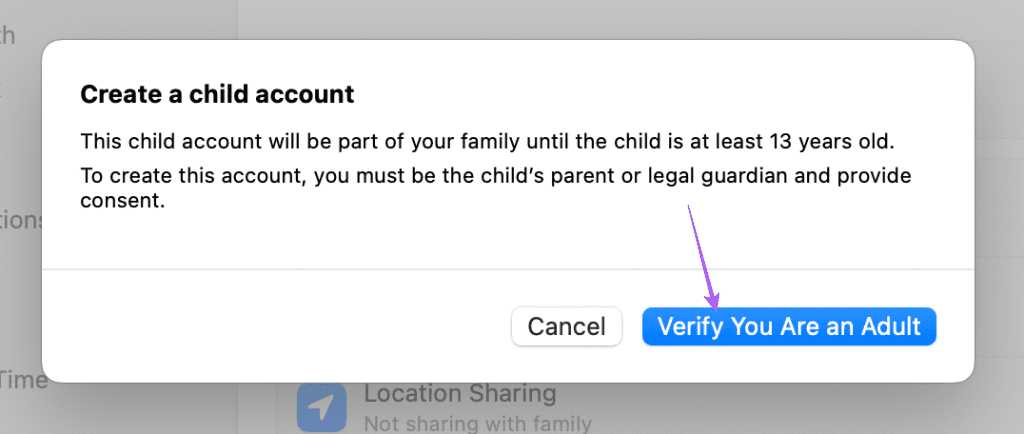
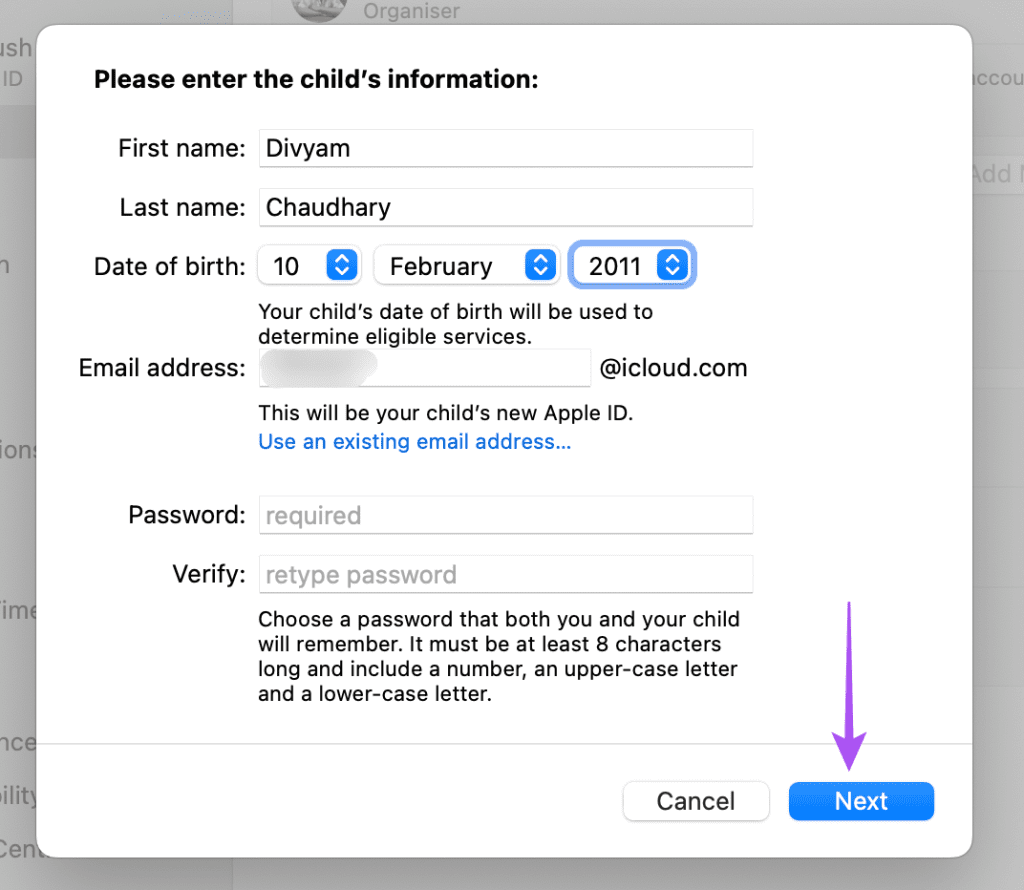
Step 7: Click on ‘Verify You are an Adult’. You will now be asked to accept the Terms and Conditions and enter your child’s information. Do note that you can only add a child account if your kid is under 13 years of age.
Step 8: Once entered, set a password for your child’s account and click on Next.
Step 9: Confirm the phone number for receiving Two-Factor Authentication codes.

Step 10: Agree to the Terms and Conditions, Ask To Buy, and Location Sharing for your child’s account.
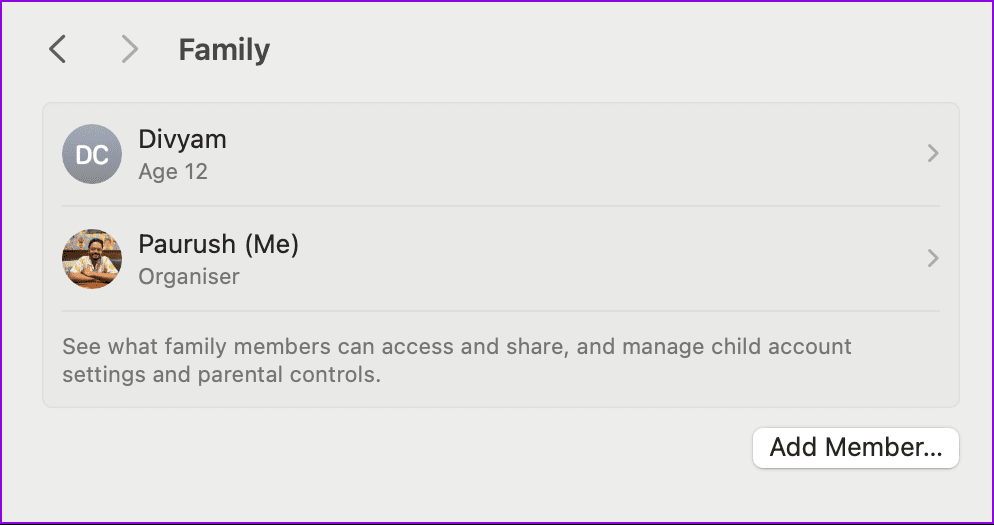
Once done, you will be able to spot your child’s account in Family Sharing.
Set Up Parental Controls on Mac
After setting up Family Sharing, you can now proceed to select Parental Controls under Screen Time. These will include different options like App Limits, Downtime, Content and Privacy Restrictions, Screen Distance, and more.
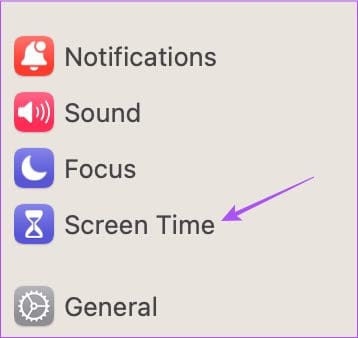
Step 1: Open Settings on your Mac and click on Screen Time from the left menu.
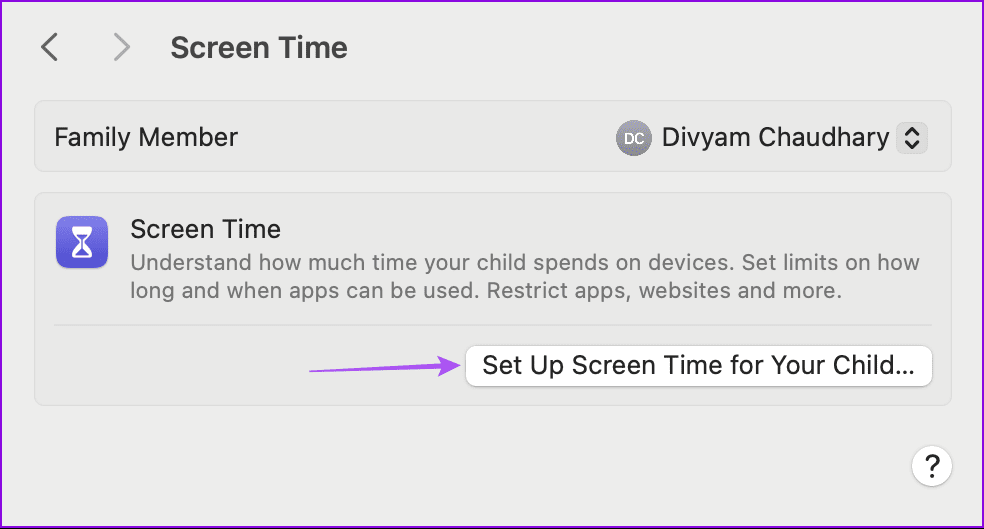
Step 2: Select your child’s account from the Family Member dropdown menu.

Step 3: Select ‘Set Up Screen Time For Your Child’.
Step 4: Click on Continue to start the process.

The app will then ask you to enable Web Content Restrictions, Communication Safety, Screen Distance, and enabling App and Website Activity.
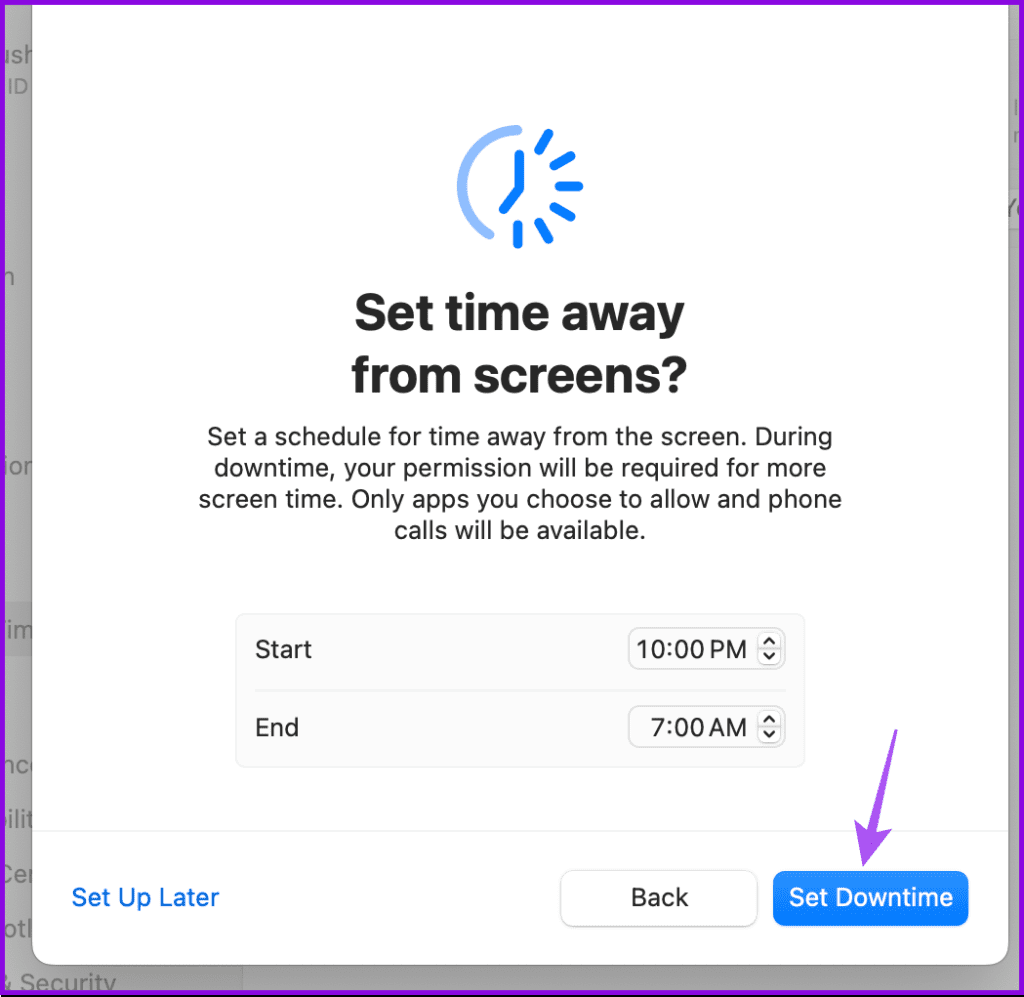
Step 5: Enter the Downtime duration for your Mac and click on Set Downtime.
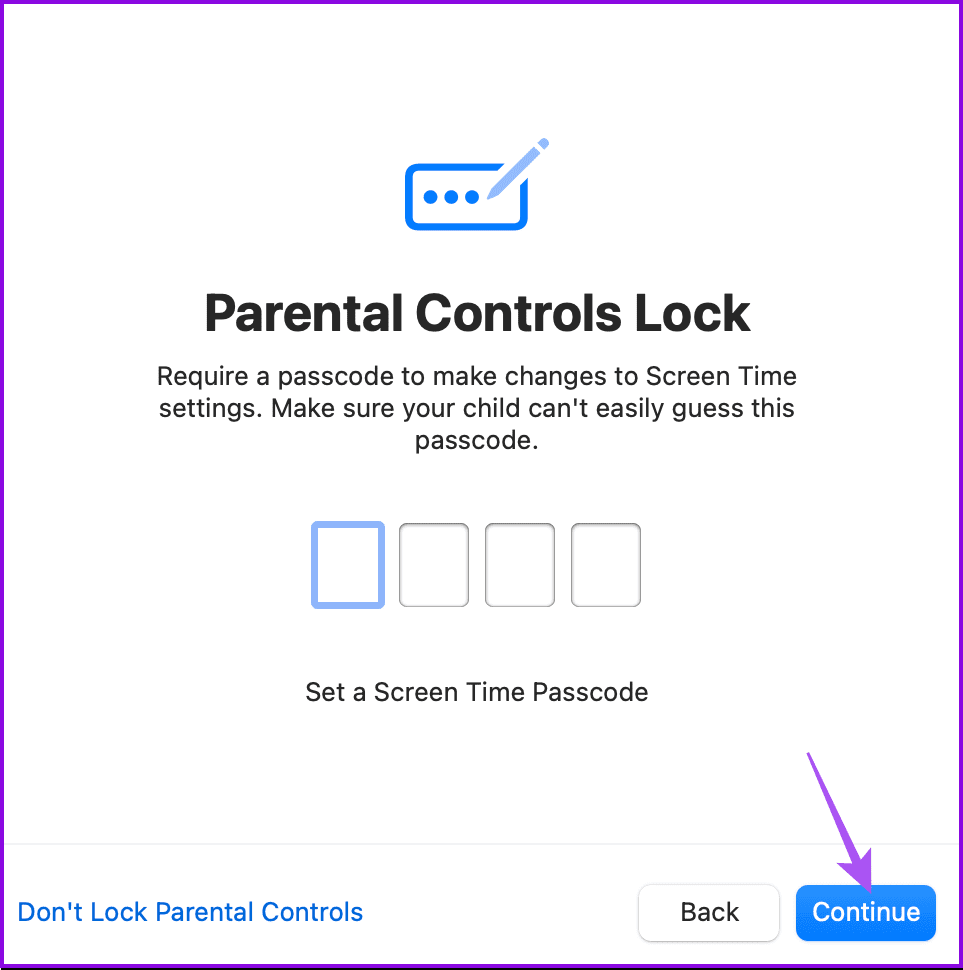
Step 6: Set a Screen Time Passcode for your child’s account and click on Continue.
And just like that, you now have successfully enabled Parental Controls on your Mac. You will see all the relevant options under Screen Time listed for your child’s account.

You can also learn the steps to remove or reset a forgotten Screen Time passcode.
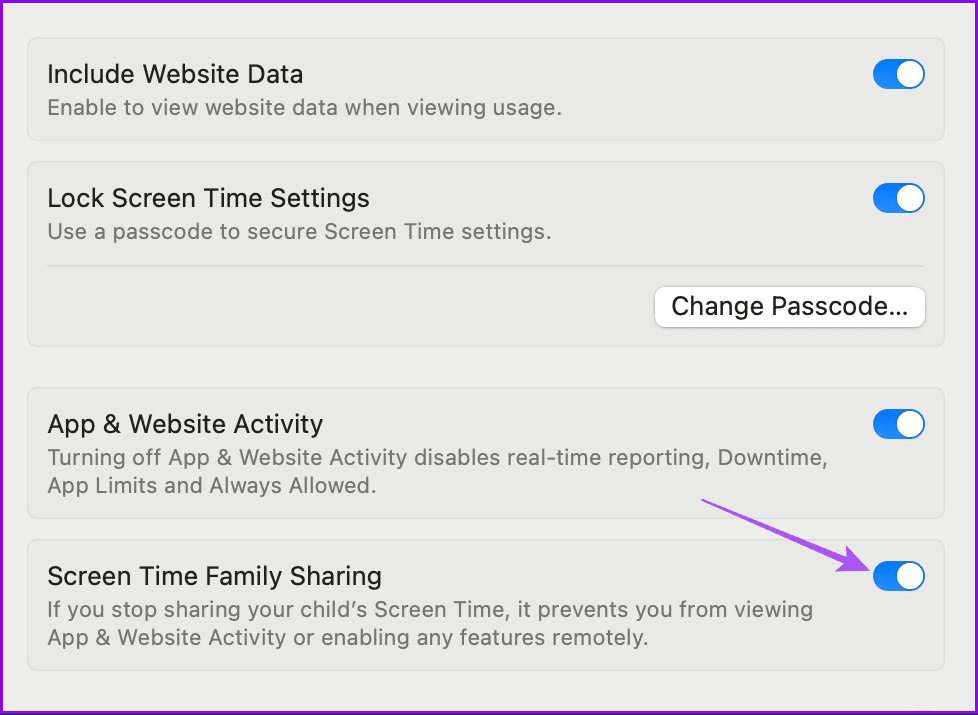
We would also advise you to enable ‘Screen Time Family Sharing’ for your kid’s account. Keeping this feature disabled will prevent you from viewing App and Website Activities or enabling features remotely for your child’s account.
You can also refer to the following posts to learn more about features available under Parental Controls in Screen Time.
Remove Child Account From Family Sharing on Mac
In case you wish to remove your kid’s account from Family Sharing, here’s how to do it on your Mac.
Step 1: Open Settings on your Mac and click on Family from the left menu.

Step 2: Click on your child’s account name.
Step 3: Click on Remove.
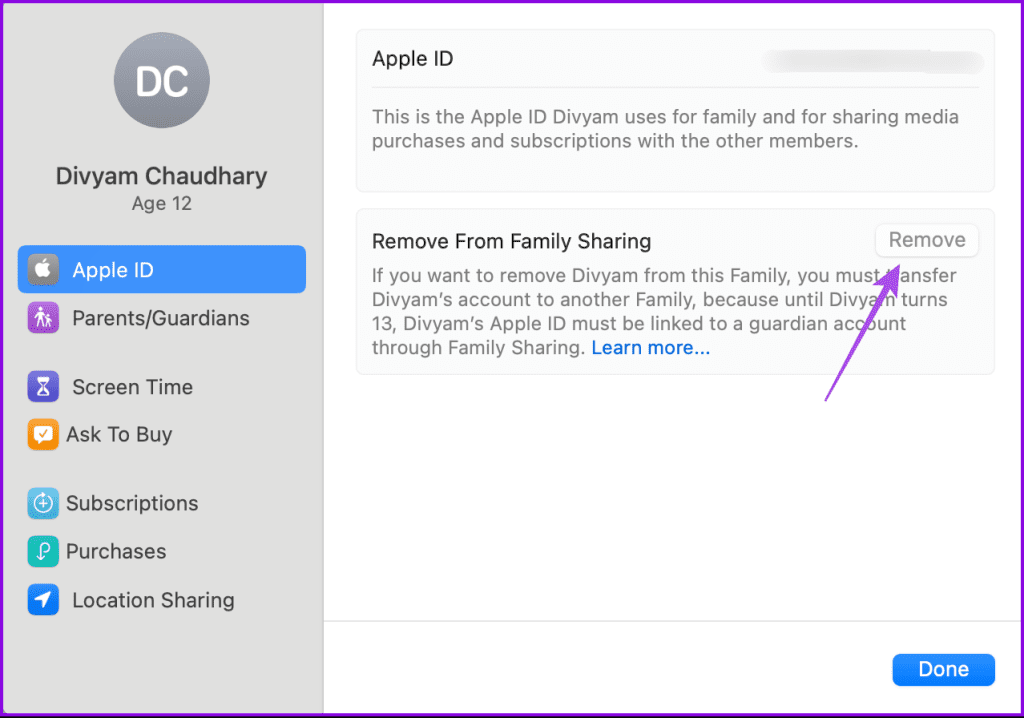
If the Remove button is greyed out, you will have to transfer your child’s account to another Family account. This is applicable if your child is under 13 years of age.
Stop Using Family Sharing on Mac
You can also stop using Family Sharing altogether on your Mac. Here’s how.
Step 1: Open Settings on your Mac and click on Family from the left menu.
Step 2: Click on your account name.
Step 3: Select Apple ID from the left menu and click on ‘Stop Using Family Sharing.’

Step 4: Follow the on-screen instructions to complete the process.
Do note that you won’t be able to turn off Family Sharing if your child is under 13 years of age and if the account has not been transferred to a new Family account.
Set Up Parental Control Without Family Sharing on Mac
If you want to add some restrictions without enabling Family Sharing, you can use the Screen Time menu on your Mac. You don’t need to create a child account for this. You can refer to our post to learn how to set up Screen Time on your Mac.
Keep an Eye
Once you set up Parental Controls on your Mac, you can have full control over your child’s interaction with technology and the internet. As a parent, it becomes imperative to protect your child’s privacy and prevent exposure to anything that’s inappropriate. Apple gives you another option called Sensitive Content Warning that can be enabled on your Mac. As the name suggests, Sensitive Content Warning can notify you of the risk of exposure to sensitive content like nudity, graphic violence, animal abuse, and other triggering experiences.
Was this helpful?
Last updated on 31 January, 2024
Read Next
 How to Set Up and Use Fire TV Stick Parental Controls
Most services now have their app on streaming devices like the Fire TV Stick.
How to Set Up and Use Fire TV Stick Parental Controls
Most services now have their app on streaming devices like the Fire TV Stick.
 How to Set Up Parental Controls on Google TV and Android TV
The Google TV interface is replacing Android TV as the default interface in most smart TVs.
How to Set Up Parental Controls on Google TV and Android TV
The Google TV interface is replacing Android TV as the default interface in most smart TVs.
 How to Set Up Parental Controls on Snapchat
Snapchat is a popular social media platform, especially among younger audiences, as it allows them to share their best moments instantly.
How to Set Up Parental Controls on Snapchat
Snapchat is a popular social media platform, especially among younger audiences, as it allows them to share their best moments instantly.
 How to Fix YouTube Button Controls Not Hiding
Usually, when you play a video on YouTube, the on-screen buttons disappear immediately or with just one tap.
How to Fix YouTube Button Controls Not Hiding
Usually, when you play a video on YouTube, the on-screen buttons disappear immediately or with just one tap.
 How to Manage and Customize Controls on OnePlus Buds
While Android offers customization on many fronts, it lacks a built-in earbuds control panel.
How to Manage and Customize Controls on OnePlus Buds
While Android offers customization on many fronts, it lacks a built-in earbuds control panel.
 How to Access and Manage Your Google Activity Using Google Activity Controls
Google offers a wide range of products in the technology space.
How to Access and Manage Your Google Activity Using Google Activity Controls
Google offers a wide range of products in the technology space.
 Top 6 Fixes for Touch Controls Not Working on AirPods and AirPods Pro
The first two generations of Apple's AirPods relied on touch-sensitive controls on the earbuds.
Top 6 Fixes for Touch Controls Not Working on AirPods and AirPods Pro
The first two generations of Apple's AirPods relied on touch-sensitive controls on the earbuds.
 6 Best RGB Corner Floor Lamps With Smart Controls
Adding a hint of color to your home is never a bad thing.
6 Best RGB Corner Floor Lamps With Smart Controls
Adding a hint of color to your home is never a bad thing.
The article above may contain affiliate links which help support Guiding Tech. The content remains unbiased and authentic and will never affect our editorial integrity.