How to Send a Calendar Invite on iPhone
Before you can send or accept invites on your iPhone, you must set up your Calendar. Here’s how to do so:
Step 1: Open the Calendar app.
Step 2: At the bottom of the screen, tap Calendars.
Step 3: At the bottom left of the screen, tap Add Calendar.
Step 4: Tap Add Calendar to create an iCloud Calendar.
Step 5: Enter a Calendar Name for your iCloud Calendar and choose a color.


Step 6: Tap Done at the top right of the page to save your new calendar.
Create a Calendar Event with Invites
Step 1: Open the Calendar app.
Step 2: At the top-right of the screen, tap the + sign to create a new calendar event.
Step 3: Fill in the following details for the event:
- Title
- Location
- Date and Time
Step 4: Tap Calendar to ensure you select the iCloud Calendar. If you have multiple calendars, ensure you choose the iCloud calendar otherwise, the option to include invitees will not be shown. If you have a Microsoft Exchange calendar, this may also work.
Step 5: Tap Invitees to launch the Add Invitees page.
Step 6: In the To field of the Add Invitees page, enter the email address of your invitee. You can also tap the + sign to select your invitees from your phone’s contact list.


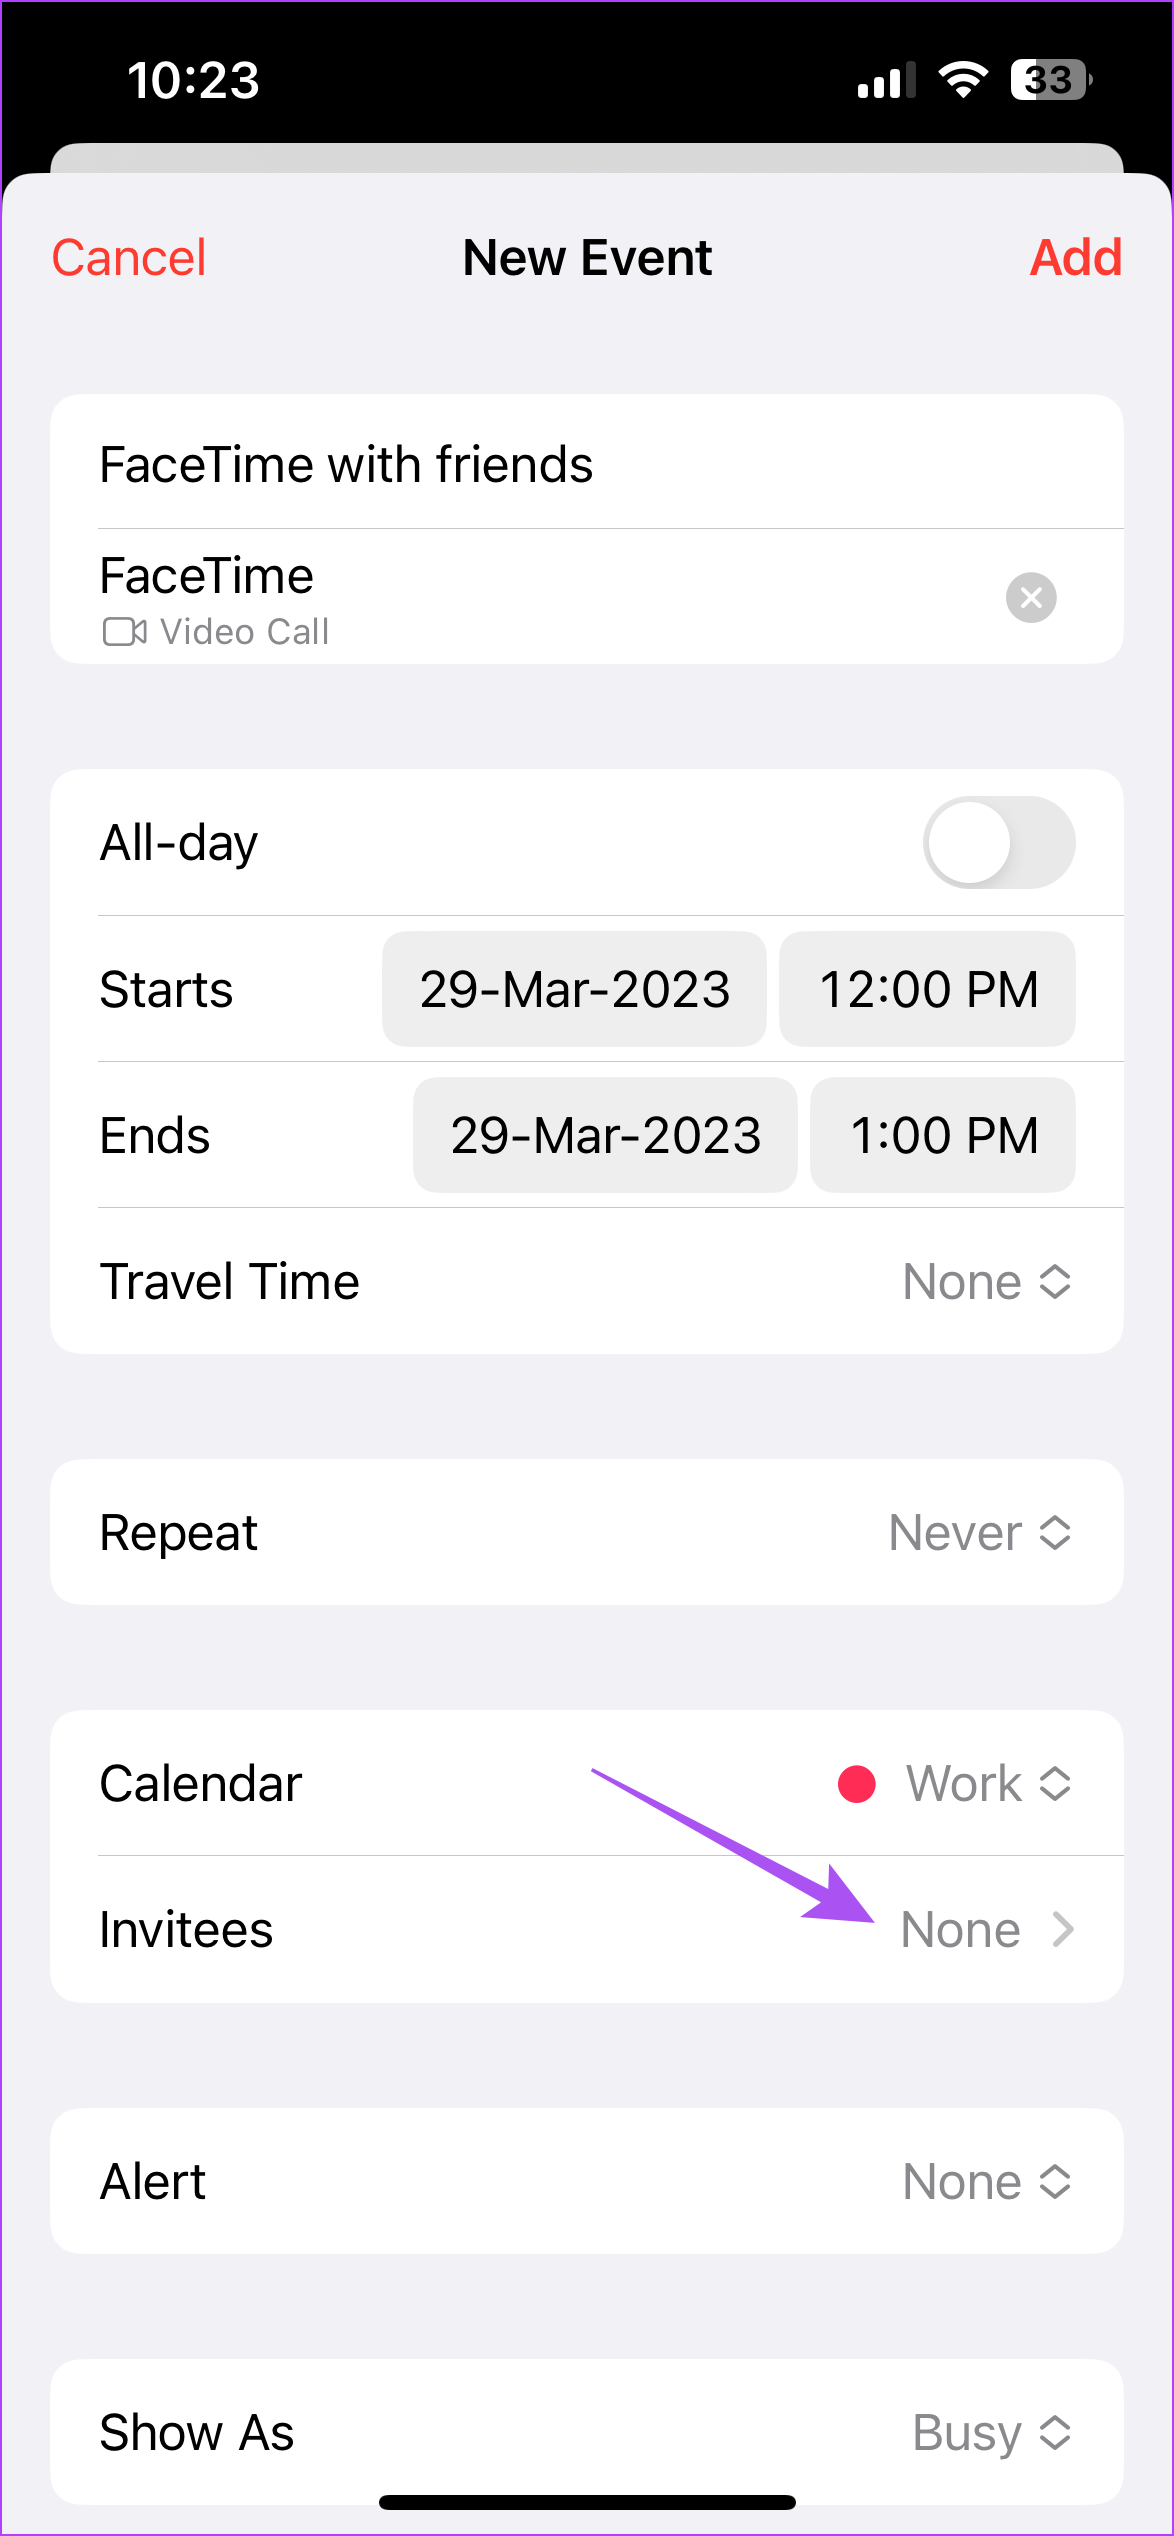
Step 7: Tap Done to save your changes.
Step 8: Tap Add at the top right of the Event page to save the event and send out your invite.
To edit your calendar event, you can simply go to your Invitees and then add/remove them.
Tip: Learn how to add birthdays in the Calendar app.
How to Accept an Invite On the Calendar App on iPhone
When you receive a meeting or event invite, you can accept it from the Calendar app on iPhone. Here’s how to do so:
Step 1: On the iPhone home screen, tap the Calendar app.
Step 2: Tap Inbox at the bottom-right corner of the screen.
Step 3: Tap your response to the invite from Accept, Maybe, or Decline.


Tip: If the search feature fails to bring up the desired results, you may want to fix the Calendar search by restarting the app or your iPhone.
Was this helpful?
Last updated on 17 July, 2024
Read Next
 How to Add and Remove Holidays Calendar in Apple Calendar App
How to Use Holidays Calendar on iPhone The Apple Calendar app offers a built-in regional calendar, displaying the common holidays (occasions and festivals) from that area.
How to Add and Remove Holidays Calendar in Apple Calendar App
How to Use Holidays Calendar on iPhone The Apple Calendar app offers a built-in regional calendar, displaying the common holidays (occasions and festivals) from that area.
 How to Add Skype Meeting to Outlook Meeting Invite (and Cool Tricks)
There's no denying the fact that Microsoft Outlook and Outlook Web are solid email managers.
How to Add Skype Meeting to Outlook Meeting Invite (and Cool Tricks)
There's no denying the fact that Microsoft Outlook and Outlook Web are solid email managers.
 How to Remove Microsoft Teams Meeting From Outlook Invite
Turn off Team Meetings in Outlook Calendar Outlook Calendar is seamlessly integrated into Outlook.
How to Remove Microsoft Teams Meeting From Outlook Invite
Turn off Team Meetings in Outlook Calendar Outlook Calendar is seamlessly integrated into Outlook.
 How to Fix “Invite Collaborator” Not Showing on Instagram
Basic Fixes Avoid scheduling your post: Instagram can prevent users from scheduling their content if they have added someone as a collaborator.
How to Fix “Invite Collaborator” Not Showing on Instagram
Basic Fixes Avoid scheduling your post: Instagram can prevent users from scheduling their content if they have added someone as a collaborator.
 How to Add and Invite Someone to WhatsApp Group
Note: The steps are the same for Android and iOS, with some minor level changes in the button or option placement.
How to Add and Invite Someone to WhatsApp Group
Note: The steps are the same for Android and iOS, with some minor level changes in the button or option placement.
 3 Ways to Fix Discord Invite Not Working
https://youtu.be/YDUXr_-dSqA Try Basic Fixes Try joining other servers: If you are getting the "Whoops, unable to accept invite" error when trying to join a particular server, you may have been
3 Ways to Fix Discord Invite Not Working
https://youtu.be/YDUXr_-dSqA Try Basic Fixes Try joining other servers: If you are getting the "Whoops, unable to accept invite" error when trying to join a particular server, you may have been
 What Happens When You Accept An Offer on Facebook Marketplace
Facebook Marketplace is an excellent platform to find local items in your area.
What Happens When You Accept An Offer on Facebook Marketplace
Facebook Marketplace is an excellent platform to find local items in your area.
 9 Ways to Fix “Update Device Settings to Accept Media Transfers” Error on Windows 11
When you connect your Android or iPhone to your Windows device, you can see most files in the Photos app.
9 Ways to Fix “Update Device Settings to Accept Media Transfers” Error on Windows 11
When you connect your Android or iPhone to your Windows device, you can see most files in the Photos app.
The article above may contain affiliate links which help support Guiding Tech. The content remains unbiased and authentic and will never affect our editorial integrity.