Method 1: Print Contacts From iPhone Using iCloud
You can print your entire contacts list from your iPhone using your iCloud account. You first need to ensure that all your contacts are synced with iCloud. Then, follow the steps to print them. Do note that you will require your computer as well.
Step 1: Open Settings on your iPhone > Profile name > iCloud > Show All > Enable Contacts for iCloud.


Step 2: On your computer, open the browser and go to iCloud account.
Step 3: Scroll down and then click the Contacts icon.
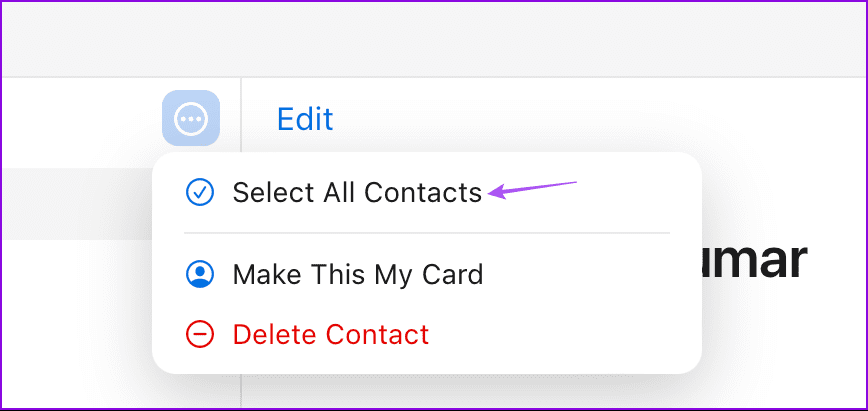
Step 4: Click the three dots at the top and then select Select All Contacts.
You can also select specific contacts from the list.
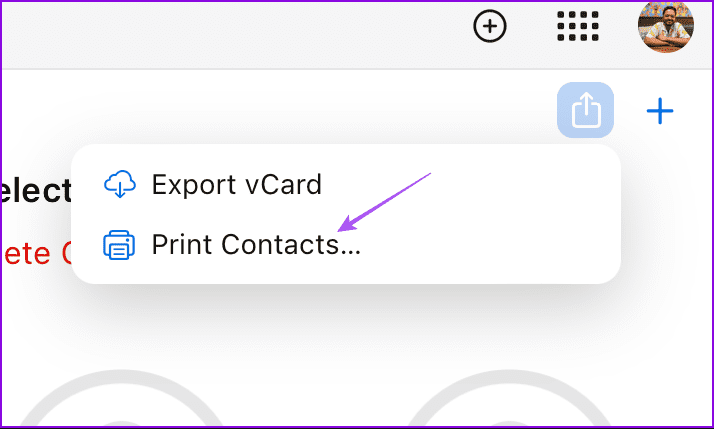
Step 5: Click the Share icon at the top-right corner and then select Print Contacts.
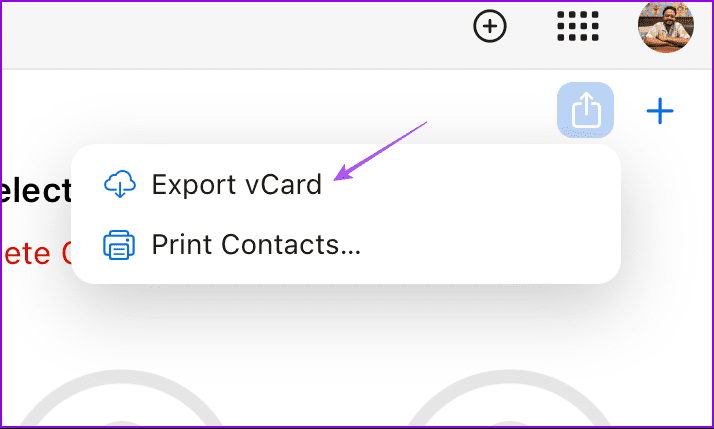
You can select Export vCard to export contacts from an iPhone into a PDF.
Method 2: Print Contacts From iPhone Using iTunes
To print your iPhone contacts without using iCloud, you can install iTunes. This method also helps Windows PC users who prefer using iTunes to sync their iPhone data.
Step 1: Download and install iTunes on your Windows PC using the link below. Then log in to your Apple account.
For Mac users, open Music.
Step 2: Connect your iPhone to your Mac or Windows PC using a cable.
Step 3: Click the Phone icon at the top.
Step 4: Select Info from the left menu.
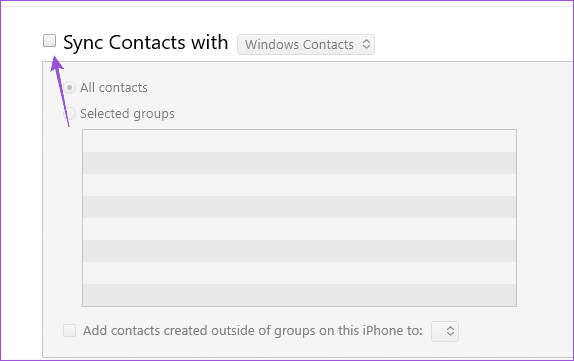
Step 5: Select the option of Sync Contacts With and then select Windows Contacts.
Step 6: Click on Apply at the bottom-right corner.
You can now open your contacts in Windows Contacts and print them.
Method 3: Print Contacts from iPhone Using Google Contacts
Another way to take a print of your iPhone contacts is by using Gmail. In case you have a Gmail account, you won’t need to use iCloud or iTunes to print from contacts. Do note that this process will mix your iCloud and Gmail contacts on your iPhone. So, if that is not a problem for you, here’s how to proceed.
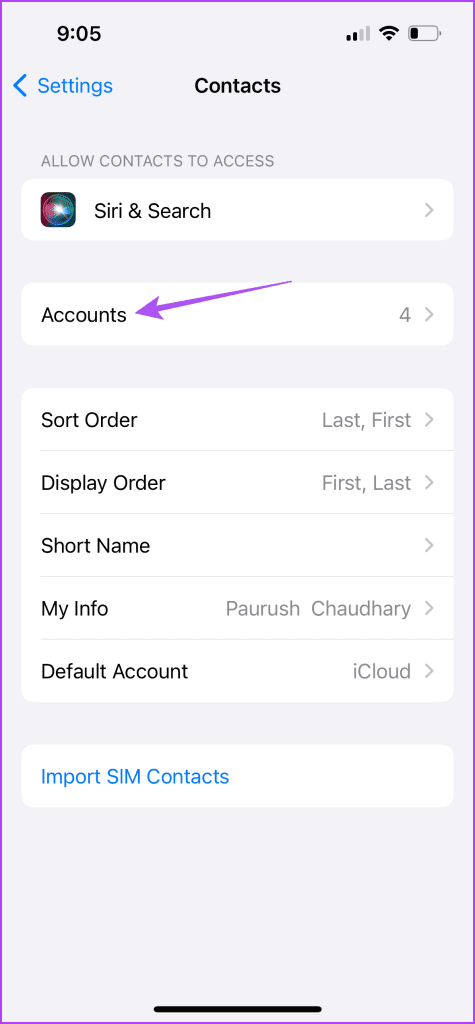
Step 1: Open Settings > Contacts > Accounts > Add Account.
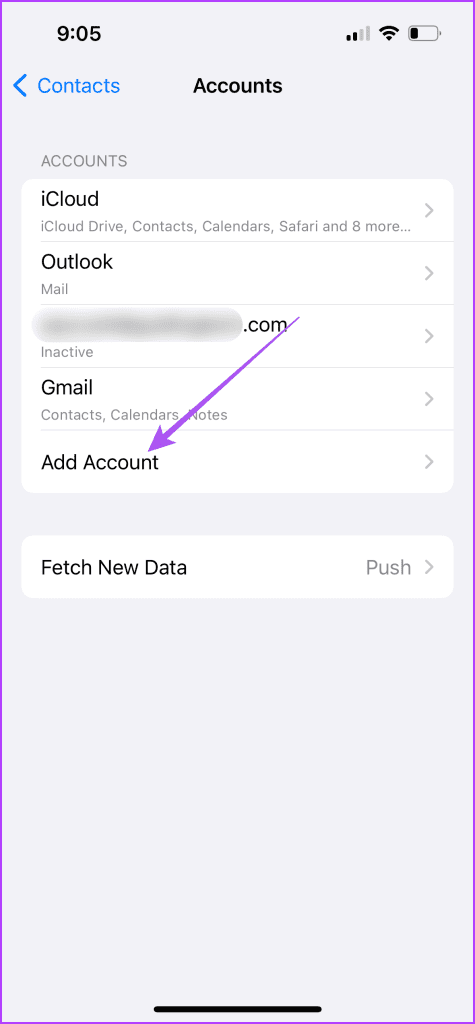
Step 3: Follow the on-screen instructions to add your Gmail account.
Step 4: Once added, tap the toggle next to contacts to sync your iPhone contacts with your Gmail account.
Step 5: Open the web browser on your computer and go to contacts.google.com.
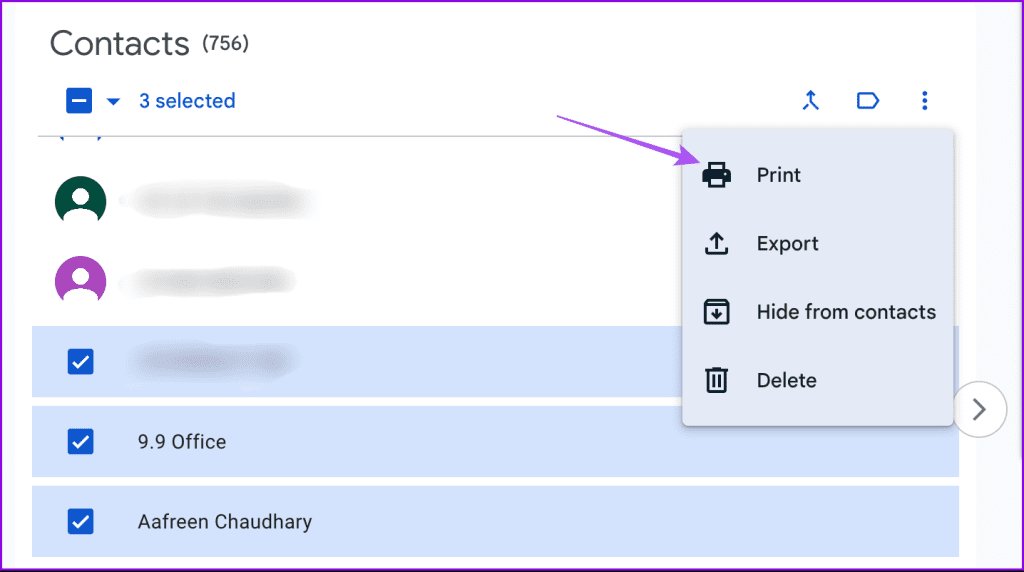
Step 6: Select the iPhone contacts that you want to print. Then click the three dots on the right side and select Print.
Method 4: Print Contacts From iPhone Using Preview on Mac
The last method applies only to Mac users. You can use the Preview app on your Mac to merge screenshots of your contacts into PDF files. This process can take some time as you will have to combine all the screenshots of your contacts into one image.
Step 1: Open the Contacts app on your Mac and take screenshots of all the contacts that you wish to print. Try to take screenshots of similar dimensions.
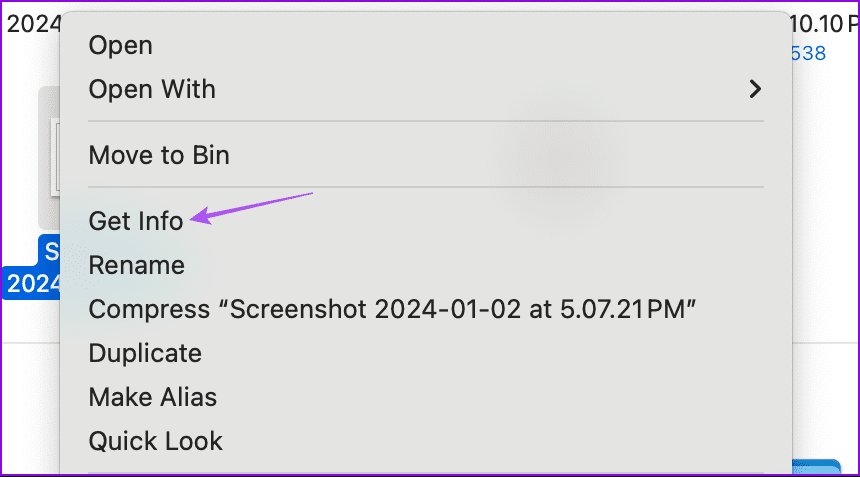
Step 2: Right-click on one screenshot and then select Get Info.
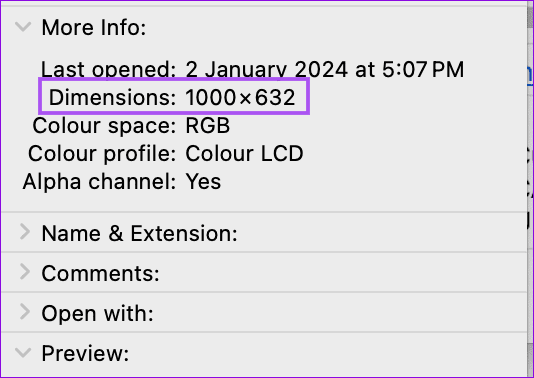
Step 3: Note the width of the image. For instance, if the dimensions are 1000×600, the width would be 1000.
Step 4: Repeat the same process to note down the width of all images.
Step 5: Open one of your screenshots in Preview on your Mac.
Step 6: Press Command + A to select the image. Then press Command + X to remove it from the Preview window.
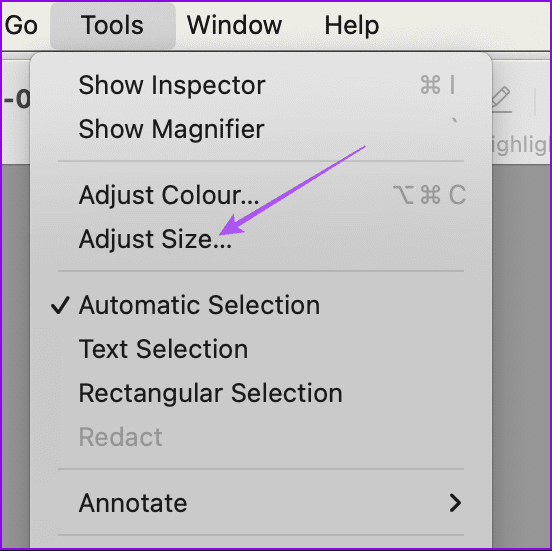
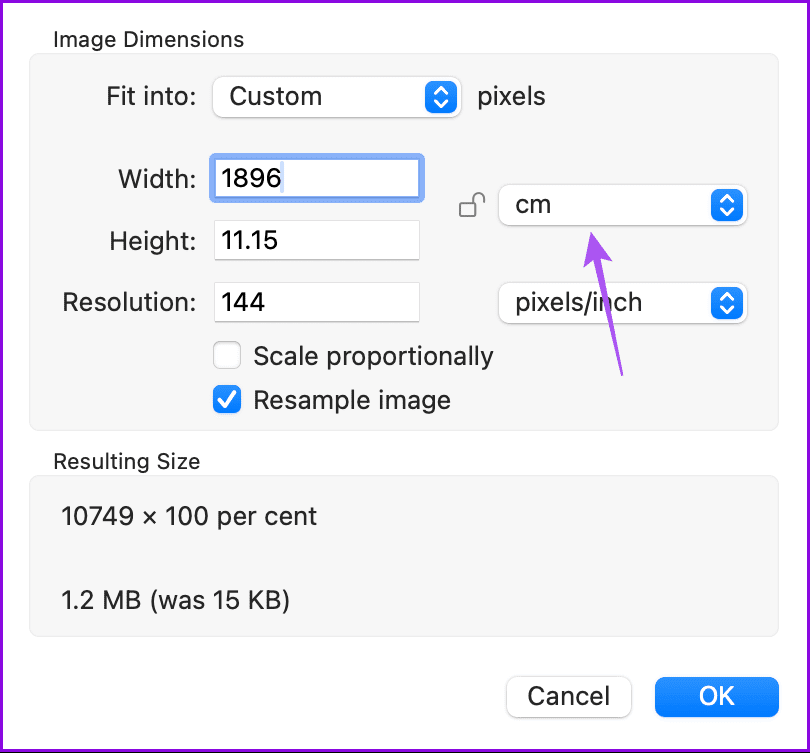
Step 7: Click on Tools > Adjust Size.
Step 8: De-select the option of Scale Proportionately.
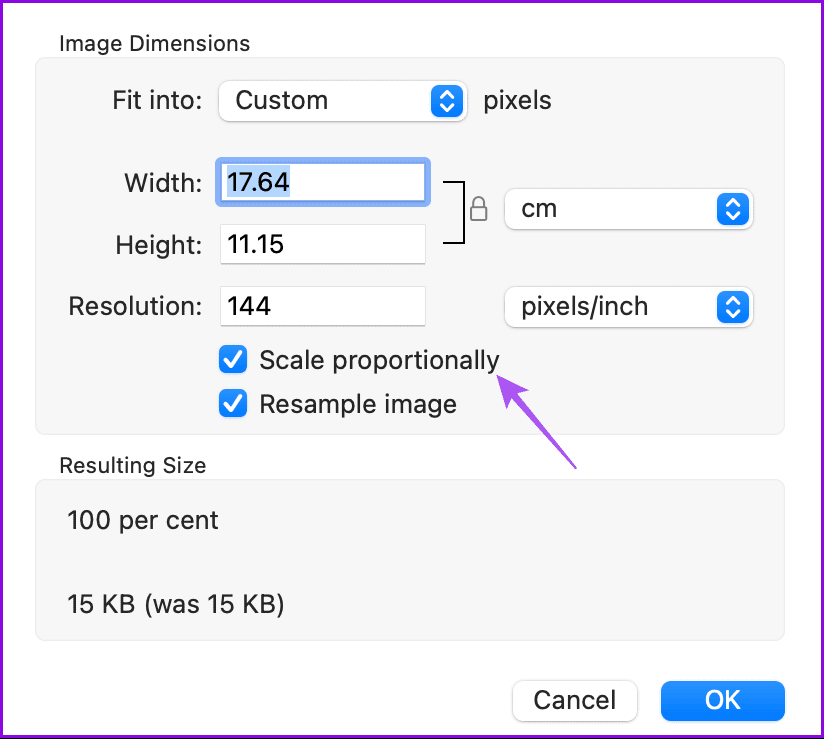
Step 9: Enter the combined width value of all your screenshots and click Ok.
Ensure that you have selected the right dimension before entering the values.
Step 10: Press Command + V to paste the image.
Step 11: Open another screenshot in Preview, select it, press Command + X to copy it, and press Command + V to paste it into the previous Preview window.
Step 12: Repeat this process until you have added all the screenshots in one image.
Step 13: Click on File > Save. You can now print this file from your Mac.

Tip: Learn more about adding or removing contacts from Favorites on iPhone.
Was this helpful?
Last updated on 26 August, 2024
Read Next
 iCloud Contacts vs Google Contacts: Where Should You Save Contacts on Your iPhone
When you are using an Android phone, one prefers using Google Contacts to store and manage contacts.
iCloud Contacts vs Google Contacts: Where Should You Save Contacts on Your iPhone
When you are using an Android phone, one prefers using Google Contacts to store and manage contacts.
 Google Contacts vs Samsung Contacts: Which App Is Best for Saving and Managing Contacts
Apart from phones running Stock Android, all other Android phones have their own set of basic apps.
Google Contacts vs Samsung Contacts: Which App Is Best for Saving and Managing Contacts
Apart from phones running Stock Android, all other Android phones have their own set of basic apps.
 How to Use Google Contacts Instead of Samsung Contacts
Samsung Galaxy phones carry a lot of pre-loaded apps, and some of them you'll rarely use.
How to Use Google Contacts Instead of Samsung Contacts
Samsung Galaxy phones carry a lot of pre-loaded apps, and some of them you'll rarely use.
 How to Print From iPhone With and Without WiFi
Print From iPhone Using Wi-Fi iPhones have a feature called AirPrint that allows you to print from your iPhone over Wi-Fi.
How to Print From iPhone With and Without WiFi
Print From iPhone Using Wi-Fi iPhones have a feature called AirPrint that allows you to print from your iPhone over Wi-Fi.
 How to Print Emails to PDF in Outlook and Gmail for iOS
Print Emails to PDF in Outlook for iOS Step 1: Open the email you want to convert.
How to Print Emails to PDF in Outlook and Gmail for iOS
Print Emails to PDF in Outlook for iOS Step 1: Open the email you want to convert.
 7 Ways to Fix Outlook Not Responding When Trying to Print
Try Basic Fixes: Restart Outlook: When Outlook relaunches, it loads all the modules, including extensions.
7 Ways to Fix Outlook Not Responding When Trying to Print
Try Basic Fixes: Restart Outlook: When Outlook relaunches, it loads all the modules, including extensions.
 5 Ways to Fix Unable to Print From Microsoft Excel on Windows 11
Fix 1: Save Your Excel File in XPS Format and Try Again If Excel can't respond to print requests, save your file in the XPS format and try again.
5 Ways to Fix Unable to Print From Microsoft Excel on Windows 11
Fix 1: Save Your Excel File in XPS Format and Try Again If Excel can't respond to print requests, save your file in the XPS format and try again.
 How to Get and Print a Receipt From Amazon: 3 Best Ways
https://youtu.be/DJFCFgil8zU 1.
How to Get and Print a Receipt From Amazon: 3 Best Ways
https://youtu.be/DJFCFgil8zU 1.
The article above may contain affiliate links which help support Guiding Tech. The content remains unbiased and authentic and will never affect our editorial integrity.

