Are you looking to customize your Windows 11 desktop? Making icons smaller is one way to achieve a more tailored and visually appealing desktop layout. In this article, we will guide you on how to make desktop icons smaller on Windows 11. Following the simple steps outlined below, you can easily resize your desktop icons to your preferred dimensions.

Resizing desktop icons can help you fit more shortcuts and icons on your screen. This makes accessing your favorite applications, files, and folders easier without cluttering desktop space. Adjusting desktop icon size can make a significant difference if you prefer a minimalist aesthetic or simply want to optimize your workspace. With this understanding, let’s adjust the size of your desktop icons in Windows 11.
1. Change Icon Size From the Desktop Context Menu
Changing the size of the icons on Windows 11 is straightforward. Follow the instructions below.
Step 1: Right-click on your desktop and select the View option from the context menu.
You will see all available options: Large icons, Medium icons, and Small icons. The default icon size is Medium.
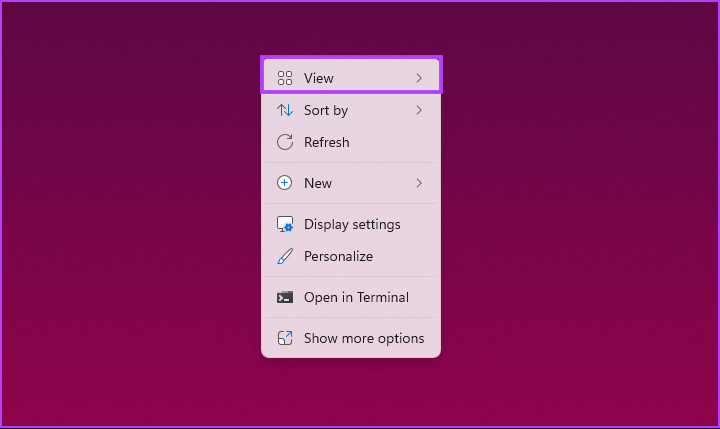
Step 2: If you want to make it smaller, select Small icons. Alternatively, select Large icons to make the icons larger.
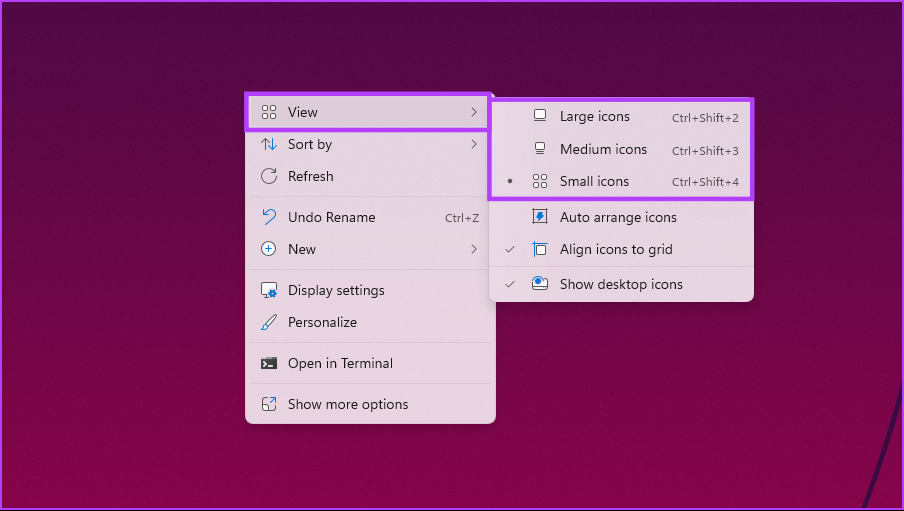
This will make all your icons available on the desktop to accommodate the change instantly. If you don’t want to move your mouse to change the icon size on your desktop, move on to the next method.
2. Using Keyboard Shortcuts
You can execute the above method with the use of a keyboard shortcut. As you may have noticed, each option has a distinct set of hotkeys for easy and quick execution. We are listing it down for your convenience.
- Large icons: Ctrl + Shift + 2
- Medium icons: Ctrl + Shift + 3
- Small icons: Ctrl + Shift + 4
So, all you have to do is press the key next to your intended icon size, and you should be able to make the icons on the desktop smaller or larger. If you want a more efficient way, check out the next method.
Also Read: How to change icons on Windows 11
3. Shrink Desktop Icons Using the Mouse Scroll
This is one of the most commonly used methods to change the size of the icons on the Windows desktop. Unlike the previous approach, this one involves using your mouse to effortlessly resize the icons and customize their appearance in a snap.

Simply hold down the Ctrl key on your keyboard and scroll the mouse in any direction to dynamically adjust the size of icons on your desktop. The beauty of this method lies in its versatility—you’re not limited to three preset options. You can fine-tune the size of icons and tailor them precisely to your preferences.
If you want to know another way to make the icons on the desktop smaller or larger, check out the next method.
4. Using Display Settings
This method needs no explanation. We will change the display resolution depending on the need to make the icons smaller. Follow the below steps.
Step 1: Right-click on the desktop and select Display settings from the context menu.
Note: Alternatively, you can go to Settings and select Display from the system menu.
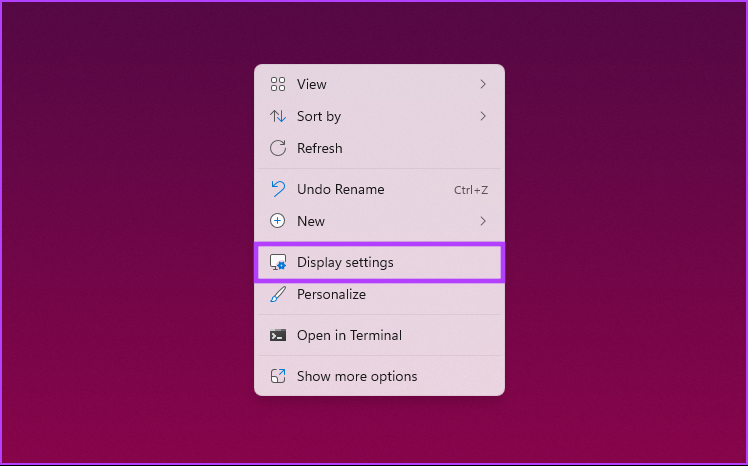
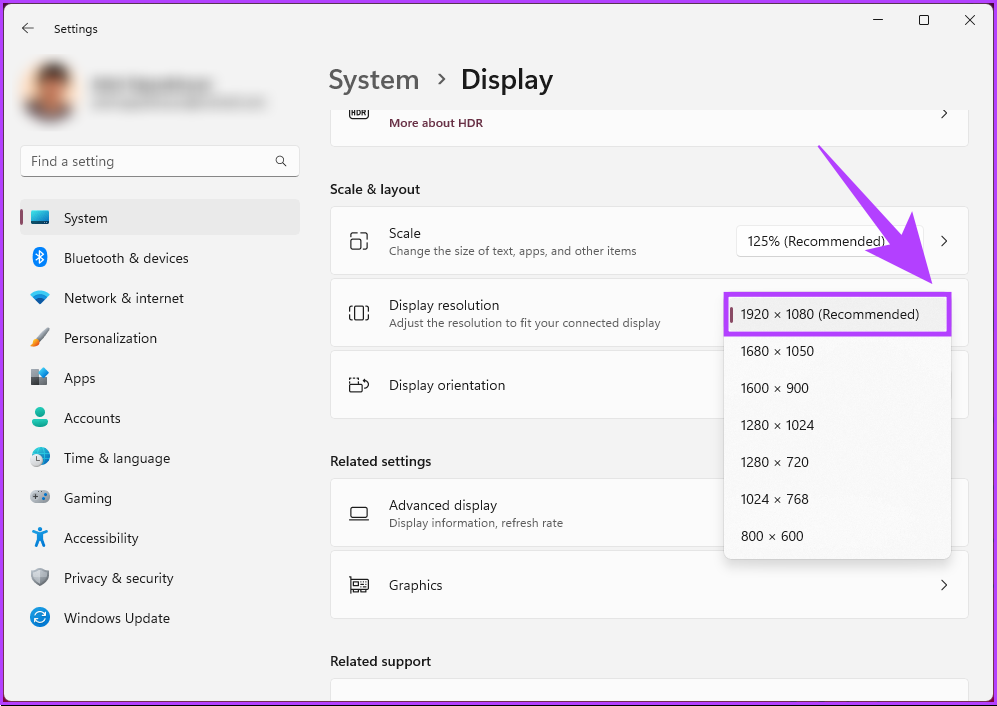
Step 2: Under Display settings, scroll down to Display resolution under ‘Scale & layout.’ And from the drop-down, select the highest resolution supported by your display.
Step 3: From the pop-up, choose Keep changes.
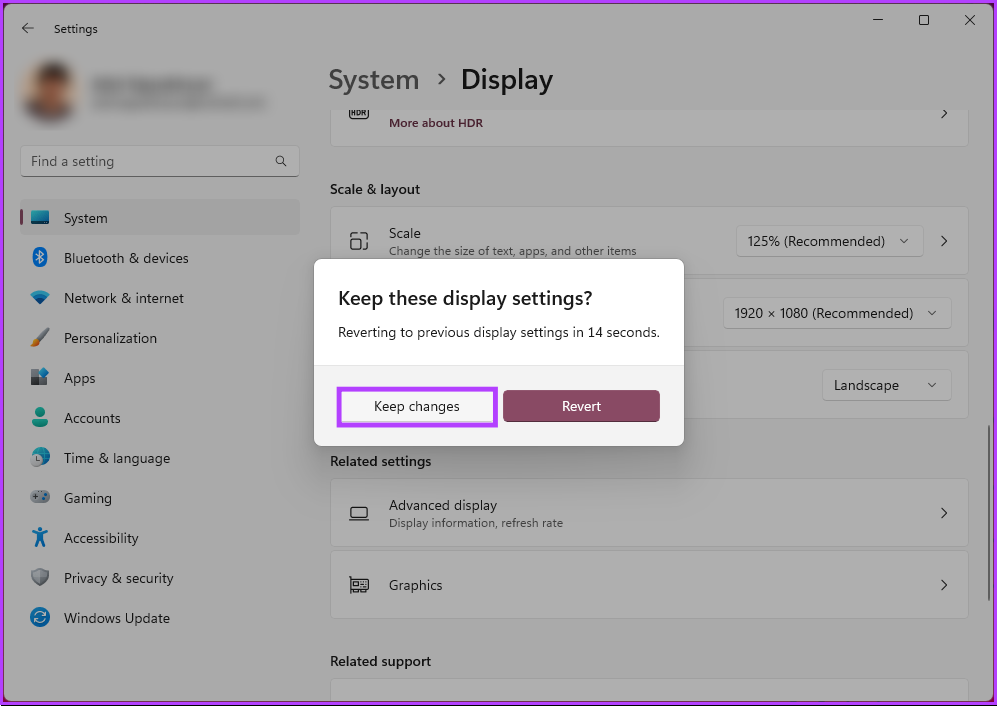
With this, the desktop icons will accommodate the changes. The large canvas shrinks the desktop icons on your Windows 11 computer. You can also change the scaling to make the desktop icons look smaller; continue with the below steps.
Step 4: Under ‘Scale & layout,’ go to Scale in the Display settings. From the drop-down menu, select a lower scaling option.
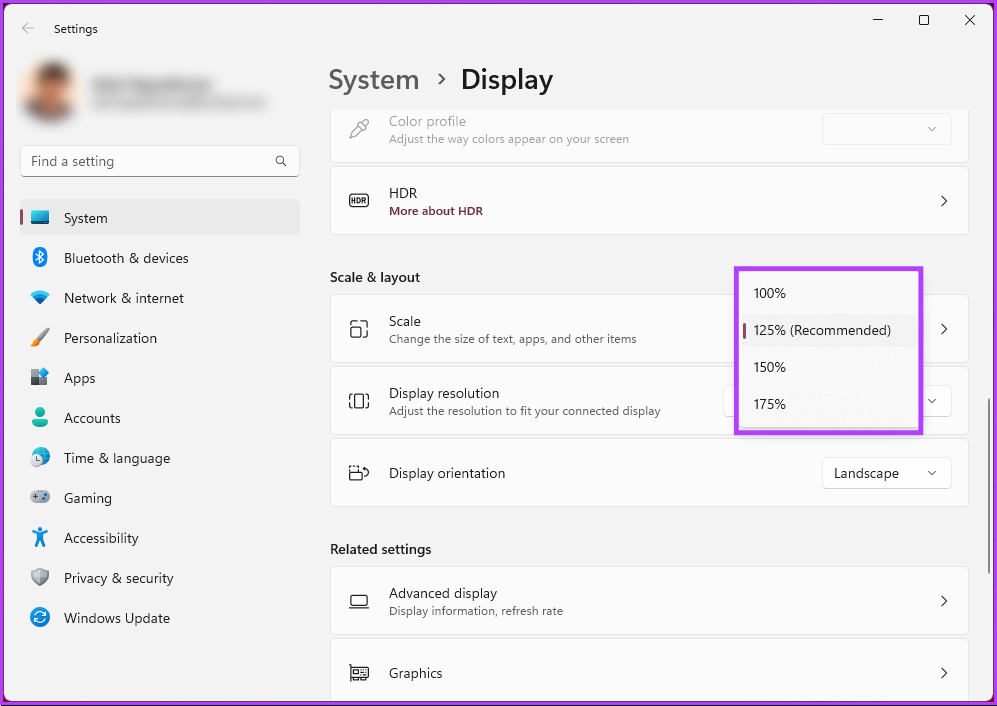
If the option doesn’t meet your needs, enter custom scaling options. To do so, click on Scale.
Step 5: In the Custom scaling option, enter a new number and click on the tick next to it to confirm.
Note: If you want smaller icons, enter a percentage close to 100%.
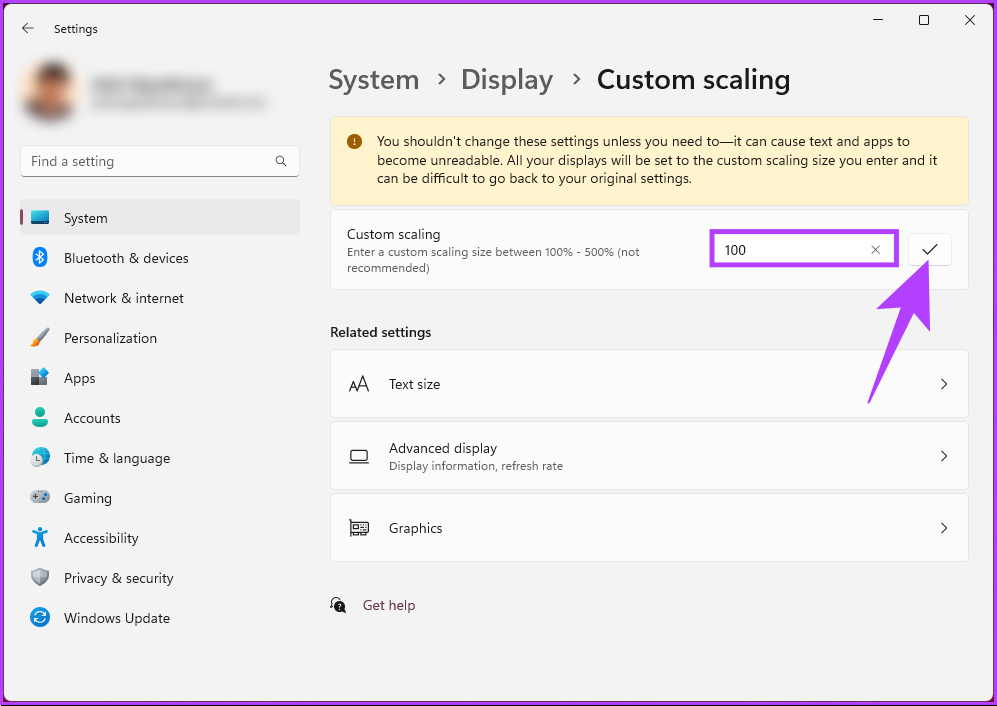
To make the change effect, you must log out from your Windows 11 computer.
Also Read: How to change the Taskbar icons size in Windows 11
5. Using Registry
This method is more complex than the above one. Moreover, because we will be using Registry Editor, we strongly advise you to back up the Windows Registry before proceeding with the steps below.
Step 1: Press the Windows key on your keyboard, type Registry Editor, and click ‘Run as administrator.’
Note: Press ‘Windows key + R’ to open the Run dialog box, type regedit.exe, and click OK to open Registry Editor.
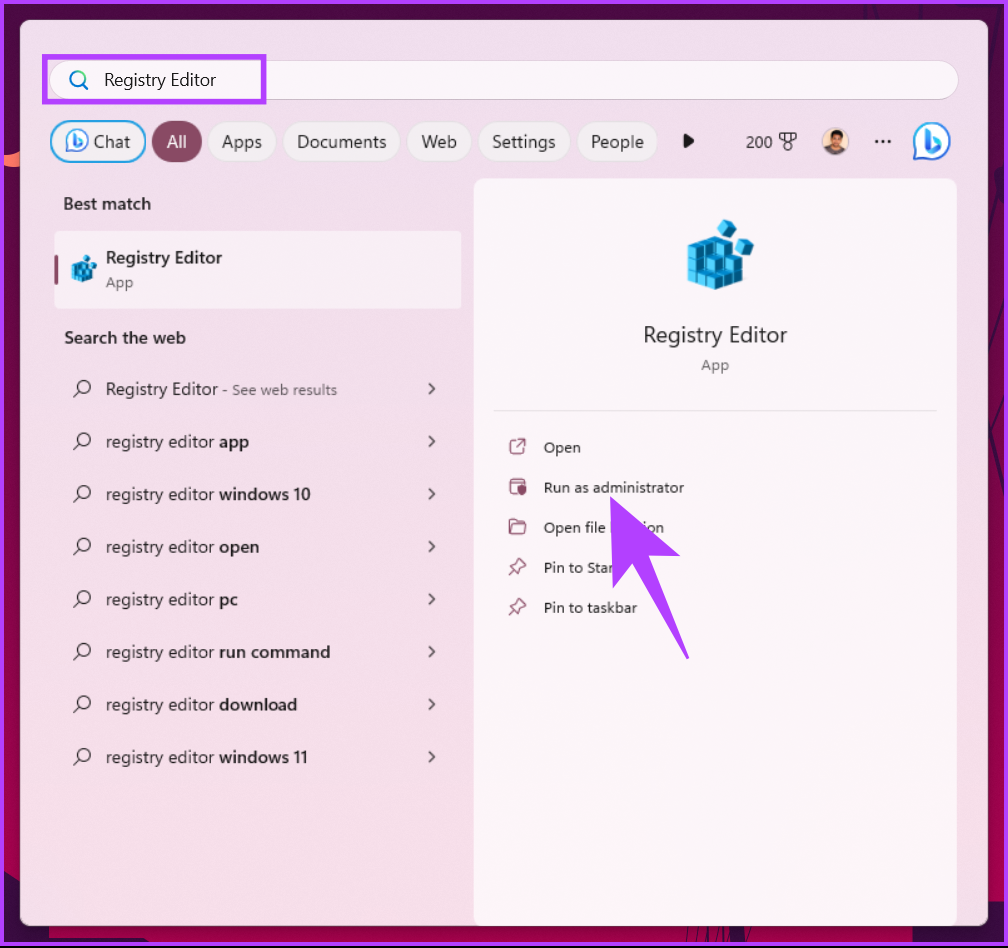
In the prompt, select Yes.
Step 2: In the top address bar, enter the mentioned address.
HKEY_CURRENT_USER\Software\Microsoft\Windows\Shell\Bags\1\Desktop
Note: You can manually navigate to the section too.

Step 3: Double-click on IconSize key on the right pane.

Step 4: In the ‘Edit DWORD (32-bit) Value’ pop-up, select Decimal and enter a number lower or higher than the current value in the Value data field. Finally, click OK.
Note: 32 for small-size icons, 48 for medium-size icons, 96 for large-size icons, and 256 for extra large-size icons. You can enter any other number as per your preference.

Finally, restart the system or Windows Explorer to implement the changes. And that’s it! When the system boots back up, you will have huge desktop or smaller icons, depending on what you entered.
Now that you know how to change the size of icons on a Windows 11 desktop, you may also want to know how to change the size of the icons in File Explorer; continue reading.
6. Change Icon Size in File Explorer
Step 1: Press the Windows key on your keyboard, type File Explorer, and click Open.
Note: Alternatively, press ‘Windows key + E’ to open File Explorer.

Step 2: In the File Explorer window, click View in the toolbar.
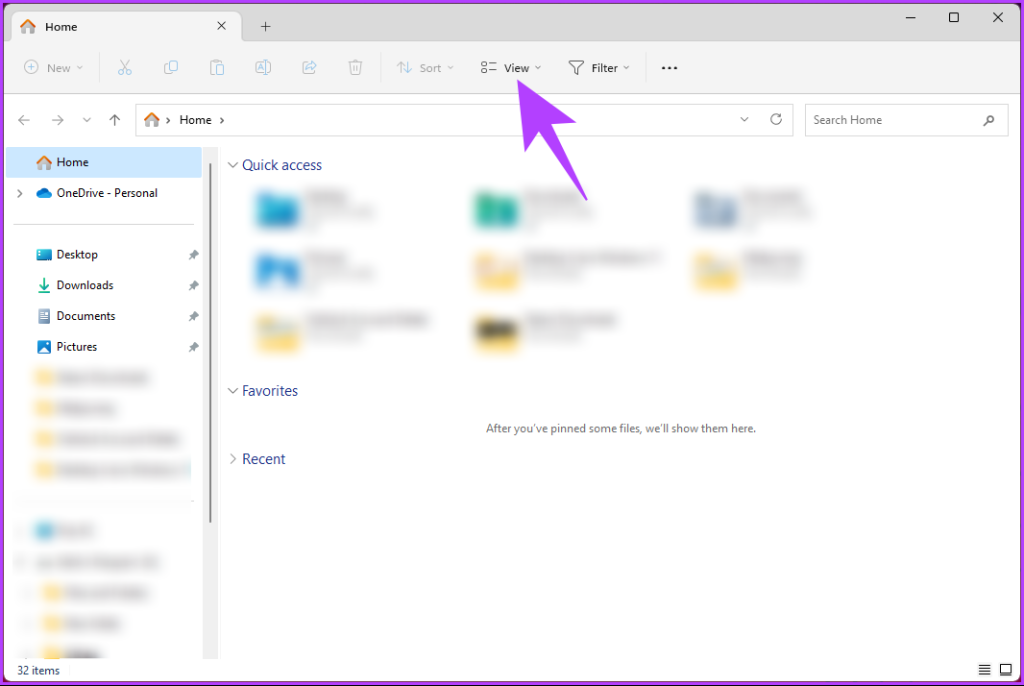
Step 3: From the drop-down menu, select the type of icon you want. For demonstration purposes, we are going with the Small icons option.
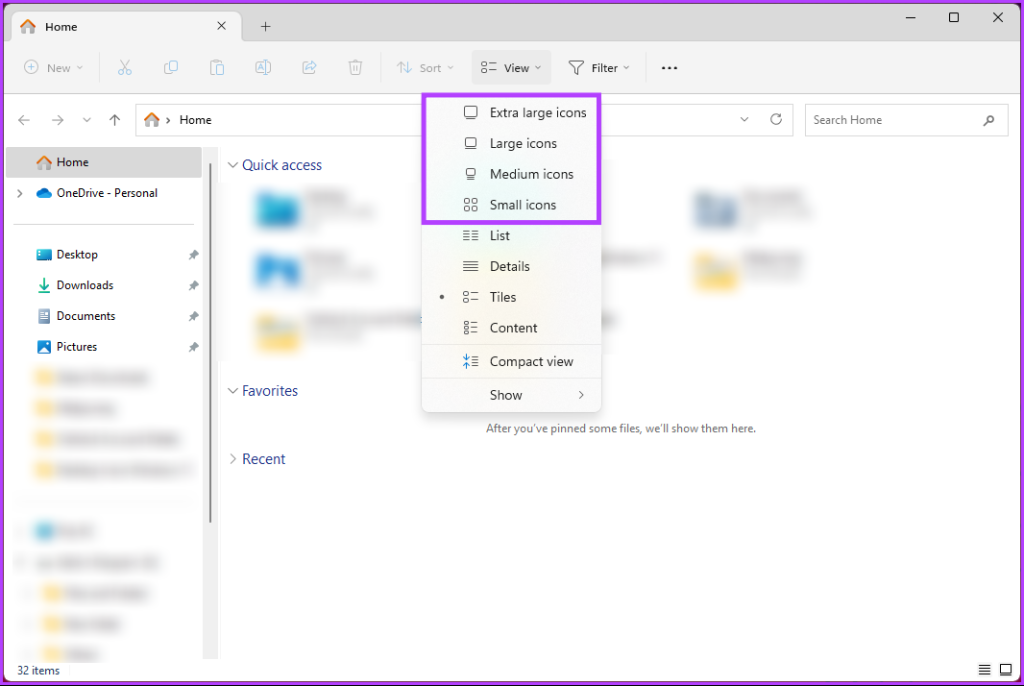
There you go. All the icons will become smaller in the folders. You can switch between sizes whenever you want. If there’s anything we missed addressing in the article, check out the FAQ section below.
FAQs on Making Icons Smaller in Windows 11
In Windows 11, the system icons and icons for various applications and files have designated storage spots within the system. Depending on the icon type and its origin, their exact locations can differ.
The built-in system icons of Windows 11 are usually housed in the “C:\Windows\System32” folder. This directory is home to a range of system icons, including folder icons, file icons, shortcut icons, and more. As for icons related to installed applications, they are typically stored within the respective application’s installation folder. Additionally, you may also come across icons stored in other locations, such as the user-specific AppData folder.
The default icon spacing in Windows 11 is set to a value of 112 (in pixels) for both the horizontal and vertical spacing. This creates a clear separation of 112 pixels between each icon, ensuring they are not too close together. By providing this space, Windows 11 avoids cluttered and overlapping icons, allowing for easier visual identification and interaction with each icon.
Make Icons Eye Catchy
Knowing how to make desktop icons smaller is a simple yet effective way to personalize your desktop experience. By making smaller icons, you can maximize your screen real estate, create a cleaner desktop layout, and easily access your favorite applications. You may also want to read how to add tags to files in Windows 11.
Was this helpful?
Last updated on 08 June, 2023
The article above may contain affiliate links which help support Guiding Tech. The content remains unbiased and authentic and will never affect our editorial integrity.

