When the Windows 11 update was announced by Microsoft, it quickly became clear that not every Windows 10 PC would be able to make the jump. Even after the barrier to entry (in terms of system requirements) was lowered, many machines and their CPUs would still be unsupported.
Say you have one of these machines. How could you still go about installing Windows 11? That’s what this article will try to guide you through.
How to Install Windows 11 on Unsupported CPU
If you’re a user who can’t quite leap to Windows 11, but know that Microsoft will be ending support for Windows 10 in October 2025, then you’re probably wondering if you can still make things work without buying a new PC. Let’s take a closer look.
You Might Still Qualify

If you’ve looked at the system requirements for Windows 11 and know your machine is able to handle the upgrade, then you might still be able to make the move successfully. Sometimes, the system checker might flag certain specs that Windows 11 doesn’t actually need to run. These include:
- Secure Boot
- CPU/TPM bypass
Sometimes, certain hardware (particularly processors) isn’t supported by Windows 11, despite being perfectly capable.
Fly By 11 to the Rescue
There are third-party programs that can help bypass these checks. “Fly by 11” is one free example that installs Windows 11 while in server mode. This tool is free to download and use and offers its own health checker, as opposed to Microsoft’s PC Health Check Tool, to help you see if you really do qualify for Windows 11.
Upgrading to Windows 11 With Fly By 11

To use “Fly by 11” (also known as “FlyObee”), you’ll need to do the following:
Step 1. Head to GitHub and download the latest zip file of the tool.

Step 2. Unzip the folder and open the “Flyby11.exe” file.

Step 3. Fly by 11 will run its own health check. If there are ticks next to both “CPU POPCNT” and “SSE4.2,” then your upgrade compatibility should be high.

Step 4. Click the “Start Upgrade Now!” button to begin the update process.
Step 5. The next page will ask for the Windows 11 ISO to install from. You can download this either from the Microsoft site, Fido, or the user-friendly Media Creation Tool. Select your option from the dropdown menu on the right of the window.

Step 6. If downloading from Fido, you can choose the version of Windows 11 you want to install via a dropdown menu. These include major updates like 24H2.

Step 7. Click “Continue” and you’ll be presented with new specifics. Be sure that you choose to install a Windows version in the same language (and regional dialect) to keep all your system settings intact.

Step 8. Once all the options have been chosen, click “Download” and the ISO will download to your PC.
Installing Windows 11 with Fly By 11
With the ISO downloaded and the tool set up, it’s time to install:
Step 1. Choose the dropdown menu and then “Select from computer” to find the ISO on your machine.

Step 2. A PowerShell window will run, and your PC should now be able to install Windows 11. Don’t worry, this will still install your desired version of Windows 11.

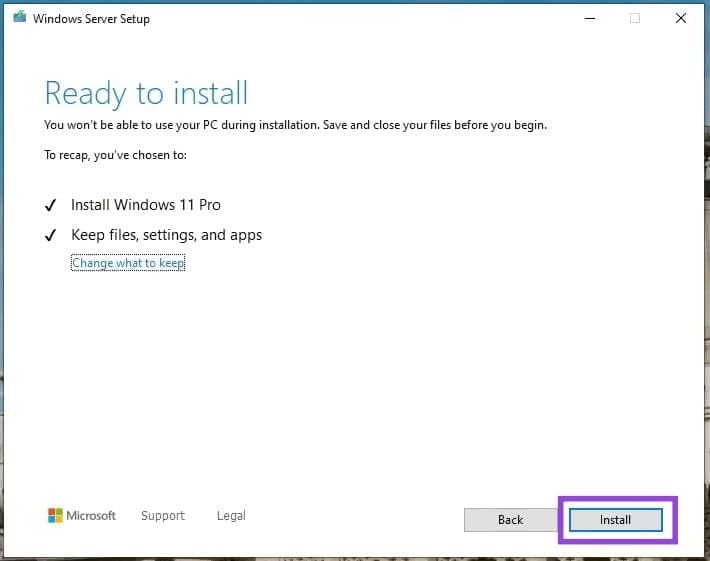
Step 3. When offered additional updates and features during installation, ensure that the “Download updates, options, and additional features” option is checked before clicking “Next.”

Step 4. Accept the license agreement and opt to keep your files and settings by selecting the “Keep files, settings, and apps” option.

Step 5. Click the “Install” button to begin the update.
Step 6. Your machine will then update to Windows 11.

Was this helpful?
Last updated on 01 August, 2025
Read Next
 How to Use Samsung Pay on Galaxy Watch in Unsupported Regions
Pre-requisites to Use Samsung Pay on the Galaxy Watch If Samsung Pay isn't available in your region by default, the Samsung Pay app will not be present on your Galaxy
How to Use Samsung Pay on Galaxy Watch in Unsupported Regions
Pre-requisites to Use Samsung Pay on the Galaxy Watch If Samsung Pay isn't available in your region by default, the Samsung Pay app will not be present on your Galaxy
 5 Ways to Fix Windows Explorer High CPU Usage on Windows 11
Try Basic Fixes Restart the Windows Explorer process: There's a chance that Windows Explorer's high CPU usage is a one-time glitch.
5 Ways to Fix Windows Explorer High CPU Usage on Windows 11
Try Basic Fixes Restart the Windows Explorer process: There's a chance that Windows Explorer's high CPU usage is a one-time glitch.
 5 Ways to Fix High CPU Usage on Windows 11
Try Basic Fixes Wait for Windows to finish updates: If Windows is in the process of checking, downloading, or installing any updates in the background, CPU usage may increase during
5 Ways to Fix High CPU Usage on Windows 11
Try Basic Fixes Wait for Windows to finish updates: If Windows is in the process of checking, downloading, or installing any updates in the background, CPU usage may increase during
 How to Reduce CPU and RAM Usage in Microsoft Teams on Windows 11
Common Fixes Update or reinstall the Microsoft Teams app: Open the Microsoft Store, search Microsoft Teams, and click Update (if available).
How to Reduce CPU and RAM Usage in Microsoft Teams on Windows 11
Common Fixes Update or reinstall the Microsoft Teams app: Open the Microsoft Store, search Microsoft Teams, and click Update (if available).
 Windows Audio Device Graph Isolation: Fix High CPU Usage
What is Windows Audio Device Graph Isolation Windows Audio Device Graph Isolation, also known as audiodg.exe, is a process that handles digital signal processing, including advanced sound enhancement effects, on
Windows Audio Device Graph Isolation: Fix High CPU Usage
What is Windows Audio Device Graph Isolation Windows Audio Device Graph Isolation, also known as audiodg.exe, is a process that handles digital signal processing, including advanced sound enhancement effects, on
 Which Browser Uses the Least RAM and CPU on Windows
How We Tested the Web Browsers We tested all four web browsers on a Windows machine with a quad-core CPU and 8GB of RAM.
Which Browser Uses the Least RAM and CPU on Windows
How We Tested the Web Browsers We tested all four web browsers on a Windows machine with a quad-core CPU and 8GB of RAM.
 6 Fixes for Discord’s High CPU Usage on Windows
Fix 1: Turn Off Hardware Acceleration The Hardware Acceleration in Discord allows the app to use your GPU instead of your CPU for graphics-intensive tasks.
6 Fixes for Discord’s High CPU Usage on Windows
Fix 1: Turn Off Hardware Acceleration The Hardware Acceleration in Discord allows the app to use your GPU instead of your CPU for graphics-intensive tasks.
 6 Ways to Fix Windows Modules Installer Worker High CPU Usage
If you've ever found your computer's fan working overtime and the CPU usage going sky-high, you're not alone.
6 Ways to Fix Windows Modules Installer Worker High CPU Usage
If you've ever found your computer's fan working overtime and the CPU usage going sky-high, you're not alone.
The article above may contain affiliate links which help support Guiding Tech. The content remains unbiased and authentic and will never affect our editorial integrity.