Microsoft Defender Antivirus is built into Windows 11 and helps protect against malware, including viruses, ransomware, and spyware. It has a Quick Scan feature that checks the locations where malware is most likely to hide. It’s useful when you want to check your PC without running a Full Scan, which examines every file and program on the device. This is the recommended scan function, as it doesn’t take as long as a Full Scan but is designed to offer a good level of protection.
Unfortunately, some Windows 11 users have discovered Windows Defender Quick Scan not working; it either stops partway through or won’t run at all.
Try these troubleshooting steps to get your MS Defender Quick Scan working again.
Windows Defender Quick Scan Not Running: Initial Checks
Step 1. Before you try any fixes, check that you’re using the correct process to run a Quick Scan. Go to the Start menu and search for Defender.

Step 2. Select Device protection.
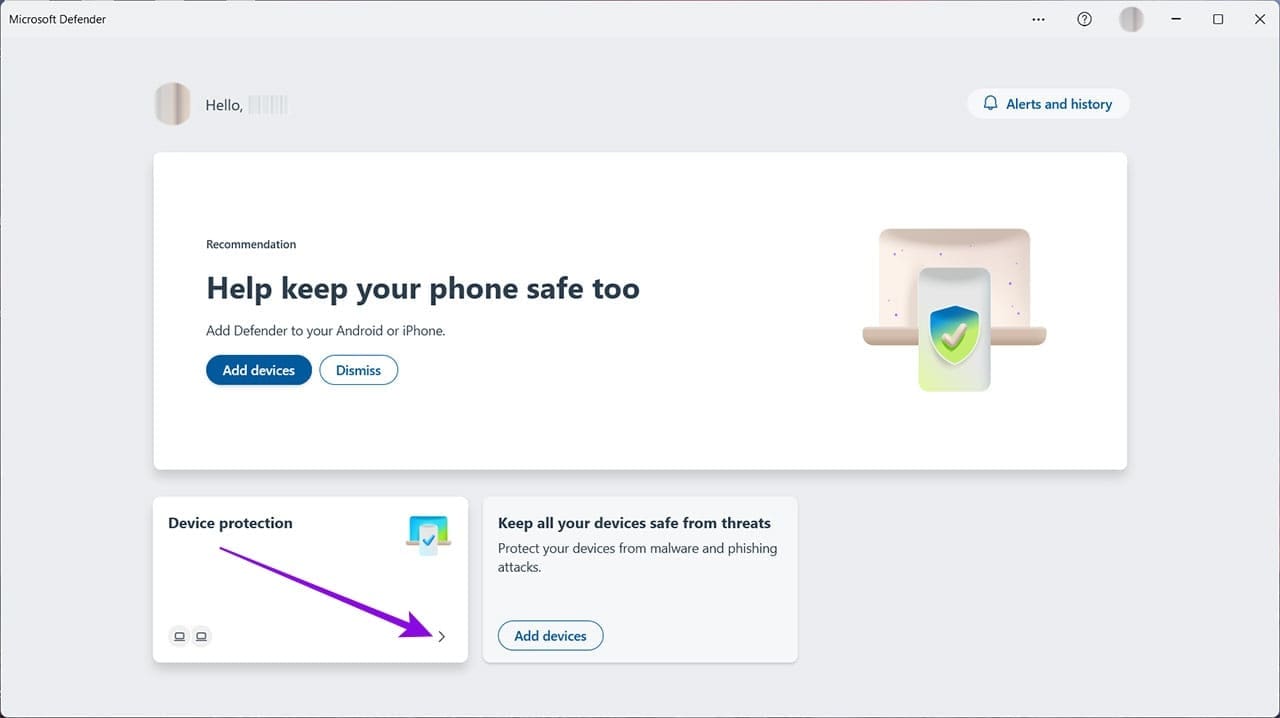
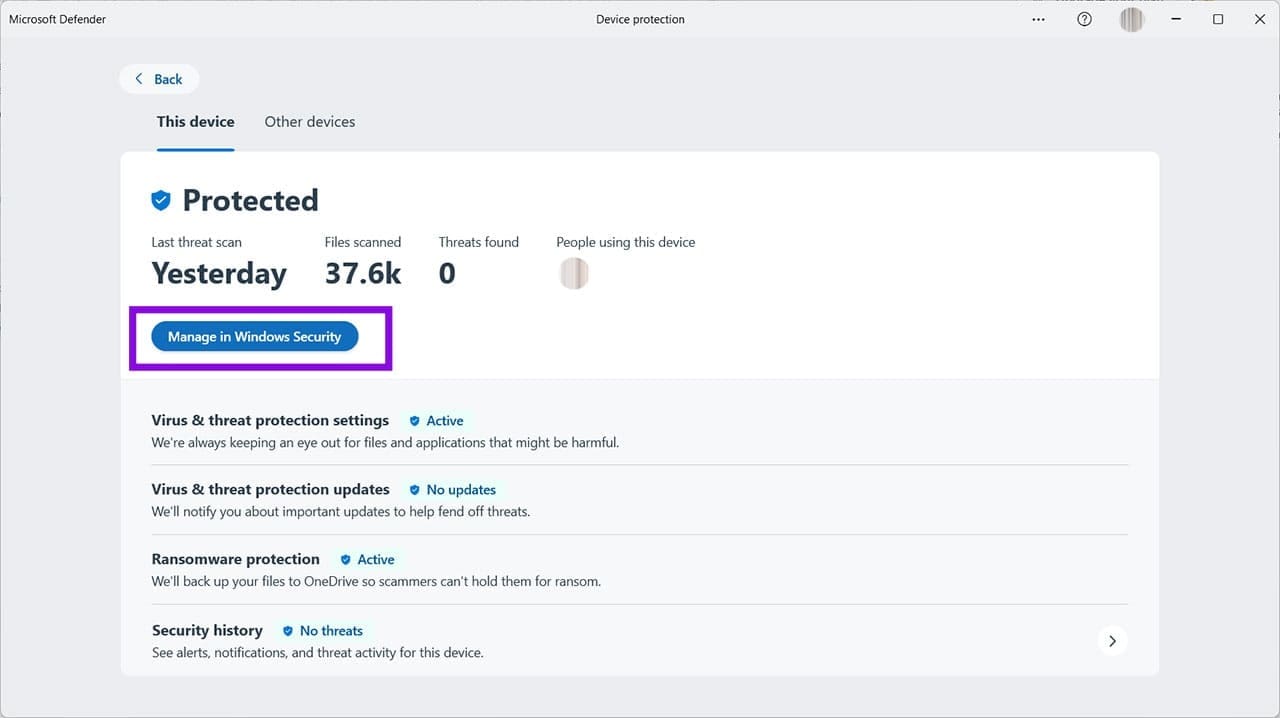
Step 3. Now click Manage in Windows Security.
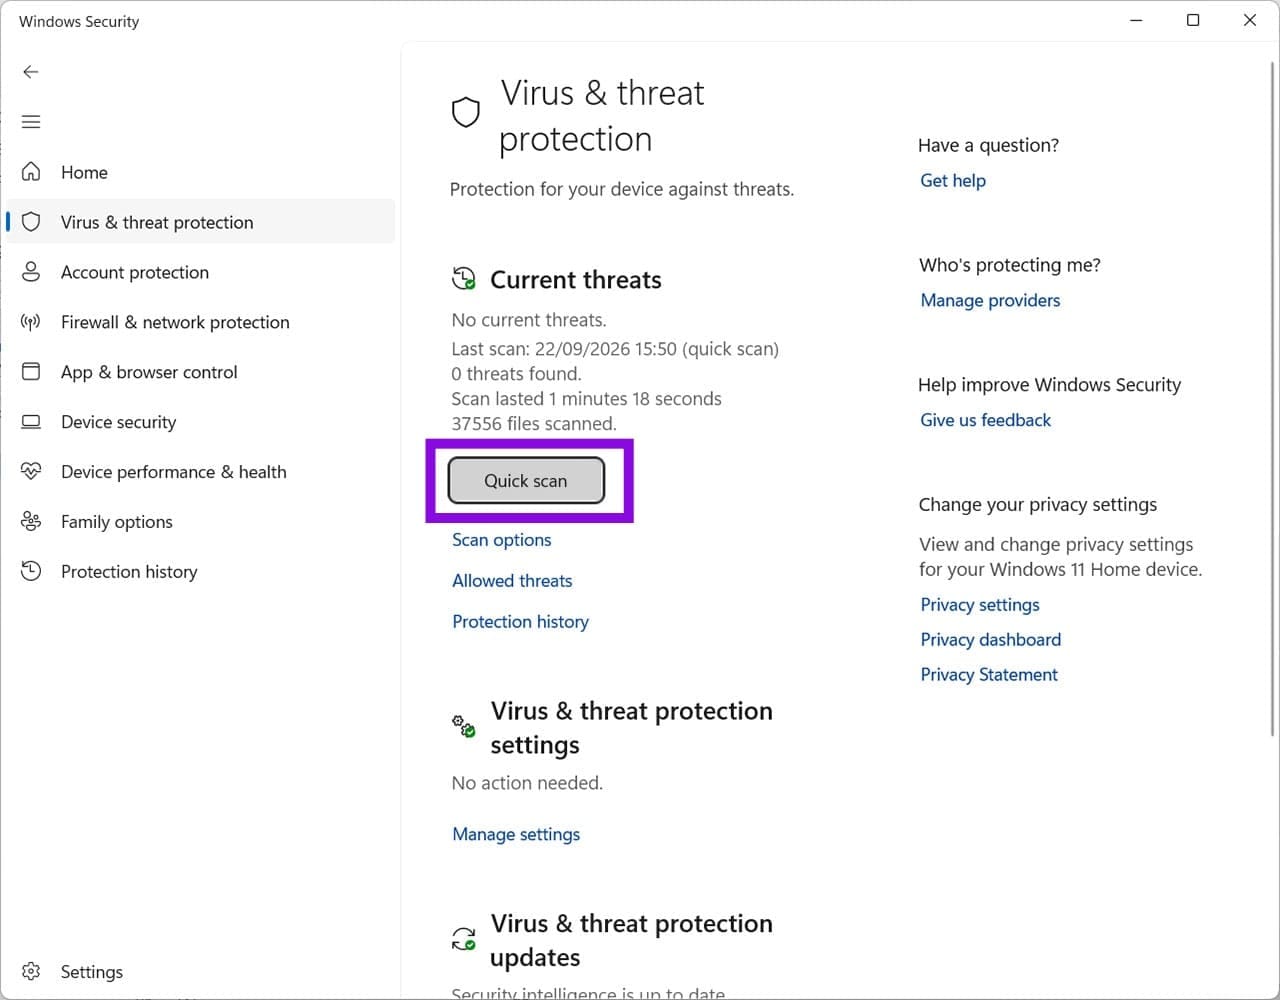
Step 4. This will take you to the Windows Security screen, and you should be on Virus & threat protection. If not, you can select this from the left-hand menu. Once you see this page, click on Quick scan to see if the feature works.
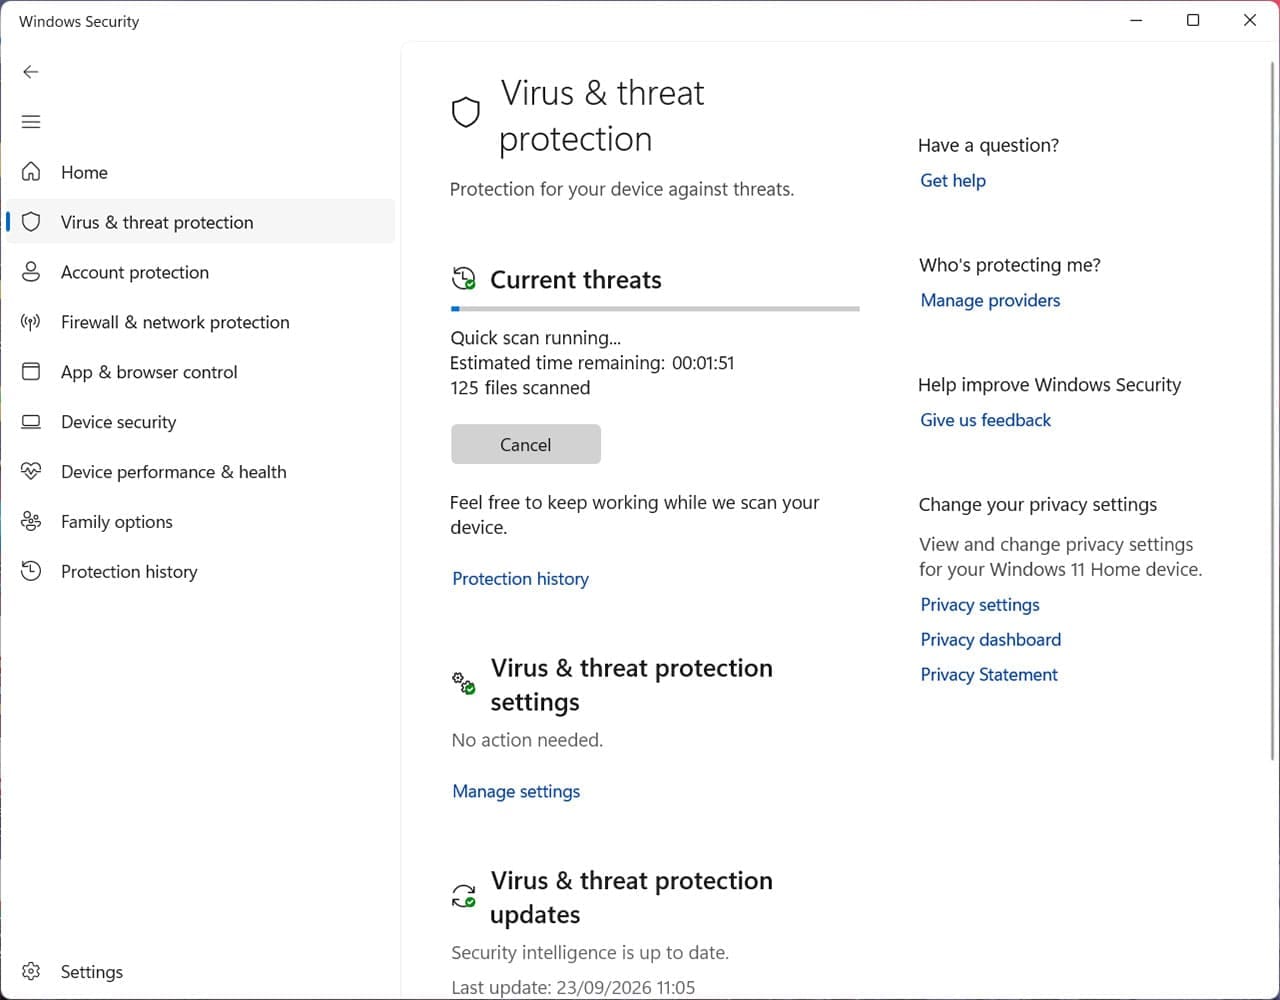
Step 5. The scan should start running, with an estimated time to complete. This is usually less than two minutes, but this change depending on how much data you have stored on your Windows 11 machine.
If this doesn’t work, restart your computer and try again. Sometimes this will fix the problem, but not always. If the problem continues, check whether another antivirus product is active. In Windows Security, go to Virus & threat protection and select Manage providers under ‘Who’s protecting me?’.
If you see something like:
- Norton
- McAfee
- Kaspersky
- Avast
- Panda
Or another known antivirus provider, right-click on the icon and press “Exit” or “Close.” You can always reactivate it after the Quick Scan has completed, if you wish.

Windows Defender Quick Scan Not Working: Check for Virus Protection Updates
Step 1. If Microsoft Defender Antivirus isn’t up to date, installing the latest protection updates can help ensure that it has the latest security intelligence, engine, and platform updates.

Step 2. Click Protection updates, then the gray Check for updates button. Sometimes, automatic updates fail to download, and this should ensure all the latest patches and bug fixes are in place.
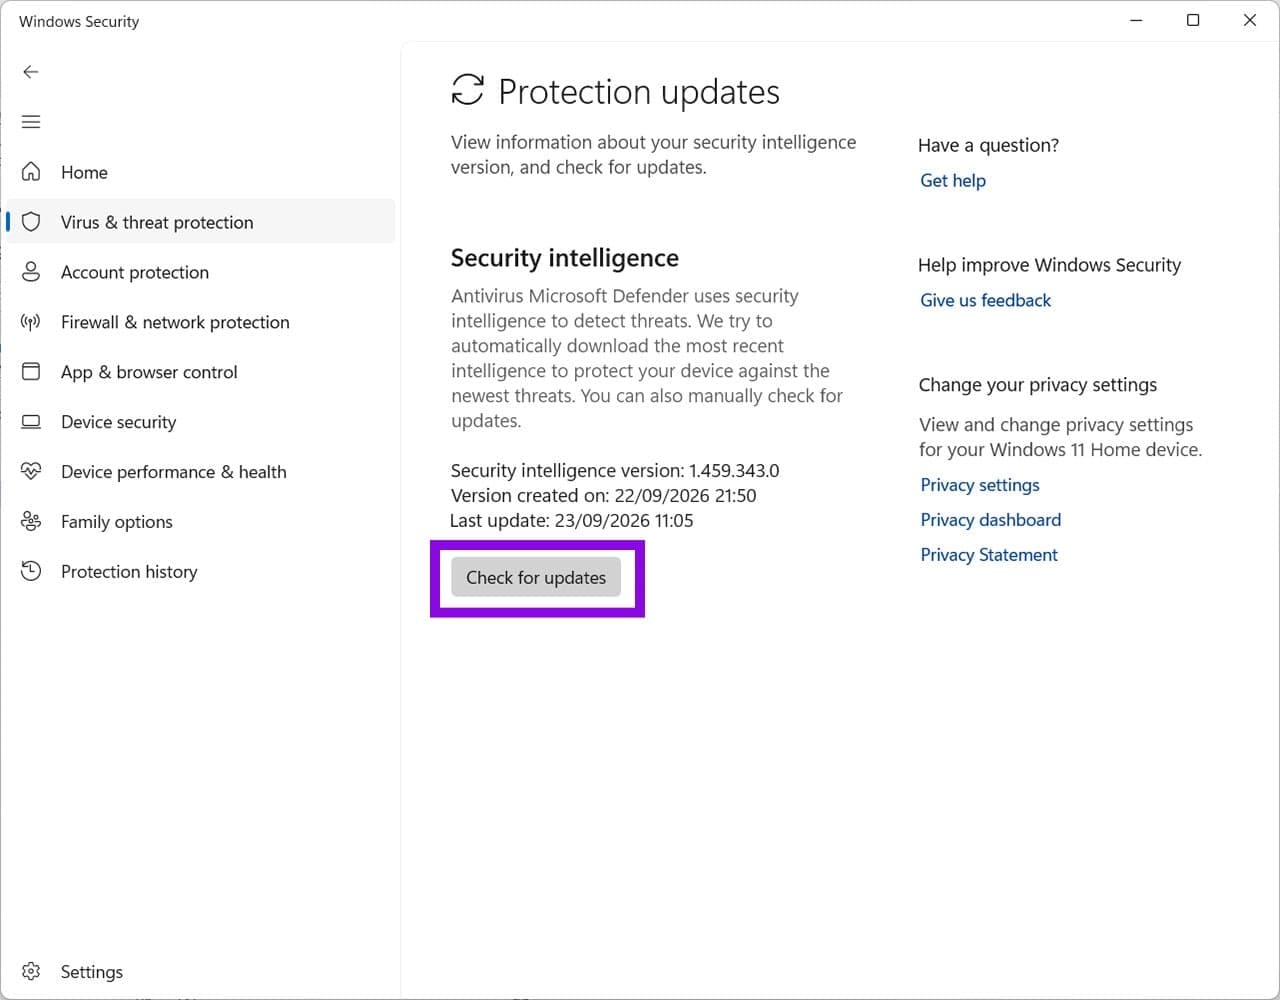
Step 3. Allow Windows to complete the update check and follow any on-screen instructions.
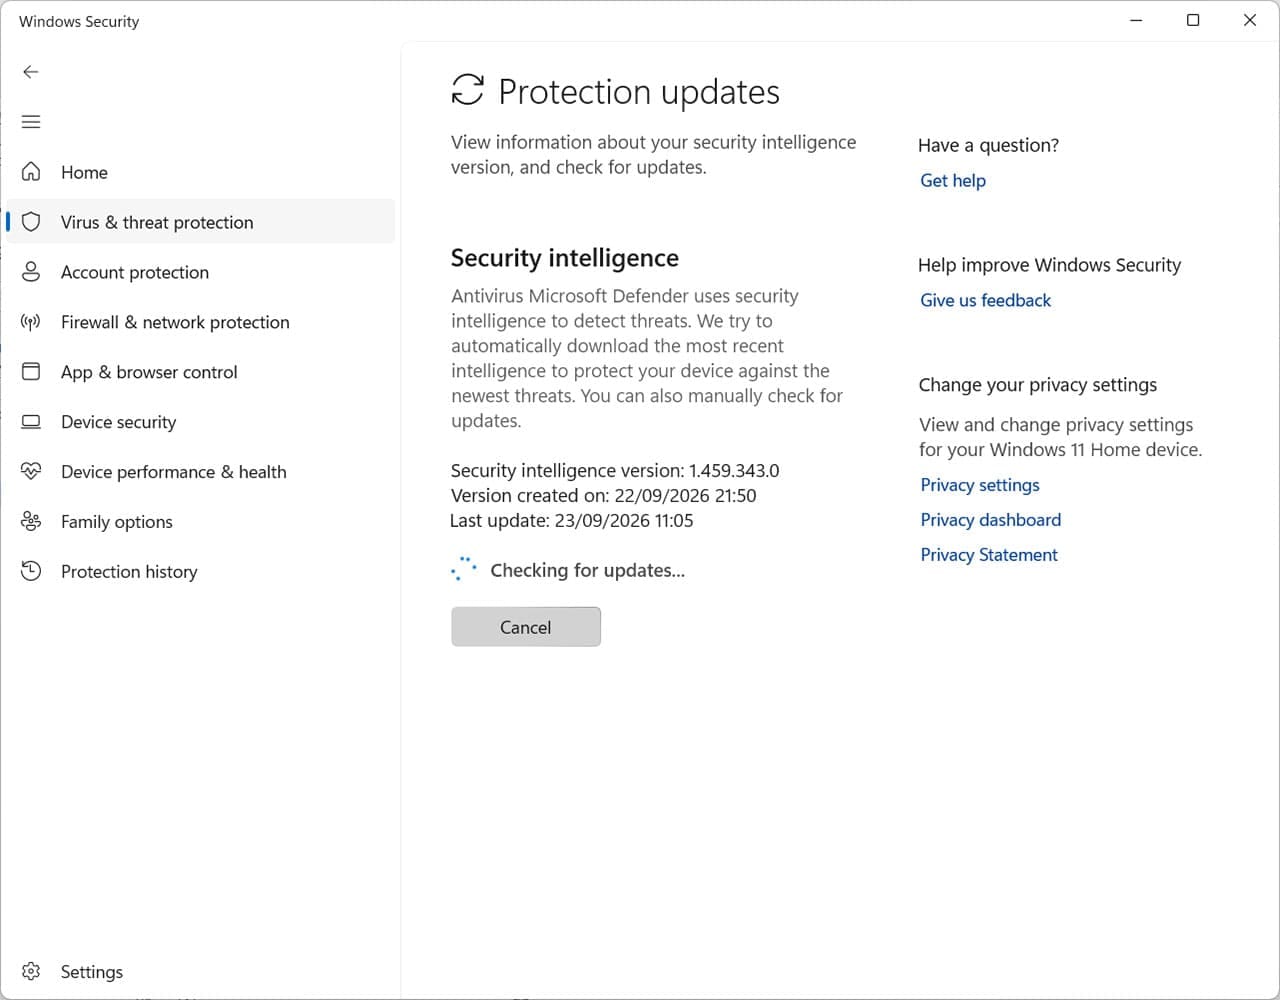
Step 4. You may now see that a new update has been installed and the “Version created on” date has changed. Restart your machine, and you should be able to use your Quick Scan as normal.

Was this helpful?
Last updated on 30 September, 2026
Read Next
 2 Quick Ways to Schedule Windows Defender Scan
Windows Defender has become integral to the Windows Security suite of tools.
2 Quick Ways to Schedule Windows Defender Scan
Windows Defender has become integral to the Windows Security suite of tools.
 Adobe Scan vs Genius Scan: Which Document Scanner App Is Better on iPhone
You can recollect the times you ran around looking for an actual scanner to get a digital copy of a document.
Adobe Scan vs Genius Scan: Which Document Scanner App Is Better on iPhone
You can recollect the times you ran around looking for an actual scanner to get a digital copy of a document.
 5 Ways to Completely Disable Windows Defender
Method 1: Using Command Prompt Step 1: Press the Windows key on your keyboard, type Command Prompt, and click Run as administrator.
5 Ways to Completely Disable Windows Defender
Method 1: Using Command Prompt Step 1: Press the Windows key on your keyboard, type Command Prompt, and click Run as administrator.
 4 Ways to Clear Windows Defender Protection History
Method 1: Using File Explorer Like many applications, Windows Defender stores the Protection History log on your computer as an accessible file.
4 Ways to Clear Windows Defender Protection History
Method 1: Using File Explorer Like many applications, Windows Defender stores the Protection History log on your computer as an accessible file.
 How to Prevent Windows Defender From Removing Files
Windows Defender is Microsoft’s built-in way of keeping your computer safe from viruses and malware.
How to Prevent Windows Defender From Removing Files
Windows Defender is Microsoft’s built-in way of keeping your computer safe from viruses and malware.
 How to Restore Quarantined Items From Windows Defender
Windows Defender (technically named “Windows Security” in Windows 11) remains one of the most reliable built-in antivirus tools and should be sufficient for most users.
How to Restore Quarantined Items From Windows Defender
Windows Defender (technically named “Windows Security” in Windows 11) remains one of the most reliable built-in antivirus tools and should be sufficient for most users.
 How to Restore Files Removed by Windows Defender
Windows Defender is an invaluable tool for keeping your PC safe from harm.
How to Restore Files Removed by Windows Defender
Windows Defender is an invaluable tool for keeping your PC safe from harm.
 5 Ways to Fix Quick Settings Not Working on Windows 11
Try Basic Fixes Restart Windows Explorer: Windows Explorer facilitates the graphical interface for several utilities, including the Quick Settings panel.
5 Ways to Fix Quick Settings Not Working on Windows 11
Try Basic Fixes Restart Windows Explorer: Windows Explorer facilitates the graphical interface for several utilities, including the Quick Settings panel.
The article above may contain affiliate links which help support Guiding Tech. The content remains unbiased and authentic and will never affect our editorial integrity.